The architecture described in this article demonstrates how you can use Teradata VantageCloud Enterprise together with Azure Data Factory to develop data integration pipelines with a low-code or no-code approach. It shows how to quickly ingest or extract Vantage data over an enhanced-security connection by using Data Factory.
Apache®, Hadoop, and the flame logo are either registered trademarks or trademarks of the Apache Software Foundation in the United States and/or other countries. No endorsement by the Apache Software Foundation is implied by the use of these marks.
Architecture
The following diagram illustrates a version of the architecture that uses virtual network peering connectivity. It uses a self-hosted integration runtime (IR) to connect to the analytics database. Teradata's VMs are deployed with only private IP addresses.

Download a Visio file of this architecture.
The following diagram illustrates a version of the architecture that uses Azure Private Link connectivity.

Download a Visio file of this architecture.
VantageCloud Enterprise on Azure is a fully managed service that's deployed in a Teradata-owned Azure subscription. You deploy cloud services in your own Azure subscription, which is then connected to the Teradata-managed subscription via one of the approved connectivity options. Teradata supports the following types of connectivity between your Azure subscription and VantageCloud Enterprise on Azure:
- Virtual network peering
- Private Link
- Azure Virtual WAN
If you plan to use virtual network peering, work with Teradata support or your Teradata account team to ensure that required security group settings are in place to initiate traffic from the self-hosted IR to the database via the virtual network peering link.
Components
To implement this architecture, you need to be familiar with Data Factory, Azure Blob Storage, Teradata VantageCloud Enterprise, and Teradata Tools and Utilities (TTU).
These components and versions are used in the integration scenarios:
- Teradata VantageCloud Enterprise 17.20, hosted on Azure
- Azure Data Factory
- Azure Blob Storage
- TTU 17.20
- Teradata ODBC Driver 17.20.12
- Teradata Studio 17.20
Teradata Vantage
Vantage provides what Teradata calls Pervasive Data Intelligence. Users across your organization can use it to get real-time, intelligent answers to their questions. In this architecture, Vantage on Azure is used as a source or destination for data integration tasks. Vantage Native Object Storage (NOS) is used to integrate with data in Blob Storage.
Data Factory
Data Factory is a serverless cloud extract, transform, load (ETL) service. You can use it to orchestrate and automate data movement and transformation. It provides a code-free user interface for data ingestion and intuitive authoring and single-pane-of-glass monitoring and management.
You can use Data Factory to create and schedule data-driven workflows (called pipelines) that can ingest data from various data stores. You can create complex ETL processes that visually transform data by using dataflows that run on Spark or compute services like Azure Batch, Azure Machine Learning, Apache Spark, SQL, Azure HDInsight with Hadoop, and Azure Databricks. Working with Data Factory involves the following layers, listed from the highest level of abstraction to the software that's closest to the data.
- Pipelines are graphical interfaces that contain activities and data paths.
- Activities perform operations on data.
- Sources and sinks are activities that specify where data comes from and where it goes.
- Datasets are well-defined sets of data that Data Factory ingests, loads, and transforms.
- Linked services enable Data Factory to access connection information for specific external data sources.
- The integration runtime (IR) provides a gateway between Data Factory and data or compute resources.
Self-hosted IR
The self-hosted IR can perform copy operations between cloud data stores and private-network data stores. You can also transform your compute resources in an on-premises network or an Azure virtual network. You need a local computer or virtual machine on your private network to install the self-hosted IR. For more information, see Considerations for using a self-hosted IR. This article describes how to use the self-hosted IR to connect to VantageCloud and extract data to load into Azure Data Lake Storage.
Teradata connector
In this architecture, Data Factory uses the Teradata connector to connect to Vantage. The Teradata connector supports:
- Teradata versions 14.10, 15.0, 15.10, 16.0, 16.10, and 16.20.
- Copying data by using basic, Windows, or LDAP authentication.
- Parallel copying from a Teradata source. For more information, see Parallel copy from Teradata.
This article describes how to set up linked services and datasets for the Data Factory Copy Data activity, which ingests data from Vantage and loads it into Data Lake Storage.
Scenario details
This article describes three scenarios:
- Data Factory pulling data from VantageCloud Enterprise and loading it into Blob Storage
- Data Factory loading data into VantageCloud Enterprise from Blob Storage
- Using Vantage NOS functionality to access data transformed and loaded into Blob Storage by Data Factory
Scenario 1: Load data into Blob Storage from VantageCloud
This scenario describes how to use Data Factory to extract data from VantageCloud Enterprise, perform some basic transformations, and then load the data into a Blob Storage container.
The scenario highlights the native integration between Data Factory and Vantage and how easily you can build an enterprise ETL pipeline to integrate data in Vantage.
To complete this procedure, you need to have a Blob Storage container in your subscription, as shown in the architecture diagrams.
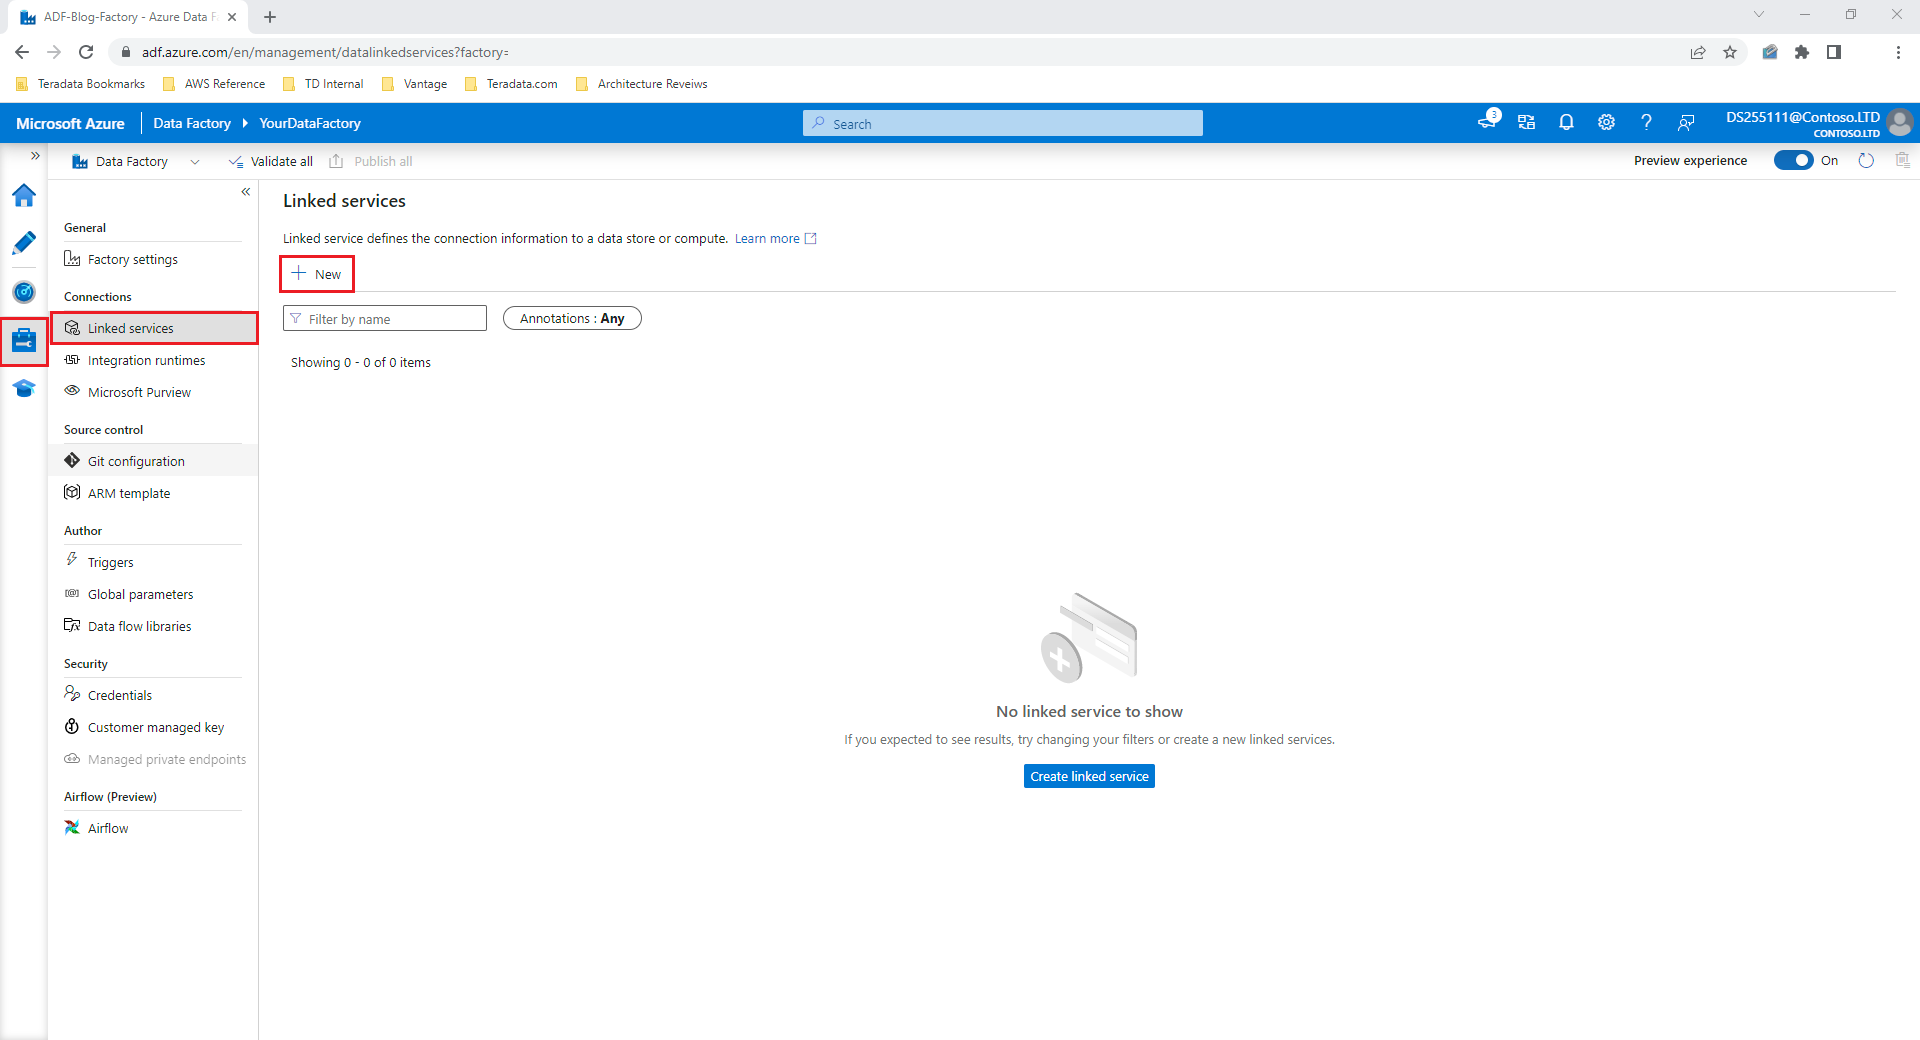
To create a native connector to Vantage, in your data factory, select the Manage tab, select Linked services, and then select New:
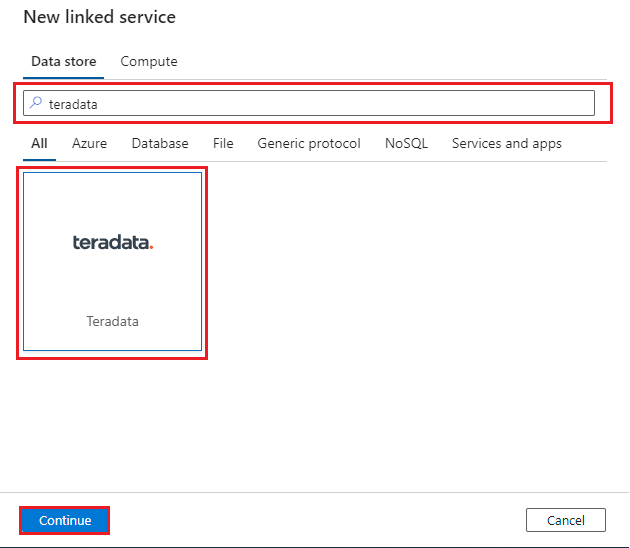
Search for Teradata and then select the Teradata connector. Then select Continue:
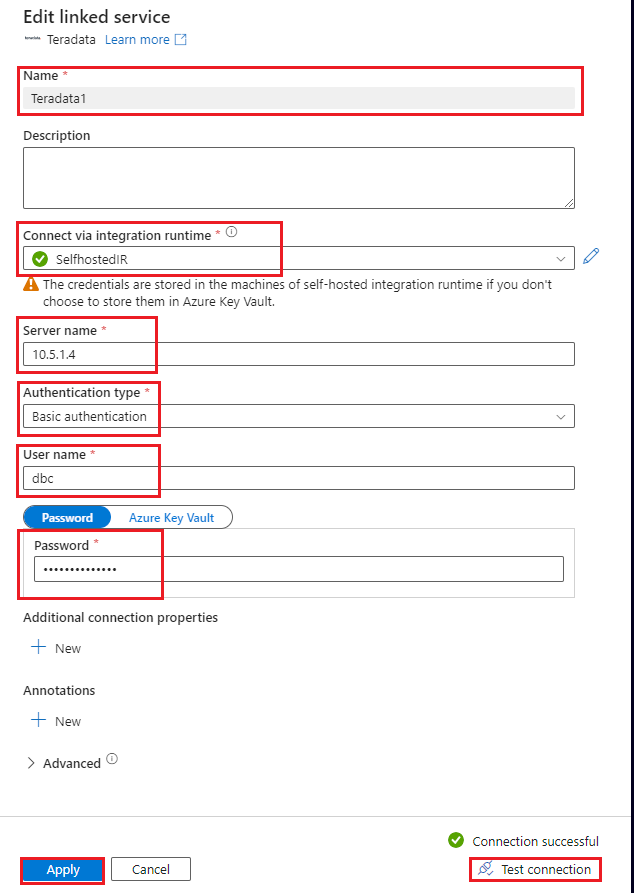
Configure the linked service to connect to your Vantage database. This procedure shows how to use a basic authentication mechanism with a user ID and password. Alternatively, depending on your security needs, you can choose a different authentication mechanism and set other parameters accordingly. For more information, see Teradata connector linked service properties. You'll use a self-hosted IR. For more information, see these instructions for deploying a self-hosted IR. Deploy it in the same virtual network as your data factory.
Use the following values to configure the linked service:
- Name: Enter a name for your linked service connection.
- Connect via integration runtime: Select SelfHostedIR.
- Server name:
- If you're connecting via virtual network peering, provide the IP address of a VM in the Teradata cluster. You can connect to the IP address of any VM in the cluster.
- If you're connecting via Private Link, provide the IP address of the private endpoint that you created in your virtual network to connect to the Teradata cluster via Private Link.
- Authentication type: Choose an authentication type. This procedure shows how to use basic authentication.
- User name and Password: Provide the credentials.
- Select Test connection, and then select Create. Be sure that interactive authoring is enabled for your IR so that the test connection functionality works.
For testing, you can use a test database in Vantage that's called
NYCTaxiADFIntegration. This database has a single table namedGreen_Taxi_Trip_Data. You can download the database from NYC OpenData. The following CREATE TABLE statement can help you understand the schema of the table.CREATE MULTISET TABLE NYCTaxiADFIntegration.Green_Taxi_Trip_Data, FALLBACK , NO BEFORE JOURNAL, NO AFTER JOURNAL, CHECKSUM = DEFAULT, DEFAULT MERGEBLOCKRATIO, MAP = TD_MAP1 ( VendorID BYTEINT, lpep_pickup_datetime DATE FORMAT ‘YY/MM/DD’, lpep_dropoff_datetime DATE FORMAT ‘YY/MM/DD’, store_and_fwd_flag VARCHAR(1) CHARACTER SET LATIN CASESPECIFIC, RatecodeID BYTEINT, PULocationID SMALLINT, DOLocationID SMALLINT, passenger_count BYTEINT, trip_distance FLOAT, fare_amount FLOAT, extra DECIMAL(18,16), mta_tax DECIMAL(4,2), tip_amount FLOAT, tolls_amount DECIMAL(18,16), ehail_fee BYTEINT, improvement_surcharge DECIMAL(3,1), total_amount DECIMAL(21,17), payment_type BYTEINT, trip_type BYTEINT, congestion_surcharge DECIMAL(4,2)) NO PRIMARY INDEX ;Next, you create a simple pipeline to copy the data from the table, perform some basic transformation, and then load the data into a Blob Storage container. As noted at the start of this procedure, you should have already created the Blob Storage container in your subscription. First, create a linked service to connect to the container, which is the sink that you'll copy the data into.
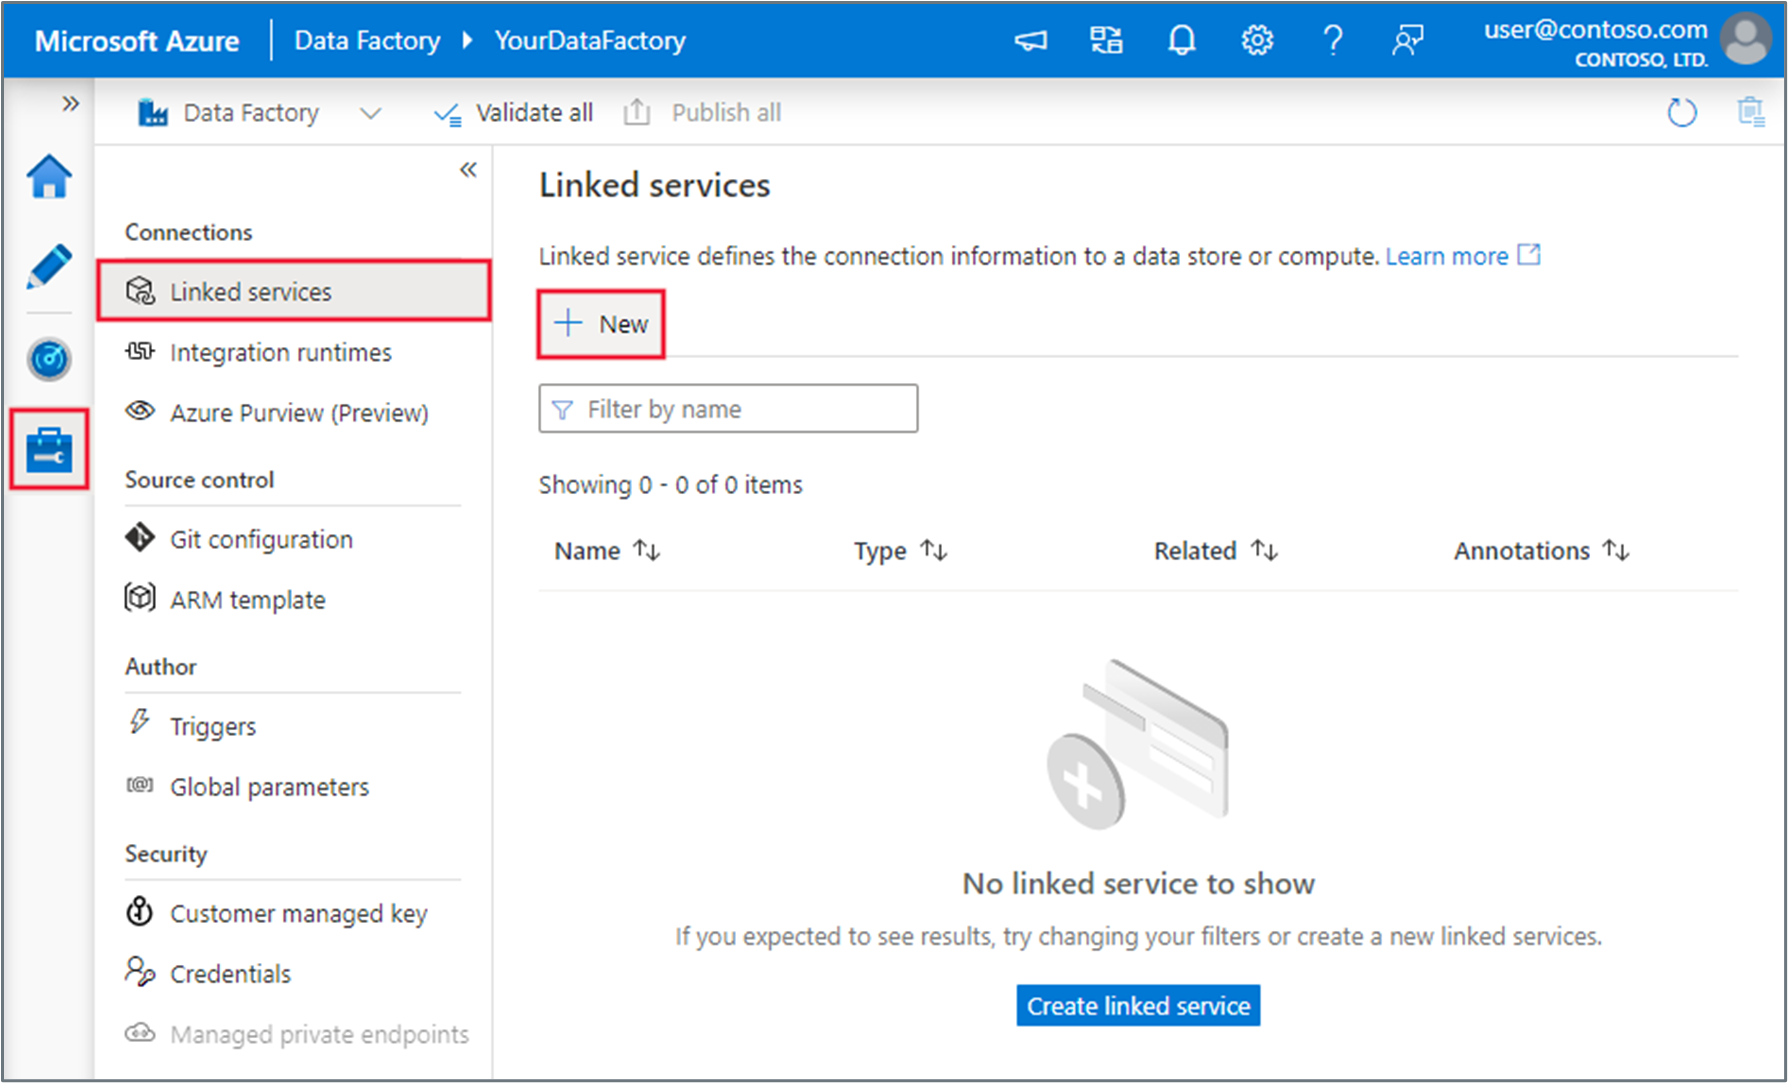
Select the Manage tab in your data factory, select Linked services, and then select New:
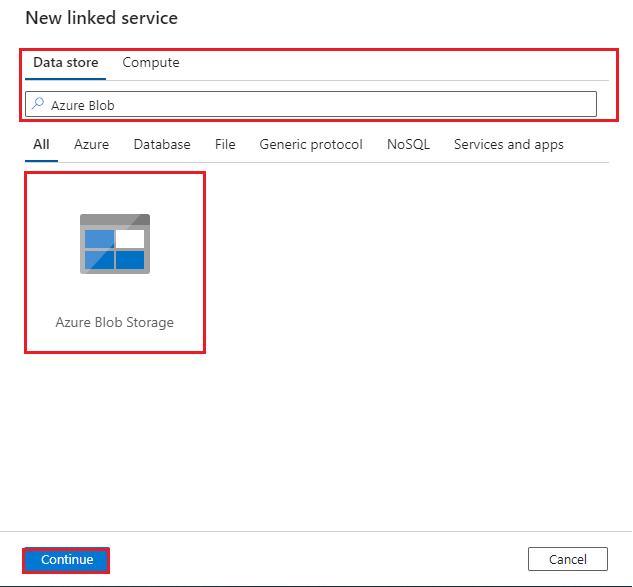
Search for Azure Blob, select the Azure Blob Storage connector, and then select Continue:
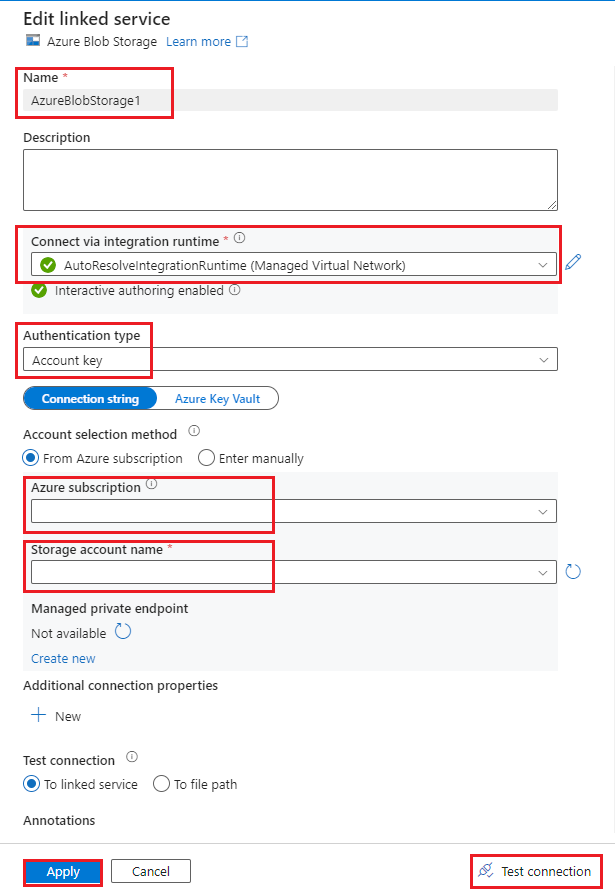
Configure the linked service to connect to the Blob Storage account:
- Name: Enter a name for your linked service connection.
- Connect via integration runtime: Select AutoResolveIntegrationRuntime.
- Authentication type: Select Account key.
- Azure subscription: Enter your Azure subscription ID.
- Storage account name: Enter your Azure storage account name.
Select Test connection to verify the connection, and then select Create.
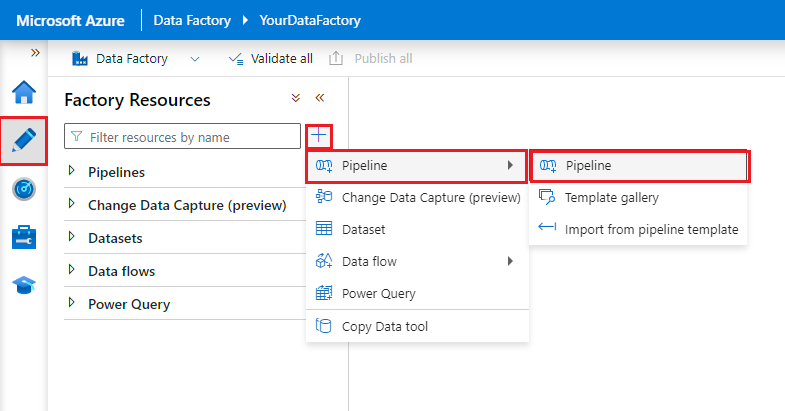
Create a Data Factory pipeline:
- Select the Author tab.
- Select the + button.
- Select Pipeline.
- Enter a name for the pipeline.
Create two datasets:
- Select the Author tab.
- Select the + button.
- Select Dataset.
- Create a dataset for the
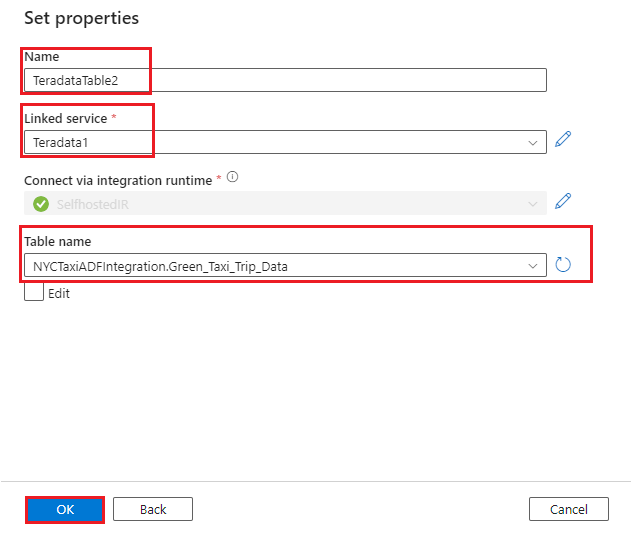
Green_Taxi_Trip_DataTeradata table:
- Select Teradata as the Data Store.
- Name: Enter a name for the dataset.
- Linked service: Select the linked service that you created for Teradata in steps 2 and 3.
- Table name: Select the table from the list.
- Select OK.
- Create an Azure Blob dataset:
- Select Azure Blob as the Data Store.
- Select the format of your data. Parquet is used in this demonstration.
- Linked service: Select the linked service that you created in step 6.
- File path: Enter the file path of the blob file.
- Import schema: Select None.
- Select OK.

Drag a Copy Data activity onto the pipeline.
Note
The Teradata connector doesn't currently support the Data Flow activity in Data Factory. If you want to perform transformation on the data, we recommend that you add a Data Flow activity after the Copy activity.
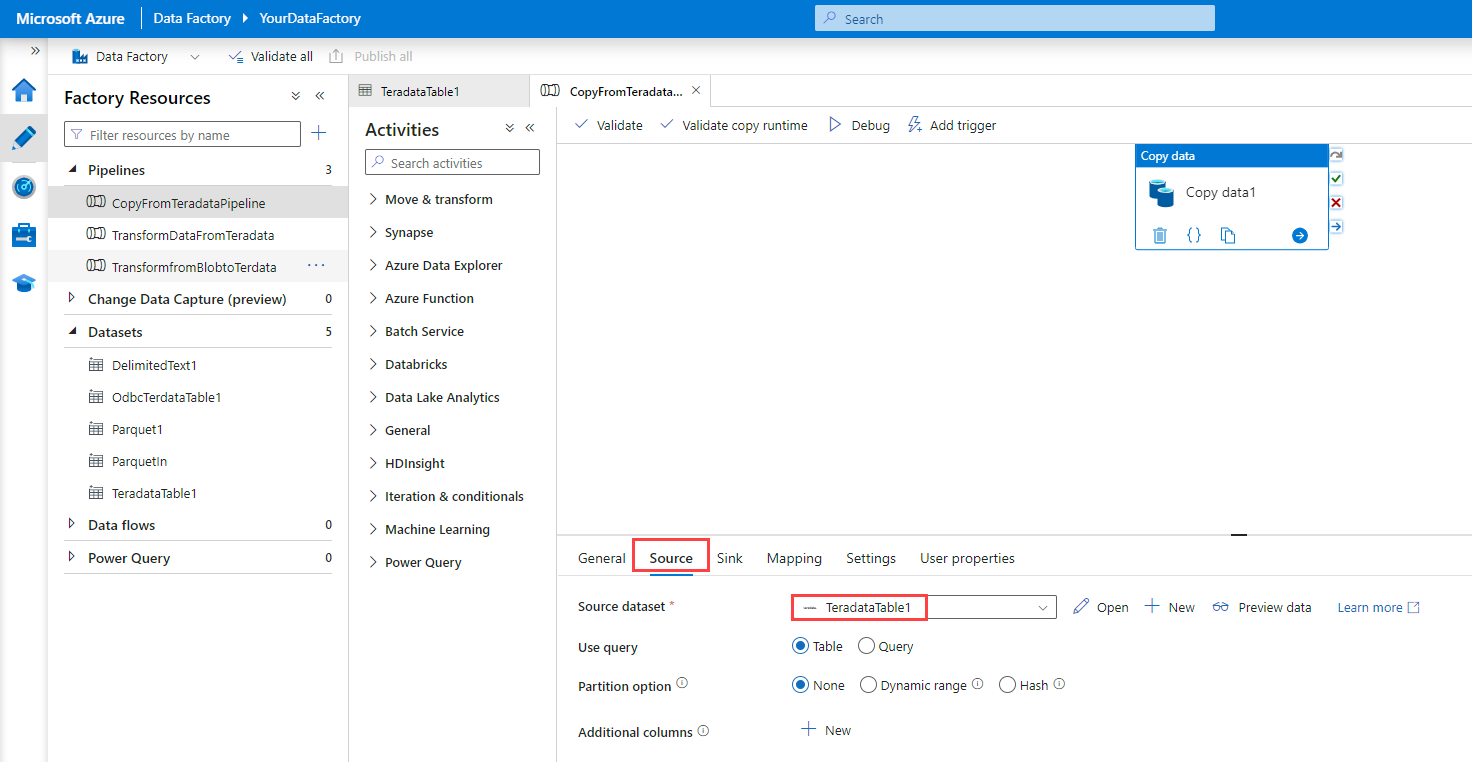
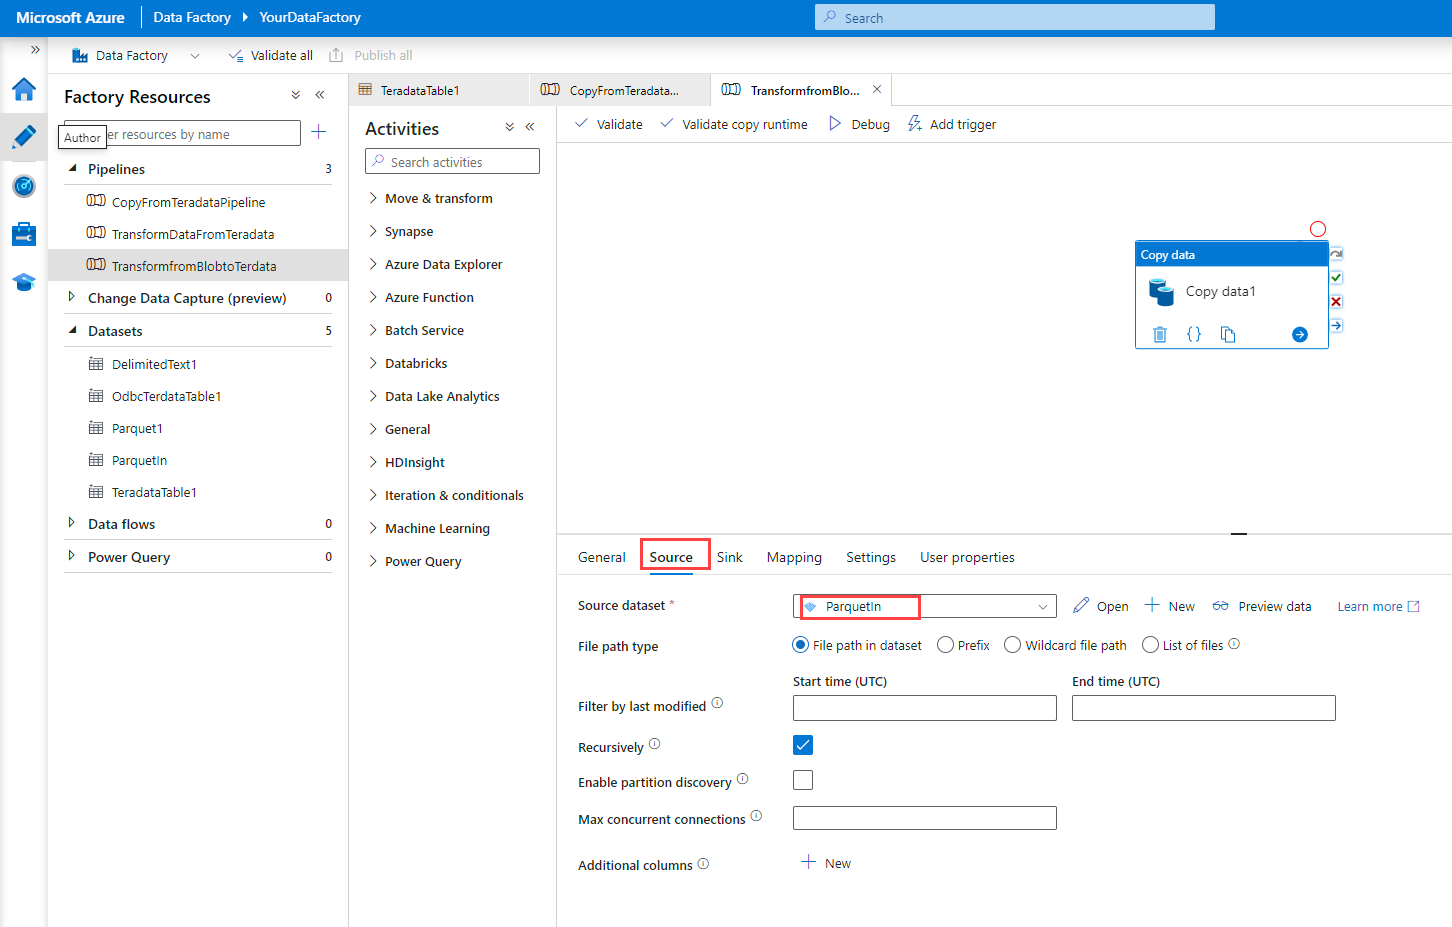
Configure the Copy Data activity:
On the Source tab, under Source dataset, select the Teradata table dataset that you created in the previous step.
For Use query, select Table.
Use the default values for the other options.
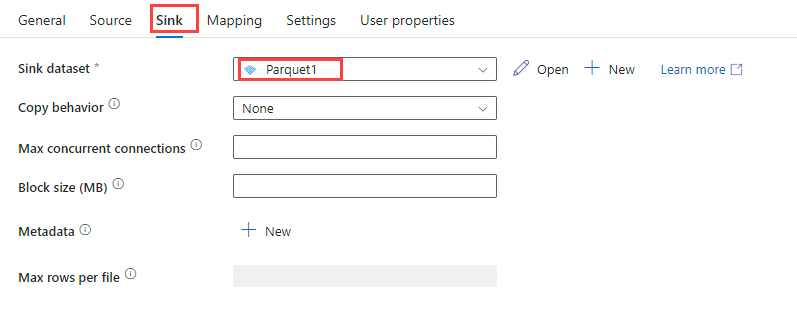
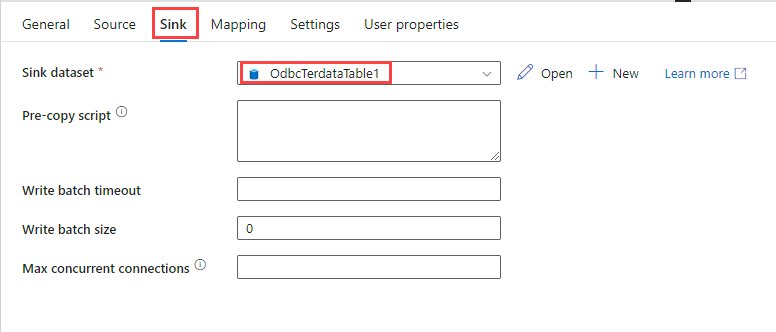
On the Sink tab, under Sink dataset, select the Azure Blob dataset that you created in the previous step.
Use the default values for the other options.
Select Debug. The pipeline copies the data from the Teradata table to a Parquet file in Blob Storage.


Scenario 2: Load data into VantageCloud from Blob Storage
This scenario describes how to use an ODBC connector to connect to Vantage via the self-hosted IR VM to load data. Because the IR needs to be installed and configured with the Teradata ODBC driver, this option works only with a Data Factory self-hosted IR.
You can also use TTU, Data Factory custom activities, and Azure Batch to load data into Vantage and transform it. For more information, see Connect Teradata Vantage to Azure Data Factory Using Custom Activity Feature. We recommend that you evaluate both options for performance, cost, and management considerations and choose the option that's best suited to your requirements.
Start by preparing the self-hosted IR that you created in the previous scenario. You need to install the Teradata ODBC driver on it. This scenario uses a Windows 11 VM for the self-hosted IR.
- Use RDP to connect to the VM.
- Download and install the Teradata ODBC driver.
- If the JAVA JRE isn't already on the VM, download and install it.
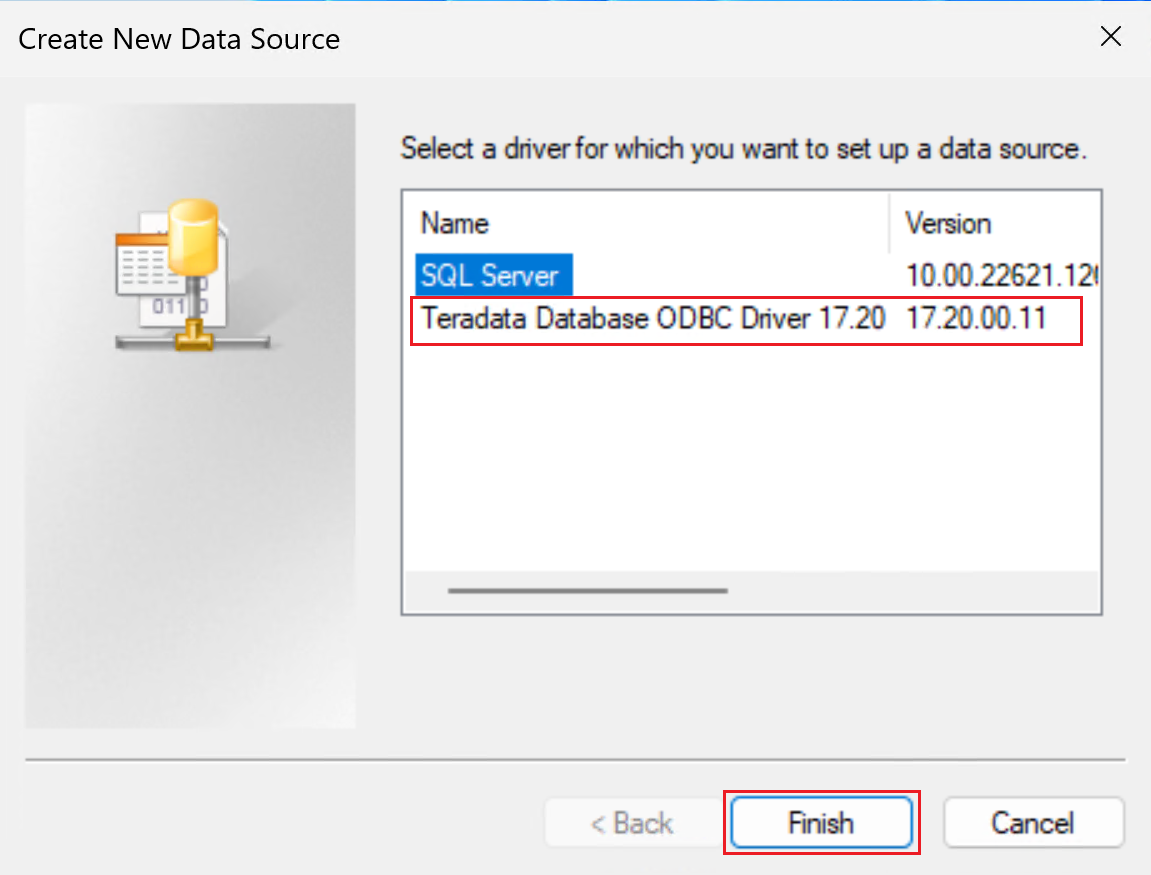
Create a 64-bit system DSN for the Teradata database by adding an ODBC data source.
Be sure to use the 64-bit DSN window.
Select the Teradata Database ODBC Driver, as shown in the following screenshot.
Select Finish to open the driver setup window.
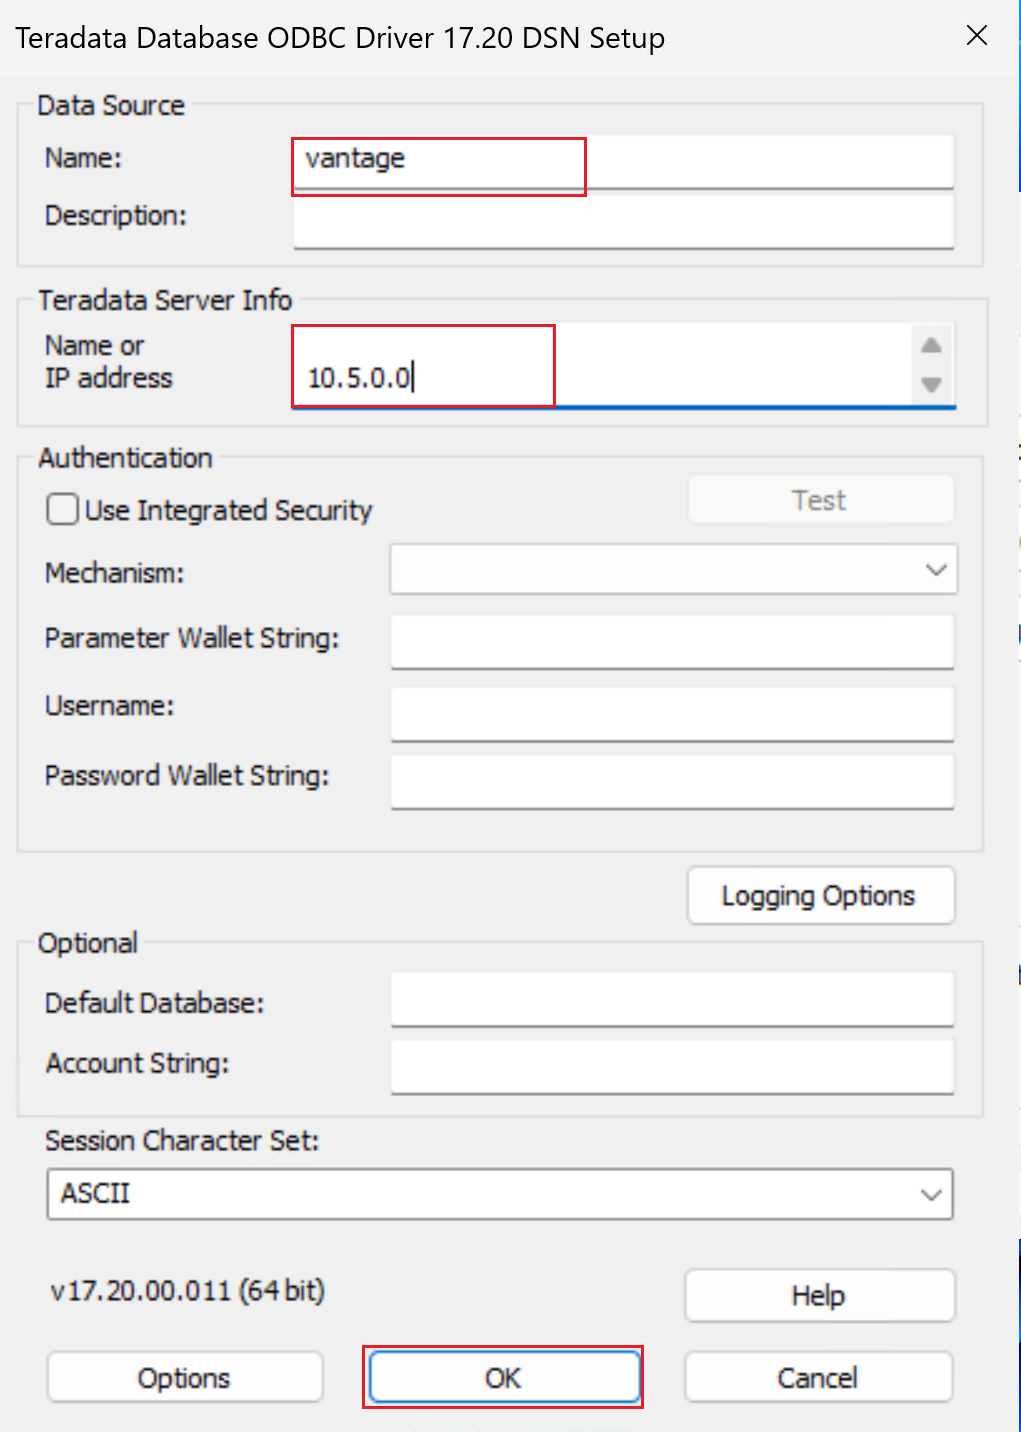
Configure the DSN properties.
Name: Enter a name for the DSN.
Under Teradata Server Info, in Name or IP address:
- If you're connecting via virtual network peering, provide the IP address of a VM in the Teradata cluster. You can connect to the IP address of any VM in the cluster.
- If you're connecting via Private Link, provide the IP address of the private endpoint that you created in your virtual network to connect to the Teradata cluster via Private Link.
Optionally, provide the Username and select Test. You're prompted to enter the credentials. Select OK and ensure that the connection succeeds. Note that you'll provide the user name and password in Data Factory when you create the ODBC linked service that's used to connect to the Teradata database from Data Factory.
Leave the other fields blank.
Select OK.
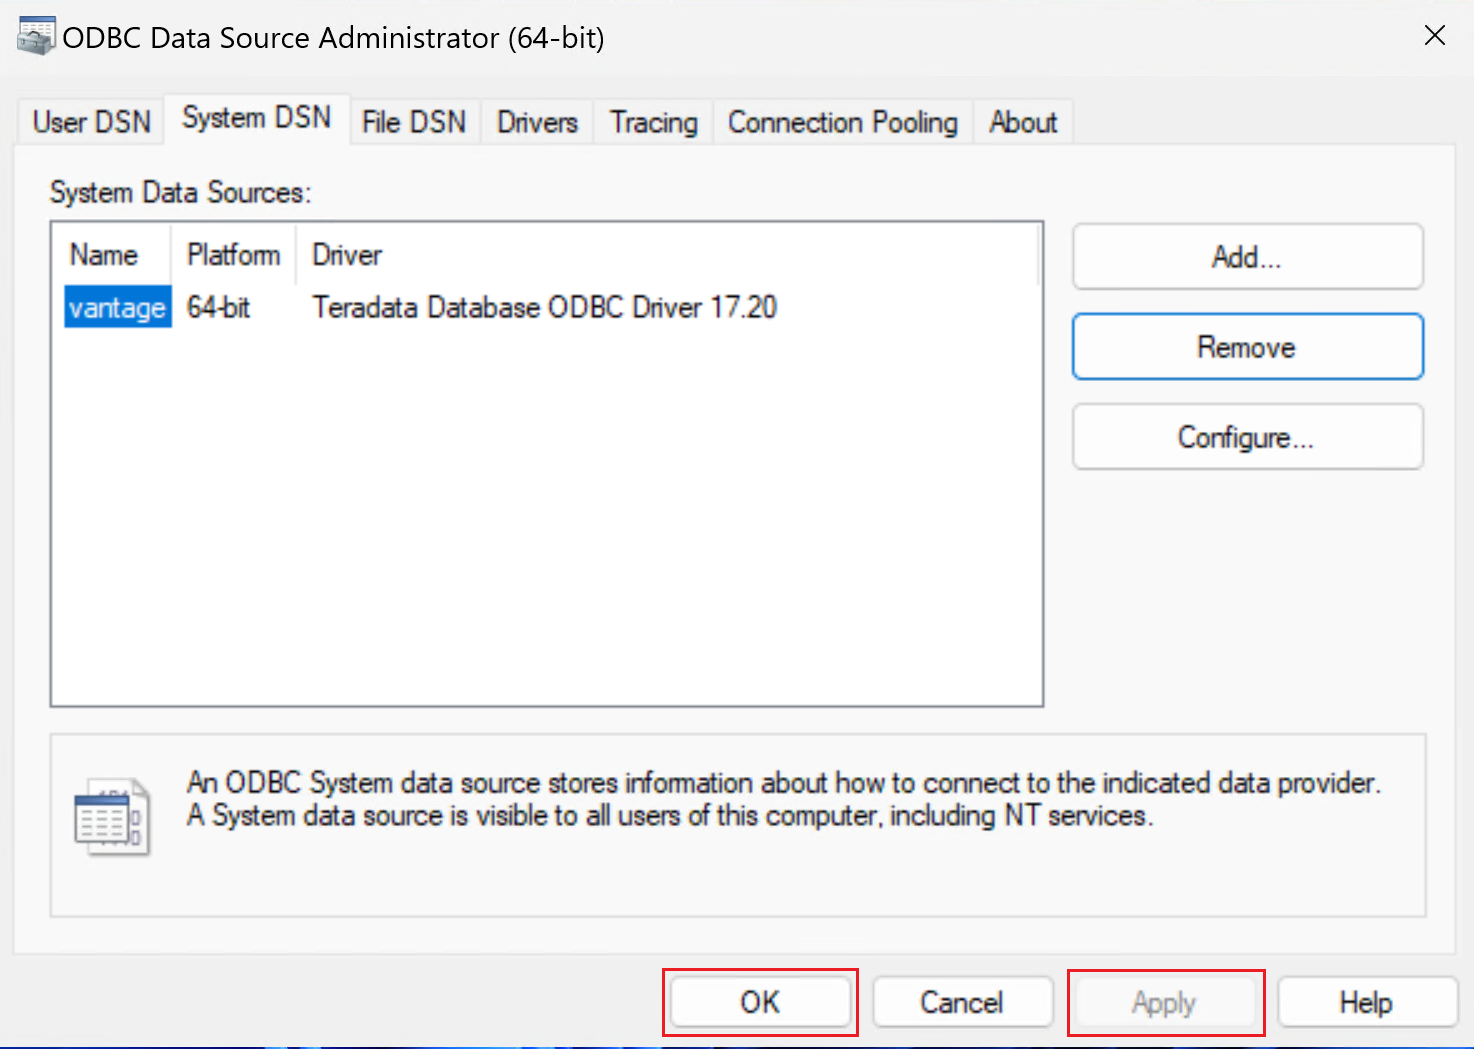
The ODBC Data Source Administrator window will look like the one in the following screenshot. Select Apply. You can now close the window. Your self-hosted IR is now ready to connect to Vantage by using ODBC.
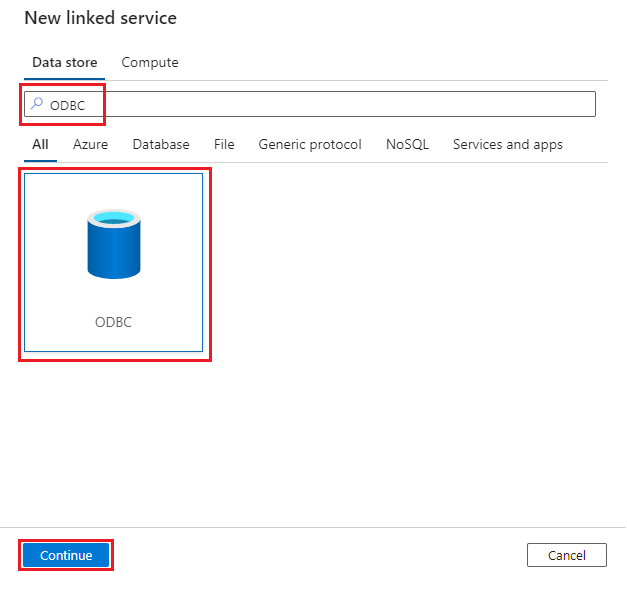
In Data Factory, create a linked service connection. Choose ODBC as the data store:
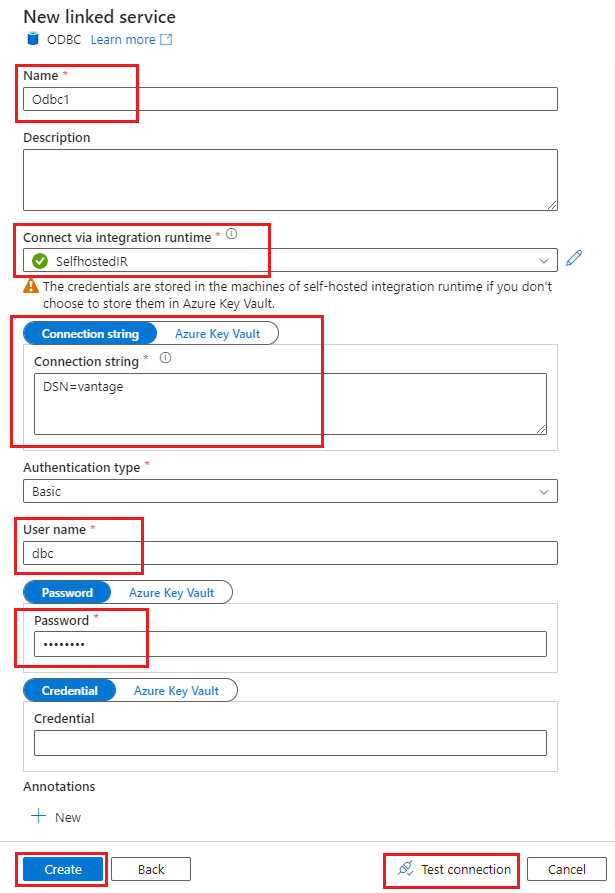
Configure the linked service with the IR that you configured in the previous steps:
Name: Provide a name for the linked service.
Connect via integration runtime: Select SelfhostedIR.
Connection string: Enter the DSN connection string with the name of the DSN that you created in the previous steps.
Authentication type: Select Basic.
Enter the user name and password for your Teradata ODBC connection.
Select Test connection, and then select Create.
Complete the following steps to create a dataset with ODBC as the data store. Use the linked service that you created earlier.
- Select the Author tab.
- Select the + button.
- Select Dataset.
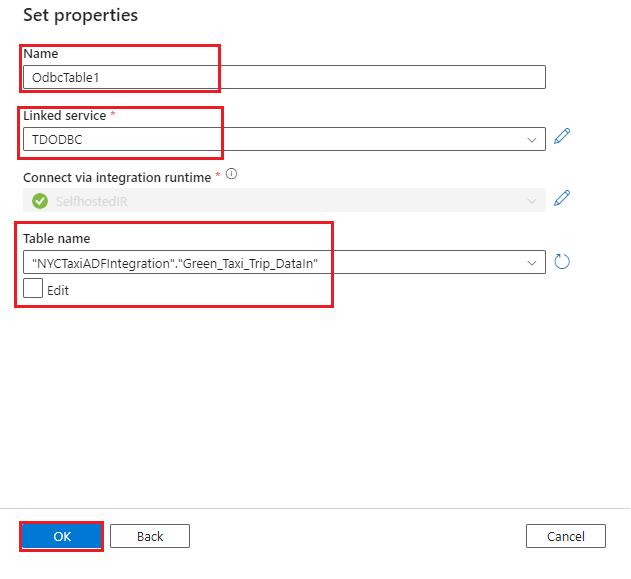
- Create a dataset for the
Green_Taxi_Trip_DataInTeradata table:
- Select ODBC as the data store, and then select Continue.
- Name: Provide a name for the dataset.
- Linked service: Select the ODBC linked service that you created in the previous steps.
- Table name: Select the table from the list.
- Select OK.
Tip
When you load the data, use a staging table with generic data types to avoid data-type mismatch errors. For example, instead of using the Decimal data type for columns, use Varchar. You can then perform data-type transformations in the Vantage database.
Create an Azure Blob connection to the source file that you want to load into Vantage by following steps 4 through 6 and step 8 in the first scenario. Note that you're creating this connection for the source file, so the path of the file will be different.
Create a pipeline that contains a Copy Data activity, as described in scenario 1.
Drag a Copy Data activity onto the pipeline.
Note
The Teradata ODBC connector doesn't currently support the Data Flow activity in Data Factory. If you want to perform transformation on the data, we recommend that you create a Data Flow activity before the Copy Data activity.
Configure the Copy Data activity:
On the Source tab, select the file dataset that you want to load into Teradata.
Use the default values for the other options.
On the Sink tab, under Sink dataset, select the Teradata table dataset that you created through ODBC connection.
Use the default values for the other options.
Select Debug. The pipeline copies the data from the Parquet file to Vantage.


Scenario 3: Access data in Blob Storage from VantageCloud
This scenario describes how to use the Vantage Native Object Store (NOS) functionality to access data that's in Blob Storage. The previous scenario is ideal when you want to load data into Vantage on a continual or scheduled basis. This scenario describes how to access data in a one-off manner from Blob Storage, with or without loading the data into Vantage.
Note
You can also use NOS to export data to Blob Storage.
You can use the following query to read, from Vantage, data that's been transformed and loaded into Blob Storage via Data Factory, without loading the data into Vantage. You can use Teradata SQL Editor to run queries. To access the data that's in the blob, you supply the storage account name and access key in the
Access_IDandAccess_Keyfields. The query also returns a field calledLocationthat specifies the path of the file that the record was read from.FROM ( LOCATION='/AZ/yourstorageaccount.blob.core.windows.net/vantageadfdatain/NYCGreenTaxi/' AUTHORIZATION='{"ACCESS_ID":"yourstorageaccountname","ACCESS_KEY":"yourstorageaccesskey"}' ) as GreenTaxiData;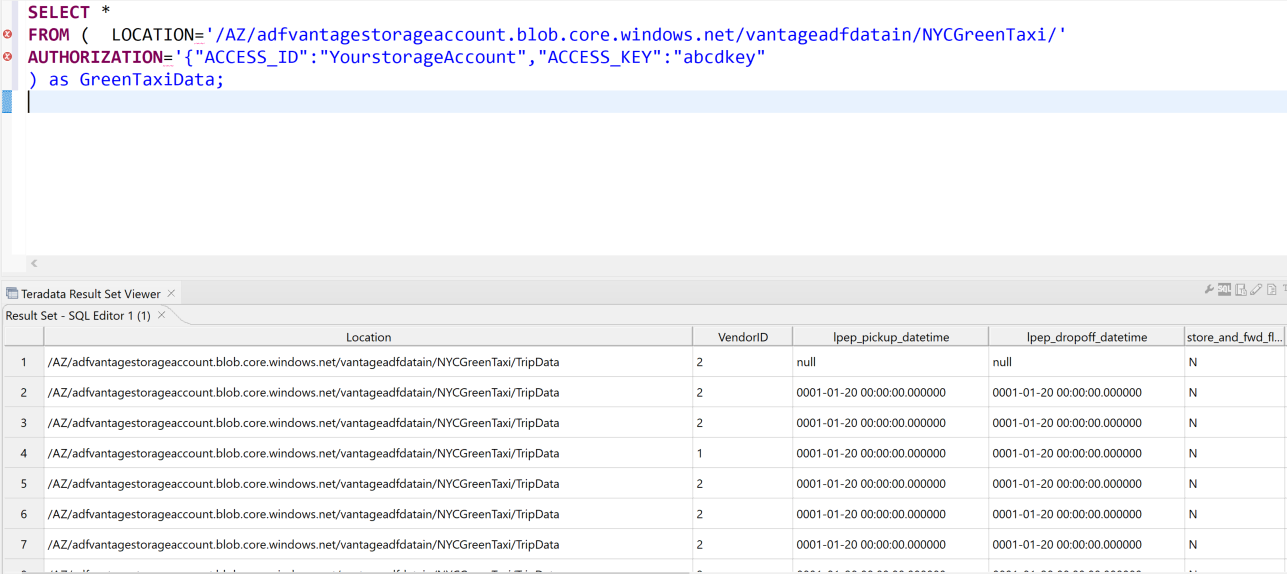
Here's another example of querying data in place. It uses the
READ_NOStable operator.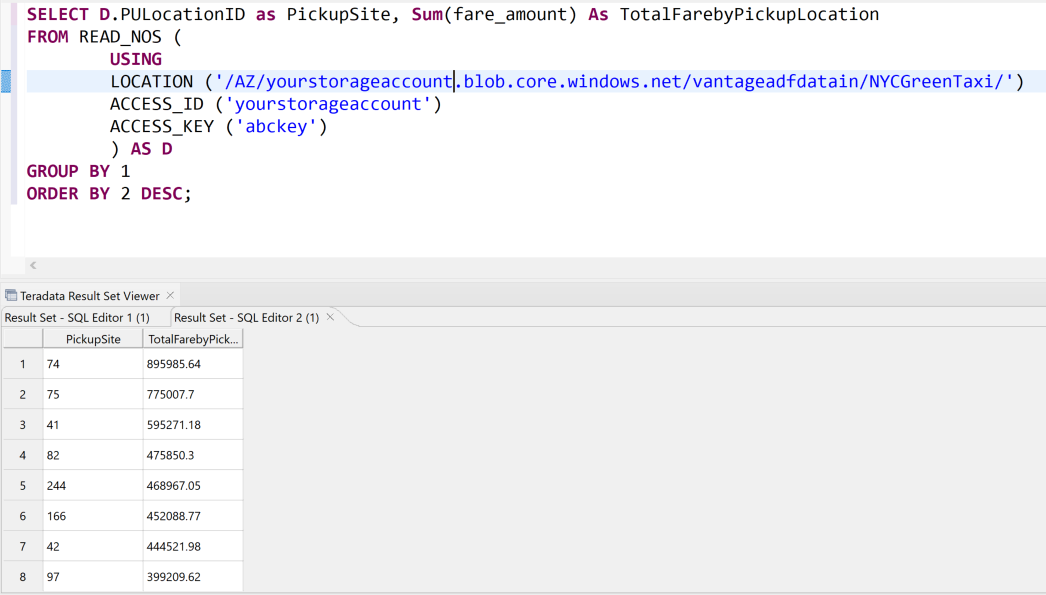
You can also query data in place or load data into a Vantage database by creating a foreign table in the object store. You first need to create an authorization object that uses the storage account name and access key in
USERandPASSWORDfields, respectively, as shown in the following syntax. You can use this object to create your foreign table so that you don't need to provide the keys when you create the table.USER 'YOUR-STORAGE-ACCOUNT-NAME' PASSWORD 'YOUR-ACCESS-KEY';You can now create the foreign table to access the data. The following query creates the table for the Green Taxi data. It uses the authorization object.
Note
When you load the Parquet file, be sure to map the data types correctly. For help with matching the data types, you can use the READ_NOS command to preview the Parquet schema.
Create Foreign Table
NYCTaxiADFIntegration.GreenTaxiForeignTable
, External security definer trusted DefAuth3
(
VendorID INT,
      lpep_pickup_datetime TIMESTAMP,
      lpep_dropoff_datetime TIMESTAMP,
      store_and_fwd_flag VARCHAR(40) CHARACTER SET UNICODE CASESPECIFIC,
      RatecodeID INT,
      PULocationID INT,
      DOLocationID INT,
      passenger_count INT,
      trip_distance FLOAT,
      fare_amount FLOAT,
      extra DECIMAL(38,18),
      mta_tax DECIMAL(38,18),
      tip_amount FLOAT,
      tolls_amount DECIMAL(38,18),
      ehail_fee INT,
      improvement_surcharge DECIMAL(38,18),
      total_amount DECIMAL(38,18),
      payment_type INT,
      trip_type INT,
      congestion_surcharge DECIMAL(38,18)
)
USING (
LOCATION('/AZ/adfvantagestorageaccount.blob.core.windows.net/vantageadfdatain/NYCGreenTaxi')
   STOREDAS ('PARQUET'))
NO PRIMARY INDEX
     , PARTITION BY COLUMN;
You can now query the data from the foreign table just as you can query any other table:
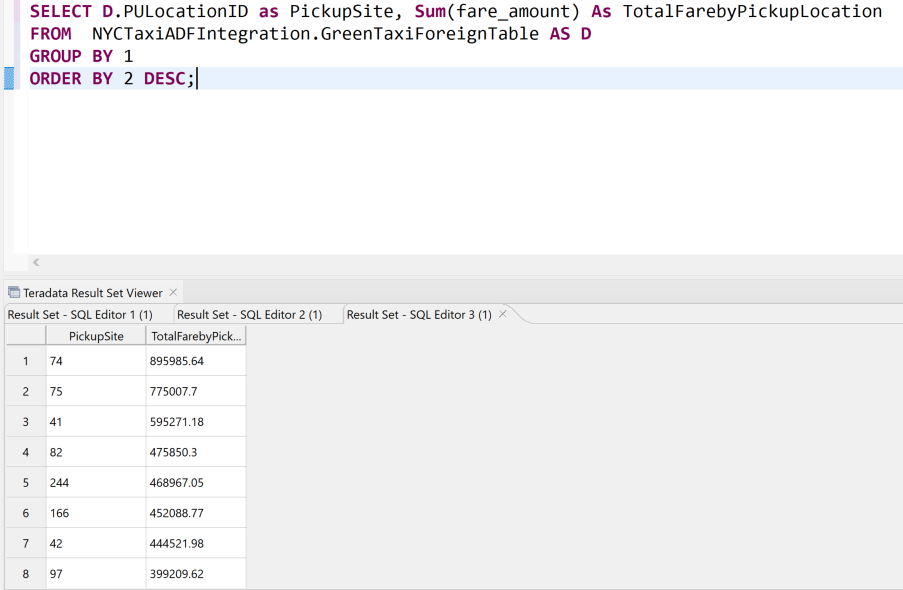
You've seen how to query data in object storage in place. However, you might want to load the data permanently into a table in the database for better query performance. You can load data from Blob Storage into a permanent table by using the following statements. Some options might work only for certain data file formats. For details, see the Teradata documentation. For sample code, see Loading External Data into a Database.
Method Description CREATE TABLE AS…WITH DATA Accesses table definitions and data from an existing foreign table and creates a new permanent table in the database CREATE TABLE AS...FROM READ_NOS Accesses data directly from the object store and creates a permanent table in the database INSERT SELECT Stores values from external data in a persistent database table The following samples show how to create a permanent table from
GreenTaxiData:CREATE Multiset table NYCTaxiADFIntegration.GreenTaxiNosPermanent As ( SELECT D.PULocationID as PickupSite, Sum(fare_amount) AS TotalFarebyPickuploation FROM NYCTaxiADFIntegration.GreenTaxiForeignTable AS D GROUP BY 1 ) with Data No Primary Index;INSERT INTO NYCTaxiADFIntegration.GreenTaxiNosPermanent SELECT D.PULocationID as PickupSite, Sum(fare_amount) AS TotalFarebyPickuploation FROM NYCTaxiADFIntegration.GreenTaxiForeignTable AS D GROUP BY 1;


Best practices
- Follow the connector performance tips and best practices that are described in Teradata as source.
- Be sure the self-hosted IR is sized correctly for your volume of data. You might want to scale out the IR to get better performance. For more information, see this self-hosted IR performance guide.
- Use the Copy activity performance and scalability guide to fine-tune Data Factory pipelines for performance.
- Use the Data Factory Copy Data tool to quickly set up a pipeline and run it on a schedule.
- Consider using an Azure VM with a self-hosted IR to manage the cost of running pipelines. If you want to run pipelines twice per day, you start the VM twice and then shut it down.
- Consider using CI/CD in Data Factory to implement Git-enabled continuous integration and development practices.
- Optimize your pipeline activity count. Unnecessary activities increase costs and make pipelines complex.
- Consider using mapping data flows to transform Blob Storage data visually with no-code and low-code processes to prepare Vantage data for uses like Power BI reporting.
- In addition to using schedule triggers, consider using a mix of tumbling window and event triggers to load Vantage data into destination locations. Reduce unnecessary triggers to reduce costs.
- Use Vantage NOS for ad-hoc querying to easily supply data for upstream applications.
Contributors
This article is maintained by Microsoft. It was originally written by the following contributors.
Principal authors:
- Sunil Sabat | Principal Program Manager
- Divyesh Sah | Director WW Cloud Architecture
- Jianlei Shen | Senior Program Manager
Other contributors:
- Mick Alberts | Technical Writer
- Emily Chen | Principal PM Manager
- Wee Hyong Tok | Partner Director PM
- Bunty Ranu | Senior Director, Worldwide Cloud Architecture
To see non-public LinkedIn profiles, sign in to LinkedIn.
Next steps
- Teradata Vantage on Azure
- Teradata Tools and Utilities 17.20
- Data Factory
- Azure virtual network peering
- Private Link service
- Data Factory Teradata connector
- Self-hosted IR
- Blob Storage documentation