Quickstart: Publish Bicep modules to private module registry
Learn how to publish Bicep modules to private modules registry, and how to call the modules from your Bicep files. Private module registry allows you to share Bicep modules within your organization. To learn more, see Create private registry for Bicep modules.
Prerequisites
If you don't have an Azure subscription, create a free account before you begin.
To work with module registries, you must have Bicep CLI version 0.4.1008 or later. To use with Azure CLI, you must also have Azure CLI version 2.31.0 or later; to use with Azure PowerShell, you must also have Azure PowerShell version 7.0.0 or later.
A Bicep registry is hosted on Azure Container Registry (ACR). To create one, see Quickstart: Create a container registry by using a Bicep file.
To set up your environment for Bicep development, see Install Bicep tools. After completing those steps, you'll have Visual Studio Code and the Bicep extension, or Visual Studio and the Bicep extension.
Create Bicep modules
A module is a Bicep file that is deployed from another Bicep file. Any Bicep file can be used as a module. You can use the following Bicep file in this quickstart. It creates a storage account:
@minLength(3)
@maxLength(11)
param storagePrefix string

@allowed([
  'Standard_LRS'
  'Standard_GRS'
  'Standard_RAGRS'
  'Standard_ZRS'
  'Premium_LRS'
  'Premium_ZRS'
  'Standard_GZRS'
  'Standard_RAGZRS'
])
param storageSKU string = 'Standard_LRS'
param location string

var uniqueStorageName = '${storagePrefix}${uniqueString(resourceGroup().id)}'

resource stg 'Microsoft.Storage/storageAccounts@2023-04-01' = {
  name: uniqueStorageName
  location: location
  sku: {
    name: storageSKU
  }
  kind: 'StorageV2'
  properties: {
    supportsHttpsTrafficOnly: true
  }
}

output storageEndpoint object = stg.properties.primaryEndpoints
Save the Bicep file as storage.bicep.
Publish modules
If you don't have an Azure container registry (ACR), see Prerequisites to create one. The login server name of the ACR is needed. The format of the login server name is: <registry-name>.azurecr.io. To get the login server name:
az acr show --resource-group <resource-group-name> --name <registry-name> --query loginServer
Use the following syntax to publish a Bicep file as a module to a private module registry.
az bicep publish --file storage.bicep --target br:exampleregistry.azurecr.io/bicep/modules/storage:v1 --documentationUri https://www.contoso.com/exampleregistry.html
In the preceding sample, ./storage.bicep is the Bicep file to be published. Update the file path if needed. The module path has the following syntax:
br:<registry-name>.azurecr.io/<file-path>:<tag>
- br is the schema name for a Bicep registry.
- file path is called
repositoryin Azure Container Registry. The file path can contain segments that are separated by the/character. This file path is created if it doesn't exist in the registry. - tag is used for specifying a version for the module.
To verify the published modules, you can list the ACR repository:
az acr repository list --name <registry-name> --output table
Call modules
To call a module, create a new Bicep file in Visual Studio Code. In the new Bicep file, enter the following line.
module stgModule 'br:<registry-name>.azurecr.io/bicep/modules/storage:v1'
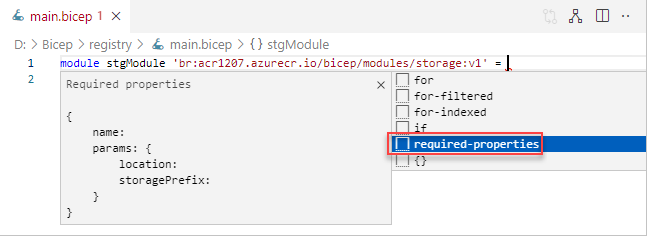
Replace <registry-name> with your ACR registry name. It takes a short moment to restore the module to your local cache. After the module is restored, the red curly line underneath the module path will go away. At the end of the line, add = and a space, and then select required-properties as shown in the following screenshot. The module structure is automatically populated.

The following example is a completed Bicep file.
@minLength(3)
@maxLength(11)
param namePrefix string
param location string = resourceGroup().location

module stgModule 'br:ace1207.azurecr.io/bicep/modules/storage:v1' = {
  name: 'stgStorage'
  params: {
    location: location
    storagePrefix: namePrefix
  }
}
Save the Bicep file locally, and then use Azure CLI or Azure PowerShell to deploy the Bicep file:
resourceGroupName = "{provide-a-resource-group-name}"
templateFile="{provide-the-path-to-the-bicep-file}"

az group create --name $resourceGroupName --location eastus

az deployment group create --resource-group $resourceGroupName --template-file $templateFile
From the Azure portal, verify the storage account has been created successfully.
Clean up resources
When the Azure resources are no longer needed, use the Azure CLI or Azure PowerShell module to delete the quickstart resource group.
resourceGroupName = "{provide-the-resource-group-name}"

az group delete --name $resourceGroupName