Create and use private endpoints (v2 experience) for Azure Backup
Azure Backup allows you to securely perform the backup and restore operations of your data from the Recovery Services vaults using private endpoints. Private endpoints use one or more private IP addresses from your Azure Virtual Network (VNet), effectively bringing the service into your VNet.
Azure Backup now provides an enhanced experience in creation and use of private endpoints compared to the classic experience (v1).
This article describes how to create and manage private endpoints for Azure Backup in the Recovery Services vault.
Create a Recovery Services vault
You can create private endpoints for Azure Backup only for Recovery Services vaults that don't have any items protected to it (or haven't had any items attempted to be protected or registered to them in the past). So, we recommend you create a new vault for private endpoint configuration.
For more information on creating a new vault, see Create and configure a Recovery Services vault. However, if you have existing vaults that already have private endpoints created, you can recreate private endpoints for them using the enhanced experience.
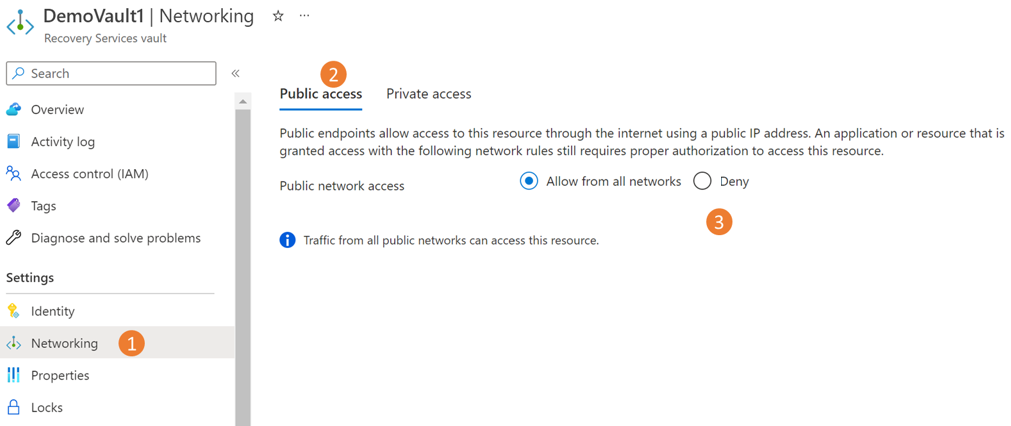
Deny public network access to the vault
You can configure your vaults to deny access from public networks.
Follow these steps:
Go to the vault > Networking.
On the Public access tab, select Deny to prevent access from public networks.
Note
- Once you deny access, you can still access the vault, but you can't move data to/from networks that don't contain private endpoints. For more information, see Create private endpoints for Azure Backup.
- Denial of public access is currently not supported for vaults that have Cross Region Restore enabled.
Select Apply to save the changes.
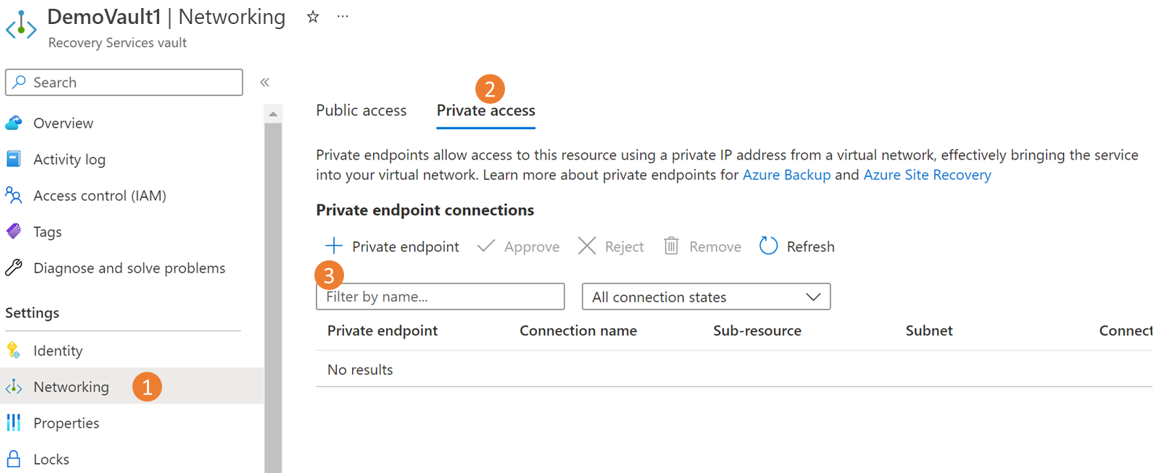
Create private endpoints for Azure Backup
To create private endpoints for Azure Backup, follow these steps:
Go to the *\vault for which you want to create private endpoints > Networking.
Go to the Private access tab and select +Private endpoint to start creating a new private endpoint.
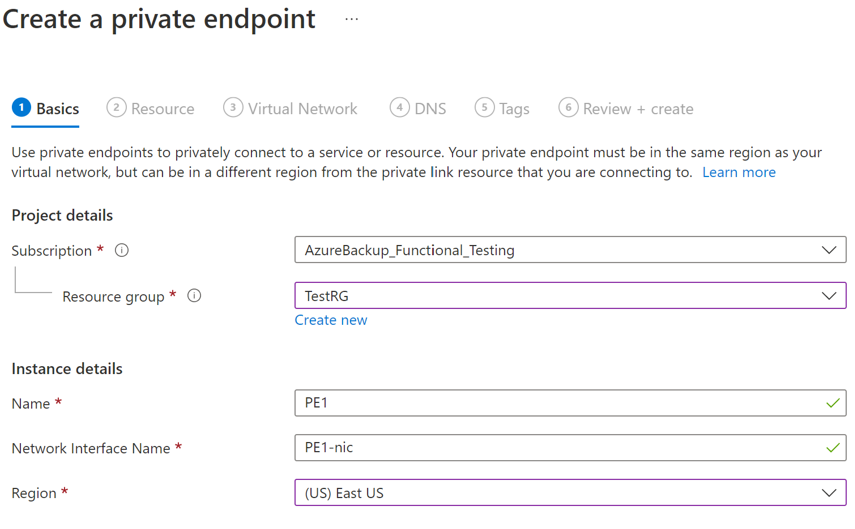
On Create a private endpoint, provide the required details:
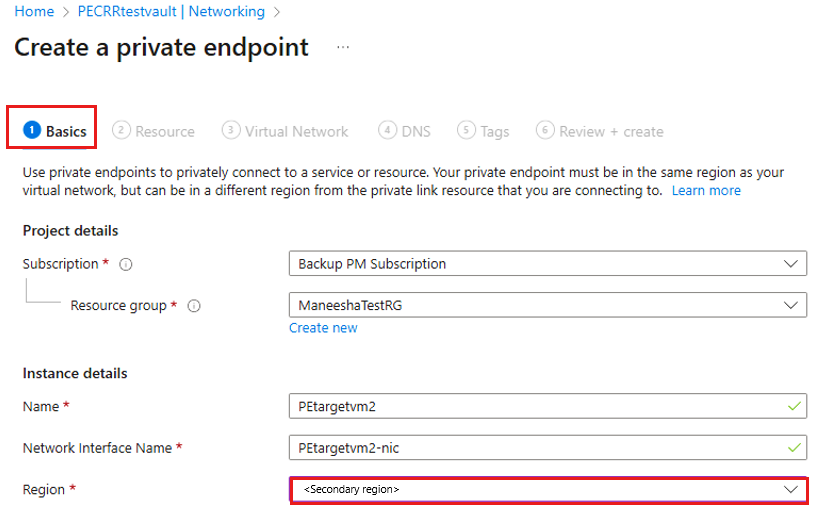
a. Basics: Provide the basic details for your private endpoints. The region should be the same as the vault and the resource to be backed-up.
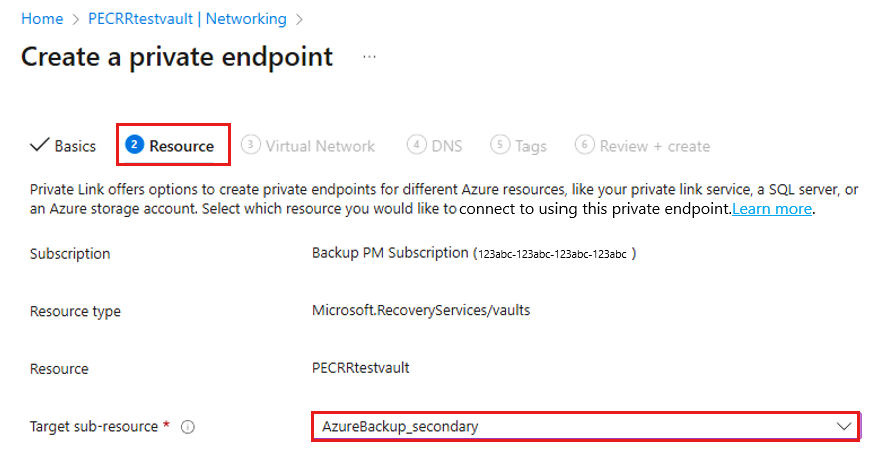
b. Resource: On this tab, select the PaaS resource for which you want to create your connection, and then select Microsoft.RecoveryServices/vaults from the resource type for your required subscription. Once done, choose the name of your Recovery Services vault as the Resource and AzureBackup as the Target subresource.
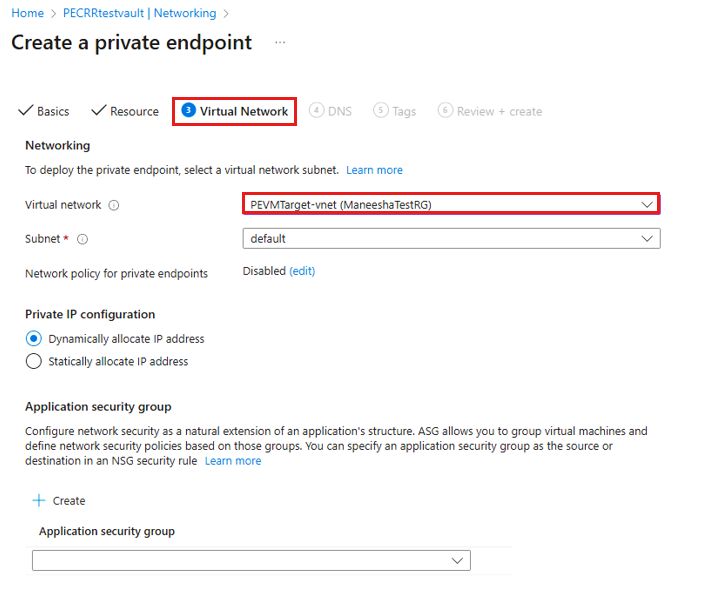
c. Virtual network: On this tab, specify the virtual network and subnet where you want the private endpoint to be created. This is the VNet where the VM is present.
d. DNS: To connect privately, you need the required DNS records. Based on your network setup, you can choose one of the following:
- Integrate your private endpoint with a private DNS zone: Select Yes if you want to integrate.
- Use your custom DNS server: Select No if you want to use your own DNS server. e. Tags: Optionally, you can add Tags for your private endpoint.
Select Review + create.
When the validation is complete, select Create to create the private endpoint.
Approve private endpoints
If you're creating the private endpoint as the owner of the Recovery Services vault, the private endpoint you created is auto-approved. Otherwise, the owner of the vault must approve the private endpoint before using it.
To manually approve private endpoints via the Azure portal, follow these steps:
In your Recovery Services vault, go to Private endpoint connections on the left pane.
Select the private endpoint connection that you want to approve.
Select Approve.
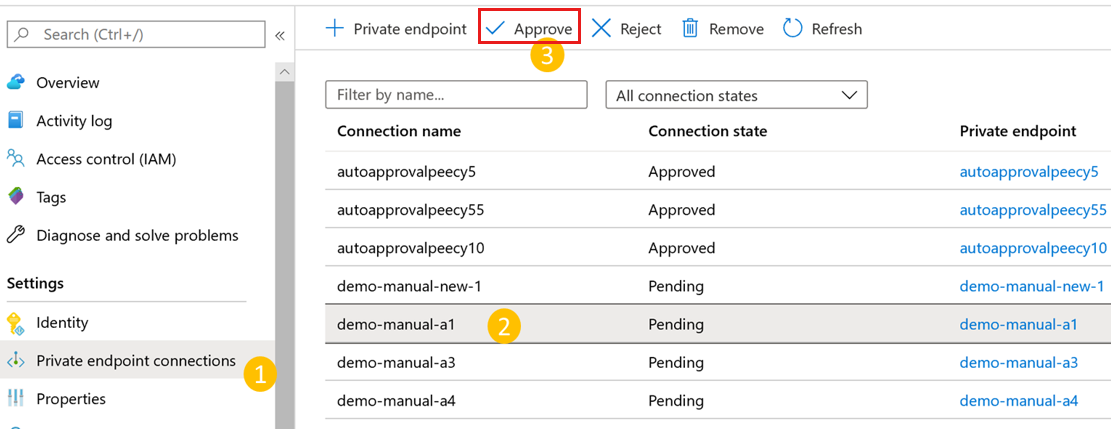
You can also select Reject or Remove if you want to reject or delete the endpoint connection.
Learn how to manually approve private endpoints using the Azure Resource Manager Client to use the Azure Resource Manager client for approving private endpoints.
Manage DNS records
You need the required DNS records in your private DNS zones or servers to connect privately. You can either integrate your private endpoint directly with Azure private DNS zones, or use your custom DNS servers to achieve this, based on your network preferences. This needs to be done for all three services - Azure Backup, Azure Blobs, and Queues.
When you integrate private endpoints with Azure private DNS zones
If you choose to integrate your private endpoint with private DNS zones, Azure Backup will add the required DNS records. You can view the private DNS zones used under DNS configuration of the private endpoint. If these DNS zones aren't present, they'll be created automatically during the creation of the private endpoint.
However, you must verify that your virtual network (which contains the resources to be backed-up) is properly linked to all three private DNS zones, as described below.
Note
If you're using proxy servers, you can choose to bypass the proxy server or perform your backups through the proxy server. To bypass a proxy server, continue to the following sections. To use the proxy server for performing your backups, see proxy server setup details for Recovery Services vault.
Validate virtual network links in private DNS zones
For each private DNS zone listed (for Azure Backup, Blobs and Queues), go to the respective Virtual network links.
You'll see an entry for the virtual network for which you've created the private endpoint. If you don't see an entry, add a virtual network link to all those DNS zones that don't have them.
When using custom DNS server or host files
If you're using a custom DNS server, you can use conditional forwarder for backup service, blob, and queue FQDNs to redirect the DNS requests to Azure DNS (168.63.129.16). Azure DNS redirects it to Azure Private DNS zone. In such setup, ensure that a virtual network link for Azure Private DNS zone exists as mentioned in this article.
The following table lists the Azure Private DNS zones required by Azure Backup:
Zone Service *.privatelink.<geo>.backup.windowsazure.comBackup *.blob.core.windows.netBlob *.queue.core.windows.netQueue *.storage.azure.netBlob Note
In the above text,
<geo>refers to the region code (for example eus and ne for East US and North Europe respectively). Refer to the following lists for regions codes:If you're using custom DNS servers or host files and don't have the Azure Private DNS zone setup, you need to add the DNS records required by the private endpoints to your DNS servers or in the host file.
Navigate to the private endpoint you created, and then go to DNS configuration. Then add an entry for each FQDN and IP displayed as Type A records in your DNS.
If you're using a host file for name resolution, make corresponding entries in the host file for each IP and FQDN according to the format -
<private ip><space><FQDN>.
Note
Azure Backup may allocate new storage account for your vault for the backup data, and the extension or agent needs to access the respective endpoints. For more about how to add more DNS records after registration and backup, see how to use private endpoints for backup.
Use private endpoints for backup
Once the private endpoints created for the vault in your VNet have been approved, you can start using them for performing your backups and restores.
Important
Ensure that you've completed all the steps mentioned above in the document successfully before proceeding. To recap, you must have completed the steps in the following checklist:
- Created a (new) Recovery Services vault
- Enabled the vault to use system assigned Managed Identity
- Assigned relevant permissions to the Managed Identity of the vault
- Created a Private Endpoint for your vault
- Approved the Private Endpoint (if not auto approved)
- Ensured all DNS records are appropriately added (except blob and queue records for custom servers, which will be discussed in the following sections)
Check VM connectivity
In the VM, in the locked down network, ensure the following:
- The VM should have access to Microsoft Entra ID.
- Execute nslookup on the backup URL (
xxxxxxxx.privatelink.<geo>.backup.windowsazure.com) from your VM, to ensure connectivity. This should return the private IP assigned in your virtual network.
Configure backup
Once you ensure the above checklist and access to have been successfully completed, you can continue to configure backup of workloads to the vault. If you're using a custom DNS server, you'll need to add DNS entries for blobs and queues that are available after configuring the first backup.
DNS records for blobs and queues (only for custom DNS servers/host files) after the first registration
After you have configured backup for at least one resource on a private endpoint enabled vault, add the required DNS records for blobs and queues as described below.
Navigate to each of these private endpoints created for the vault and go to DNS configuration.
Add an entry for each FQDN and IP displayed as Type A records in your DNS.
If you're using a host file for name resolution, make corresponding entries in the host file for each IP and FQDN according to the format -
<private ip><space><FQDN>.In addition to the above, there's another entry needed after the first backup, which is discussed here.
Backup and restore of workloads in Azure VM (SQL and SAP HANA)
Once the private endpoint is created and approved, no other changes are required from the client side to use the private endpoint (unless you're using SQL Availability Groups, which we discuss later in this section). All communication and data transfer from your secured network to the vault will be performed through the private endpoint. However, if you remove private endpoints for the vault after a server (SQL or SAP HANA) has been registered to it, you'll need to re-register the container with the vault. You don't need to stop protection for them.
DNS records for blobs (only for custom DNS servers/host files) after the first backup
After you run the first backup and you're using a custom DNS server (without conditional forwarding), it's likely that your backup will fail. If that happens:
Navigate to the private endpoint created for the vault and go to DNS configuration.
Add an entry for each FQDN and IP displayed as Type A records in your DNS.
If you're using a host file for name resolution, make corresponding entries in the host file for each IP and FQDN according to the format -
<private ip><space><FQDN>.
Note
At this point, you should be able to run nslookup from the VM and resolve to private IP addresses when done on the vault’s Backup and Storage URLs.
When using SQL Availability Groups
When using SQL Availability Groups (AG), you'll need to provision conditional forwarding in the custom AG DNS as described below:
- Sign in to your domain controller.
- Under the DNS application, add conditional forwarders for all three DNS zones (Backup, Blobs, and Queues) to the host IP 168.63.129.16 or the custom DNS server IP address, as necessary. The following screenshots show when you're forwarding to the Azure host IP. If you're using your own DNS server, replace with the IP of your DNS server.
Back up and restore through MARS agent and DPM server
When using the MARS Agent to back up your on-premises resources, make sure your on-premises network (containing your resources to be backed up) is peered with the Azure VNet that contains a private endpoint for the vault, so you can use it. You can then continue to install the MARS agent and configure backup as detailed here. However, you must ensure all communication for backup happens through the peered network only.
But if you remove private endpoints for the vault after a MARS agent has been registered to it, you'll need to re-register the container with the vault. You don't need to stop protection for them.
Note
- Private endpoints are supported with only DPM server 2022 and later.
- Private endpoints are not yet supported with MABS.
Cross Subscription Restore to a Private Endpoint enabled vault
To perform Cross Subscription Restore to a Private Endpoint enabled vault:
- In the source Recovery Services vault, go to the Networking tab.
- Go to the Private access section and create Private Endpoints.
- Select the subscription of the target vault in which you want to restore.
- In the Virtual Network section, select the VNet of the target VM that you want to restore across subscription.
- Create the Private Endpoint and trigger the restore process.
Cross region restore to a private endpoint enabled vault
You can create a Secondary Private Endpoint before or after adding protected items in the vault.
To restore data across regions to a Private Endpoint enabled vault, follow these steps:
Go to the target Recovery Services Vault > Settings > Networking, and ensure that Private Endpoint is created with the target VM VNet before protecting any items.
If the private endpoint is not enabled, enable it.
On the Private access tab, create Private Endpoints in the secondary region.

On the Create a private endpoint blade, on the Basics tab, select the Region as the secondary region of the target VM to which you want to do the Cross Region Restore operation.
On the Resource tab, select the Target sub-resource as AzureBackup_Secondary.
On the Virtual Network blade, select the Virtual Network of the target VM to which you want to do the Cross Region Restore operation.
Note
You can add a maximum of 12 Azure Backup Secondary Private Endpoints to a vault.
Create the private endpoint and start the restore process from the secondary region.

Deleting private endpoints
To delete private endpoints using REST API, see this section.
Next steps
Feedback
Coming soon: Throughout 2024 we will be phasing out GitHub Issues as the feedback mechanism for content and replacing it with a new feedback system. For more information see: https://aka.ms/ContentUserFeedback.
Submit and view feedback for