Work with query parameters
This article explains how to work with query parameters in the Azure Databricks SQL editor.
Query parameters allow you to make your queries more dynamic and flexible by inserting variable values at runtime. Instead of hard-coding specific values into your queries, you can define parameters to filter data or modify output based on user input. This approach improves query reuse, enhances security by preventing SQL injection, and enables more efficient handling of diverse data scenarios.
Named parameter marker syntax
Named parameter markers are typed placeholder variables. Use this syntax to write queries in the following parts of the Azure Databricks UI:
SQL editor
Notebooks
AI/BI dashboard dataset editor
AI/BI Genie spaces (Public Preview)
Insert parameters into your SQL queries by typing a colon followed by a parameter name, such as :parameter_name. When you include a named parameter marker in a query, a widget appears in the UI. You can use the widget to edit the parameter type and name.
Add a named parameter marker to a query
This example adds a parameter marker to the following query:
SELECT
  trip_distance,
  fare_amount
FROM
  samples.nyctaxi.trips
WHERE
  fare_amount < 5
This query returns a dataset that includes only fare amounts that are under five dollars. Use the following steps to edit the query to use a parameter instead of the hard-coded value (5).
- Delete the number 5 from the query.
- Type a colon (:) followed by the string
fare_parameter. The last line of your updated query should sayfare_amount < :fare_parameter. - Click the
 gear icon near the parameter widget. The dialog shows the following fields:
- Keyword: The keyword that represents the parameter in the query. You cannot edit this field. To change the keyword, edit the marker in the SQL query.
- Title: The title that appears over the widget. By default, the title is the same as the keyword.
- Type: Supported types are Text, Number, Dropdown List, Date, Date and Time, and Date and Time (with Seconds). The default is Text.
- In the dialog, change the Type to Number.
- Enter a number into the parameter widget and click Apply changes.
- Click Save to save the query.
Named parameter syntax examples
The following examples demonstrate some common use cases for parameters.
Insert a date
The following example includes a Date parameter that limits query results to records after a specific date.
SELECT
  o_orderdate AS Date,
  o_orderpriority AS Priority,
  sum(o_totalprice) AS `Total Price`
FROM
  samples.tpch.orders
WHERE
  o_orderdate > :date_param
GROUP BY
  1,
  2
Insert a number
The following example includes a Number parameter that limits results to records where the o_total_price field is greater than the provided parameter value.
SELECT
  o_orderdate AS Date,
  o_orderpriority AS Priority,
  o_totalprice AS Price
FROM
  samples.tpch.orders
WHERE
  o_totalprice > :num_param
Insert a field name
In the following example, the field_param is used with the IDENTIFIER function to provide a threshold value for the query at runtime. The parameter value should be a column name from the table used in the query.
SELECT
  *
FROM
  samples.tpch.orders
WHERE
  IDENTIFIER(:field_param) < 10000
Insert database objects
The following example creates three parameters: catalog, schema, and table.
SELECT
  *
FROM
  IDENTIFIER(:catalog || '.' || :schema || '.' || :table)
See IDENTIFIER clause.
Concatenate multiple parameters
You can include parameters in other SQL functions. This example allows the viewer to select an employee title and a number ID. The query uses the format_string function to concatenate the two strings and filter on the rows that match. See format_string function.
SELECT
  o_orderkey,
  o_clerk
FROM
  samples.tpch.orders
WHERE
  o_clerk LIKE format_string('%s%s', :title, :emp_number)
Work with JSON strings
You can use parameters to extract an attribute from a JSON string. The following example uses the from_json function to convert the JSON string to a struct value. Substituting the string a as the value for the parameter (param) returns the attribute 1.
SELECT
  from_json('{"a": 1}', 'map<string, int>') [:param]
Syntax changes
The following table shows common use cases for parameters, the original Databricks SQL mustache syntax, and the equivalent syntax using named parameter marker syntax.
| Parameter use case | Mustache parameter syntax | Named parameter marker syntax |
|---|---|---|
| Load only data before a specified date | WHERE date_field < '{{date_param}}'You must include quotes around the date parameter and curly brackets. |
WHERE date_field < :date_param |
| Load only data less than a specified numeric value | WHERE price < {{max_price}} |
WHERE price < :max_price |
| Compare two strings | WHERE region = {{region_param}} |
WHERE region = :region_param |
| Specify the table used in a query | SELECT * FROM {{table_name}} |
SELECT * FROM IDENTIFIER(:table)When a user enters this parameter, they should use the full three-level namespace to identify the table. |
| Independently specify the catalog, schema, and table used in a query | SELECT * FROM {{catalog}}.{{schema}}.{{table}} |
SELECT * FROM IDENTIFIER(:catalog \|\| '.' \|\| :schema \|\| '.' \|\| :table) |
| Use parameters as a template in a longer, formatted string | “({{area_code}}) {{phone_number}}” Parameter values are automatically concatenated as a string. |
format_string(“(%d)%d, :area_code, :phone_number) See Concatenate multiple parameters for a complete example. |
Mustache parameter syntax
Important
The following sections apply to query syntax that you can use in the SQL editor only. That means if you copy and paste a query using this syntax into any other Azure Databricks interface, such as a notebook or AI/BI dashboard dataset editor, the query must be manually adjusted to use named parameter markers before it runs without error.
In the SQL editor, any string between double curly braces {{ }} is treated as a query parameter. A widget appears above the results pane where you set the parameter value. While Azure Databricks generally recommends using named parameter markers, some functionality is only supported using mustache parameter syntax.
Use mustache parameter syntax for the following functionality:
- Legacy dashboard filters
- Multiple value dropdown parameters
- Date ranges
- Query based drop-down parameters
Add a mustache parameter
- Type
Cmd + I. The parameter is inserted at the text caret and the Add Parameter dialog appears.- Keyword: The keyword that represents the parameter in the query.
- Title: The title that appears over the widget. By default, the title is the same as the keyword.
- Type: Supported types are Text, Number, Date, Date and Time, Date and Time (with Seconds), Dropdown List, and Query Based Dropdown List. The default is Text.
- Enter the keyword, optionally override the title, and select the parameter type.
- Click Add Parameter.
- In the parameter widget, set the parameter value.
- Click Apply Changes.
- Click Save.
Alternatively, type double curly braces {{ }} and click the gear icon near the parameter widget to edit the settings.
To re-run the query with a different parameter value, enter the value in the widget and click Apply Changes.
Edit a query parameter
To edit a parameter, click the gear icon beside the parameter widget. To prevent users who don’t own the query from changing the parameter, click Show Results Only. The <Keyword> parameter dialog appears.
Remove a query parameter
To remove a query parameter, delete the parameter from your query. The parameter widget disappears, and you can rewrite your query using static values.
Change the order of parameters
To change the order in which parameters are shown, you can click and drag each parameter to the desired position.
Query parameter types
Text
Takes a string as input. Backslash, single, and double quotation marks are escaped, and Azure Databricks adds quotation marks to this parameter. For example, a string like mr's Li"s is transformed to 'mr\'s Li\"s' An example of using this could be
SELECT * FROM users WHERE name={{ text_param }}
Number
Takes a number as its input. An example of using this could be
SELECT * FROM users WHERE age={{ number_param }}
Dropdown List
To restrict the scope of possible parameter values when running a query, use the Dropdown List parameter type. An example would be SELECT * FROM users WHERE name='{{ dropdown_param }}'. When selected from the parameter settings panel, a text box appears where you enter your allowed values, each value separated by a new line. Dropdown lists are text parameters. To use dates or dates and times in your Dropdown List, enter them in the format your data source requires. The strings are not escaped. You can choose between a single-value or multi-value dropdown.
- Single value: Single quotation marks around the parameter are required.
- Multi-value: Toggle the Allow multiple values option. In the Quotation drop-down, choose whether to leave the parameters as entered (no quotation marks) or wrap the parameters with single or double quotation marks. You don’t need to add quotation marks around the parameter if you choose quotation marks.
Change your WHERE clause to use the IN keyword in your query.
SELECT ...
FROM   ...
WHERE field IN ( {{ Multi Select Parameter }} )
The parameter multi-selection widget lets you pass multiple values to the database. If you select the Double Quotation Mark option for the Quotation parameter, your query reflects the following format: WHERE IN ("value1", "value2", "value3")
Query-Based Dropdown List
Takes the result of a query as its input. It has the same behavior as the Dropdown List parameter. You must save the Databricks SQL dropdown list query to use it as an input in another query.
- Click Query Based Dropdown list under Type in the settings panel.
- Click the Query field and select a query. If your target query returns a large number of records, the performance will degrade.
If your target query returns more than one column, Databricks SQL uses the first one. If your target query returns name and value columns, Databricks SQL populates the parameter selection widget with the name column but executes the query with the associated value.
For example, suppose the following query returns the data in the table.
SELECT user_uuid AS 'value', username AS 'name'
FROM users
| value | name |
|---|---|
| 1001 | John Smith |
| 1002 | Jane Doe |
| 1003 | Bobby Tables |
When Azure Databricks runs the query, the value passed to the database would be 1001, 1002, or 1003.
Date and Time
Azure Databricks has several options to parameterize date and timestamp values, including options to simplify the parameterization of time ranges. Select from three options of varying precision:
| Option | Precision | Type |
|---|---|---|
| Date | day | DATE |
| Date and Time | minute | TIMESTAMP |
| Date and Time (with seconds) | second | TIMESTAMP |
When choosing a Range parameter option, you create two parameters designated by .start and .end suffixes. All options pass parameters to your query as string literals; Azure Databricks requires that you wrap date and time values in single quotation marks ('). For example:
-- Date parameter
SELECT *
FROM usage_logs
WHERE date = '{{ date_param }}'

-- Date and Time Range parameter
SELECT *
FROM usage_logs
WHERE modified_time > '{{ date_range.start }}' and modified_time < '{{ date_range.end }}'
Date parameters use a calendar-picking interface and default to the current date and time.
Note
The Date Range parameter only returns correct results for columns of DATE type. For TIMESTAMP columns, use one of the Date and Time Range options.
Dynamic date and date range values
When you add a date or date range parameter to your query, the selection widget shows a blue lightning bolt icon. Click it to display dynamic values like today, yesterday, this week, last week, last month, or last year. These values update dynamically.
Important
Dynamic dates and date ranges aren’t compatible with scheduled queries.
Using query parameters in dashboards
Optionally, queries can use parameters or static values. When a visualization based on a parameterized query is added to a dashboard, the visualization can be configured to use either a:
Widget parameter
Widget parameters are specific to a single visualization in a dashboard, appear in the visualization panel, and the parameter values specified apply only to the query underlying the visualization.
Dashboard parameter
Dashboard parameters can apply to multiple visualizations. When you add a visualization based on a parameterized query to a dashboard, the parameter will be added as a dashboard parameter by default. Dashboard parameters are configured for one or more visualizations in a dashboard and appear at the top of the dashboard. The parameter values specified for a dashboard parameter apply to visualizations reusing that particular dashboard parameter. A dashboard can have multiple parameters, each of which can apply to some visualizations and not others.
Static value
Static values are used in place of a parameter that responds to changes. Static values allow you to hard code a value in place of a parameter. They make the parameter “disappear” from the dashboard or widget where it previously appeared.
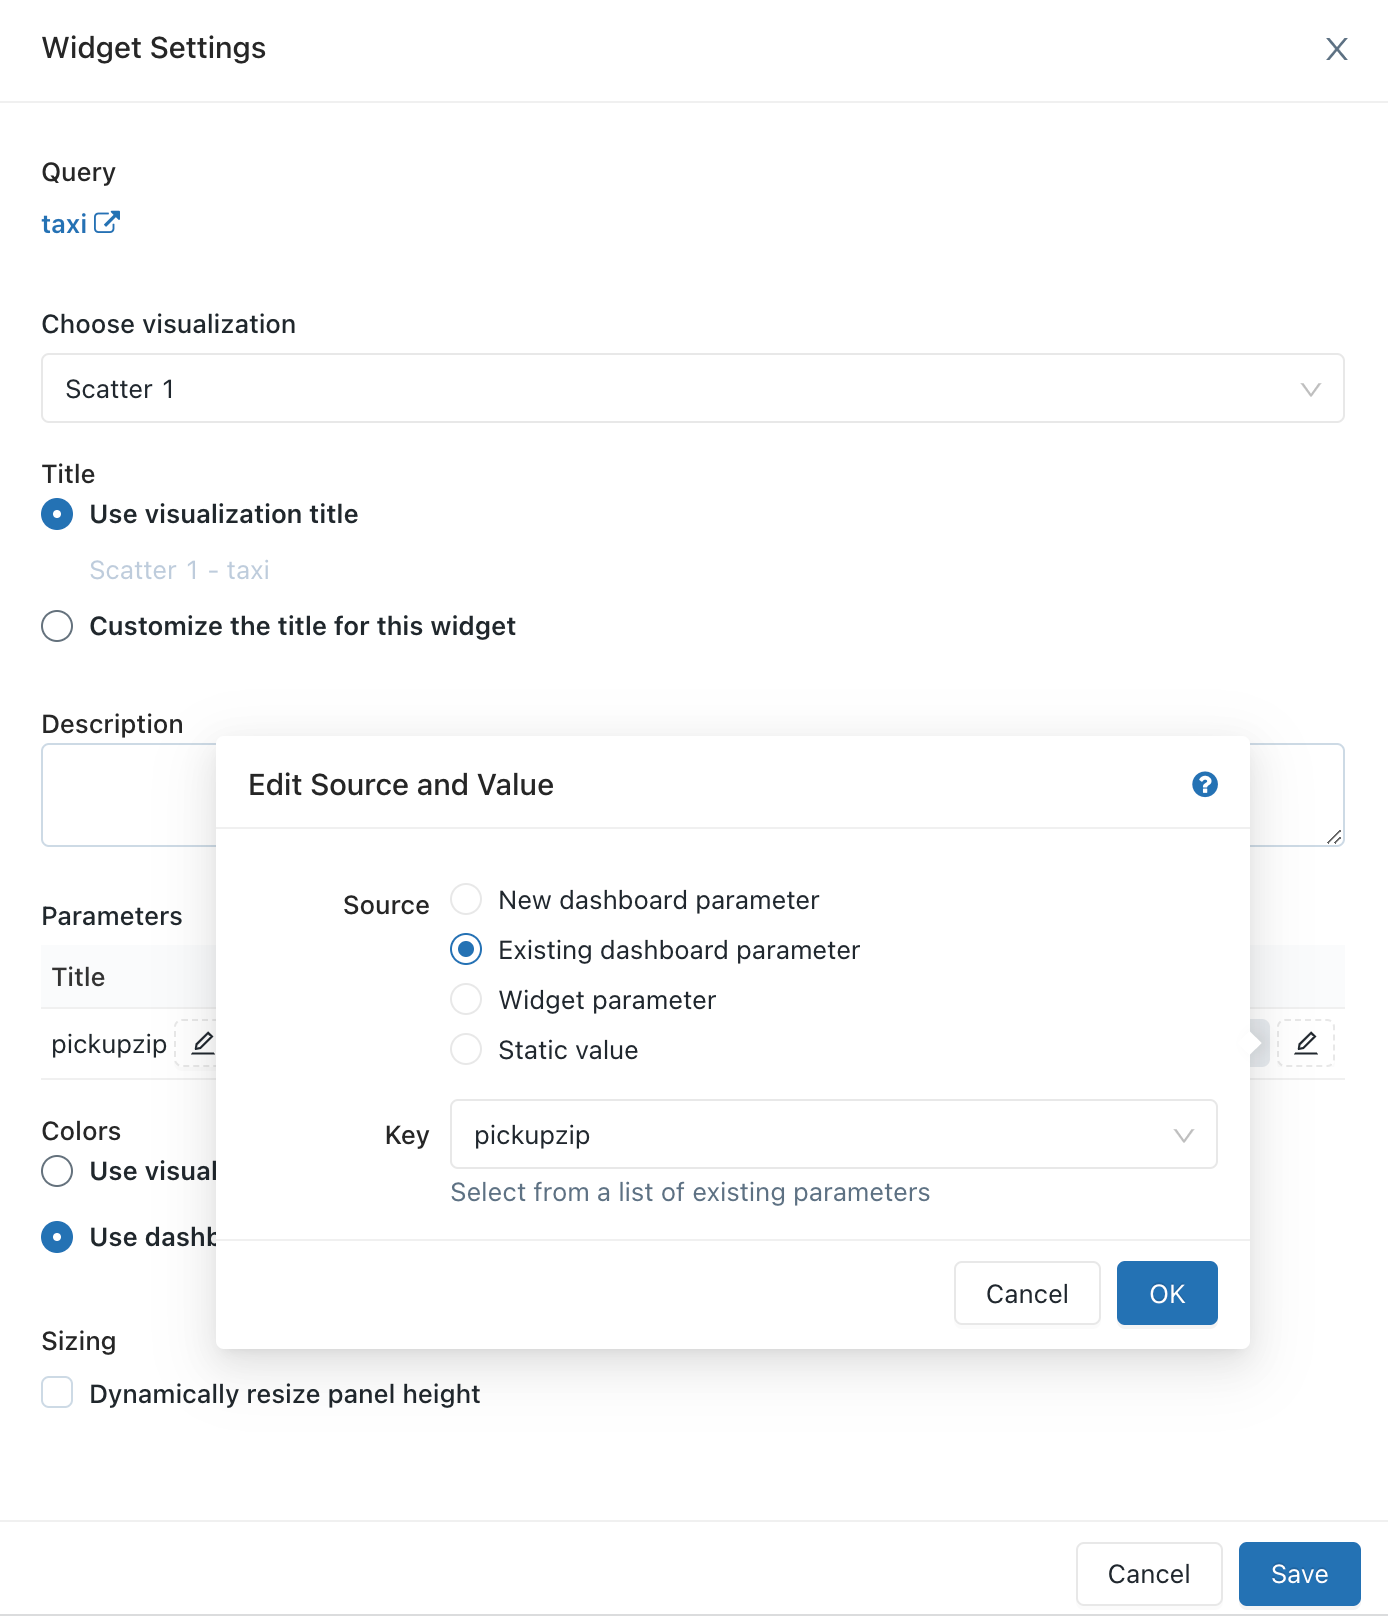
When you add a visualization containing a parameterized query, you can choose the title and the source for the parameter in the visualization query by clicking the appropriate pencil icon. You can also select the keyword and a default value. See Parameter properties.
After adding a visualization to a dashboard, access the parameter mapping interface by clicking the kebab menu on the upper-right of a dashboard widget and then clicking Change widget settings.
Parameter properties
Title: The display name that appears beside the value selector on your dashboard. It defaults to the parameter Keyword. To edit it, click the pencil icon
 . Titles are not displayed for static dashboard parameters because the value selector is hidden. If you select Static value as your Value Source, the Title field is grayed out.
Keyword: The string literal for this parameter in the underlying query. This is useful for debugging if your dashboard does not return the expected results.
Default Value: The value used if no other value is specified. To change this from the query screen, run the query with your desired parameter value and click the Save button.
Value Source: The source of the parameter value. Click the pencil icon
to choose a source.- New dashboard parameter: Create a new dashboard-level parameter. This lets you set a parameter value in one place on your dashboard and map it to multiple visualizations.
- Existing dashboard parameter: Map parameter to an existing dashboard parameter. You must specify which pre-existing dashboard parameter.
- Widget parameter: Displays a value selector inside your dashboard widget. This is useful for one-off parameters that are not shared between widgets.
- Static value: Choose a static value for the widget, regardless of the values used on other widgets. Statically mapped parameter values do not display a value selector anywhere on the dashboard, which is more compact. This lets you take advantage of the flexibility of query parameters without cluttering the user interface on a dashboard when certain parameters are not expected to change frequently.
Frequently Asked Questions (FAQ)
- Can I reuse the same parameter multiple times in a single query?
- Can I use multiple parameters in a single query?
Can I reuse the same parameter multiple times in a single query?
Yes. Use the same identifier in the curly brackets. This example uses the {{org_id}} parameter twice.
SELECT {{org_id}}, count(0)
FROM queries
WHERE org_id = {{org_id}}
Can I use multiple parameters in a single query?
Yes. Use a unique name for each parameter. This example uses two parameters: {{org_id}} and {{start_date}}.
SELECT count(0)
FROM queries
WHERE org_id = {{org_id}} AND created_at > '{{start_date}}'