Add Azure Developer CLI support to your app using an existing template
The Azure Developer CLI (azd) provides two different workflows to initialize a template to use with your app, which include:
- Use code in the current directory: This approach analyzes your app and autogenerates supported infrastructure and configuration resources.
- Select a template: This approach allows you to integrate an existing template with your app, or use an existing template as a starting point for a new app.
Both of these approaches are explored in the Create Azure Developer CLI templates overview doc.
In this article, you learn how to add support for the Azure Developer CLI (azd) to your app through the Select a template approach. Visit the Add azd support to your app using an existing template doc for more information on the alternative approach. You can also visit the Training - build and deploy azd templates for more information on building azd templates.
Select a template for your app
The Select a template workflow of the azd init command allows you to choose an existing azd template to use as a starting point. The contents of the selected template are added to the root directory of your project. Most templates provide the required set of azd files and folders, and many include a complete set infrastructure-as-code files to provision Azure resources for a chosen application stack.
In this example, you'll use the Starter - Bicep template, which includes the essential structure of an azd template and some useful boilerplate code to get started. Starter templates are a great choice when you want to scaffold out the correct template structure and starting resources, but still author your own infrastructure files.
To follow along with the steps ahead using an existing sample application, clone the following starter project to an empty directory on your computer:
git clone https://github.com/Azure-Samples/msdocs-python-flask-webapp-quickstartIn your command line tool of choice, navigate to the root directory of the cloned project.
Run the
azd initcommand to initialize anazdtemplate.azd initWhen prompted, choose the option to Select a template.
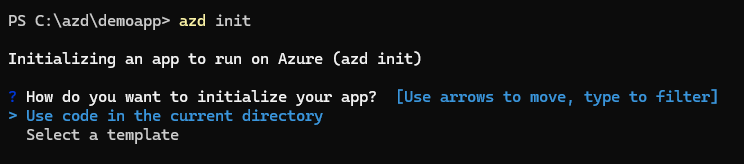
From the list of templates, select Starter - Bicep. You can type the template name or use your keyboard arrow keys to find it.
When prompted, enter a short environment name, such as testenv.
After you run
azd init, the following assets are added to your current directory:├── .azdo [ Configures an Azure Pipeline ] ├── .devcontainer [ For DevContainer ] ├── .github [ Configures a GitHub workflow ] ├── .vscode [ VS Code workspace configurations ] ├── .azure [ Stores Azure configurations and environment variables ] ├── infra [ Contains infrastructure as code files ] │ ├── main.bicep/main.tf [ Main infrastructure file ] │ ├── main.parameters.json/main.tfvars.json [ Parameters file ] │ └── core/modules [ Contains reusable Bicep/Terraform modules ] └── azure.yaml [ Describes the app and type of Azure resources]
Update the Bicep files
Your project now contains the core structure and assets of an azd template. However, to provision the Azure resources for your specific project, the Bicep files in the infra folder need to be updated. To host the sample application, you'll need to define the following resources using Bicep files:
- An Azure App Service Plan
- An Azure App Service running on Linux
Open the root project directory in your editor of choice, such as Visual Studio Code.
Open the
main.bicepfile in theinfrafolder using your editor. This file contains useful boilerplate code to setup essential variables, parameters, and naming conventions. Beneath the comment block around line 50 that readsAdd resources to be provisioned below, add the following Bicep:// Creates an app service instance to host the app module web './core/host/appservice.bicep' = { name: 'web' scope: rg params: { name: '${abbrs.webSitesAppService}web-${resourceToken}' location: location tags: union(tags, { 'azd-service-name': 'web' }) appServicePlanId: appServicePlan.outputs.id runtimeName: 'python' runtimeVersion: '3.8' scmDoBuildDuringDeployment: true } } // Create an App Service Plan to group applications under the same payment plan and SKU module appServicePlan './core/host/appserviceplan.bicep' = { name: 'appserviceplan' scope: rg params: { name: '${abbrs.webServerFarms}${resourceToken}' location: location tags: tags sku: { name: 'B1' } } }Note
- A unique string is generated based on subscription ID and used as a
${resourceToken}variable. This token is appended to the name of all Azure resources created byazd. azduses tags to identify resources so you can modify the names based on your organization's naming convention.- The
'azd-service-name': 'web'tag on the app service is the valueazduses to identify deployment host. The value must be the same as what is defined for the service in the azure.yaml file.
- A unique string is generated based on subscription ID and used as a
Update the azure.yaml file
To deploy the app, azd needs to know more about your app. The azure.yaml file is used to define the source code location, language, and the Azure hosting service for each service in your app. For full details, refer to the azure.yaml schema.
Open the
azure.yamlat the root of the project.Add the following lines to the bottom of the file:
name: msdocs-python-flask-webapp-quickstart
services:
  web:
    project: .
    language: py
    host: appservice
Provision and deploy the template
Save all of your changes and run the following command to provision and deploy the app resources on Azure:
azd upWhen the command finishes, click the link in the command output to navigate to the deployed site.
Your project is now compatible with Azure Developer CLI and can be used as a template.
Note
azd also supports using Buildpack for containerizing your apps by default. If your azd template targets Azure Container Apps or Azure Kubernetes Service but does not include a Docker file, azd automatically generates an image using Buildpack.
Feedback
Coming soon: Throughout 2024 we will be phasing out GitHub Issues as the feedback mechanism for content and replacing it with a new feedback system. For more information see: https://aka.ms/ContentUserFeedback.
Submit and view feedback for