Manually deploy a Java application with JBoss EAP on an Azure Red Hat OpenShift cluster
This article shows you how to deploy a Red Hat JBoss Enterprise Application Platform (EAP) application to an Azure Red Hat OpenShift cluster. The sample is a Java application backed by an SQL database. The app is deployed using JBoss EAP Helm Charts.
In this guide, you learn how to:
- Prepare a JBoss EAP application for OpenShift.
- Create a single database instance of Azure SQL Database.
- Because Azure Workload Identity is not yet supported by Azure OpenShift, this article still uses username and password for database authentication instead of using passwordless database connections.
- Deploy the application on an Azure Red Hat OpenShift cluster by using JBoss Helm Charts and OpenShift Web Console
The sample application is a stateful application that stores information in an HTTP session. It makes use of the JBoss EAP clustering capabilities and uses the following Jakarta EE and MicroProfile technologies:
- Jakarta Server Faces
- Jakarta Enterprise Beans
- Jakarta Persistence
- MicroProfile Health
This article is step-by-step manual guidance for running JBoss EAP app on an Azure Red Hat OpenShift cluster. For a more automated solution that accelerates your journey to Azure Red Hat OpenShift cluster, see Quickstart: Deploy JBoss EAP on Azure Red Hat OpenShift using the Azure portal.
If you're interested in providing feedback or working closely on your migration scenario with the engineering team developing JBoss EAP on Azure solutions, fill out this short survey on JBoss EAP migration and include your contact information. The team of program managers, architects, and engineers will promptly get in touch with you to initiate close collaboration.
Important
This article deploys an application by using JBoss EAP Helm Charts. At the time of writing, this feature is still offered as a Technology Preview. Before choosing to deploy applications with JBoss EAP Helm Charts on production environments, ensure that this feature is a supported feature for your JBoss EAP/XP product version.
Important
While Red Hat and Microsoft Azure jointly engineer, operate, and support Azure Red Hat OpenShift to provide an integrated support experience, the software you run on top of Azure Red Hat OpenShift, including that described in this article, is subject to its own support and license terms. For details about support of Azure Red Hat OpenShift, see Support lifecycle for Azure Red Hat OpenShift 4. For details about support of the software described in this article, see the main pages for that software as listed in the article.
Prerequisites
Note
Azure Red Hat OpenShift requires a minimum of 40 cores to create and run an OpenShift cluster. The default Azure resource quota for a new Azure subscription doesn't meet this requirement. To request an increase in your resource limit, see Standard quota: Increase limits by VM series. The free trial subscription isn't eligible for a quota increase, upgrade to a Pay-As-You-Go subscription before requesting a quota increase.
Prepare a local machine with a Unix-like operating system supported by the various products installed - such as Ubuntu, macOS, or Windows Subsystem for Linux.
Install a Java Standard Edition (SE) implementation. The local development steps in this article were tested with Java Development Kit (JDK) 17 from the Microsoft build of OpenJDK.
Install Maven 3.8.6 or later.
Install Azure CLI 2.40 or later.
Clone the code for this demo application (todo-list) to your local system. The demo application is at GitHub.
Follow the instructions in Create an Azure Red Hat OpenShift 4 cluster.
Though the "Get a Red Hat pull secret" step is labeled as optional, it's required for this article. The pull secret enables your Azure Red Hat OpenShift cluster to find the JBoss EAP application images.
If you plan to run memory-intensive applications on the cluster, specify the proper virtual machine size for the worker nodes using the
--worker-vm-sizeparameter. For more information, see:Connect to the cluster by following the steps in Connect to an Azure Red Hat OpenShift 4 cluster.
- Follow the steps in "Install the OpenShift CLI"
- Connect to an Azure Red Hat OpenShift cluster using the OpenShift CLI with the user
kubeadmin
Execute the following command to create the OpenShift project for this demo application:
oc new-project eap-demoExecute the following command to add the view role to the default service account. This role is needed so the application can discover other pods and set up a cluster with them:
oc policy add-role-to-user view system:serviceaccount:$(oc project -q):default -n $(oc project -q)
Prepare the application
Clone the sample application using the following command:
git clone https://github.com/Azure-Samples/jboss-on-aro-jakartaee
You cloned the Todo-list demo application and your local repository is on the main branch. The demo application is a simple Java app that creates, reads, updates, and deletes records on Azure SQL. You can deploy this application as it is on a JBoss EAP server installed in your local machine. You just need to configure the server with the required database driver and data source. You also need a database server accessible from your local environment.
However, when you're targeting OpenShift, you might want to trim the capabilities of your JBoss EAP server. For example, you might want to reduce the security exposure of the provisioned server and reduce the overall footprint. You might also want to include some MicroProfile specs to make your application more suitable for running on an OpenShift environment. When you use JBoss EAP, one way to accomplish this task is by packaging your application and your server in a single deployment unit known as a Bootable JAR. Let's do that by adding the required changes to our demo application.
Navigate to your demo application local repository and change the branch to bootable-jar:
## cd jboss-on-aro-jakartaee
git checkout bootable-jar
Let's do a quick review of what we changed in this branch:
- We added the
wildfly-jar-mavenplugin to provision the server and the application in a single executable JAR file. The OpenShift deployment unit is our server with our application. - On the Maven plugin, we specified a set of Galleon layers. This configuration enables us to trim the server capabilities to only what we need. For complete documentation on Galleon, see the WildFly documentation.
- Our application uses Jakarta Faces with Ajax requests, which means that there's information stored in the HTTP session. We don't want to lose such information if a pod is removed. We could save this information on the client and send it back on each request. However, there are cases where you might decide not to distribute certain information to the clients. For this demo, we chose to replicate the session across all pod replicas. To do it, we added
<distributable />to the web.xml. That, together with the server clustering capabilities, makes the HTTP session distributable across all pods. - We added two MicroProfile Health Checks that enable you to identify when the application is live and ready to receive requests.
Run the application locally
Before deploying the application on OpenShift, we're going to run it locally to verify how it works. The following steps assume you have Azure SQL running and available from your local environment.
To create the database, follow the steps in Quickstart: Create an Azure SQL Database single database, but use the following substitutions.
- For Resource group use the resource group you created previously.
- For Database name use
todos_db. - For Server admin login use
azureuser. - For Password use
Passw0rd!. - In the Firewall rules section, toggle the Allow Azure services and resources to access this server to Yes.
All of the other settings can be safely used from the linked article.
On the Additional settings page, you don't have to choose the option to prepopulate the database with sample data, but there's no harm in doing so.
After you create the database, get the value for the server name from the overview page. Hover the mouse over the value of the Server name field and select the copy icon that appears beside the value. Save this value aside for use later (we set a variable named MSSQLSERVER_HOST to this value).
Note
To keep monetary costs low, the Quickstart directs the reader to select the serverless compute tier. This tier scales to zero when there's no activity. When this happens, the database isn't immediately responsive. If at any point when executing the steps in this article you observe database problems, consider disabling Auto-pause. To learn how, search for Auto-pause in Azure SQL Database serverless. At the time of writing, the following Azure CLI command disables Auto-pause for the database configured in this article: az sql db update --resource-group $RESOURCEGROUP --server <Server name, without the .database.windows.net part> --name todos_db --auto-pause-delay -1
Follow the next steps to build and run the application locally.
Build the Bootable JAR. Because we're using the
eap-datasources-galleon-packwith MS SQL Server database, we must specify the database driver version we want to use with this specific environment variable. For more information on theeap-datasources-galleon-packand MS SQL Server, see the documentation from Red Hatexport MSSQLSERVER_DRIVER_VERSION=7.4.1.jre11 mvn clean packageLaunch the Bootable JAR by using the following commands.
You must ensure that the Azure SQL database permits network traffic from the host on which this server is running. Because you selected Add current client IP address when performing the steps in Quickstart: Create an Azure SQL Database single database, if the host on which the server is running is the same host from which your browser is connecting to the Azure portal, the network traffic should be permitted. If host on which the server is running is some other host, you need to refer to Use the Azure portal to manage server-level IP firewall rules.
When we're launching the application, we need to pass the required environment variables to configure the data source:
export MSSQLSERVER_USER=azureuser
export MSSQLSERVER_PASSWORD='Passw0rd!'
export MSSQLSERVER_JNDI=java:/comp/env/jdbc/mssqlds
export MSSQLSERVER_DATABASE=todos_db
export MSSQLSERVER_HOST=<server name saved aside earlier>
export MSSQLSERVER_PORT=1433
mvn wildfly-jar:run
If you want to learn more about the underlying runtime used by this demo, the Galleon Feature Pack for integrating datasources documentation has a complete list of available environment variables. For details on the concept of feature-pack, see the WildFly documentation.
If you receive an error with text similar to the following example:
Cannot open server '<your prefix>mysqlserver' requested by the login. Client with IP address 'XXX.XXX.XXX.XXX' is not allowed to access the server.This message indicates that your steps to ensure that the network traffic is permitted didn't work. Ensure the IP address from the error message is included in the firewall rules.
If you receive a message with text similar to the following example:
Caused by: com.microsoft.sqlserver.jdbc.SQLServerException: There is already an object named 'TODOS' in the database.This message indicates the sample data is already in the database. You can ignore this message.
(Optional) If you want to verify the clustering capabilities, you can also launch more instances of the same application by passing to the Bootable JAR the
jboss.node.nameargument and, to avoid conflicts with the port numbers, shifting the port numbers by usingjboss.socket.binding.port-offset. For example, to launch a second instance that represents a new pod on OpenShift, you can execute the following command in a new terminal window:export MSSQLSERVER_USER=azureuser export MSSQLSERVER_PASSWORD='Passw0rd!' export MSSQLSERVER_JNDI=java:/comp/env/jdbc/mssqlds export MSSQLSERVER_DATABASE=todos_db export MSSQLSERVER_HOST=<server name saved aside earlier> export MSSQLSERVER_PORT=1433 mvn wildfly-jar:run -Dwildfly.bootable.arguments="-Djboss.node.name=node2 -Djboss.socket.binding.port-offset=1000"If your cluster is working, you can see on the server console log a trace similar to the following one:
INFO [org.infinispan.CLUSTER] (thread-6,ejb,node) ISPN000094: Received new cluster view for channel ejbNote
By default the Bootable JAR configures the JGroups subsystem to use the UDP protocol and sends messages to discover other cluster members to the 230.0.0.4 multicast address. To properly verify the clustering capabilities on your local machine, your Operating System should be capable of sending and receiving multicast datagrams and route them to the 230.0.0.4 IP through your ethernet interface. If you see warnings related to the cluster on the server logs, check your network configuration and verify it supports multicast on that address.
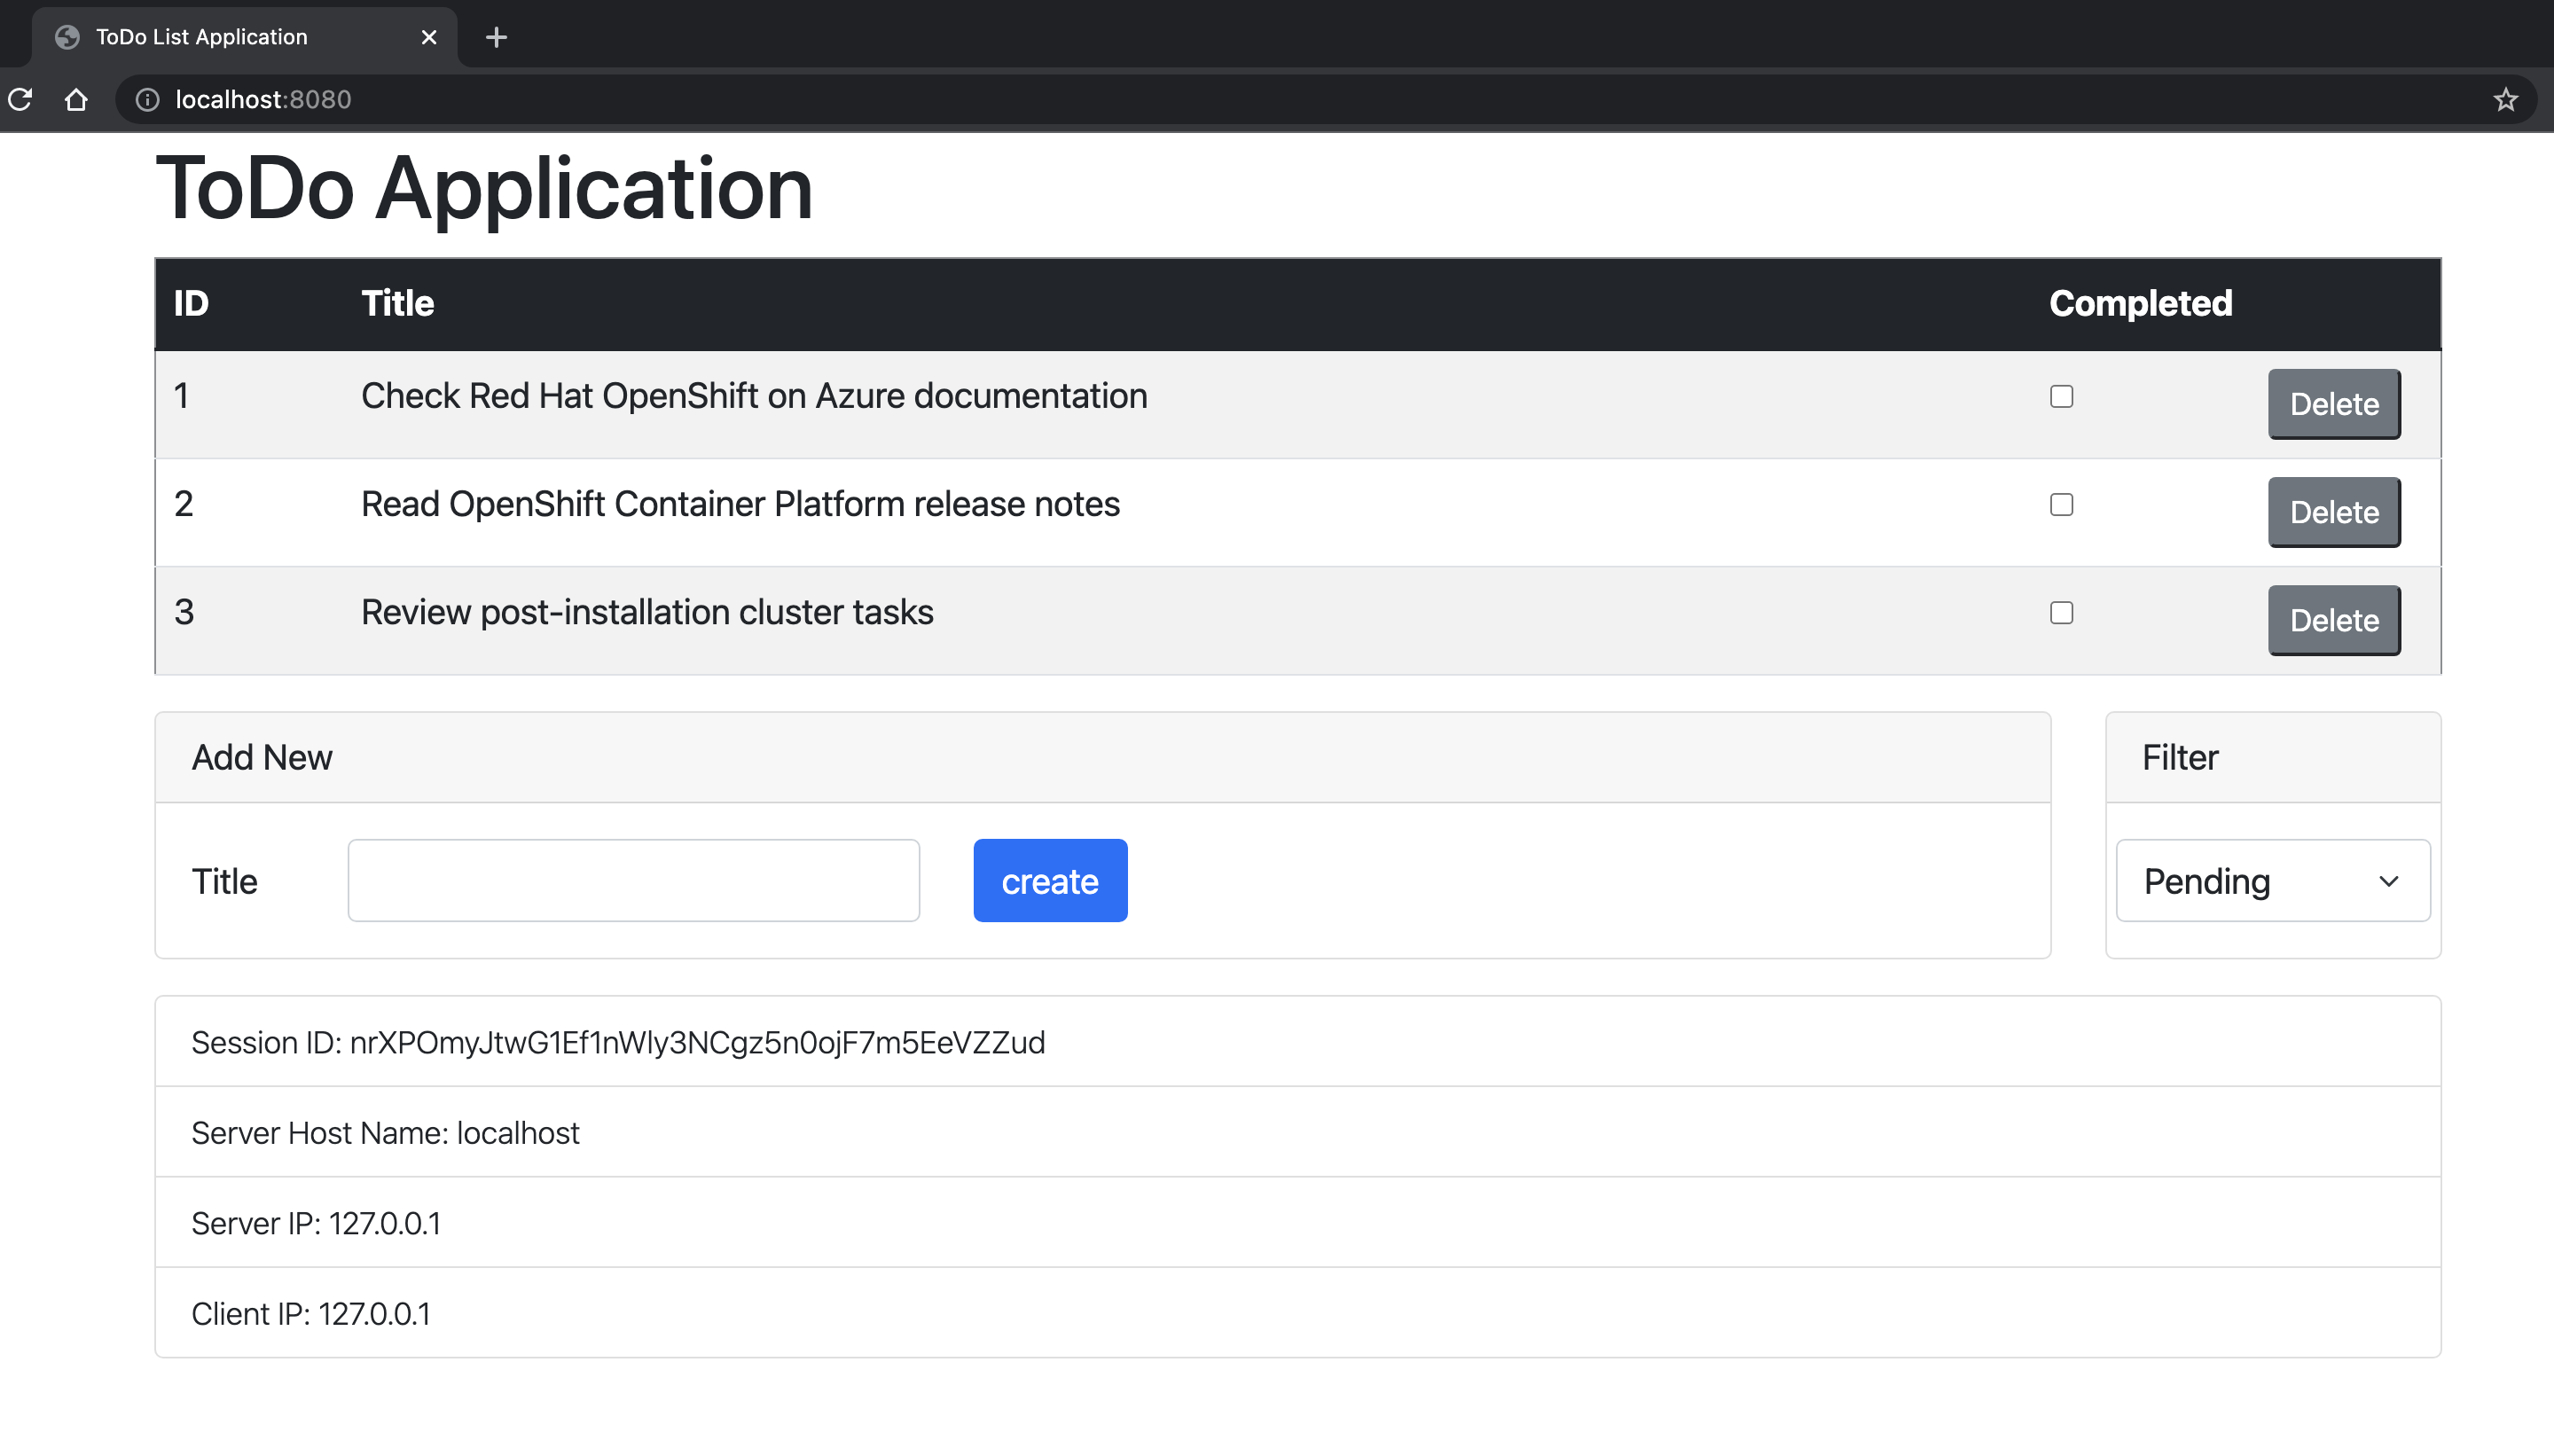
Open http://localhost:8080/ in your browser to visit the application home page. If you created more instances, you can access them by shifting the port number, for example http://localhost:9080/. The application should look similar to the following image:
Check the liveness and readiness probes for the application. OpenShift uses these endpoints to verify when your pod is live and ready to receive user requests.
To check the status of liveness, run:
curl http://localhost:9990/health/liveYou should see this output:
{"status":"UP","checks":[{"name":"SuccessfulCheck","status":"UP"}]}To check the status of readiness, run:
curl http://localhost:9990/health/readyYou should see this output:
{"status":"UP","checks":[{"name":"deployments-status","status":"UP","data":{"todo-list.war":"OK"}},{"name":"server-state","status":"UP","data":{"value":"running"}},{"name":"boot-errors","status":"UP"},{"name":"DBConnectionHealthCheck","status":"UP"}]}Press Ctrl+C to stop the application.
Deploy to OpenShift
To deploy the application, we're going to use the JBoss EAP Helm Charts already available in Azure Red Hat OpenShift. We also need to supply the desired configuration, for example, the database user, the database password, the driver version we want to use, and the connection information used by the data source. The following steps assume you have Azure SQL running and accessible from your OpenShift cluster, and you stored the database user name, password, hostname, port, and database name in an OpenShift OpenShift Secret object named mssqlserver-secret.
Navigate to your demo application local repository and change the current branch to bootable-jar-openshift:
git checkout bootable-jar-openshift
Let's do a quick review about what we changed in this branch:
- We added a new Maven profile named
bootable-jar-openshiftthat prepares the Bootable JAR with a specific configuration for running the server on the cloud. For example, it enables the JGroups subsystem to use network requests to discover other pods by using the KUBE_PING protocol. - We added a set of configuration files in the jboss-on-aro-jakartaee/deployment directory. In this directory, you can find the configuration files to deploy the application.
Deploy the application on OpenShift
The next steps explain how you can deploy the application with a Helm chart using the OpenShift web console. Avoid hard coding sensitive values into your Helm chart using a feature called "secrets". A secret is simply a collection of name-value pairs, where the values are specified in some known place before they're needed. In our case, the Helm chart uses two secrets, with the following name-value pairs from each.
mssqlserver-secretdb-hostconveys the value ofMSSQLSERVER_HOST.db-nameconveys the value ofMSSQLSERVER_DATABASEdb-passwordconveys the value ofMSSQLSERVER_PASSWORDdb-portconveys the value ofMSSQLSERVER_PORT.db-userconveys the value ofMSSQLSERVER_USER.
todo-list-secretapp-cluster-passwordconveys an arbitrary, user-specified password so that cluster nodes can form more securely.app-driver-versionconveys the value ofMSSQLSERVER_DRIVER_VERSION.app-ds-jndiconveys the value ofMSSQLSERVER_JNDI.
Create
mssqlserver-secret.oc create secret generic mssqlserver-secret \ --from-literal db-host=${MSSQLSERVER_HOST} \ --from-literal db-name=${MSSQLSERVER_DATABASE} \ --from-literal db-password=${MSSQLSERVER_PASSWORD} \ --from-literal db-port=${MSSQLSERVER_PORT} \ --from-literal db-user=${MSSQLSERVER_USER}Create
todo-list-secret.export MSSQLSERVER_DRIVER_VERSION=7.4.1.jre11 oc create secret generic todo-list-secret \ --from-literal app-cluster-password=mut2UTG6gDwNDcVW \ --from-literal app-driver-version=${MSSQLSERVER_DRIVER_VERSION} \ --from-literal app-ds-jndi=${MSSQLSERVER_JNDI}Open the OpenShift console and navigate to the developer view. You can discover the console URL for your OpenShift cluster by running this command. Sign in with the
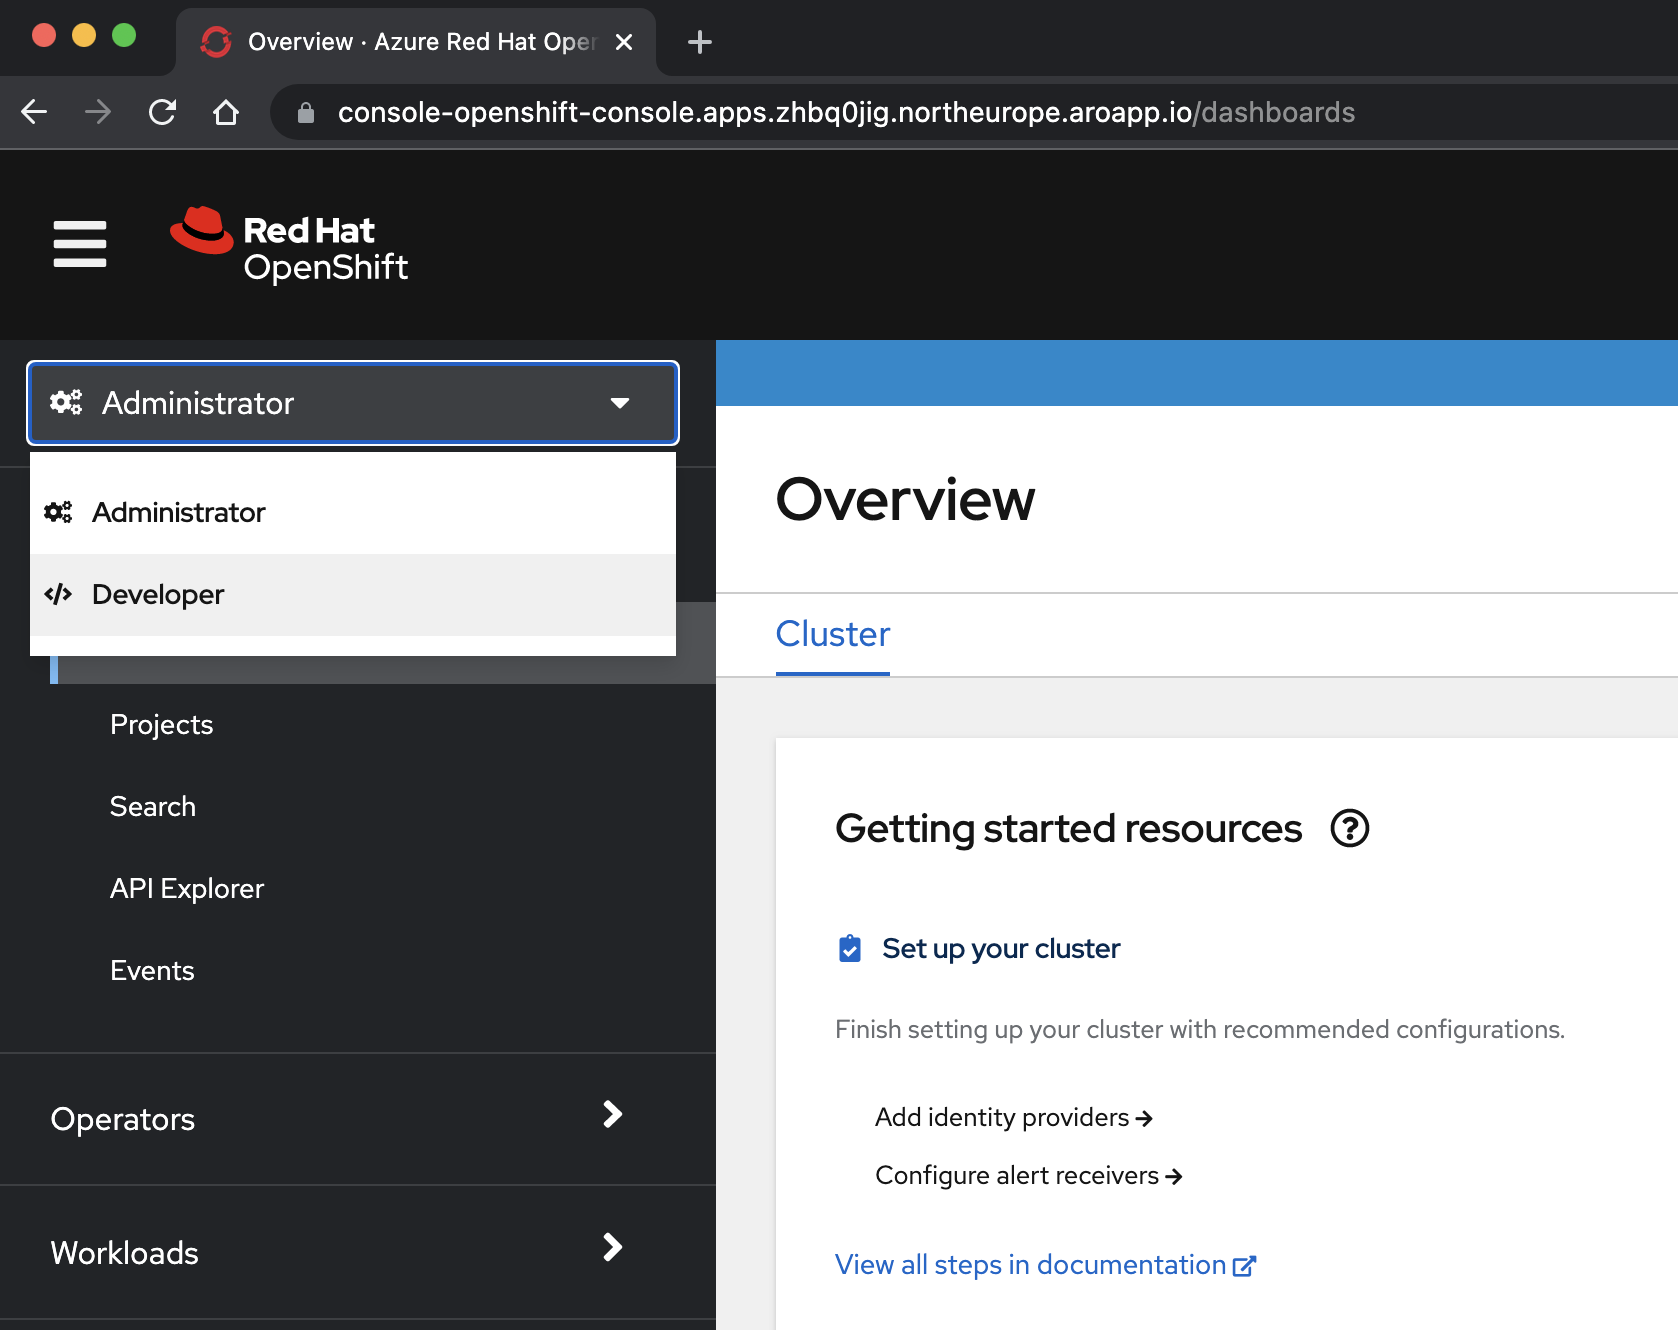
kubeadminuserid and password you obtained from a preceding step.az aro show \ --name $CLUSTER \ --resource-group $RESOURCEGROUP \ --query "consoleProfile.url" \ --output tsvSelect the </> Developer perspective from the drop-down menu at the top of the navigation pane.
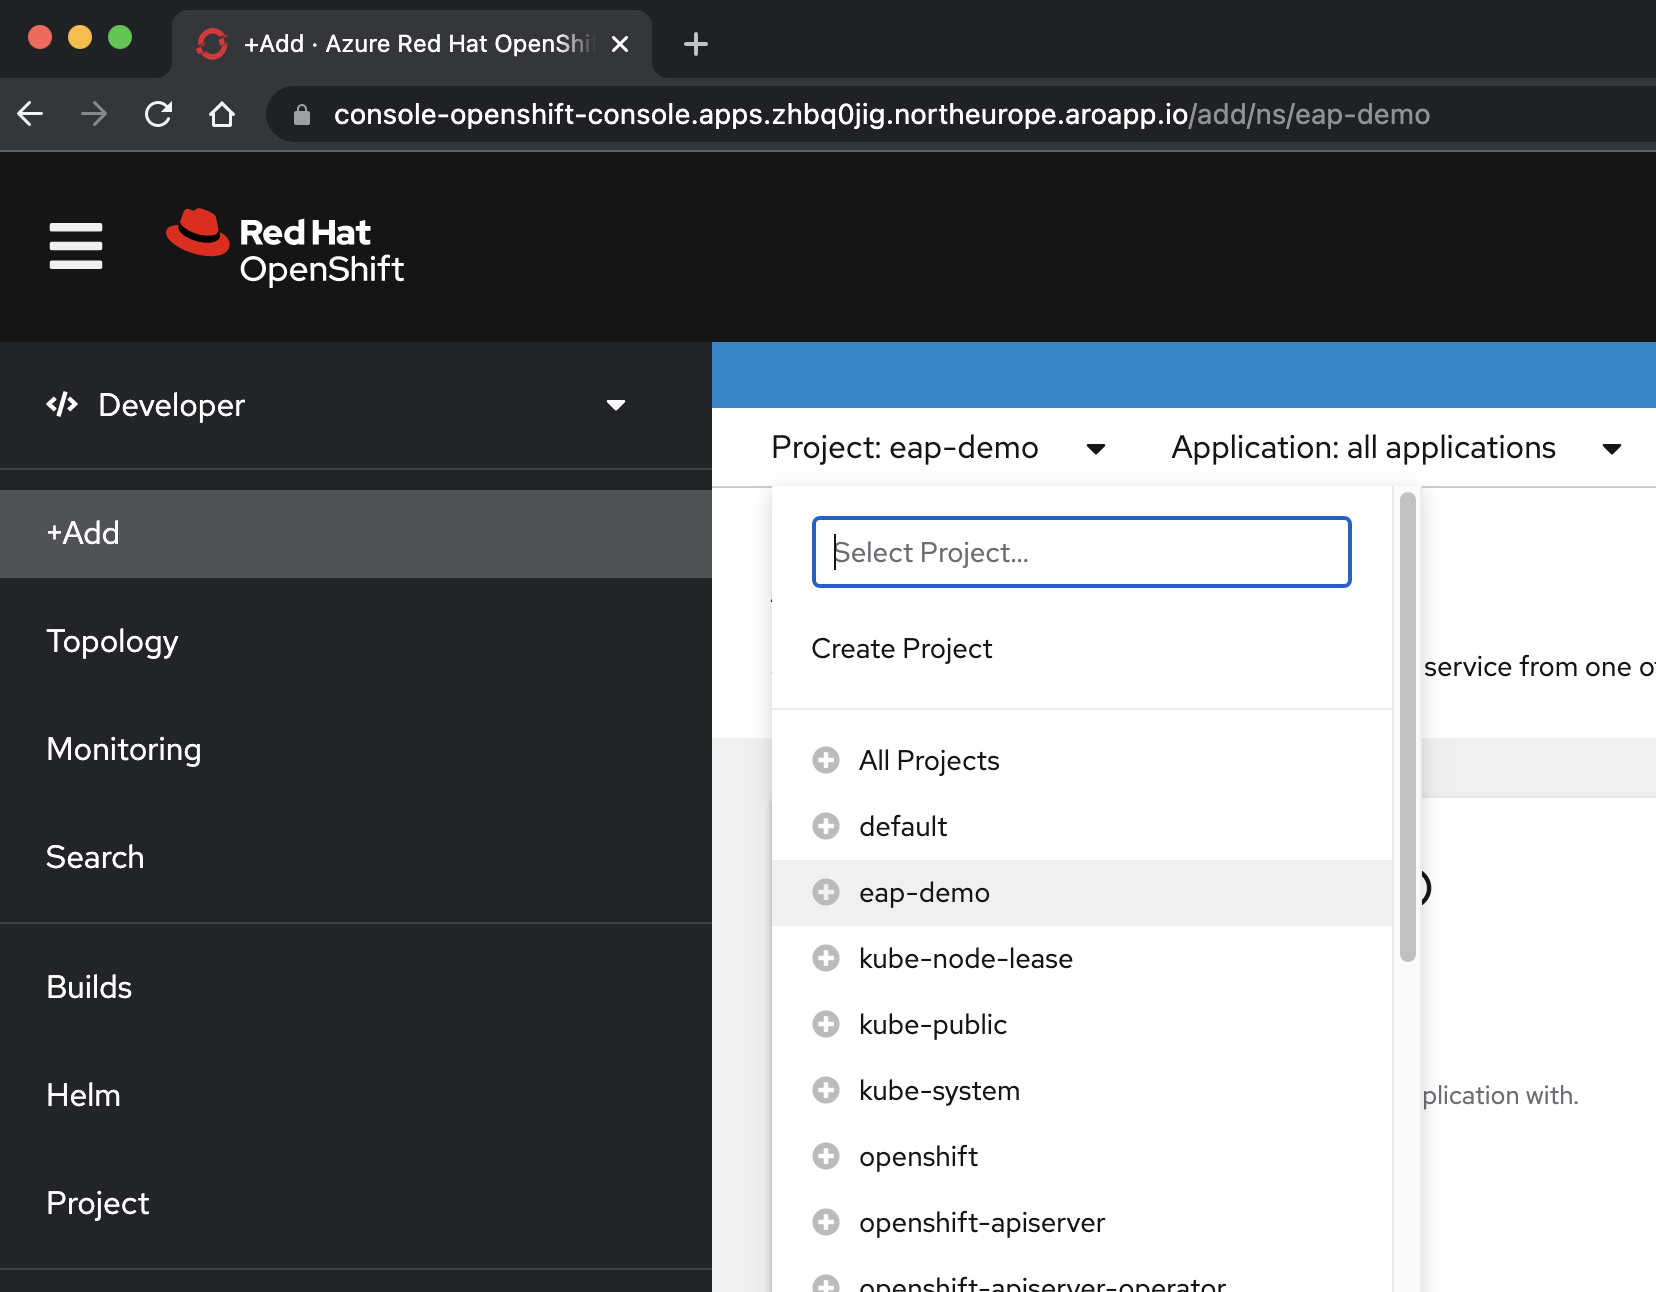
In the </> Developer perspective, select the eap-demo project from the Project drop-down menu.
Select +Add. In the Developer Catalog section, select Helm Chart. You arrive at the Helm Chart catalog available on your Azure Red Hat OpenShift cluster. In the Filter by keyword box, type eap. You should see several options, as shown here:
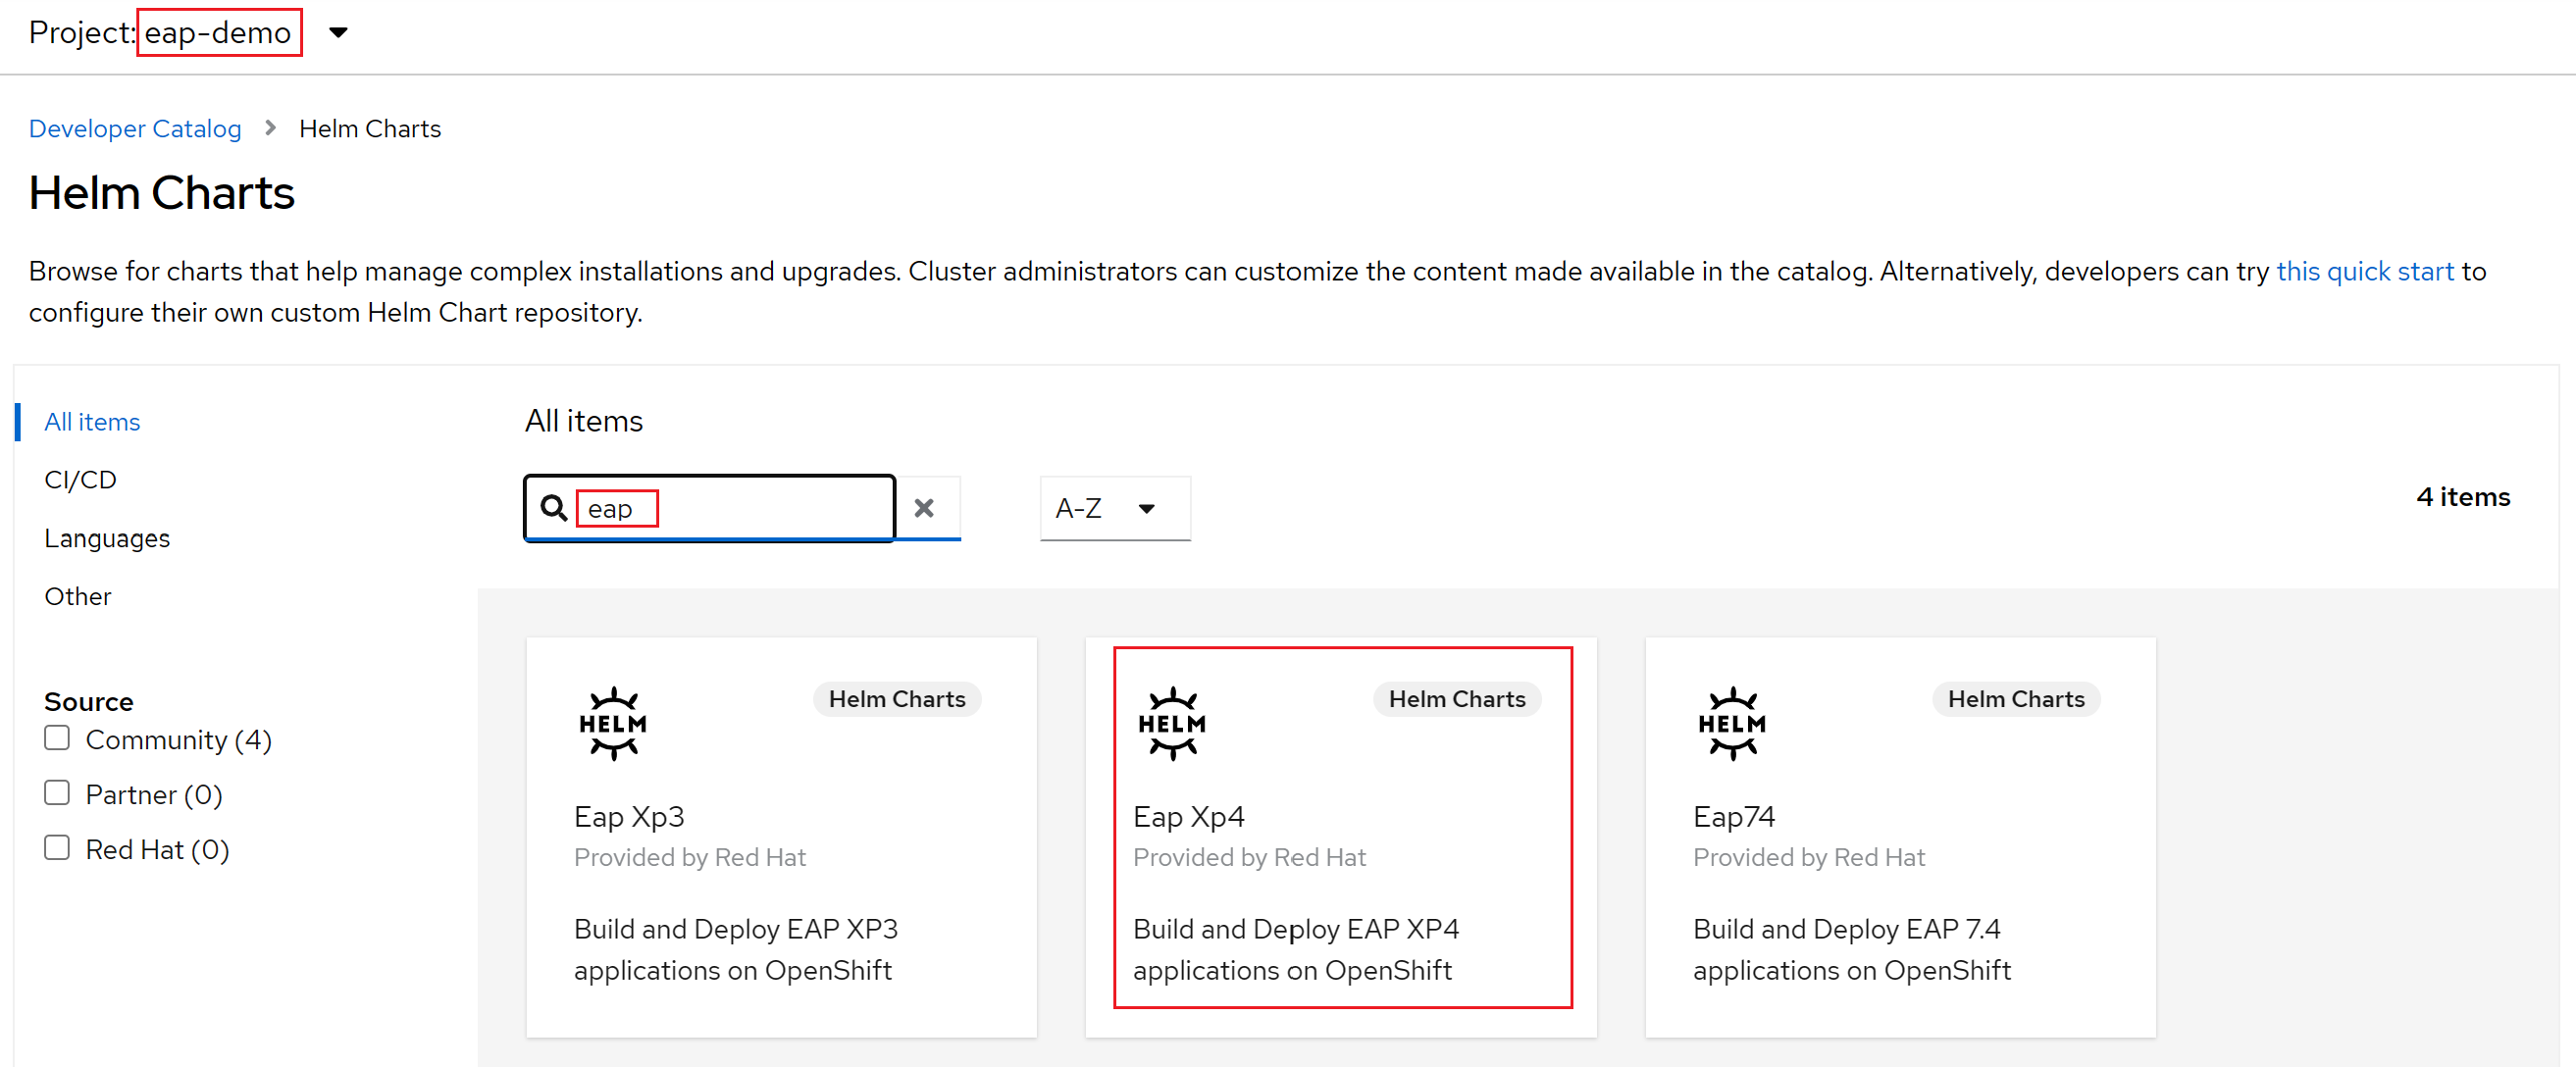
Because our application uses MicroProfile capabilities, we select the Helm Chart for EAP Xp. The "Xp" stands for Expansion Pack. With the JBoss Enterprise Application Platform expansion pack, developers can use Eclipse MicroProfile application programming interfaces (APIs) to build and deploy microservices-based applications.
Select the JBoss EAP XP 4 Helm Chart, and then select Install Helm Chart.
At this point, we need to configure the chart to build and deploy the application:
Change the name of the release to eap-todo-list-demo.
We can configure the Helm Chart either using a Form View or a YAML View. In the section labeled Configure via, select YAML View.
Change the YAML content to configure the Helm Chart by copying and pasting the content of the Helm Chart file available at deployment/application/todo-list-helm-chart.yaml instead of the existing content:
This content makes references to the secrets you set earlier.
Finally, select Install to start the application deployment. This action opens the Topology view with a graphical representation of the Helm release (named eap-todo-list-demo) and its associated resources.
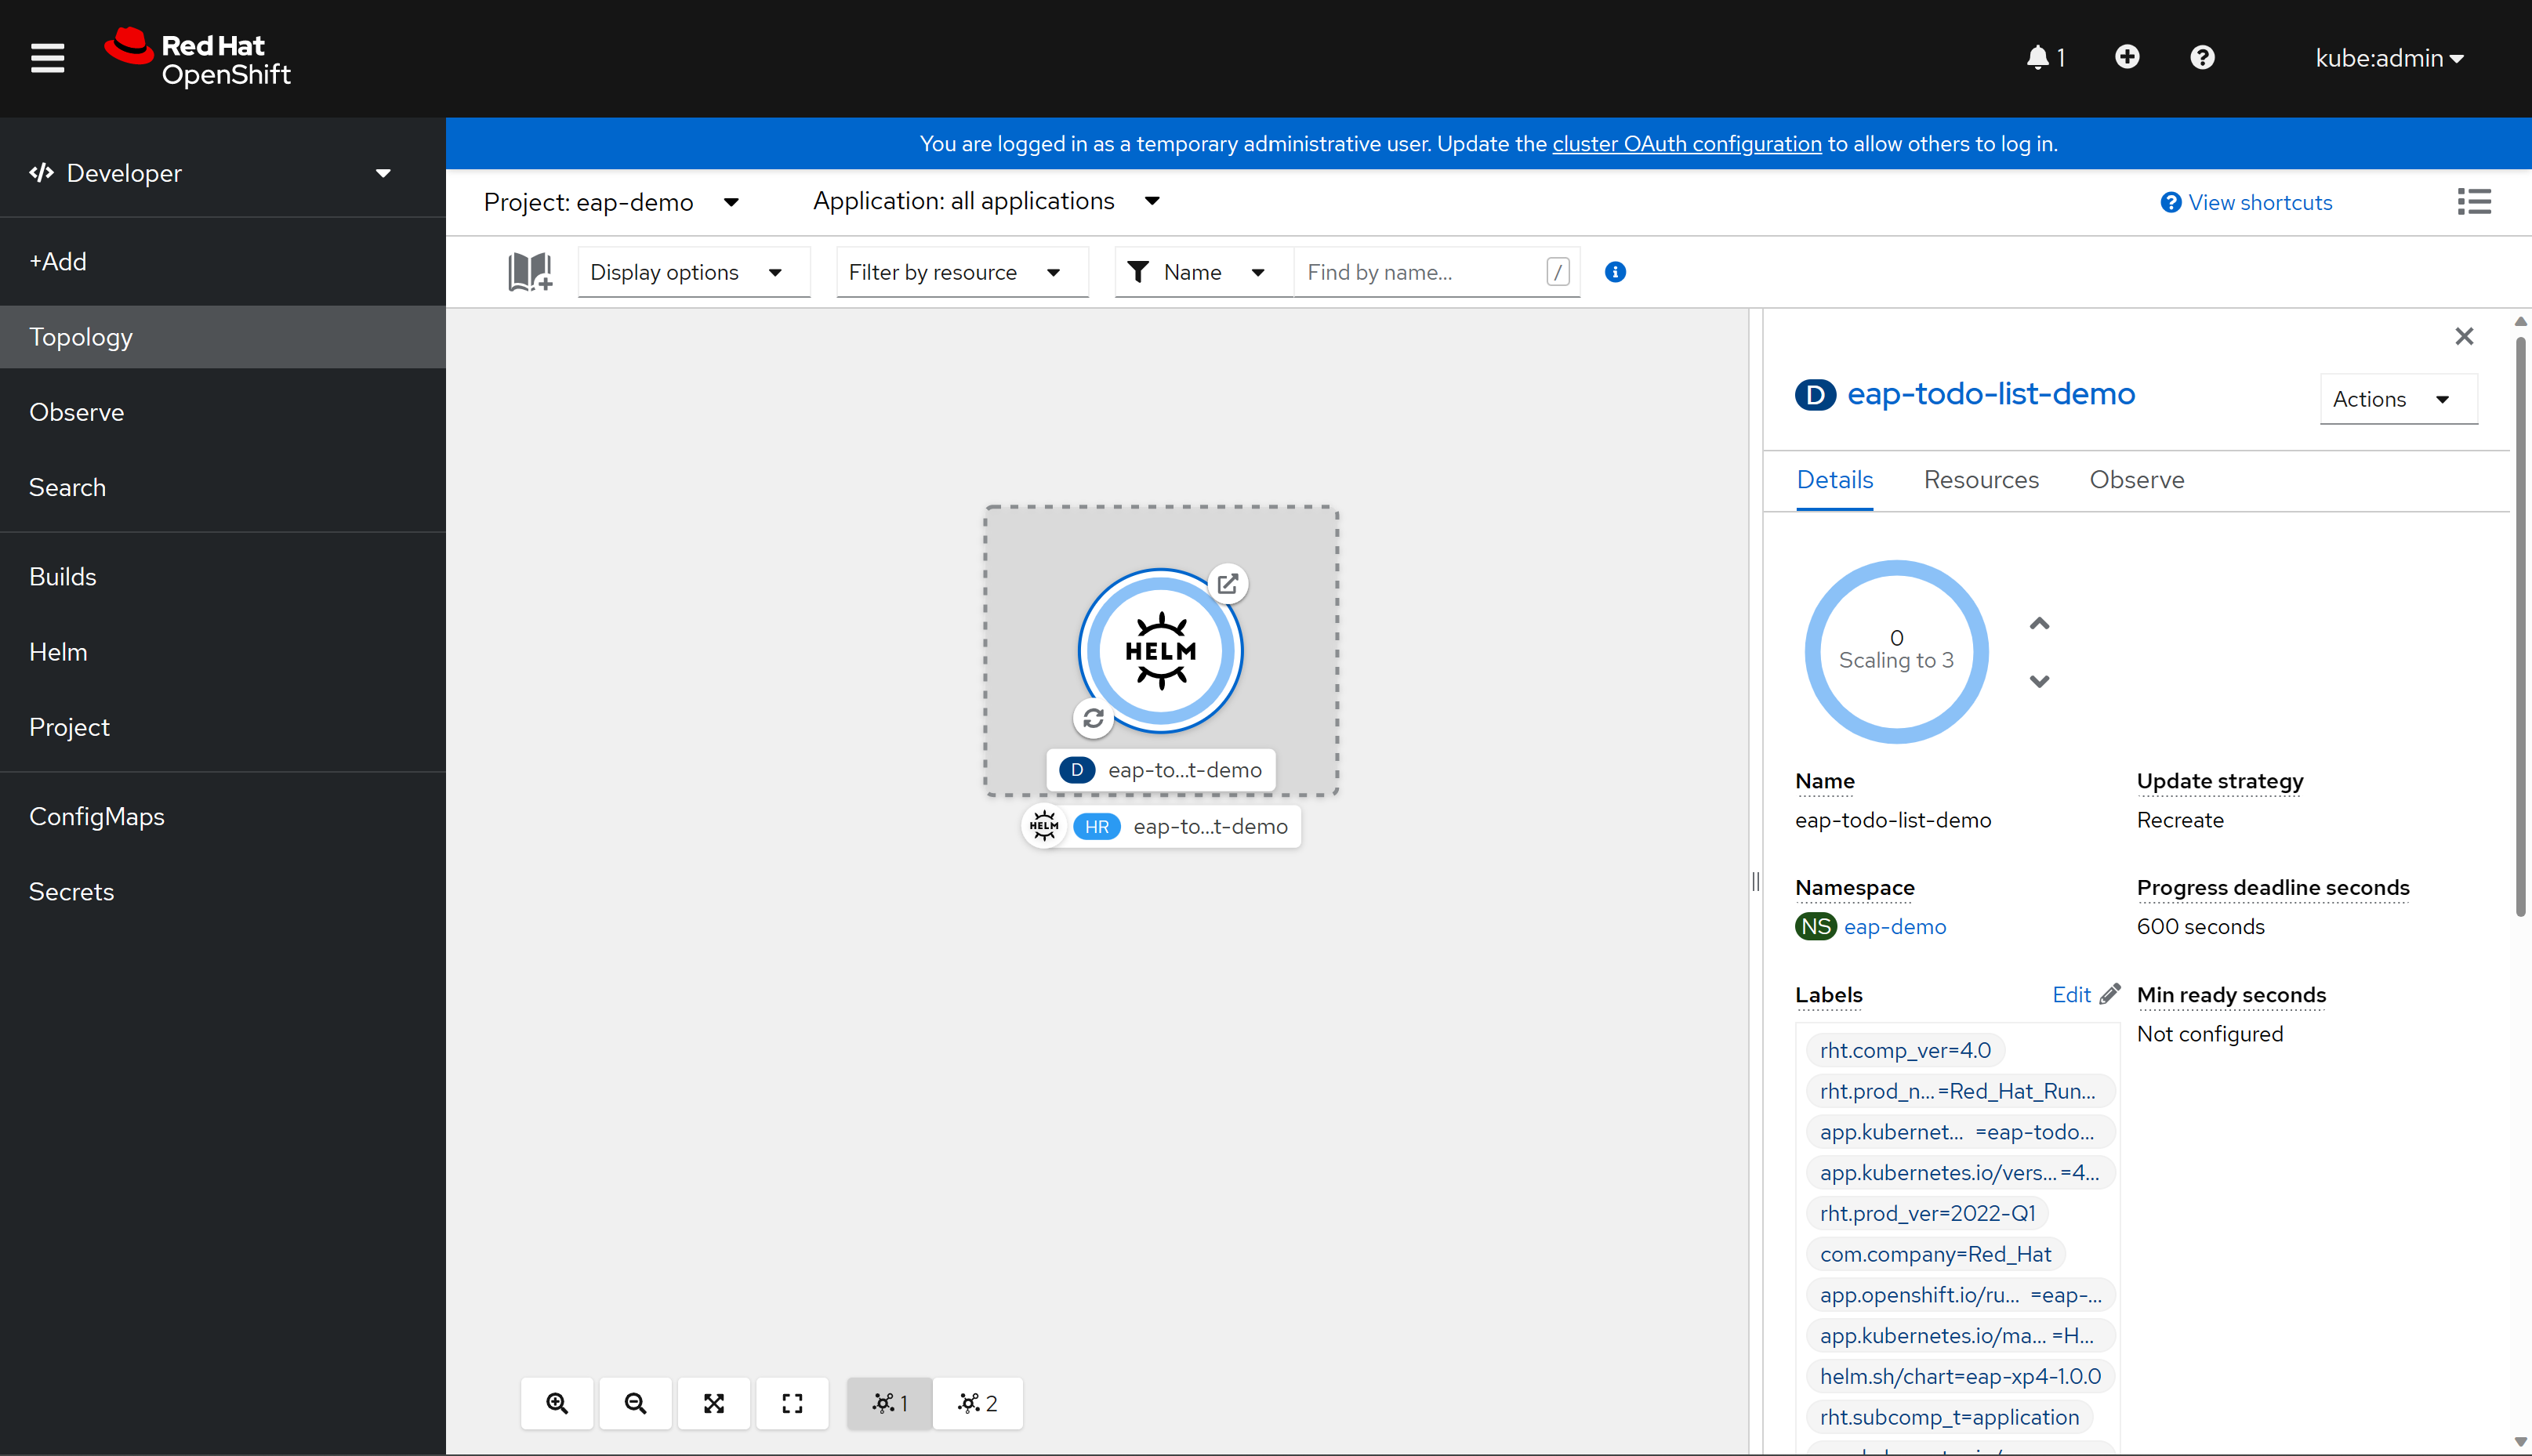
The Helm Release (abbreviated HR) is named eap-todo-list-demo. It includes a Deployment resource (abbreviated D) also named eap-todo-list-demo.
If you select the icon with two arrows in a circle at the lower left of the D box, you're taken to the Logs pane. Here you can observe the progress of the build. To return to the topology view, select Topology in the left navigation pane.
When the build is finished, the bottom-left icon displays a green check.
When the deployment is completed, the circle outline is dark blue. If you hover the mouse over the dark blue, you should see a message appear stating something similar to
3 Running. When you see that message, you can go to application the URL (using the top-right icon) from the route associated with the deployment.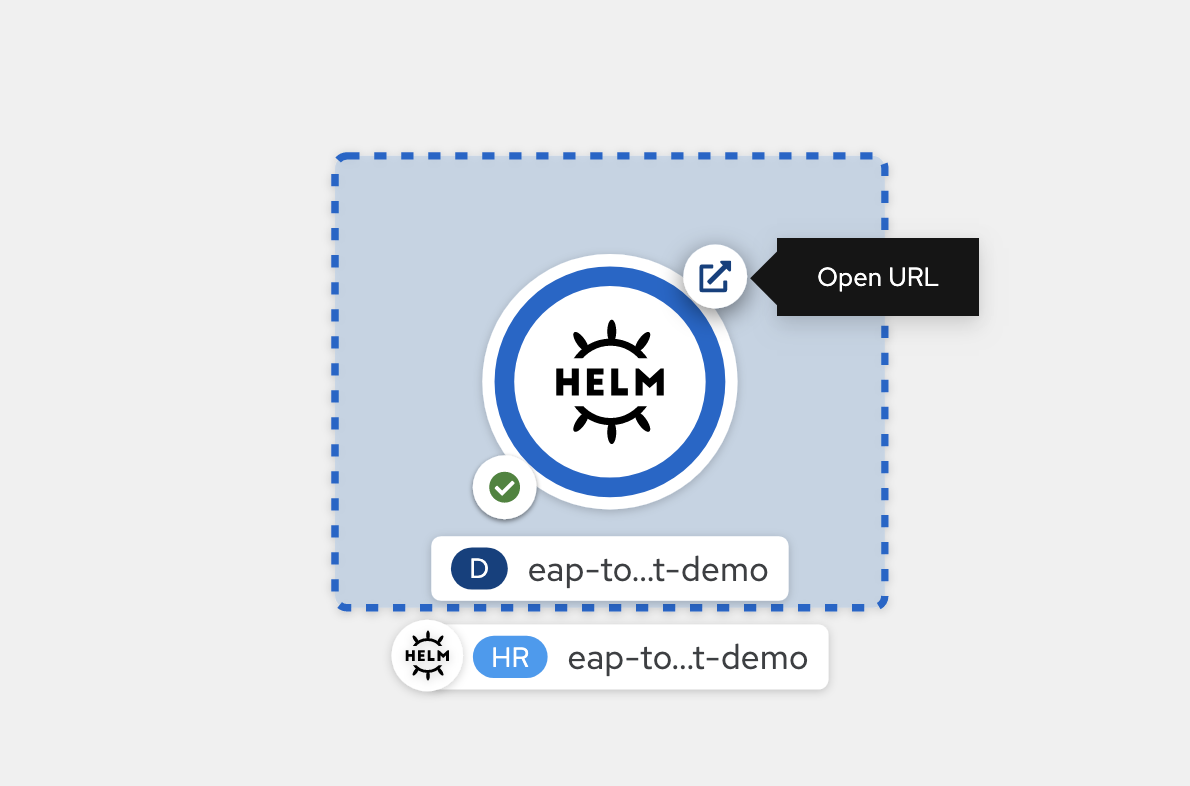
The application is opened in your browser looking similar to the following image ready to be used:
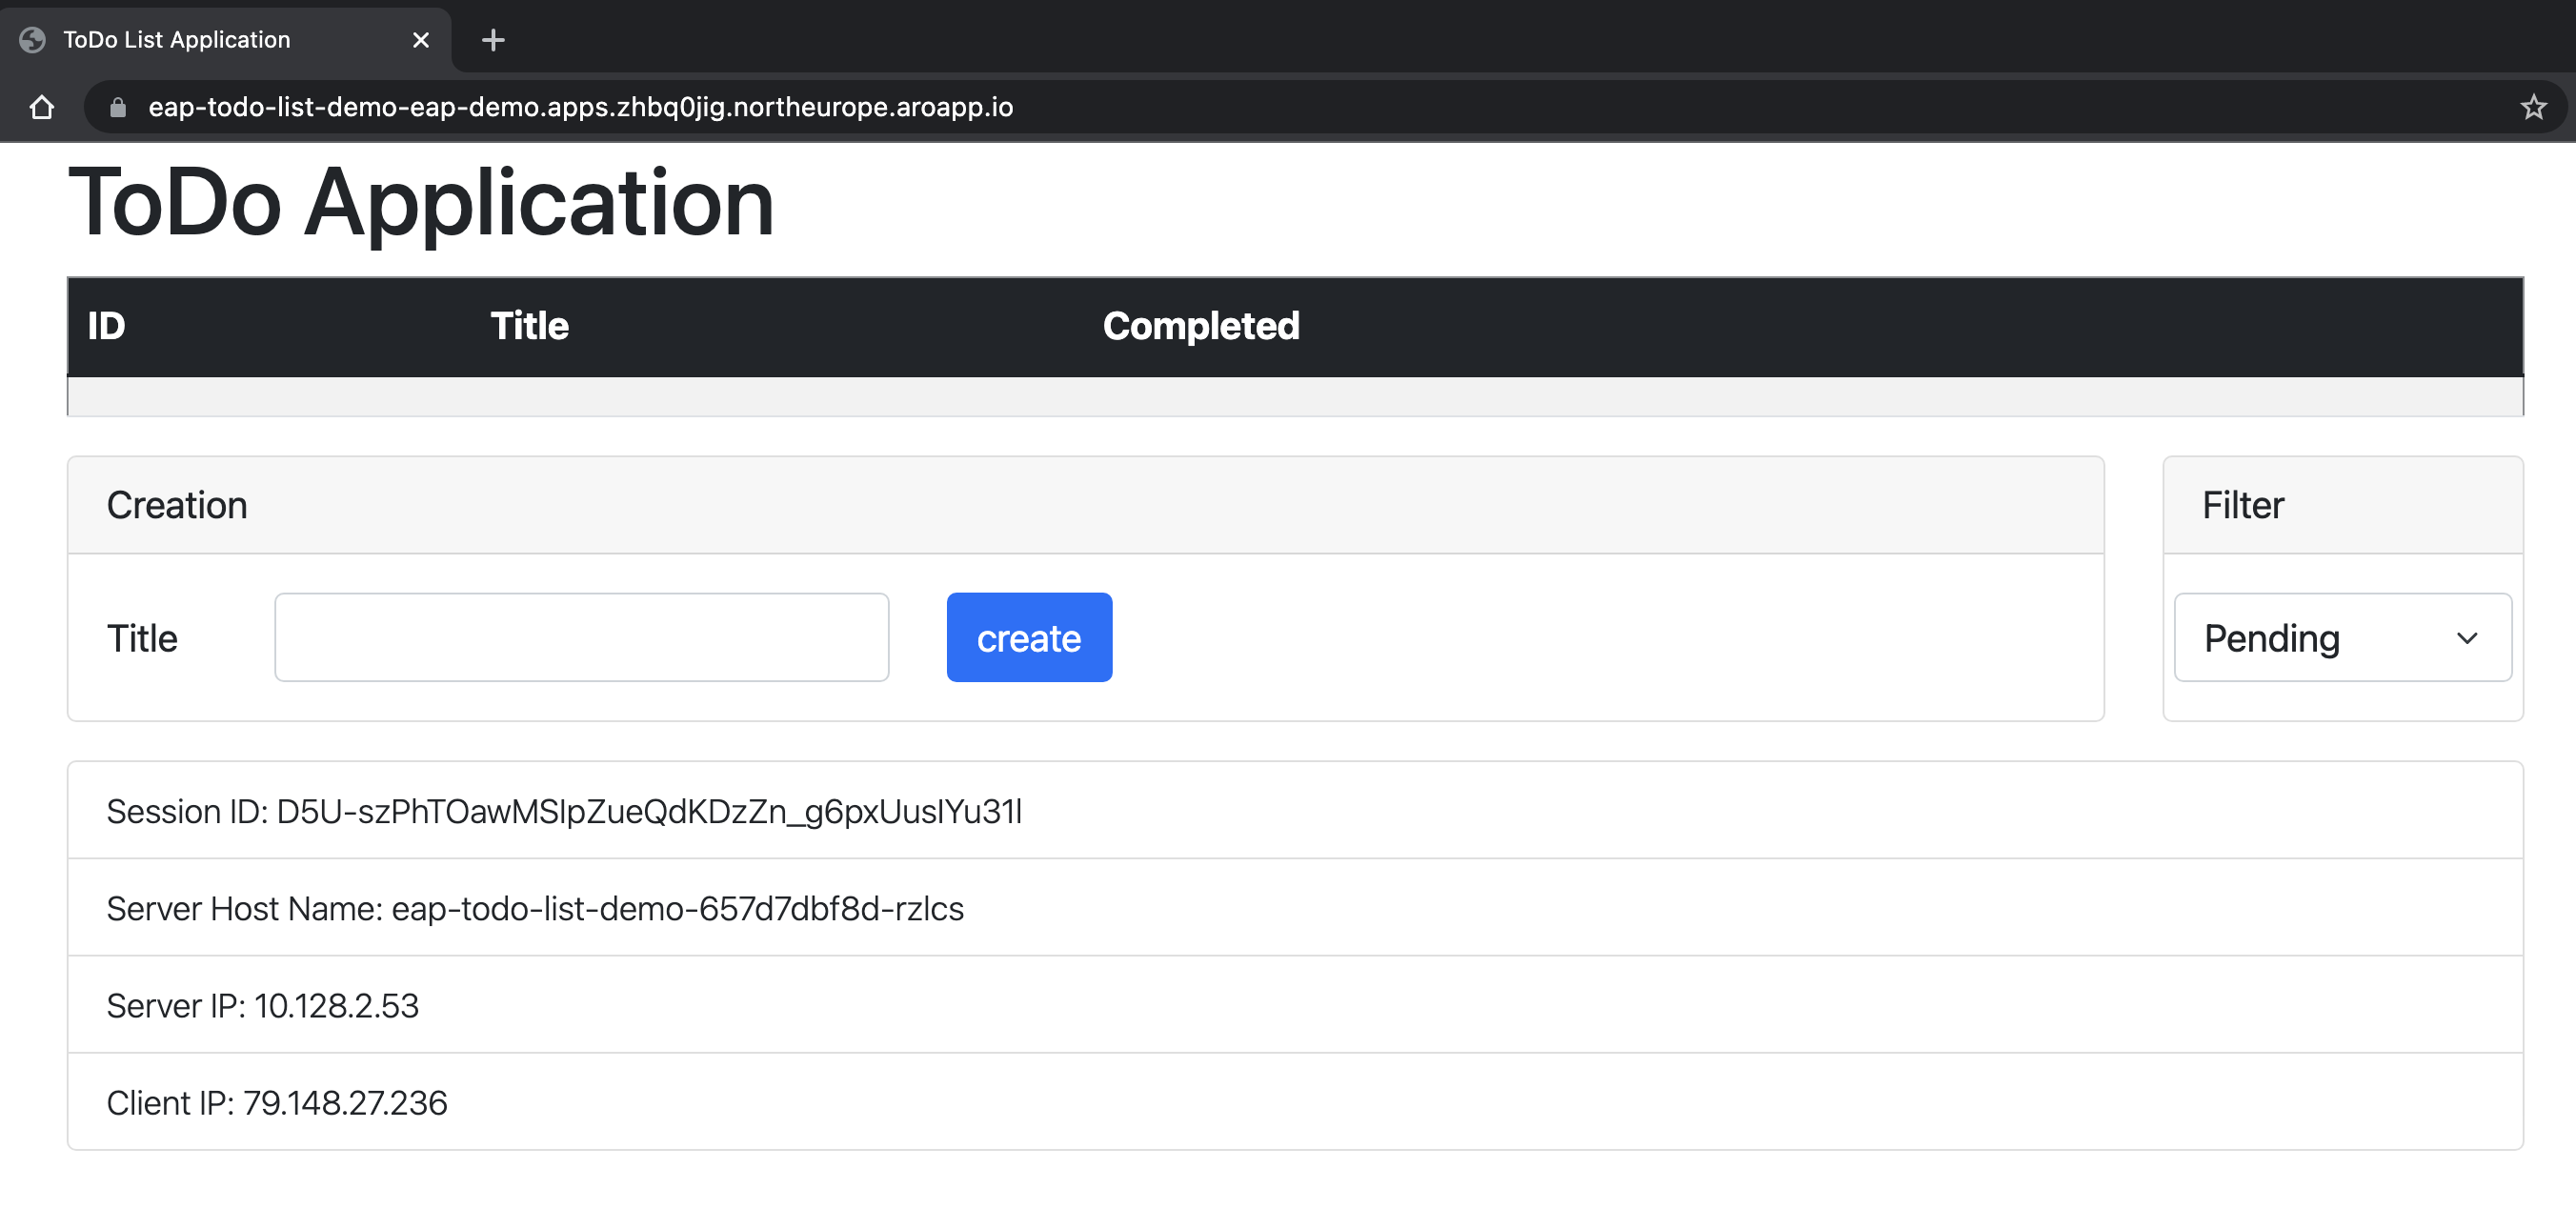
The application shows you the name of the pod that serves the information. To verify the clustering capabilities, you could add some Todo items. Then, delete the pod with the name indicated in the Server Host Name field that appears on the application by using
oc delete pod <pod-name>. After deleting the pod, create a new Todo on the same application window. You can see that the new Todo is added via an Ajax request and the Server Host Name field now shows a different name. Behind the scenes, the OpenShift load balancer dispatched the new request and delivered it to an available pod. The Jakarta Faces view is restored from the HTTP session copy stored in the pod that's processing the request. Indeed, you can see that the Session ID field didn't change. If the session isn't replicated across your pods, you get a Jakarta FacesViewExpiredException, and your application doesn't work as expected.
Clean up resources
Delete the application
If you only want to delete your application, you can open the OpenShift console and, at the developer view, navigate to the Helm menu option. On this menu, you can see all the Helm Chart releases installed on your cluster.
Locate the eap-todo-list-demo Helm Chart. At the end of the row, select the tree vertical dots to open the action contextual menu entry.
Select Uninstall Helm Release to remove the application. Notice that the secret object used to supply the application configuration isn't part of the chart. You need to remove it separately if you no longer need it.
Execute the following command if you want to delete the secret that holds the application configuration:
$ oc delete secrets/todo-list-secret
# secret "todo-list-secret" deleted
Delete the OpenShift project
You can also delete all the configuration created for this demo by deleting the eap-demo project. To do so, execute the following command:
$ oc delete project eap-demo
# project.project.openshift.io "eap-demo" deleted
Delete the Azure Red Hat OpenShift cluster
Delete the Azure Red Hat OpenShift cluster by following the steps in Tutorial: Delete an Azure Red Hat OpenShift 4 cluster.
Delete the resource group
If you want to delete all of the resources created by the preceding steps, delete the resource group you created for the Azure Red Hat OpenShift cluster.
Next steps
You can learn more from references used in this guide:
- Red Hat JBoss Enterprise Application Platform
- Azure Red Hat OpenShift
- JBoss EAP Helm Charts
- JBoss EAP Bootable JAR
Continue to explore options to run JBoss EAP on Azure.

