Manage columns on your board
Azure DevOps Services | Azure DevOps Server 2022 - Azure DevOps Server 2019
Managing columns on your board is essential for visualizing your team's workflow. Each column corresponds to a stage of work, such as "To do," "In progress," and "Done." You can customize these columns to match your specific process, while each card on the board represents a work item, such as a user story, bug, or task.
Note
- To manage columns on a sprint Taskboard, see Customize a Taskboard.
- To manage columns on a backlog or in query results, see Change column options.
Note
- To add columns to a Taskboard, you need to customize the workflow. For more information, see Add or modify a work item type.
- To add columns to a backlog or query results, see Change column options.
- For an overview of the features supported on each backlog and board, see Backlog, board, and plan views.
Prerequisites
- Access levels: You need Basic access or higher to fully utilize all backlog and board features. Users with Stakeholder access can edit work items on the board and add existing tags, but they can’t create new work items or update fields displayed on cards.
- Permissions: To configure team settings, you must be part of the Project Administrators security group or have the Team Administrator role. For more information, see Change project-level permissions.
- Access levels: You need Basic access or higher to fully utilize all backlog and board features. Users with Stakeholder access can edit work items on the board and add existing tags, but they can’t create new work items, update fields displayed on cards, or drag-and-drop work items to update status or reorder cards.
- Permissions: To configure team settings, you must be part of the Project Administrators security group or have the Team Administrator role. For more information, see Change project-level permissions.
To avoid revisiting your configuration, do the following tasks per role.
You should also review the following articles:
- Kanban board overview
- Configure and customize Azure Boards
- Set up your backlogs and boards
- Workflow states and state categories
Map workflow states
Your board uses the Work item type and State categories to group work items that you want handled in the same manner.
1. Identify your team's workflows
The following table lists example workflows and their descriptions, so you can identify your team's workflows.
| Workflow | Description |
|---|---|
| Backlog | Make a prioritized list of work items that the team isn't yet ready to work on. |
| Analyze | Identify well-understood and shared acceptance criteria, along with overall work required to develop and test the item. |
| Develop | Code and run unit tests for the item. |
| Test | Run exploratory, automated, integration, and other tests. |
| Done | Hand off to production because the item is ready. |
2. Familiarize yourself with work item types and boards
Familiarize yourself with the different work item types and their corresponding boards. Understanding where each type appears helps you manage your work effectively.
| Work item type category | Work items appear here |
|---|---|
| Requirement | Only on the product board. |
| Feature | Only on the Feature portfolio board. |
| Epic | Only on the Epic portfolio board. |
| Custom | Only on a custom portfolio board. |
Tip
We recommend that you map each workflow state to a column. If it’s not mapped, it doesn’t appear on the board.
3. Specify the workflow State
Specify the workflow State for each work item type (WIT) and column, using one of the following four categories:
| State category | Description |
|---|---|
| Proposed | The first board column is automatically mapped to the default state for each work item. |
| In Progress | Work flow state must be specified for each work item type and column. |
| Completed | Can only map to the last board column. |
| Removed | Workflow state doesn't need to be specified. |
Note
When you add bugs or other work items to a board, it might create new workflow states that require adjustments to column-to-state mappings in the following situations:
- When a team admin shows bugs on backlogs and boards.
- When a project admin adds work item types to backlogs and boards.
- When a project collection or project admin customizes the workflow for a work item type in the Requirement category using inherited process or on-premises XML process.
Add and edit columns
Column titles and choices depend on the process that you used to create your project and whether your team chose to treat bugs like requirements or like tasks.
Do the following steps to add and edit your columns:
Select Configure team settings
 to configure the board and set general team settings.
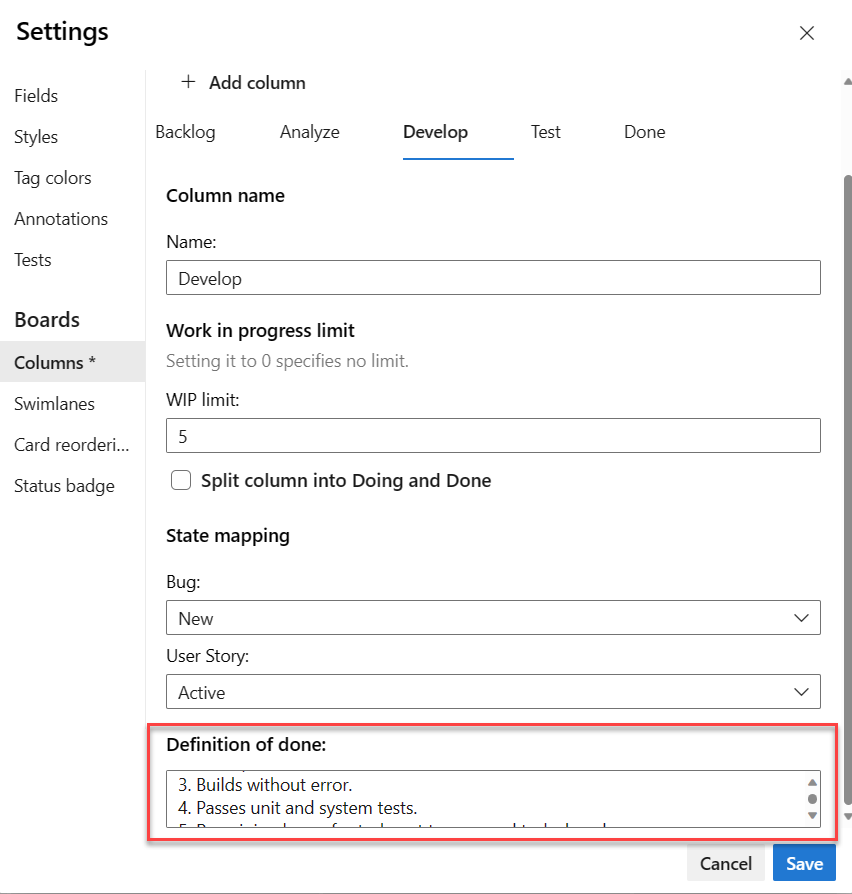
Select Columns and then a column tab to see all the settings that you can modify. Your initial column settings look similar to the settings shown in the following image.

Select from the following actions, as appropriate:
Rename your column titles to map to your workflow stages. You can add, rename, and move columns to support more stages. In the following examples, we rename the first three columns to Backlog, Analyze, and Develop and add a column labeled Test.
Rename a column directly from the board.

Or, you can open the dialog and change one or more settings for a column.

Change the column order by dragging the column tab to the position that you want.
Delete a column by first making sure that the column doesn't contain any work items and if it does, move the items to another column. Then, do the following steps:
- Open Settings and select Columns > Column options menu
 .
. - Select Remove from the menu.

- Open Settings and select Columns > Column options menu
Change state mappings as needed for added columns, added workflow states, or added WITs.
Update state mappings when you add columns, workflow states, or WITs, which is typically necessary when you change the Working with bugs setting, add WITs to the Requirement category, or customize the workflow.
Select Save.
Update status and handoff items
To update the status, drag-and-drop your work items. For example, to signal when work can start in a downstream stage, drag items to the next column.

You can move an item from one column to any other column on the board, forward and back. To hand off work to another team member, reassign it directly from the board.

Team members who receive the handoff can set alerts to get immediate email notifications of their newly assigned work.
Change your team's priorities
Drag an item up or down within a column.

Track column status
Use the query tool to list a subset of work items for review, triage, update, or chart generation. For example, you can create a query to list all active user stories (specify two clauses: Work Item Type=User Story and State=Active).
Specify WIP limits, split columns, and definition of done
Split columns
Each column represents a work stage, showing the number of items in progress. However, there’s often a lag between moving work into a column and starting it. To address this lag, enable split columns, which divide each column into "Doing" and "Done."

Split columns help your team implement a pull mechanism, providing visibility into idle items and improving workflow transparency.
Move items into the Doing and Done columns
With split columns enabled, update item statuses as usual. However, now when you complete work on an item, you move it into Done, instead of a downstream column. When you complete an item, move it to Done instead of a downstream column. The next team member pulls it into Doing and reassigns it to themselves when ready.
For example, after finishing a coding task, move it to Done under Develop. The tester then pulls it into Doing under Test when ready to start testing.

Identify bottlenecks
Split columns provide you even greater insight into how many items sit idle in a Done column. Your team can readily see when items pile up, which signal a potential bottleneck.

By reviewing the frequency of pile ups and where they occur, your team can adjust their processes to eliminate the bottlenecks. Workflow processes that incur no or few bottlenecks correspond to perfect flows. No item sits in a queue for any
Choose which columns you want to split
Before you split columns, ensure you mapped each stage of your team's process to a column. Only split columns where clear hand-offs exist and you want teams to pull the item into the next stage.
Open your board and choose the
gear icon to configure the board and set general team settings.
Choose Columns and then choose the column tab that you want to split. Add a check mark in the checkbox to cause the column to split.
Note
There are different column titles and choices based on the process used to create your project and whether your team chose to treat bugs like requirements or like tasks.

Select Save.
Tip
You can filter queries and create charts using the Board Column Done field.
List work items in a Doing or Done column
You can query for work items in a split column using the Board Column Done field. This field takes of a value of False when in the Doing column and True when in the Done column.
For examples on querying Board columns, see Query by assignment or workflow changes.
Add the Definition of Done to a column
When your team advances from one stage to the next in their work, it's crucial that they have a shared understanding of what constitutes as "Done." You can define the criteria for the Definition of Done in each column. By doing so, the team can identify the necessary tasks that need to be completed before advancing an item to the next stage. This task also implements one of the core tenets, make processes and policies explicit.
Team members can quickly double-check the criteria by choosing the Information tooltip  info icon.

Open your board.
Choose the
gear icon to configure the board and set general team settings.
Choose Columns and then a column tab to configure the Definition of Done for that column.
Select Save.
Do more tasks
In the following table, we list tasks and their associated articles, so you can do more with your board.
| Article | Task |
|---|---|
| Interactively filter backlogs, boards, queries, and plans | Filter your board to focus on select work based on assignment to a team member or sprint, tags, or parent feature. |
| Update status | Update workflow status through drag-and-drop operations. |
| Change priorities | Reorder cards to change priority of work items. |
| Customize cards | View and quickly assign values to key field. |
| Track board column status | Create queries and charts based on board columns. |
| View and configure a cumulative flow diagram | Review a cumulative flow diagram based on column assignments. |