Build, test, and deploy Android apps
Azure DevOps Services
This quickstart shows you how to set up a YAML pipeline in Azure Pipelines to automatically build, test, and deploy an Android app.
Prerequisites
An Azure DevOps organization and project where you have permission to create pipelines and deploy apps. To create a project, see Create a project in Azure DevOps.
A GitHub account.
Important
During GitHub procedures, you might be prompted to create a GitHub service connection or be redirected to GitHub to sign in, install Azure Pipelines, authorize Azure Pipelines, or authenticate to GitHub organizations. Follow the onscreen instructions to complete the process. For more information, see Access to GitHub repositories.
Create and run the pipeline
Do the following tasks to set up a pipeline for a simple Android application.
To get the code for the sample app, fork the Android sample app repository to your GitHub account.
In your Azure DevOps project, select Pipelines > New pipeline, or Create pipeline if this pipeline is the first in the project.
Select GitHub as the location of your source code.
On the Select a repository screen, select your forked Android sample repository.
On the Configure your pipeline screen, select Android.
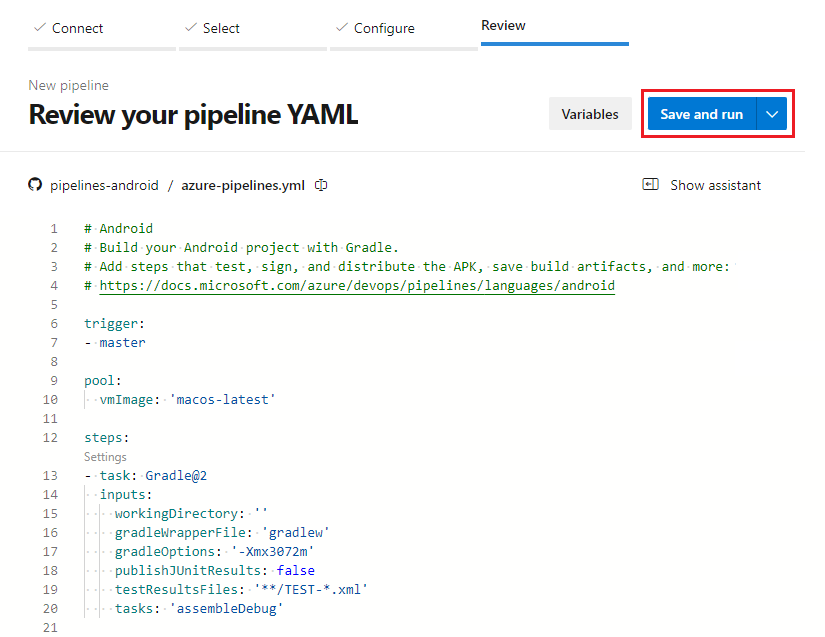
Azure Pipelines provides a starter pipeline based on the Android template. Review the pipeline code.
Select Save and run.
Optionally, edit the Commit message and provide a description. Then select Save and run again to commit the azure-pipelines.yml file to your repository and start a build.
The build run page shows build details and progress. If you want to watch your pipeline in action, select Job on the lower part of the page.
You now have a working Android YAML pipeline, azure-pipelines.yml, in your repository that's ready to customize.
Customize your pipeline
To make changes to your pipeline, select Edit on the pipeline page. The following sections describe some common ways to customize your Android pipeline.
Configure Gradle
The starter YAML pipeline uses Gradle, a common open-source build tool for Android projects. For more information, see the Gradle task.
In the example task, the tasks parameter builds the assembleDebug build type. You can adjust the tasks value for the build variants you want, such as build, test, and assembleRelease.
The example task also assumes that your gradlew file is at the root of the repository. If not, adjust the workingDirectory and gradleWrapperFile values accordingly.
The workingDirectory should be similar to the root of the repository, such as AndroidApps/MyApp or $(system.defaultWorkingDirectory)/AndroidApps/MyApp. The gradleWrapperFile path should be similar to the root of the repository, such as AndroidApps/MyApp/gradlew or $(system.defaultWorkingDirectory)/AndroidApps/MyApp/gradlew.
- task: Gradle@2
  inputs:
    workingDirectory: ''
    gradleWrapperFile: 'gradlew'
    gradleOptions: '-Xmx3072m'
    publishJUnitResults: false
    testResultsFiles: '**/TEST-*.xml'
    tasks: 'assembleDebug'
For more information about using Gradle tasks, see Using tasks in the Gradle documentation. For more information about build tasks, see Build a debug APK and Configure build variants in the Google Android development documentation.
Sign and align the Android package (APK)
To run on a device instead of an emulator, the Android Application Package (APK) must be signed. Zipaligning reduces the RAM the application consumes. If your build doesn't already sign and zipalign the APK, add the Android Signing task to the pipeline. For more information, see Sign a mobile app.
For security, store the jarsignerKeystorePassword and jarsignerKeyPassword in secret variables and use those variables in your pipeline.
- task: AndroidSigning@2
  inputs:
    apkFiles: '**/*.apk'
    jarsign: true
    jarsignerKeystoreFile: 'pathToYourKeystoreFile'
    jarsignerKeystorePassword: '$(jarsignerKeystorePassword)'
    jarsignerKeystoreAlias: 'yourKeystoreAlias'
    jarsignerKeyPassword: '$(jarsignerKeyPassword)'
    zipalign: true
Test on the Android emulator
To install and run the Android emulator, add the Bash task to your pipeline, and paste in the following code. The emulator starts as a background process and is available in later tasks. Arrange the emulator parameters to fit your testing environment.
#!/usr/bin/env bash

# Install AVD files
echo "y" | $ANDROID_HOME/cmdline-tools/latest/bin/sdkmanager --install 'system-images;android-27;google_apis;x86'

# Create emulator
echo "no" | $ANDROID_HOME/tools/bin/avdmanager create avd -n xamarin_android_emulator -k 'system-images;android-27;google_apis;x86' --force

$ANDROID_HOME/emulator/emulator -list-avds

echo "Starting emulator"

# Start emulator in background
nohup $ANDROID_HOME/emulator/emulator -avd xamarin_android_emulator -no-snapshot > /dev/null 2>&1 &
$ANDROID_HOME/platform-tools/adb wait-for-device shell 'while [[ -z $(getprop sys.boot_completed | tr -d '\r') ]]; do sleep 1; done; input keyevent 82'

$ANDROID_HOME/platform-tools/adb devices

echo "Emulator started"
Test on Azure-hosted devices
To test your app in a hosted lab of Android devices in the Visual Studio App Center, add the App Center Test task to your pipeline.
This task requires an App Center free trial account, which must be converted to paid after 30 days to continue to use the test lab. Sign up for an App Center account before you use this task.
The following example runs an App Center test suite. The task uses a service connection that you must set up.
For the complete task syntax and reference, see App Center Test task. For more information, see Using Azure DevOps for UI Testing.
- task: AppCenterTest@1
  inputs:
    appFile: path/myapp.ipa
    artifactsDirectory: '$(Build.ArtifactStagingDirectory)/AppCenterTest'
    frameworkOption: 'appium'
    appiumBuildDirectory: test/upload
    serverEndpoint: 'My App Center service connection'
    appSlug: username/appIdentifier
    devices: 'devicelist'
Keep artifacts with the build record
To store your APK file with the build record or test and deploy it in subsequent pipelines, add the Copy Files and Publish Build Artifacts tasks to your pipeline. For more information, see Publish and download pipeline artifacts.
- task: CopyFiles@2
  inputs:
    contents: '**/*.apk'
    targetFolder: '$(build.artifactStagingDirectory)'
- task: PublishBuildArtifacts@1
  inputs:
    pathToPublish: $(Build.ArtifactStagingDirectory)
    artifactName: MyBuildOutputs
Deploy to App Center
To distribute an app to a group of testers or beta users, or promote the app to Intune or Google Play, add the App Center Distribute task. The task requires a free App Center account that remains free of charge.
The following example distributes an app to users. For the complete task syntax and reference, see App Center Distribute. For more information, see Deploy Azure DevOps Builds with App Center.
- task: AppCenterDistribute@3
  inputs:
    serverEndpoint: 'AppCenter'
    appSlug: '$(APP_CENTER_SLUG)'
    appFile: '$(APP_FILE)' # Relative path from the repo root to the APK file you want to publish
    symbolsOption: 'Android'
    releaseNotesOption: 'input'
    releaseNotesInput: 'Here are the release notes for this version.'
    destinationType: 'groups'
Install the Google Play extension and deploy to Google Play
To automate interaction with Google Play, install the Google Play extension and then use the following tasks. By default, these tasks authenticate to Google Play by using a service connection that you must configure.
Release
To release a new Android app version to the Google Play store, add the Google Play Release task to your pipeline.
- task: GooglePlayRelease@4
  inputs:
    apkFile: '**/*.apk'
    serviceEndpoint: 'yourGooglePlayServiceConnectionName'
    track: 'internal'
Promote
To promote a previously released Android application update from one track to another, such as alpha → beta, add the Google Play Promote task to your pipeline.
- task: GooglePlayPromote@3
  inputs:
    packageName: 'com.yourCompany.appPackageName'
    serviceEndpoint: 'yourGooglePlayServiceConnectionName'
    sourceTrack: 'internal'
    destinationTrack: 'alpha'
Increase rollout
To increase the rollout percentage of an application that was previously released to the rollout track, add the Google Play Increase Rollout task to your pipeline.
- task: GooglePlayIncreaseRollout@2
  inputs:
    packageName: 'com.yourCompany.appPackageName'
    serviceEndpoint: 'yourGooglePlayServiceConnectionName'
    userFraction: '0.5' # 0.0 to 1.0 (0% to 100%)
Update status
To update the rollout status for an application that was previously released to the rollout track, add the Google Play Status Update task to your pipeline.
  - task: GooglePlayStatusUpdate@2
    inputs:
      authType: ServiceEndpoint
      packageName: 'com.yourCompany.appPackageName'
      serviceEndpoint: 'yourGooglePlayServiceConnectionName'
      status: 'inProgress' # draft | inProgress | halted | completed
Create an app bundle
You can build and sign an app bundle with an inline script and a secure file.
Download your keystore and store it as a secure file in the Azure Pipelines library.
Create variables for
keystore.password,key.alias, andkey.passwordin a variable group.
In your YAML pipeline:
Add the Download Secure File task to download the app.keystore secure file.
- task: DownloadSecureFile@1
  name: keyStore
  displayName: "Download keystore from secure files"
  inputs:
    secureFile: app.keystore
Use the Bash task with a Bash script to build and sign the app bundle.
- task: Bash@3
  displayName: "Build and sign App Bundle"
  inputs:
    targetType: "inline"
    script: |
      msbuild -restore $(Build.SourcesDirectory)/myAndroidApp/*.csproj -t:SignAndroidPackage -p:AndroidPackageFormat=aab -p:Configuration=$(buildConfiguration) -p:AndroidKeyStore=True -p:AndroidSigningKeyStore=$(keyStore.secureFilePath) -p:AndroidSigningStorePass=$(keystore.password) -p:AndroidSigningKeyAlias=$(key.alias) -p:AndroidSigningKeyPass=$(key.password)
Use the Copy Files task to copy the app bundle.
- task: CopyFiles@2
  displayName: 'Copy deliverables'
  inputs:
    SourceFolder: '$(Build.SourcesDirectory)/myAndroidApp/bin/$(buildConfiguration)'
    Contents: '*.aab'
    TargetFolder: 'drop'
From here, you can either create and save an artifact with the Publish Build Artifact task or use the Google Play extension to publish the app bundle.
Related extensions
- Codified Security from Codified Security
- Google Play from Microsoft
- Mobile App Tasks for iOS and Android from James Montemagno
- Mobile Testing Lab from Perfecto Mobile
- React Native from Microsoft