Connect to Azure by using an Azure Resource Manager service connection
Azure DevOps Services | Azure DevOps Server 2022 - Azure DevOps Server 2019
You can use an Azure Resource Manager service connection to connect to Azure resources such as Azure Key Vault. If you use a Resource Manager service connection, you can use a pipeline to deploy to an Azure resource like an Azure App Service app without authenticating each time.
You have authentication multiple options for connecting to Azure by using Azure Resource Manager service connections:
- Service principal with workload identity federation
- Service principal with secret
- System-assigned managed identity
- Public profile
The service connection uses a service principal to authenticate with Azure resources.
Create an Azure Resource Manager service connection that uses workload identity federation
Workload identity federation uses OpenID Connect (OIDC) to authenticate with Microsoft Entra protected resources without using secrets. You can automatically create the workload identity federation for authentication or manually create it.
We recommend that you use this approach if all the following items are true for your scenario:
- You have the Owner role for your Azure subscription.
- You're not connecting to the Azure Stack or the Azure US Government environments.
- Any Marketplace extensions tasks that you use are updated to support workload identity federation.
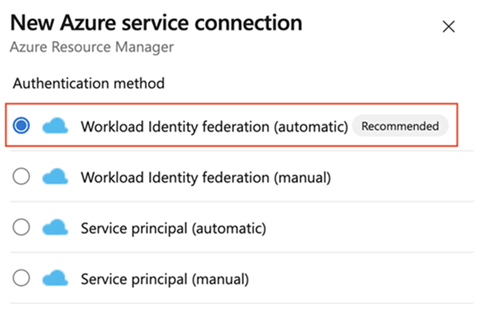
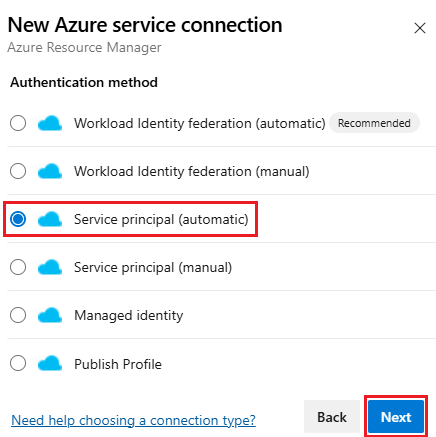
Create a service connection with workload identity federation (automatic)
With this selection, Azure DevOps automatically queries for the subscription, management group, or Machine Learning workspace that you want to connect to and creates a workload identity federation for authentication.
In the Azure DevOps project, go to Project settings > Service connections.
For more information, see Open project settings.
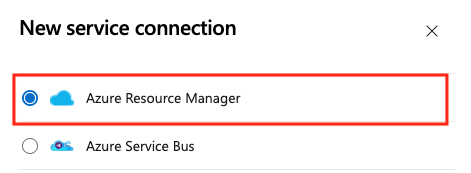
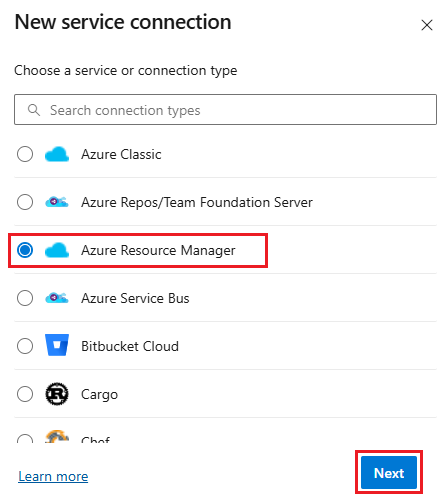
Select New service connection, then select Azure Resource Manager and Next.
Select Workload identity federation (automatic) and Next.
Select a Scope level. Select Subscription, Management Group, or Machine Learning Workspace. Management groups are containers that help you manage access, policy, and compliance across multiple subscriptions. A Machine Learning Workspace is place to create machine learning artifacts.
For the Subscription scope, enter the following parameters:
Parameter Description Subscription Required. Select the Azure subscription. Resource group Required. Enter the Azure subscription name. For the Management Group scope, select the Azure management group.
For the Machine Learning Workspace scope, enter the following parameters:
Parameter Description Subscription Required. Select the Azure subscription. Resource Group Required. Select the resource group containing the workspace. Machine Learning Workspace Required. Select the Azure Machine Learning workspace.
Enter a Service connection name.
Optionally, enter a description for the service connection.
Select Grant access permission to all pipelines to allow all pipelines to use this service connection. If you don't select this option, you must manually grant access to each pipeline that uses this service connection.
Select Save.
After the new service connection is created, copy the connection name and paste it into your code as the value for azureSubscription.
To deploy to a specific Azure resource, the task needs more data about that resource. Go to the resource in the Azure portal, and then copy the data into your code. For example, to deploy a web app, copy the name of the Azure App Service app and paste it into your code as the value for WebAppName.
Create service connection with workload identity federation (manual)
Use this option to manually create a service connection that uses an existing workload identity federation for authentication.
In the Azure DevOps project, go to Project settings > Service connections.
For more information, see Open project settings.
Select New service connection, then select Azure Resource Manager and Next.
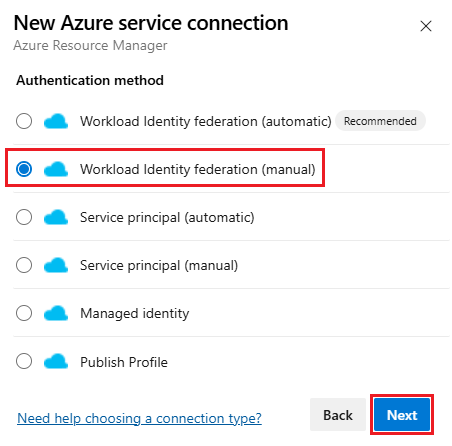
Select Workload identity federation (manual) and Next.
In Step 1: Basics:
- Enter a Service connection name
- Optionally, enter a Description.
- Select Grant access permission to all pipelines to allow all pipelines to use this service connection. If you don't select this option, you must manually grant access to each pipeline that uses this service connection.
- Select Next.
In Step 2: Service Principal Details:
Step 2: Service Principal Details contains the following parameters. You can enter or select the following parameters:
Parameter Description Issuer Required. DevOps automatically creates the issuer URL is automatically created Subject identifier Required. DevOps automatically creates the subject identifier. Environment Required. Choose a cloud environment to connect to. If you select Azure Stack, enter the environment URL, which is something like https://management.local.azurestack.external.Select the Scope Level. Select Subscription, Management Group, or Machine Learning Workspace. Management groups are containers that help you manage access, policy, and compliance across multiple subscriptions. A Machine Learning Workspace is place to create machine learning artifacts.
For the Subscription scope, enter the following parameters:
Parameter Description Subscription Id Required. Enter the Azure subscription ID. Subscription Name Required. Enter the Azure subscription name. For the Management Group scope, enter the following parameters:
Parameter Description Management Group Id Required. Enter the Azure management group ID. Management Group Name Required. Enter the Azure management group name. For the Machine Learning Workspace scope, enter the following parameters:
Parameter Description Subscription Id Required. Enter the Azure subscription ID. Subscription Name Required. Enter the Azure subscription name. Resource Group Required. Select the resource group containing the workspace. ML Workspace Name Required. Enter the name of the existing Azure Machine Learning workspace. ML Workspace Location Required. Enter the location of the existing Azure Machine Learning workspace.
In the Authentication section, enter or select the following parameters:
Parameter Description Service Principal Id Required. Enter the service principal ID. Tenant Id Required. Enter the tenant ID. In the Details section, enter the following parameters:
Parameter Description Connection Name Required. The name that you use to refer to this service connection in task properties. Not the name of your Azure subscription. Description Optional. Enter a description of the service connection. In the Security section, select Grant access permission to all pipelines to allow all pipelines to use this service connection. If you don't select this option, you must manually grant access to each pipeline that uses this service connection.
Select Verify and save to validate and create the service connection.
After the new service connection is created, copy the connection name and paste it into your code as the value for azureSubscription.
To deploy to a specific Azure resource, the task needs more data about that resource. Go to the resource in the Azure portal, and then copy the data into your code. For example, to deploy a web app, copy the name of the Azure App Service app and paste it into your code as the value for WebAppName.
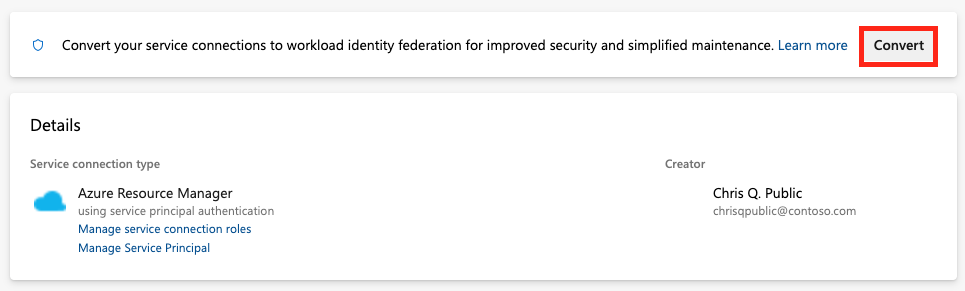
Convert an existing Azure Resource Manager service connection to use workload identity federation
You can quickly convert an existing Azure Resource Manager service connection to use workload identity federation for authentication instead of a service principal. You can use the service connection conversion tool in Azure DevOps if your service connection meets these requirements:
- Azure DevOps originally created the service connection. If you manually create your service connection, you can't convert the service connection by using the service connection conversion tool because Azure DevOps doesn't have permissions to modify its own credentials.
- Only one project uses the service connection. You can't convert cross-project service connections.
To convert a service connection:
In the Azure DevOps project, go to Project settings > Service connections.
For more information, see Open project settings.
Select the service connection that you want to convert to use workload identity.
Select Convert.
If you have an existing service principal credential with an expired secret, you see a different option to convert.

Select Convert again to confirm that you want to create a new service connection.
The conversion might take a few minutes. If you want to revert the connection, you must revert it within seven days.
Convert multiple Azure Resource Manager service connections with a script
Use a script to update multiple service connections at once to now use workload identity federation for authentication.
This example PowerShell script requires two parameters: Azure DevOps organization (example: https://dev.azure.com/fabrikam-tailspin) and Azure DevOps project (example: Space game web agent). The script then retrieves the associated service connections for your Azure DevOps project and organization.
When converting service connections to use workload identity federation, you are prompted to confirm the update for each connection not already using it. Upon confirmation, the script updates these service connections via the Azure DevOps REST API to utilize workload identity federation.
The script requires PowerShell 7.3 or newer and Azure CLI to run. Save the script to a .ps1 file and run it using PowerShell 7.
#!/usr/bin/env pwsh
<#
.SYNOPSIS
    Convert multiple Azure Resource Manager service connection(s) to use Workload identity federation

.LINK
    https://aka.ms/azdo-rm-workload-identity-conversion

.EXAMPLE
    ./convert_azurerm_service_connection_to_oidc_simple.ps1 -Project <project> -OrganizationUrl https://dev.azure.com/<organization>
#>

#Requires -Version 7.3

param (
    [parameter(Mandatory=$true,HelpMessage="Name of the Azure DevOps Project")]
    [string]
    [ValidateNotNullOrEmpty()]
    $Project,

    [parameter(Mandatory=$true,HelpMessage="Url of the Azure DevOps Organization")]
    [uri]
    [ValidateNotNullOrEmpty()]
    $OrganizationUrl
)
$apiVersion = "7.1"
$PSNativeCommandArgumentPassing = "Standard"

#-----------------------------------------------------------
# Log in to Azure
$azdoResource = "499b84ac-1321-427f-aa17-267ca6975798" # application id of Azure DevOps
az login --allow-no-subscriptions --scope ${azdoResource}/.default
$OrganizationUrl = $OrganizationUrl.ToString().Trim('/')

#-----------------------------------------------------------
# Retrieve the service connection
$getApiUrl = "${OrganizationUrl}/${Project}/_apis/serviceendpoint/endpoints?authSchemes=ServicePrincipal&type=azurerm&includeFailed=false&includeDetails=true&api-version=${apiVersion}"
az rest --resource $azdoResource -u "${getApiUrl} " -m GET --query "sort_by(value[?authorization.scheme=='ServicePrincipal' && data.creationMode=='Automatic' && !(isShared && serviceEndpointProjectReferences[0].projectReference.name!='${Project}')],&name)" -o json `
        | Tee-Object -Variable rawResponse | ConvertFrom-Json | Tee-Object -Variable serviceEndpoints | Format-List | Out-String | Write-Debug
if (!$serviceEndpoints -or ($serviceEndpoints.count-eq 0)) {
    Write-Warning "No convertible service connections found"
    exit 1
}

foreach ($serviceEndpoint in $serviceEndpoints) {
    # Prompt user to confirm conversion
    $choices = @(
        [System.Management.Automation.Host.ChoiceDescription]::new("&Convert", "Converting service connection '$($serviceEndpoint.name)'...")
        [System.Management.Automation.Host.ChoiceDescription]::new("&Skip", "Skipping service connection '$($serviceEndpoint.name)'...")
        [System.Management.Automation.Host.ChoiceDescription]::new("&Exit", "Exit script")
    )
    $prompt = $serviceEndpoint.isShared ? "Convert shared service connection '$($serviceEndpoint.name)'?" : "Convert service connection '$($serviceEndpoint.name)'?"
    $decision = $Host.UI.PromptForChoice([string]::Empty, $prompt, $choices, $serviceEndpoint.isShared ? 1 : 0)

    if ($decision -eq 0) {

        Write-Host "$($choices[$decision].HelpMessage)"
    } elseif ($decision -eq 1) {
        Write-Host "$($PSStyle.Formatting.Warning)$($choices[$decision].HelpMessage)$($PSStyle.Reset)"
        continue
    } elseif ($decision -ge 2) {
        Write-Host "$($PSStyle.Formatting.Warning)$($choices[$decision].HelpMessage)$($PSStyle.Reset)"
        exit
    }

    # Prepare request body
    $serviceEndpoint.authorization.scheme = "WorkloadIdentityFederation"
    $serviceEndpoint.data.PSObject.Properties.Remove('revertSchemeDeadline')
    $serviceEndpoint | ConvertTo-Json -Depth 4 | Write-Debug
    $serviceEndpoint | ConvertTo-Json -Depth 4 -Compress | Set-Variable serviceEndpointRequest
    $putApiUrl = "${OrganizationUrl}/${Project}/_apis/serviceendpoint/endpoints/$($serviceEndpoint.id)?operation=ConvertAuthenticationScheme&api-version=${apiVersion}"
    # Convert service connection
    az rest -u "${putApiUrl} " -m PUT -b $serviceEndpointRequest --headers content-type=application/json --resource $azdoResource -o json `
            | ConvertFrom-Json | Set-Variable updatedServiceEndpoint

    $updatedServiceEndpoint | ConvertTo-Json -Depth 4 | Write-Debug
    if (!$updatedServiceEndpoint) {
        Write-Debug "Empty response"
        Write-Error "Failed to convert service connection '$($serviceEndpoint.name)'"
        exit 1
    }
    Write-Host "Successfully converted service connection '$($serviceEndpoint.name)'"
}
Revert an existing Azure Resource Manager Service connection that uses a service principal secret
You can revert a converted automatic service connection with its secret for seven days. After seven days, manually create a new secret.
If you manually create and convert your service connection, you can't revert the service connection by using the service connection conversion tool because Azure DevOps doesn't have permissions to modify its own credentials.
To revert a service connection:
In the Azure DevOps project, go to Pipelines > Service connections.
Select an existing service connection to revert.
Select Revert conversion to the original scheme.
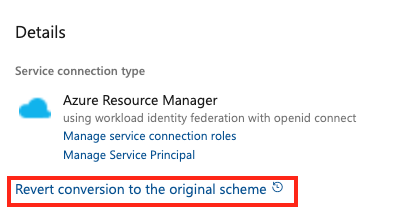
Select Revert again to confirm your choice.
Create an Azure Resource Manager service connection that uses a service principal secret
You can set up a service connection to authenticate with Azure resources by using a service principal secret. This approach is useful when you need to further limit permissions for Azure resources that users access through the service connection.
You can choose to configure the service connection manually or automatically. It's best practice to use the automatic approach if you signed in as the owner of the Azure Pipelines organization and the Azure subscription, and you don't need to further limit permissions for Azure resources that users access through the service connection.
We recommend that you use this approach if all the following items are true for your scenario:
- You're signed in as the owner of the Azure Pipelines organization and the Azure subscription.
- You don't need to further limit permissions for Azure resources that users access through the service connection.
- You're not connecting to Azure Stack or to an Azure Government Cloud.
- You're not connecting from Azure DevOps Server 2019 or earlier versions of Team Foundation Server.
To create the service connection:
In the Azure DevOps project, go to Project settings > Service connections.
For more information, see Open project settings.
Select New service connection, then select Azure Resource Manager and Next.
Select Service principal (automatic) and Next.
Select the Scope level. Select Subscription, Management Group, or Machine Learning Workspace. Management groups are containers that help you manage access, policy, and compliance across multiple subscriptions. A Machine Learning Workspace is place to create machine learning artifacts.
For the Subscription scope, enter the following parameters:
Parameter Description Subscription Id Required. Enter the Azure subscription ID. Subscription Name Required. Enter the Azure subscription name. For the Management Group scope, enter the following parameters, select the Azure management group.
For the Machine Learning Workspace scope, enter the following parameters:
Parameter Description Subscription Id Required. Enter the Azure subscription ID. Subscription Name Required. Enter the Azure subscription name. Resource Group Required. Select the resource group containing the workspace. ML Workspace Name Required. Enter the name of the existing Azure Machine Learning workspace. ML Workspace Location Required. Enter the location of the existing Azure Machine Learning workspace.
Enter a Service connection name.
Optionally, enter a description for the service connection.
Select Grant access permission to all pipelines to allow all pipelines to use this service connection. If you don't select this option, you must manually grant access to each pipeline that uses this service connection.
Select Save.
After the new service connection is created:
- If you use the classic editor, select the connection name you assigned in the Azure subscription setting of your pipeline.
- If you use a YAML file, copy the connection name into your code as the value for
azureSubscription.
To deploy to a specific Azure resource, add more information about the resource to the task:
- If you use the classic editor, select data to add to the task. For example, select the App Service name.
- If you use a YAML file, go to the resource in the Azure portal. Copy the data that you need and paste into your task code. For example, to deploy a web app, copy the name of the App Service app and paste it as the value for
WebAppNamein the task YAML.
Note
When you follow this approach, Azure DevOps connects with Microsoft Entra ID and creates an app registration with a secret that's valid for three months. When the service connection is about to expire, Microsoft Entra ID displays this prompt: A certificate or secret is expiring soon. Create a new one. In this scenario, you must refresh the service connection.
To refresh a service connection, in the Azure DevOps portal, edit the connection, and then select Verify. After you save the edit, the service connection is valid for another three months.
We recommend that you use workload identity federation instead of creating a secret. If you use workload identity federation, you don't need to rotate secrets, and app registration maintains its intended purpose. To start using workload identity federation, go to the service connection details page and select Convert. The service connection is converted to use workload identity federation instead of a secret. For more information, see Convert an existing Azure Resource Manager service connection to use workload identity federation.
For more information, see Troubleshoot an Azure Resource Manager service connection.
If you have problems using this approach (such as no subscriptions shown in the dropdown list) or if you want to limit user permissions, you can instead use a service principal or a virtual machine with a managed identity.
Create an Azure Resource Manager service connection that uses an existing service principal
If you want to use a predefined set of access permissions and you don't already have a service principal defined for this purpose, follow one of these tutorials to create a new service principal:
- Use the portal to create a Microsoft Entra application and a service principal that can access resources
- Use Azure PowerShell to create an Azure service principal that has a certificate
To create a service connection that uses an existing service principal:
In the Azure DevOps project, go to Project settings > Service connections.
For more information, see Open project settings.
Select New service connection, then select Azure Resource Manager and Next.
Select Service principal (manual) and Next.
From the New Azure service connection dialog, select the Environment. If you select Azure Stack, enter the environment URL, which is something like
https://management.local.azurestack.external.Select the Scope Level. Select Subscription, Management Group, or Machine Learning Workspace. Management groups are containers that help you manage access, policy, and compliance across multiple subscriptions. A Machine Learning Workspace is place to create machine learning artifacts.
For the Subscription scope, enter the following parameters:
Parameter Description Subscription Id Required. Enter the Azure subscription ID. Subscription Name Required. Enter the Azure subscription name. For the Management Group scope, enter the following parameters:
Parameter Description Management Group Id Required. Enter the Azure management group ID. Management Group Name Required. Enter the Azure management group name. For the Machine Learning Workspace scope, enter the following parameters:
Parameter Description Subscription Id Required. Enter the Azure subscription ID. Subscription Name Required. Enter the Azure subscription name. Resource Group Required. Select the resource group containing the workspace. ML Workspace Name Required. Enter the name of the existing Azure Machine Learning workspace. ML Workspace Location Required. Enter the location of the existing Azure Machine Learning workspace.
In the Authentication section, enter or select the following parameters:
Parameter Description Service Principal Id Required. Enter the service principal ID. Credential Select Service Principal Key or Certificate. If you selected Service Principal Key, enter the key (password). If you selected Certificate, enter the certificate. Tenant Id Required. Enter the tenant ID. Verify Select to validate the settings you entered. In the Details section, enter the following parameters:
Parameter Description Connection Name Required. The name that you use to refer to this service connection in task properties. Not the name of your Azure subscription. Description Optional. Enter a description of the service connection. Security Select Grant access permission to all pipelines to allow all pipelines to use this service connection. If you don't select this option, you must manually grant access to each pipeline that uses this service connection. Select Verify and save to validate and create the service connection.
After the new service connection is created:
- If you use the service connection in the UI, select the connection name that you assigned in the Azure subscription setting of your pipeline.
- If you use the service connection in a YAML file, copy the connection name and paste it into your code as the value for
azureSubscription.
If necessary, modify the service principal to expose the appropriate permissions.
For more information about authenticating by using a service principal, see Use role-based access control to manage access to your Azure subscription resources or the blog post Automate an Azure resource group deployment by using a service principal in Visual Studio.
For more information, see Troubleshoot Azure Resource Manager service connections.
Create an Azure Resource Manager service connection to a VM that uses a managed identity
Note
To use a managed identity to authenticate, you must use a self-hosted agent on an Azure virtual machine (VM).
You can configure self-hosted agents on Azure VMs to use an Azure managed identity in Microsoft Entra ID. In this scenario, you use the system-assigned managed identity (service principal) to grant the agents access to any Azure resource that supports Microsoft Entra ID, such as an instance of Azure Key Vault.
In the Azure DevOps project, go to Project settings > Service connections.
For more information, see Open project settings.
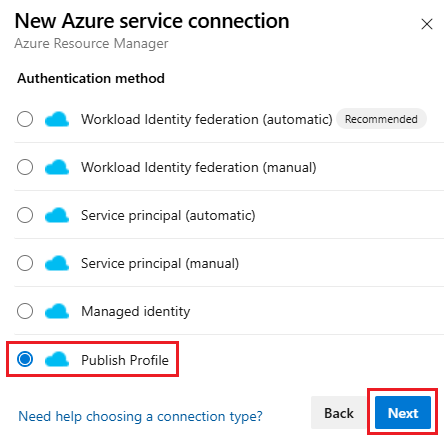
Select New service connection, then select Azure Resource Manager and Next.
Select Managed identity for the authentication method.
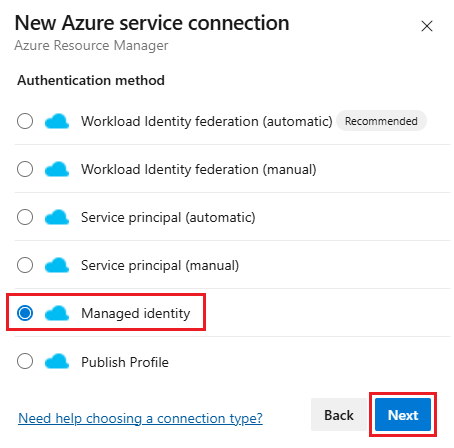
For Environment, select the environment name (Azure Cloud, Azure Stack, or Government cloud options).
Select the Scope level. Select Subscription, Management Group, or Machine Learning Workspace. Management groups are containers that help you manage access, policy, and compliance across multiple subscriptions. A Machine Learning Workspace is place to create machine learning artifacts.
For the Subscription scope, enter the following parameters:
Parameter Description Subscription Id Required. Enter the Azure subscription ID. Subscription Name Required. Enter the Azure subscription name. For the Management Group scope, enter the following parameters:
Parameter Description Management Group Id Required. Enter the Azure management group ID. Management Group Name Required. Enter the Azure management group name. For the Machine Learning Workspace scope, enter the following parameters:
Parameter Description Subscription Id Required. Enter the Azure subscription ID. Subscription Name Required. Enter the Azure subscription name. Resource Group Required. Select the resource group containing the workspace. ML Workspace Name Required. Enter the name of the existing Azure Machine Learning workspace. ML Workspace Location Required. Enter the location of the existing Azure Machine Learning workspace.
Enter the Tenant Id.
Enter the Service connection name.
Optionally, enter a description for the service connection.
Select Grant access permission to all pipelines to allow all pipelines to use this service connection. If you don't select this option, you must manually grant access to each pipeline that uses this service connection.
Select Save.
After the new service connection is created:
- If you use the service connection in the UI, select the connection name that you assigned in the Azure subscription setting of your pipeline.
- If you use the service connection in a YAML file, copy the connection name into your code as the value for
azureSubscription.
Ensure that the VM (agent) has the appropriate permissions.
For example, if your code needs to call Azure Resource Manager, assign the VM the appropriate role by using role-based access control (RBAC) in Microsoft Entra ID.
For more information, see How can I use managed identities for Azure resources? and Use role-based access control to manage access to your Azure subscription resources.
For more information about the process, see Troubleshoot Azure Resource Manager service connections.
Create a service connection using a publish profile
You can create a service connection by using a publish profile. You can use a publish profile to create a service connection to an Azure App Service.
In the Azure DevOps project, go to Project settings > Service connections.
For more information, see Open project settings.
Select New service connection, then select Azure Resource Manager and Next.
Select Publish profile for the authentication method and select Next.
Enter the following parameters:
Parameter Description Subscription Required. Select an existing Azure subscription. If no Azure subscriptions or instances appear, see Troubleshoot Azure Resource Manager service connections. WebApp Required. Enter the name of the Azure App Service app. Service connection Name Required. The name that you use to refer to this service connection in task properties. Not the name of your Azure subscription. Description Optional. The description of the service connection. Select Grant access permission to all pipelines to allow all pipelines to use this service connection. If you don't select this option, you must manually grant access to each pipeline that uses this service connection.
Select Save.
After the new service connection is created:
- If you use the service connection in the UI, select the connection name that you assigned in the Azure subscription setting of your pipeline.
- If you use the service connection in a YAML file, copy the connection name and paste it into your code as the value for
azureSubscription.
Connect to an Azure Government Cloud
For information about connecting to an Azure Government Cloud, see Connect from Azure Pipelines (Azure Government Cloud).
Connect to Azure Stack
For information about connecting to Azure Stack, see these articles:
Help and support
- Explore troubleshooting tips.
- Get advice on Stack Overflow.
- Post your questions, search for answers, or suggest a feature in the Azure DevOps Developer Community.
- Get support for Azure DevOps.
Feedback
Coming soon: Throughout 2024 we will be phasing out GitHub Issues as the feedback mechanism for content and replacing it with a new feedback system. For more information see: https://aka.ms/ContentUserFeedback.
Submit and view feedback for