Quickstart: Run Azure IoT Operations Preview in GitHub Codespaces with K3s
Important
Azure IoT Operations Preview – enabled by Azure Arc is currently in preview. You shouldn't use this preview software in production environments.
You'll need to deploy a new Azure IoT Operations installation when a generally available release is made available. You won't be able to upgrade a preview installation.
See the Supplemental Terms of Use for Microsoft Azure Previews for legal terms that apply to Azure features that are in beta, preview, or otherwise not yet released into general availability.
In this quickstart, you deploy a suite of IoT services to an Azure Arc-enabled Kubernetes cluster so that you can remotely manage your devices and workloads. Azure IoT Operations is a digital operations suite of services. This quickstart guides you through using Orchestrator to deploy these services to a Kubernetes cluster. At the end of the quickstart, you have a cluster that you can manage from the cloud that generates sample data to use in the following quickstarts.
The rest of the quickstarts in this end-to-end series build on this one to define sample assets, data processing pipelines, and visualizations.
If you want to deploy Azure IoT Operations to a local cluster such as Azure Kubernetes Service Edge Essentials or K3s on Ubuntu, see Deployment details.
Before you begin
This series of quickstarts is intended to help you get started with Azure IoT Operations as quickly as possible so that you can evaluate an end-to-end scenario. In a true development or production environment, multiple teams working together perform these tasks and some tasks might require elevated permissions.
For the best new user experience, we recommend using an Azure free account so that you have owner permissions over the resources in these quickstarts. We also provide steps to use GitHub Codespaces as a virtual environment in which you can quickly begin deploying resources and running commands without installing new tools on your own machines.
Prerequisites
For this quickstart, you create a Kubernetes cluster to receive the Azure IoT Operations deployment.
If you want to reuse a cluster that already has Azure IoT Operations deployed to it, refer to the steps in Clean up resources to uninstall Azure IoT Operations before continuing.
Before you begin, prepare the following prerequisites:
An Azure subscription. If you don't have an Azure subscription, create one for free before you begin.
A GitHub account.
Visual Studio Code installed on your development machine. For more information, see Download Visual Studio Code.
Microsoft/Authorization/roleAssignments/write permissions at the resource group level.
What problem will we solve?
Azure IoT Operations is a suite of data services that run on Kubernetes clusters. You want these clusters to be managed remotely from the cloud, and able to securely communicate with cloud resources and endpoints. We address these concerns with the following tasks in this quickstart:
- Create a Kubernetes cluster and connect it to Azure Arc for remote management.
- Create a schema registry.
- Deploy Azure IoT Operations to your cluster.
Connect a Kubernetes cluster to Azure Arc
Azure IoT Operations should work on any Kubernetes cluster that conforms to the Cloud Native Computing Foundation (CNCF) standards. For speed and convenience, this quickstart uses GitHub Codespaces to host your cluster.
Important
Codespaces are easy to set up quickly and tear down later, but they're not suitable for performance evaluation or scale testing. Use GitHub Codespaces for exploration only. To learn how to deploy Azure IoT Operations to a production cluster such as AKS Edge Essentials, see Prepare your Azure Arc-enabled Kubernetes cluster.
In this section, you create a new cluster and connect it to Azure Arc. If you want to reuse a cluster that you deployed Azure IoT Operations to previously, refer to the steps in Clean up resources to uninstall Azure IoT Operations before continuing.
Use GitHub Codespaces to try Azure IoT Operations on a Kubernetes cluster without installing anything on your local machine. The Azure-Samples/explore-iot-operations codespace is preconfigured with:
- K3s running in K3d for a lightweight Kubernetes cluster
- Azure CLI
- Kubectl for managing Kubernetes resources
- Other useful tools like Helm and k9s
To create your codespace and cluster, use the following steps:
Create a codespace in GitHub Codespaces.

Provide the following recommended secrets for your codespace:
Parameter Value SUBSCRIPTION_ID Your Azure subscription ID. RESOURCE_GROUP A name for a new Azure resource group where your cluster will be created. LOCATION An Azure region close to you. For the list of currently supported regions, see Supported regions. Tip
The values you provide as secrets in this step get saved on your GitHub account to be used in this and future codespaces. They're added as environment variables in the codespace terminal, and you can use those environment variables in the CLI commands in the next section.
Additionally, this codespace creates a
CLUSTER_NAMEenvironment variable which is set with the codespace name.Select Create new codespace.
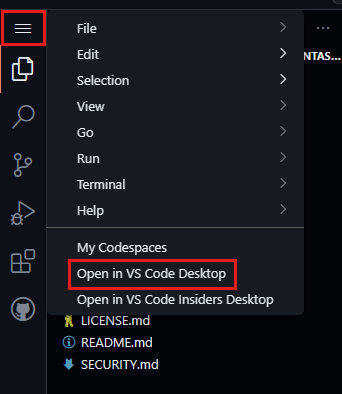
Once the codespace is ready, select the menu button at the top left, then select Open in VS Code Desktop.
If prompted, install the GitHub Codespaces extension for Visual Studio Code and sign in to GitHub.
In Visual Studio Code, select View > Terminal.
Use this terminal to run all of the CLI commands for managing your cluster.
To connect your cluster to Azure Arc:
In your codespace terminal, sign in to Azure CLI:
az loginTip
If you're using the GitHub codespace environment in a browser rather than VS Code desktop, running
az loginreturns a localhost error. To fix the error, either:- Open the codespace in VS Code desktop, and then return to the browser terminal and rerun
az login. - Or, after you get the localhost error on the browser, copy the URL from the browser and run
curl "<URL>"in a new terminal tab. You should see a JSON response with the message "You have logged into Microsoft Azure!."
- Open the codespace in VS Code desktop, and then return to the browser terminal and rerun
After you sign in, Azure CLI displays all of your subscriptions and indicates your default subscription with an asterisk
*. To continue with your default subscription, selectEnter. Otherwise, type the number of the Azure subscription that you want to use.Register the required resource providers in your subscription:
Note
This step only needs to be run once per subscription. To register resource providers, you need permission to do the
/register/actionoperation, which is included in subscription Contributor and Owner roles. For more information, see Azure resource providers and types.az provider register -n "Microsoft.ExtendedLocation" az provider register -n "Microsoft.Kubernetes" az provider register -n "Microsoft.KubernetesConfiguration" az provider register -n "Microsoft.IoTOperations" az provider register -n "Microsoft.DeviceRegistry"Use the az group create command to create a resource group in your Azure subscription to store all the resources:
az group create --location $LOCATION --resource-group $RESOURCE_GROUPUse the az connectedk8s connect command to Arc-enable your Kubernetes cluster and manage it as part of your Azure resource group:
az connectedk8s connect --name $CLUSTER_NAME --location $LOCATION --resource-group $RESOURCE_GROUPTip
The value of
$CLUSTER_NAMEis automatically set to the name of your codespace. Replace the environment variable if you want to use a different name.Get the
objectIdof the Microsoft Entra ID application that the Azure Arc service in your tenant uses and save it as an environment variable.export OBJECT_ID=$(az ad sp show --id bc313c14-388c-4e7d-a58e-70017303ee3b --query id -o tsv)Use the az connectedk8s enable-features command to enable custom location support on your cluster. This command uses the
objectIdof the Microsoft Entra ID application that the Azure Arc service uses.az connectedk8s enable-features -n $CLUSTER_NAME -g $RESOURCE_GROUP --custom-locations-oid $OBJECT_ID --features cluster-connect custom-locations
Verify cluster
Use the Azure IoT Operations extension for Azure CLI to verify that your cluster host is configured correctly for deployment by using the verify-host command on the cluster host:
az iot ops verify-host
This helper command checks connectivity to Azure Resource Manager and Microsoft Container Registry endpoints.
Create a storage account and schema registry
Azure IoT Operations requires a schema registry on your cluster. Schema registry requires an Azure storage account so that it can synchronize schema information between cloud and edge.
The command to create a schema registry in this section requires Microsoft/Authorization/roleAssignments/write permissions at the resource group level.
Run the following CLI commands in your Codespaces terminal.
Set environment variables for the resources you create in this section.
Placeholder Value <STORAGE_ACCOUNT_NAME> A name for your storage account. Storage account names must be between 3 and 24 characters in length and only contain numbers and lowercase letters. <SCHEMA_REGISTRY_NAME> A name for your schema registry. <SCHEMA_REGISTRY_NAMESPACE> A name for your schema registry namespace. The namespace uniquely identifies a schema registry within a tenant. export STORAGE_ACCOUNT=<STORAGE_ACCOUNT_NAME> export SCHEMA_REGISTRY=<SCHEMA_REGISTRY_NAME> export SCHEMA_REGISTRY_NAMESPACE=<SCHEMA_REGISTRY_NAMESPACE>Create a storage account with hierarchical namespace enabled.
az storage account create --name $STORAGE_ACCOUNT --location $LOCATION --resource-group $RESOURCE_GROUP --enable-hierarchical-namespaceCreate a schema registry that connects to your storage account. This command also creates a blob container called schemas in the storage account if one doesn't exist already.
az iot ops schema registry create --name $SCHEMA_REGISTRY --resource-group $RESOURCE_GROUP --registry-namespace $SCHEMA_REGISTRY_NAMESPACE --sa-resource-id $(az storage account show --name $STORAGE_ACCOUNT -o tsv --query id)
Deploy Azure IoT Operations Preview
In this section, you configure your cluster with the dependencies for your Azure IoT Operations components, then deploy Azure IoT Operations.
Run the following CLI commands in your Codespaces terminal.
Initialize your cluster for Azure IoT Operations.
Tip
The
initcommand only needs to be run once per cluster. If you're reusing a cluster that already had Azure IoT Operations version 0.7.0 deployed on it, you can skip this step.az iot ops init --cluster $CLUSTER_NAME --resource-group $RESOURCE_GROUP --sr-resource-id $(az iot ops schema registry show --name $SCHEMA_REGISTRY --resource-group $RESOURCE_GROUP -o tsv --query id)This command might take several minutes to complete. You can watch the progress in the deployment progress display in the terminal.
Deploy Azure IoT Operations. This command takes several minutes to complete:
az iot ops create --cluster $CLUSTER_NAME --resource-group $RESOURCE_GROUP --name ${CLUSTER_NAME}-instanceThis command might take several minutes to complete. You can watch the progress in the deployment progress display in the terminal.
If you get an error that says Your device is required to be managed to access your resource, run
az loginagain and make sure that you sign in interactively with a browser.
View resources in your cluster
While the deployment is in progress, the CLI progress interface shows you the deployment stage that you're in. Once the deployment is complete, you can use kubectl commands to observe changes on the cluster or, since the cluster is Arc-enabled, you can use the Azure portal.
To view the pods on your cluster, run the following command:
kubectl get pods -n azure-iot-operations
To view your resources on the Azure portal, use the following steps:
In the Azure portal, go to the resource group that contains your Azure IoT Operations instance, or search for and select Azure IoT Operations.
Select the name of your Azure IoT Operations instance.
On the Overview page of your instance, the Arc extensions tab displays the resources that were deployed to your cluster.


How did we solve the problem?
In this quickstart, you configured your Arc-enabled Kubernetes cluster so that it could communicate securely with your Azure IoT Operations components. Then, you deployed those components to your cluster. For this test scenario, you have a single Kubernetes cluster that's probably running locally on your machine. In a production scenario, however, you can use the same steps to deploy workloads to many clusters across many sites.
Clean up resources
If you're continuing on to the next quickstart, keep all of your resources.
If you want to remove the Azure IoT Operations deployment but keep your cluster, use the az iot ops delete command:
az iot ops delete --cluster $CLUSTER_NAME --resource-group $RESOURCE_GROUP
If you want to delete all the resources you created for this quickstart, delete the Kubernetes cluster where you deployed Azure IoT Operations and then remove the Azure resource group that contained the cluster.
If you used Codespaces for these quickstarts, delete your Codespace from GitHub.