Tutorial: Train a classification model with no-code AutoML in the Azure Machine Learning studio
In this tutorial, you learn how to train a classification model with no-code automated machine learning (AutoML) using Azure Machine Learning in the Azure Machine Learning studio. This classification model predicts whether a client subscribes to a fixed term deposit with a financial institution.
With Automated ML, you can automate away time intensive tasks. Automated machine learning rapidly iterates over many combinations of algorithms and hyperparameters to help you find the best model based on a success metric of your choosing.
You don't write any code in this tutorial. You use the studio interface to perform training. You learn how to do the following tasks:
- Create an Azure Machine Learning workspace
- Run an automated machine learning experiment
- Explore model details
- Deploy the recommended model
Prerequisites
An Azure subscription. If you don't have an Azure subscription, create a free account.
Download the bankmarketing_train.csv data file. The y column indicates if a customer subscribed to a fixed term deposit, which is later identified as the target column for predictions in this tutorial.
Note
This Bank Marketing dataset is made available under the Creative Commons (CCO: Public Domain) License. Any rights in individual contents of the database are licensed under the Database Contents License and available on Kaggle. This dataset was originally available within the UCI Machine Learning Database.
[Moro et al., 2014] S. Moro, P. Cortez and P. Rita. A Data-Driven Approach to Predict the Success of Bank Telemarketing. Decision Support Systems, Elsevier, 62:22-31, June 2014.
Create a workspace
An Azure Machine Learning workspace is a foundational resource in the cloud that you use to experiment, train, and deploy machine learning models. It ties your Azure subscription and resource group to an easily consumed object in the service.
Complete the following steps to create a workspace and continue the tutorial.
Sign in to Azure Machine Learning studio.
Select Create workspace.
Provide the following information to configure your new workspace:
Field Description Workspace name Enter a unique name that identifies your workspace. Names must be unique across the resource group. Use a name that's easy to recall and to differentiate from workspaces created by others. The workspace name is case-insensitive. Subscription Select the Azure subscription that you want to use. Resource group Use an existing resource group in your subscription or enter a name to create a new resource group. A resource group holds related resources for an Azure solution. You need contributor or owner role to use an existing resource group. For more information, see Manage access to an Azure Machine Learning workspace. Region Select the Azure region closest to your users and the data resources to create your workspace. Select Create to create the workspace.
For more information on Azure resources, see Create the workspace.
For other ways to create a workspace in Azure, Manage Azure Machine Learning workspaces in the portal or with the Python SDK (v2).
Create an Automated Machine Learning job
Complete the following experiment set-up and run steps by using the Azure Machine Learning studio at https://ml.azure.com. Machine Learning Studio is a consolidated web interface that includes machine learning tools to perform data science scenarios for data science practitioners of all skill levels. The studio isn't supported on Internet Explorer browsers.
Select your subscription and the workspace you created.
In the navigation pane, select Authoring > Automated ML.
Because this tutorial is your first automated ML experiment, you see an empty list and links to documentation.
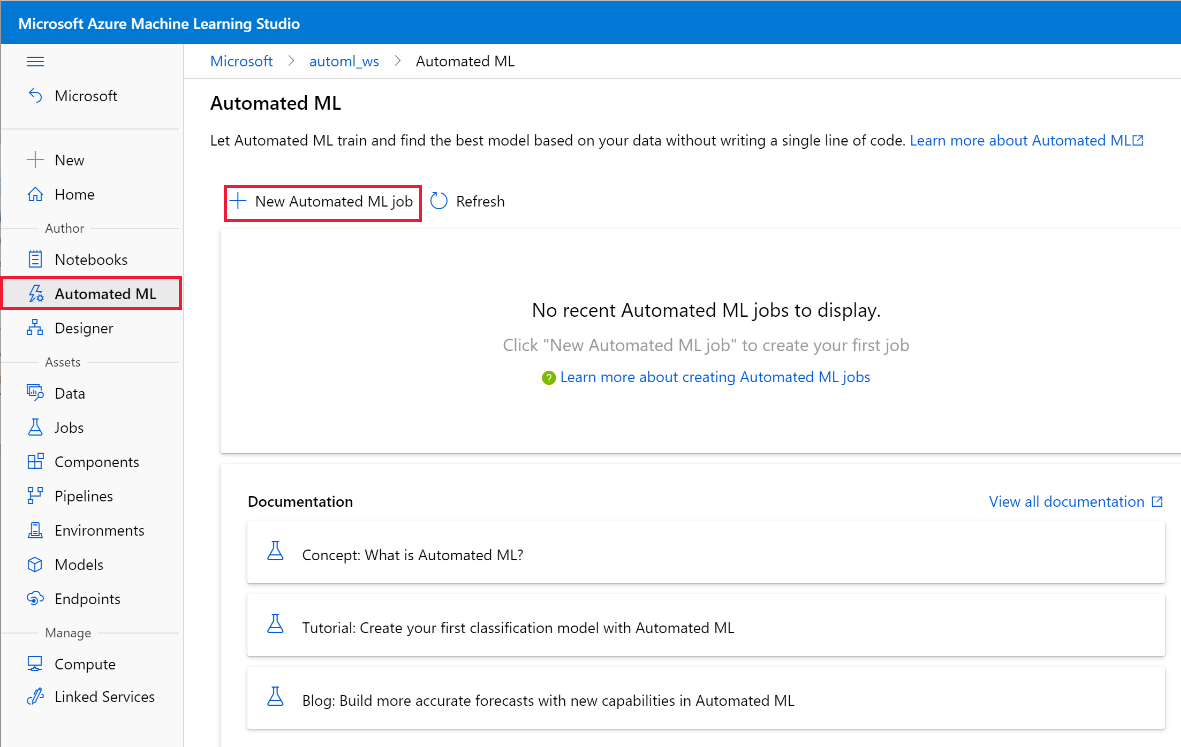
Select New Automated ML job.
In Training method, select Train automatically, then select Start configuring job.
In Basic settings, select Create new, then for Experiment name, enter my-1st-automl-experiment.
Select Next to load your dataset.

Create and load a dataset as a data asset
Before you configure your experiment, upload the data file to your workspace in the form of an Azure Machine Learning data asset. For this tutorial, you can think of a data asset as your dataset for the Automated ML job. Doing so allows you to ensure that your data is formatted appropriately for your experiment.
In Task type & data, for Select task type, choose Classification.
Under Select data, choose Create.
In the Data type form, give your data asset a name and provide an optional description.
For Type, select Tabular. The automated ML interface currently only supports TabularDatasets.
Select Next.
In the Data source form, select From local files. Select Next.
In Destination storage type, select the default datastore that was automatically set up during your workspace creation: workspaceblobstore. You upload your data file to this location to make it available to your workspace.
Select Next.
In File or folder selection, select Upload files or folder > Upload files.
Choose the bankmarketing_train.csv file on your local computer. You downloaded this file as a prerequisite.
Select Next.
When the upload finishes, the Data preview area is populated based on the file type.
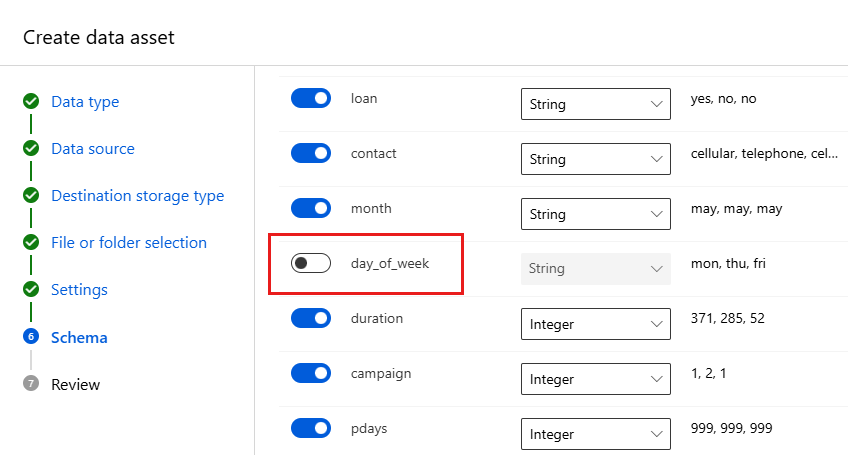
In the Settings form, review the values for your data. Then select Next.
Field Description Value for tutorial File format Defines the layout and type of data stored in a file. Delimited Delimiter One or more characters for specifying the boundary between separate, independent regions in plain text or other data streams. Comma Encoding Identifies what bit to character schema table to use to read your dataset. UTF-8 Column headers Indicates how the headers of the dataset, if any, are treated. All files have same headers Skip rows Indicates how many, if any, rows are skipped in the dataset. None The Schema form allows for further configuration of your data for this experiment. For this example, select the toggle switch for the day_of_week, so as to not include it. Select Next.
In the Review form, verify your information, and then select Create.
Select your dataset from the list.
Review the data by selecting the data asset and looking at the preview tab. Ensure that it doesn't include day_of_week and select Close.
Select Next to proceed to task settings.
Configure job
After you load and configure your data, you can set up your experiment. This setup includes experiment design tasks such as, selecting the size of your compute environment and specifying what column you want to predict.
Populate the Task settings form as follows:
Select y (String) as the target column, which is what you want to predict. This column indicates whether the client subscribed to a term deposit or not.
Select View additional configuration settings and populate the fields as follows. These settings are to better control the training job. Otherwise, defaults are applied based on experiment selection and data.
Additional configurations Description Value for tutorial Primary metric Evaluation metric used to measure the machine learning algorithm. AUCWeighted Explain best model Automatically shows explainability on the best model created by automated ML. Enable Blocked models Algorithms you want to exclude from the training job None Select Save.
Under Validate and test:
- For Validation type, select k-fold cross-validation.
- For Number of cross validations, select 2.
Select Next.
Select compute cluster as your compute type.
A compute target is a local or cloud-based resource environment used to run your training script or host your service deployment. For this experiment, you can either try a cloud-based serverless compute (preview) or create your own cloud-based compute.
Note
To use serverless compute, enable the preview feature, select Serverless, and skip this procedure.
To create your own compute target, in Select compute type, select Compute cluster to configure your compute target.
Populate the Virtual Machine form to set up your compute. Select New.
Field Description Value for tutorial Location Your region that you'd like to run the machine from West US 2 Virtual machine tier Select what priority your experiment should have Dedicated Virtual machine type Select the virtual machine type for your compute. CPU (Central Processing Unit) Virtual machine size Select the virtual machine size for your compute. A list of recommended sizes is provided based on your data and experiment type. Standard_DS12_V2 Select Next to go to the Advanced Settings form.
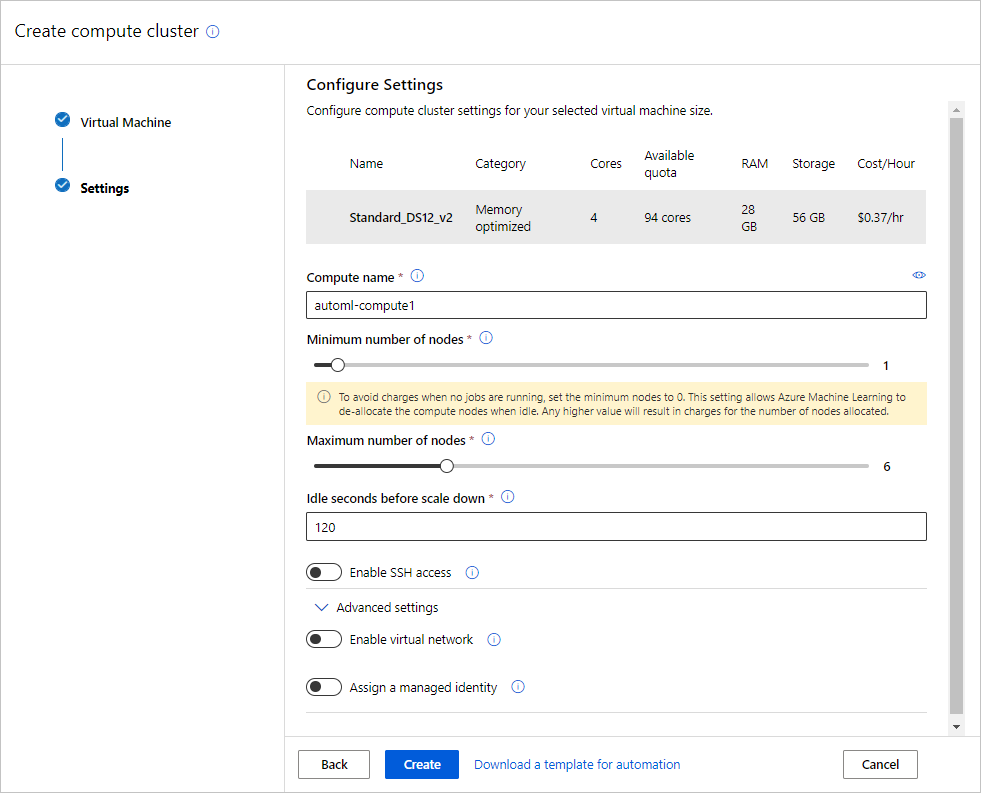
Field Description Value for tutorial Compute name A unique name that identifies your compute context. automl-compute Min / Max nodes To profile data, you must specify 1 or more nodes. Min nodes: 1
Max nodes: 6Idle seconds before scale down Idle time before the cluster is automatically scaled down to the minimum node count. 120 (default) Advanced settings Settings to configure and authorize a virtual network for your experiment. None Select Create.
Creating a compute can take minutes to complete.
After creation, select your new compute target from the list. Select Next.
Select Submit training job to run the experiment. The Overview screen opens with the Status at the top as the experiment preparation begins. This status updates as the experiment progresses. Notifications also appear in the studio to inform you of the status of your experiment.

Important
Preparation takes 10-15 minutes to prepare the experiment run. Once running, it takes 2-3 minutes more for each iteration.
In production, you'd likely walk away for a bit. But for this tutorial, you can start exploring the tested algorithms on the Models tab as they complete while the others continue to run.
Explore models
Navigate to the Models + child jobs tab to see the algorithms (models) tested. By default, the job orders the models by metric score as they complete. For this tutorial, the model that scores the highest based on the chosen AUCWeighted metric is at the top of the list.
While you wait for all of the experiment models to finish, select the Algorithm name of a completed model to explore its performance details. Select the Overview and the Metrics tabs for information about the job.
The following animation views the selected model's properties, metrics, and performance charts.

View model explanations
While you wait for the models to complete, you can also take a look at model explanations and see which data features (raw or engineered) influenced a particular model's predictions.
These model explanations can be generated on demand. The model explanations dashboard that's part of the Explanations (preview) tab summarizes these explanations.
To generate model explanations:
In the navigation links at the top of the page, select the job name to go back to the Models screen.
Select the Models + child jobs tab.
For this tutorial, select the first MaxAbsScaler, LightGBM model.
Select Explain model. On the right, the Explain model pane appears.
Select your compute type and then select the instance or cluster: automl-compute that you created previously. This compute starts a child job to generate the model explanations.
Select Create. A green success message appears.
Note
The explainability job takes about 2-5 minutes to complete.
Select Explanations (preview). This tab populates after the explainability run completes.
On the left, expand the pane. Under Features, select the row that says raw.
Select the Aggregate feature importance tab. This chart shows which data features influenced the predictions of the selected model.
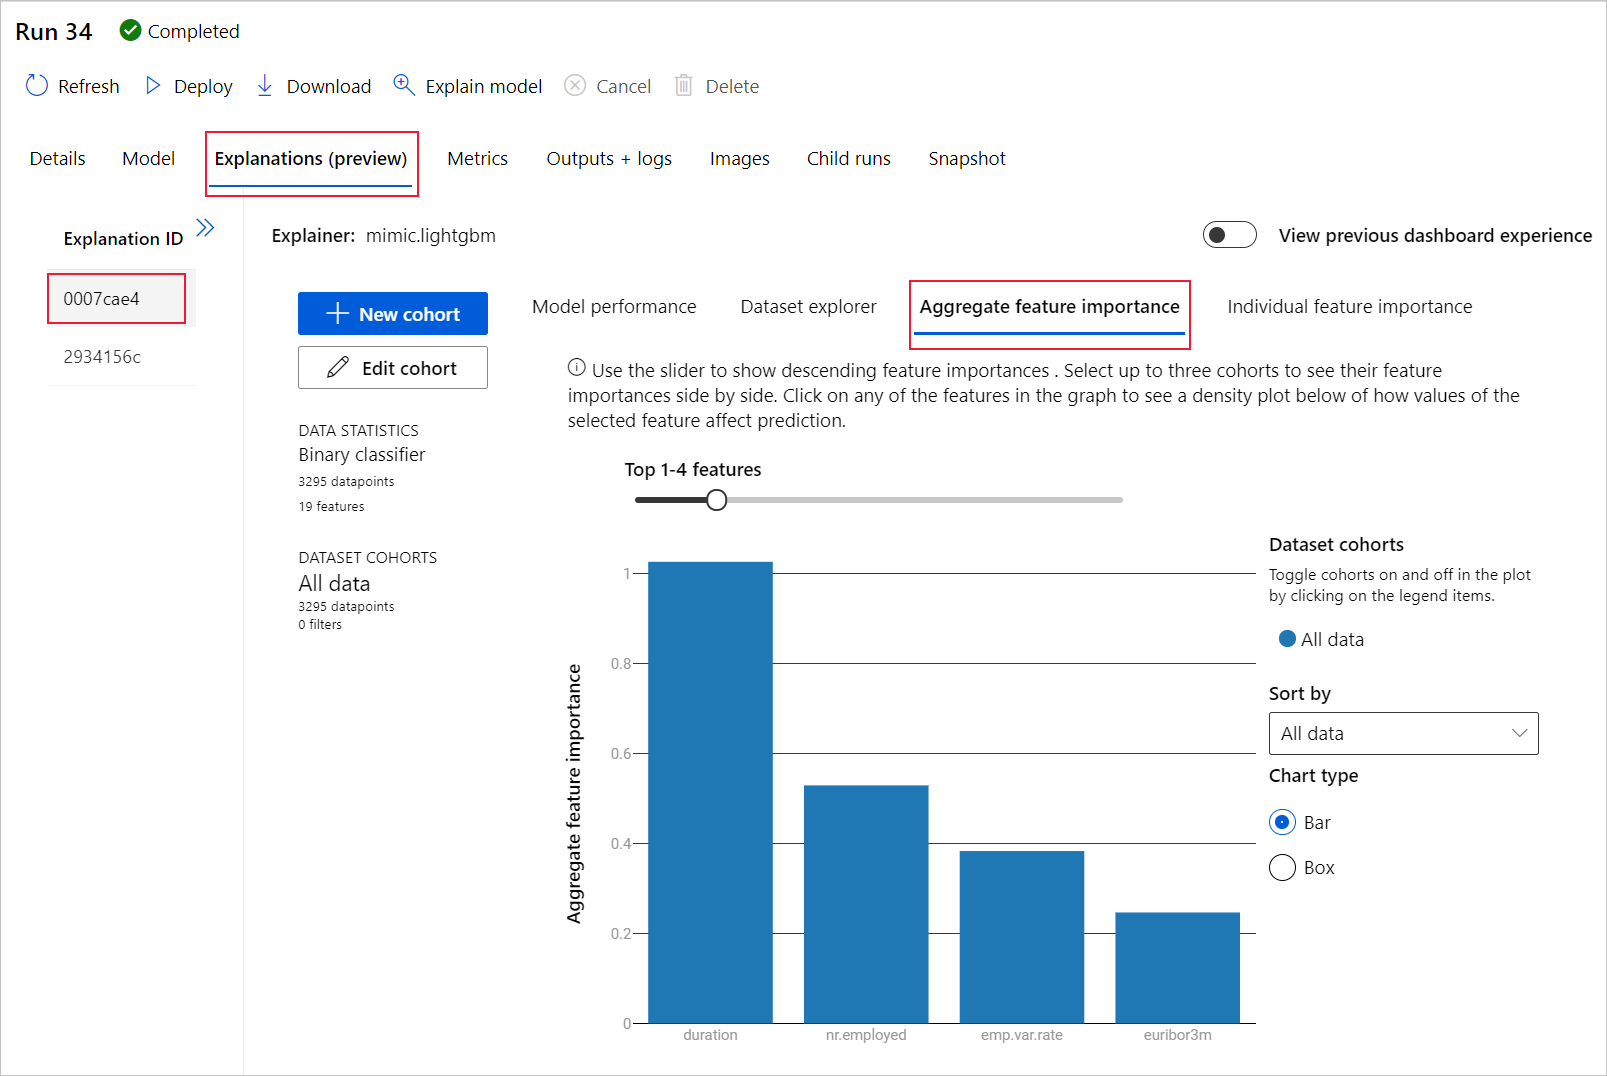
In this example, the duration appears to have the most influence on the predictions of this model.

Deploy the best model
The automated machine learning interface allows you to deploy the best model as a web service. Deployment is the integration of the model so it can predict on new data and identify potential areas of opportunity. For this experiment, deployment to a web service means that the financial institution now has an iterative and scalable web solution for identifying potential fixed term deposit customers.
Check to see whether your experiment run is complete. To do so, navigate back to the parent job page by selecting the job name at the top of your screen. A Completed status is shown on the top left of the screen.
After the experiment run is complete, the Details page is populated with a Best model summary section. In this experiment context, VotingEnsemble is considered the best model, based on the AUCWeighted metric.
Deploy this model. Deployment takes about 20 minutes to complete. The deployment process entails several steps including registering the model, generating resources, and configuring them for the web service.
Select VotingEnsemble to open the model-specific page.
Select Deploy > Web service.
Populate the Deploy a model pane as follows:
Field Value Name my-automl-deploy Description My first automated machine learning experiment deployment Compute type Select Azure Container Instance Enable authentication Disable. Use custom deployment assets Disable. Allows for the default driver file (scoring script) and environment file to be autogenerated. For this example, use the defaults provided in the Advanced menu.
Select Deploy.
A green success message appears at the top of the Job screen. In the Model summary pane, a status message appears under Deploy status. Select Refresh periodically to check the deployment status.
You have an operational web service to generate predictions.
Proceed to the Related content to learn more about how to consume your new web service, and test your predictions using Power BI built in Azure Machine Learning support.
Clean up resources
Deployment files are larger than data and experiment files, so they cost more to store. If you want to keep your workspace and experiment files, delete only the deployment files to minimize costs to your account. If you don't plan to use any of the files, delete the entire resource group.
Delete the deployment instance
Delete just the deployment instance from Azure Machine Learning at https://ml.azure.com/.
Go to Azure Machine Learning. Navigate to your workspace and under the Assets pane, select Endpoints.
Select the deployment you want to delete and select Delete.
Select Proceed.
Delete the resource group
Important
The resources that you created can be used as prerequisites to other Azure Machine Learning tutorials and how-to articles.
If you don't plan to use any of the resources that you created, delete them so you don't incur any charges:
In the Azure portal, in the search box, enter Resource groups and select it from the results.
From the list, select the resource group that you created.
In the Overview page, select Delete resource group.
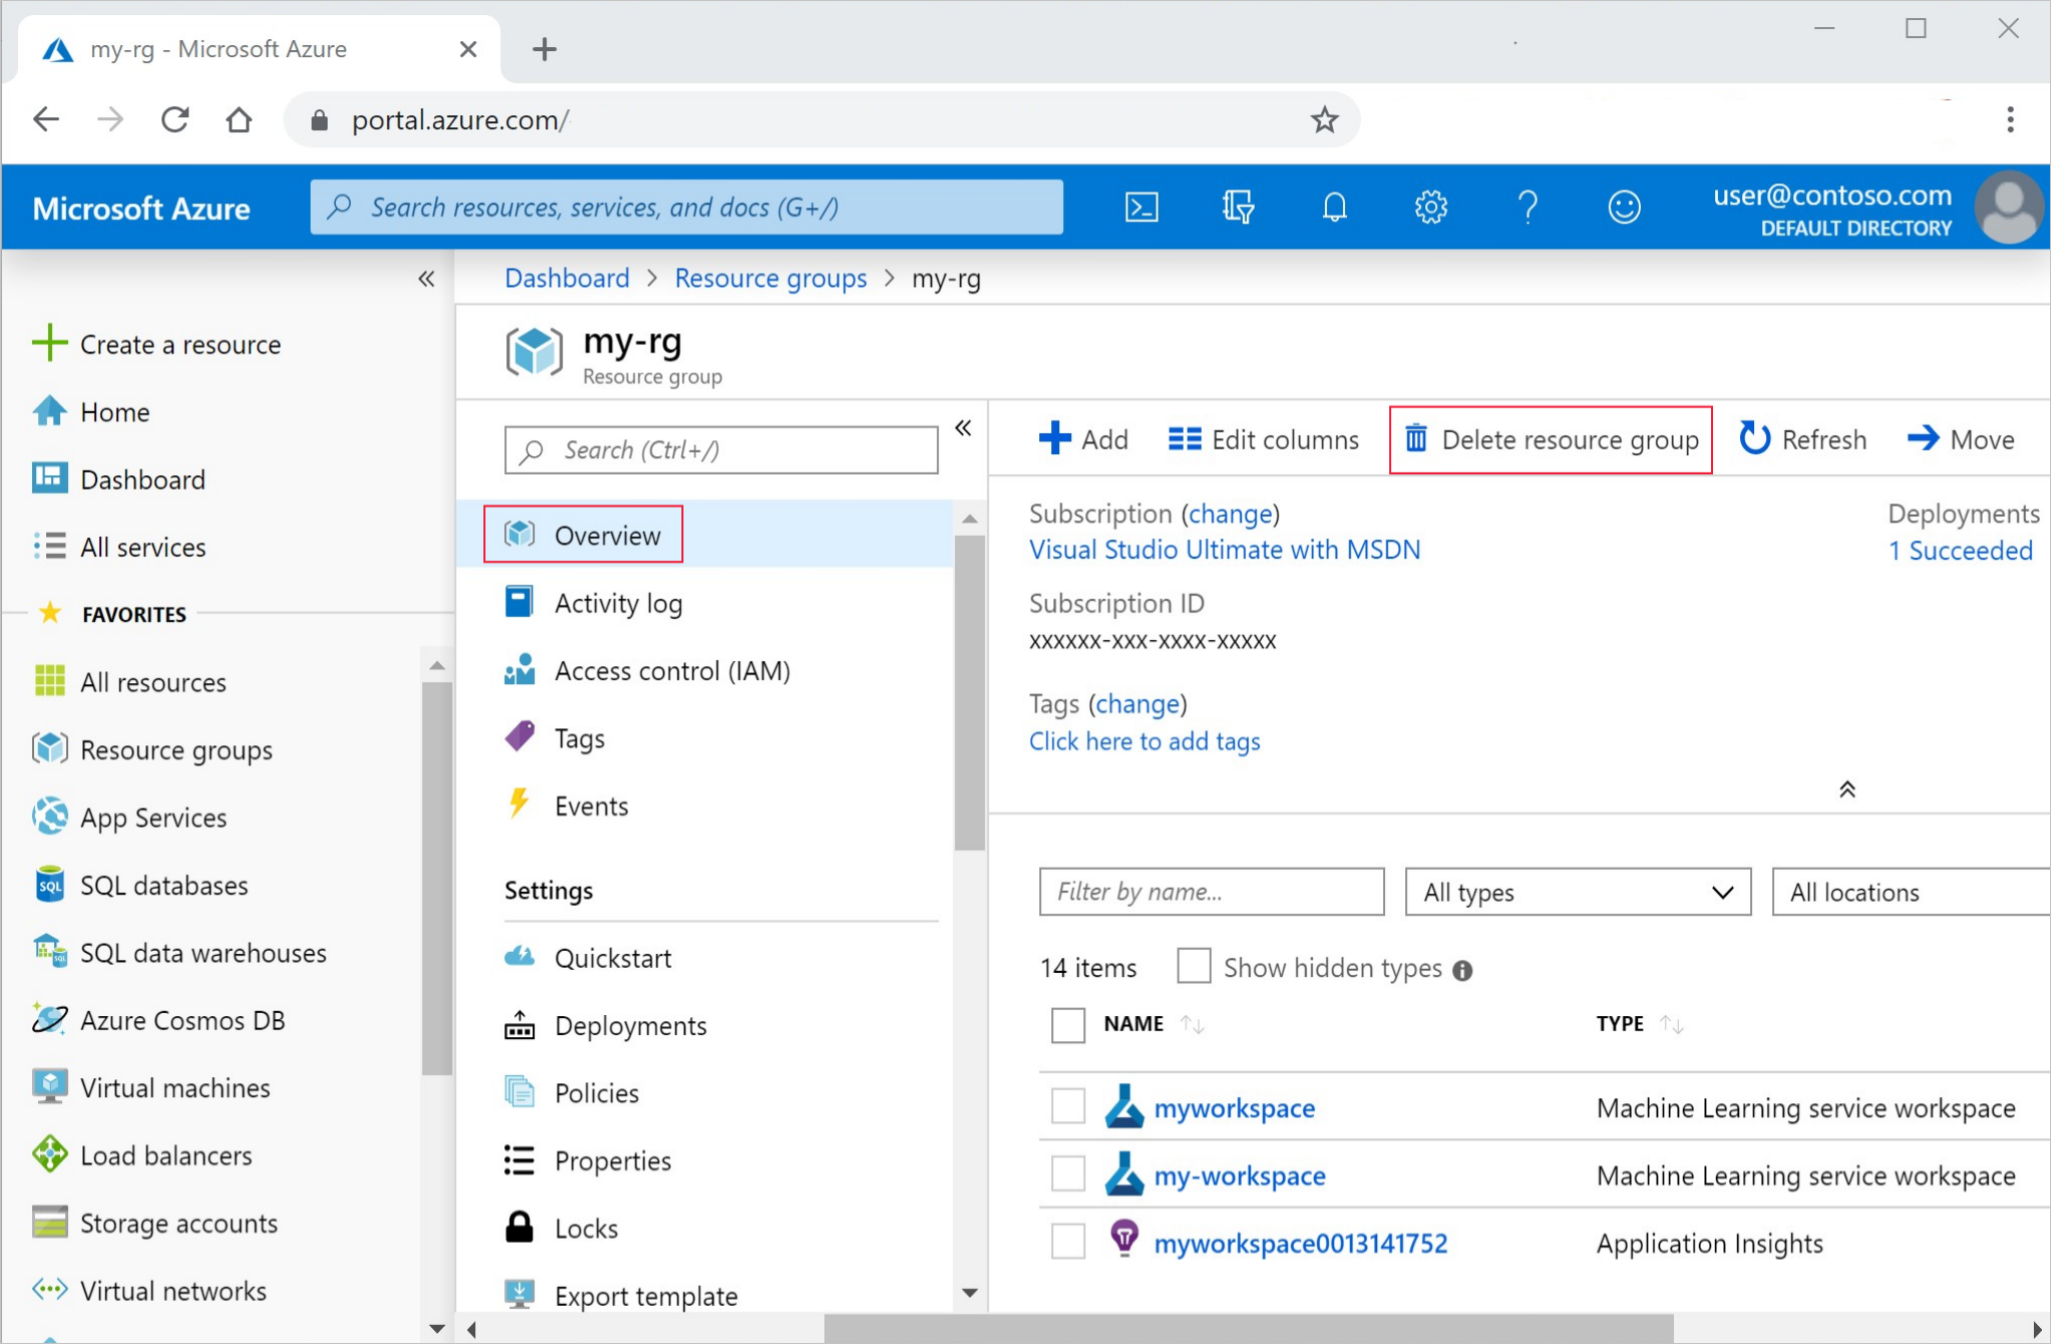
Enter the resource group name. Then select Delete.
Related content
In this automated machine learning tutorial, you used Azure Machine Learning's automated ML interface to create and deploy a classification model. For more information and next steps, see these resources:
- Learn more about automated machine learning.
- Learn about classification metrics and charts: Evaluate automated machine learning experiment results article.
- Learn more about how to set up AutoML for NLP.
Also try automated machine learning for these other model types:
- For a no-code example of forecasting, see Tutorial: Forecast demand with no-code automated machine learning in the Azure Machine Learning studio.
- For a code first example of an object detection model, see the Tutorial: Train an object detection model with AutoML and Python.