Tutorial: Migrate offline from Amazon Aurora PostgreSQL to Azure Database for PostgreSQL with the migration service
This article describes how to migrate your PostgreSQL database from Amazon Aurora to Azure Database for PostgreSQL offline.
The migration service in Azure Database for PostgreSQL is a fully managed service that's integrated into the Azure portal and the Azure CLI. It's designed to simplify your migration journey to Azure Database for PostgreSQL.
In this tutorial, you:
- Complete prerequisites
- Initiate the migration
- Monitor the migration
- Verify the migration
Prerequisites
Before you start a migration by using the migration service in Azure Database for PostgreSQL, it's important to complete the following prerequisites. These prerequisites are specifically designed for offline migration scenarios.
- Verify the source version
- Configure the target setup
- Configure the network setup
- Enable extensions
- Check server parameters
- Check users and roles
- Disable high availability (reliability) and read replicas on the target
Verify the source version
The source PostgreSQL server version must be 9.5 or later. If the source PostgreSQL version is earlier than 9.5, upgrade the version to 9.5 or later before you start the migration.
Configure the target setup
Before you begin the migration, you must create an instance of Azure Database for PostgreSQL in Azure. The SKU that's provisioned for Azure Database for PostgreSQL - Flexible Server should match the source.
For more information, see Create an instance of Azure Database for PostgreSQL.
Configure the network setup
Network setup is crucial for the migration service to function correctly. Ensure that the source PostgreSQL server can communicate with the target server in Azure Database for PostgreSQL.
For information about network setup, see Network scenarios for the migration service.
Enable extensions
To ensure a successful migration by using the migration service in Azure Database for PostgreSQL, you might need to verify extensions to your source PostgreSQL instance. Extensions provide functionality and features that might be required for your application. Make sure that you verify the extensions on the source PostgreSQL instance before you initiate the migration process.
In the target instance of Azure Database for PostgreSQL - Flexible Server, enable supported extensions that are identified in the source PostgreSQL instance.
For more information, see Extensions in Azure Database for PostgreSQL.
Note
A restart is required when you make any changes to the shared_preload_libraries parameter.
Check server parameters
Server parameters aren't automatically migrated to the target environment and must be manually configured.
Match server parameter values from the source PostgreSQL database to the instance of Azure Database for PostgreSQL. In the Azure portal, go to Server parameters and manually update the values.
Save the parameter changes and restart the instance of Azure Database for PostgreSQL to apply the new configuration if necessary.
Check users and roles
When you migrate to Azure Database for PostgreSQL, it's essential to address the migration of users and roles separately because they require manual intervention.
Manual migration of users and roles: Users and their associated roles must be manually migrated to the instance of Azure Database for PostgreSQL. To facilitate this process, you can use the pg_dumpall utility with the
--globals-onlyflag to export global objects such as roles and user accounts.Execute the following command. Replace
<username>with the actual username, and replace<filename>with the name you want to use for the output file.pg_dumpall --globals-only -U <username> -f <filename>.sqlRestriction on superuser roles: Azure Database for PostgreSQL doesn't support superuser roles. Superuser permissions must be removed before migration. Ensure that you adjust the permissions and roles accordingly.
By completing these steps, you can ensure that user accounts and roles are correctly migrated to Azure Database for PostgreSQL without issues related to superuser restrictions.
Disable high availability (reliability) and read replicas on the target
It's critical that you disable high availability (reliability) and read replicas in the target environment before you initiate migration. These features should be enabled only after the migration is completed.
Initiate the migration
You can migrate by using the Azure portal or the Azure CLI.
The Azure portal offers a simple and intuitive wizard-based experience to guide you through migration. By completing the steps that are outlined in this tutorial, you can seamlessly transfer your database to Azure Database for PostgreSQL - Flexible Server and take advantage of its powerful features and scalability.
To migrate by using the Azure portal, first configure the migration task. Then, connect to the source and target, and initiate the migration.
Configure the migration task
To configure the migration task in the Azure portal:
Open your web browser and go to the Azure portal. Enter your credentials to sign in.
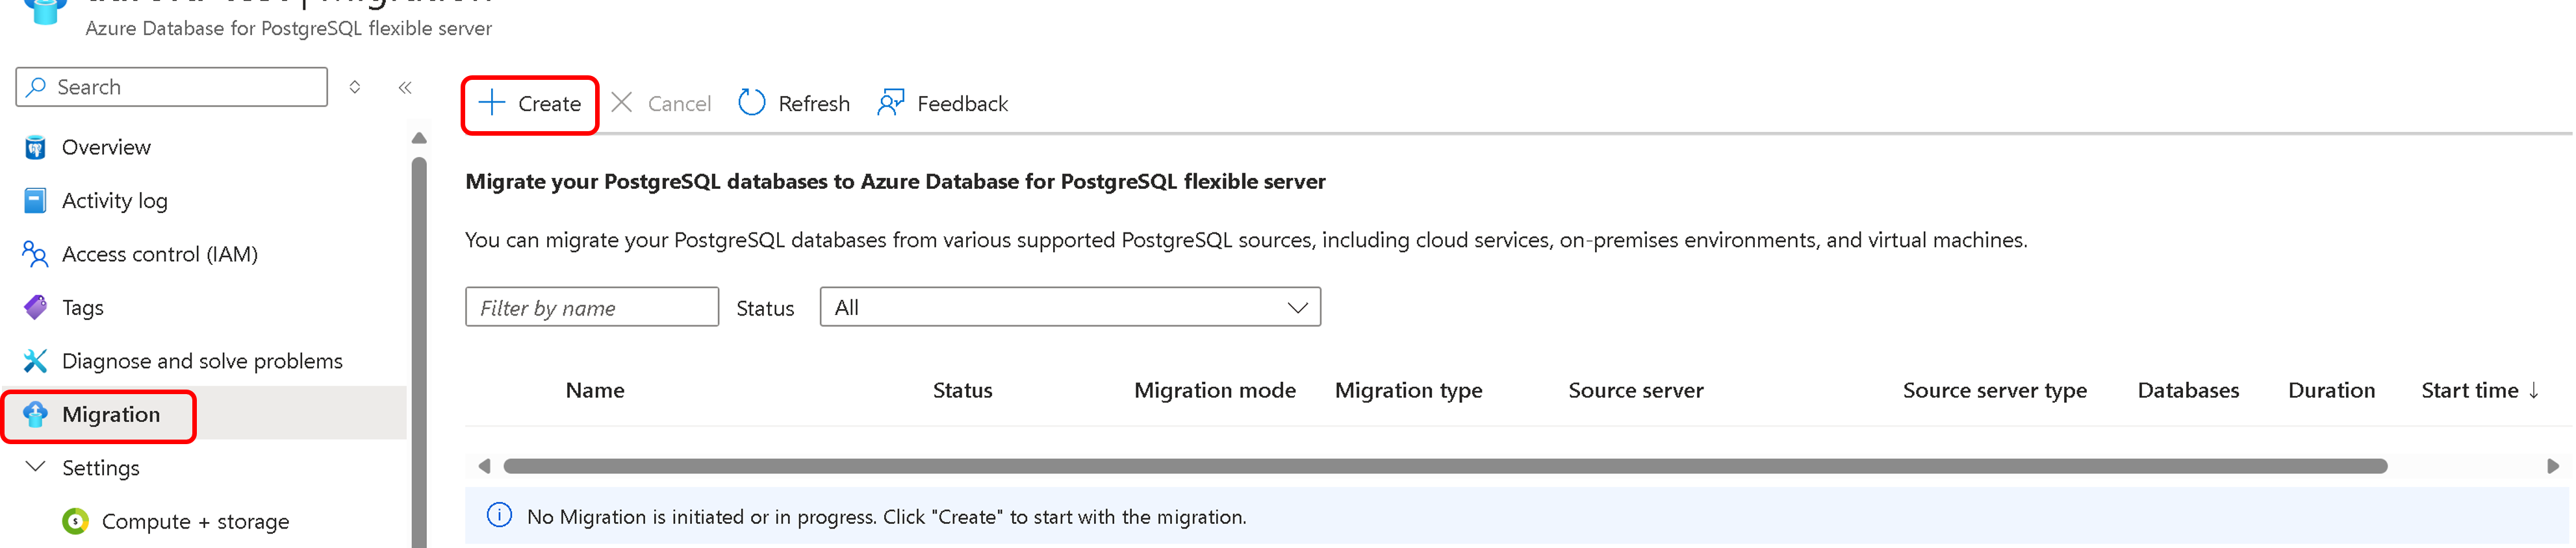
Go to your instance of Azure Database for PostgreSQL - Flexible Server.
On the service menu, select Migration.

Select Create to migrate from Amazon Aurora to a flexible server.
The first time you use the migration service, an empty grid appears with a prompt to begin your first migration. If migrations to your flexible server target are already created, the grid contains information about attempted migrations.
Select Create to step through a series of tabs to set up a migration.


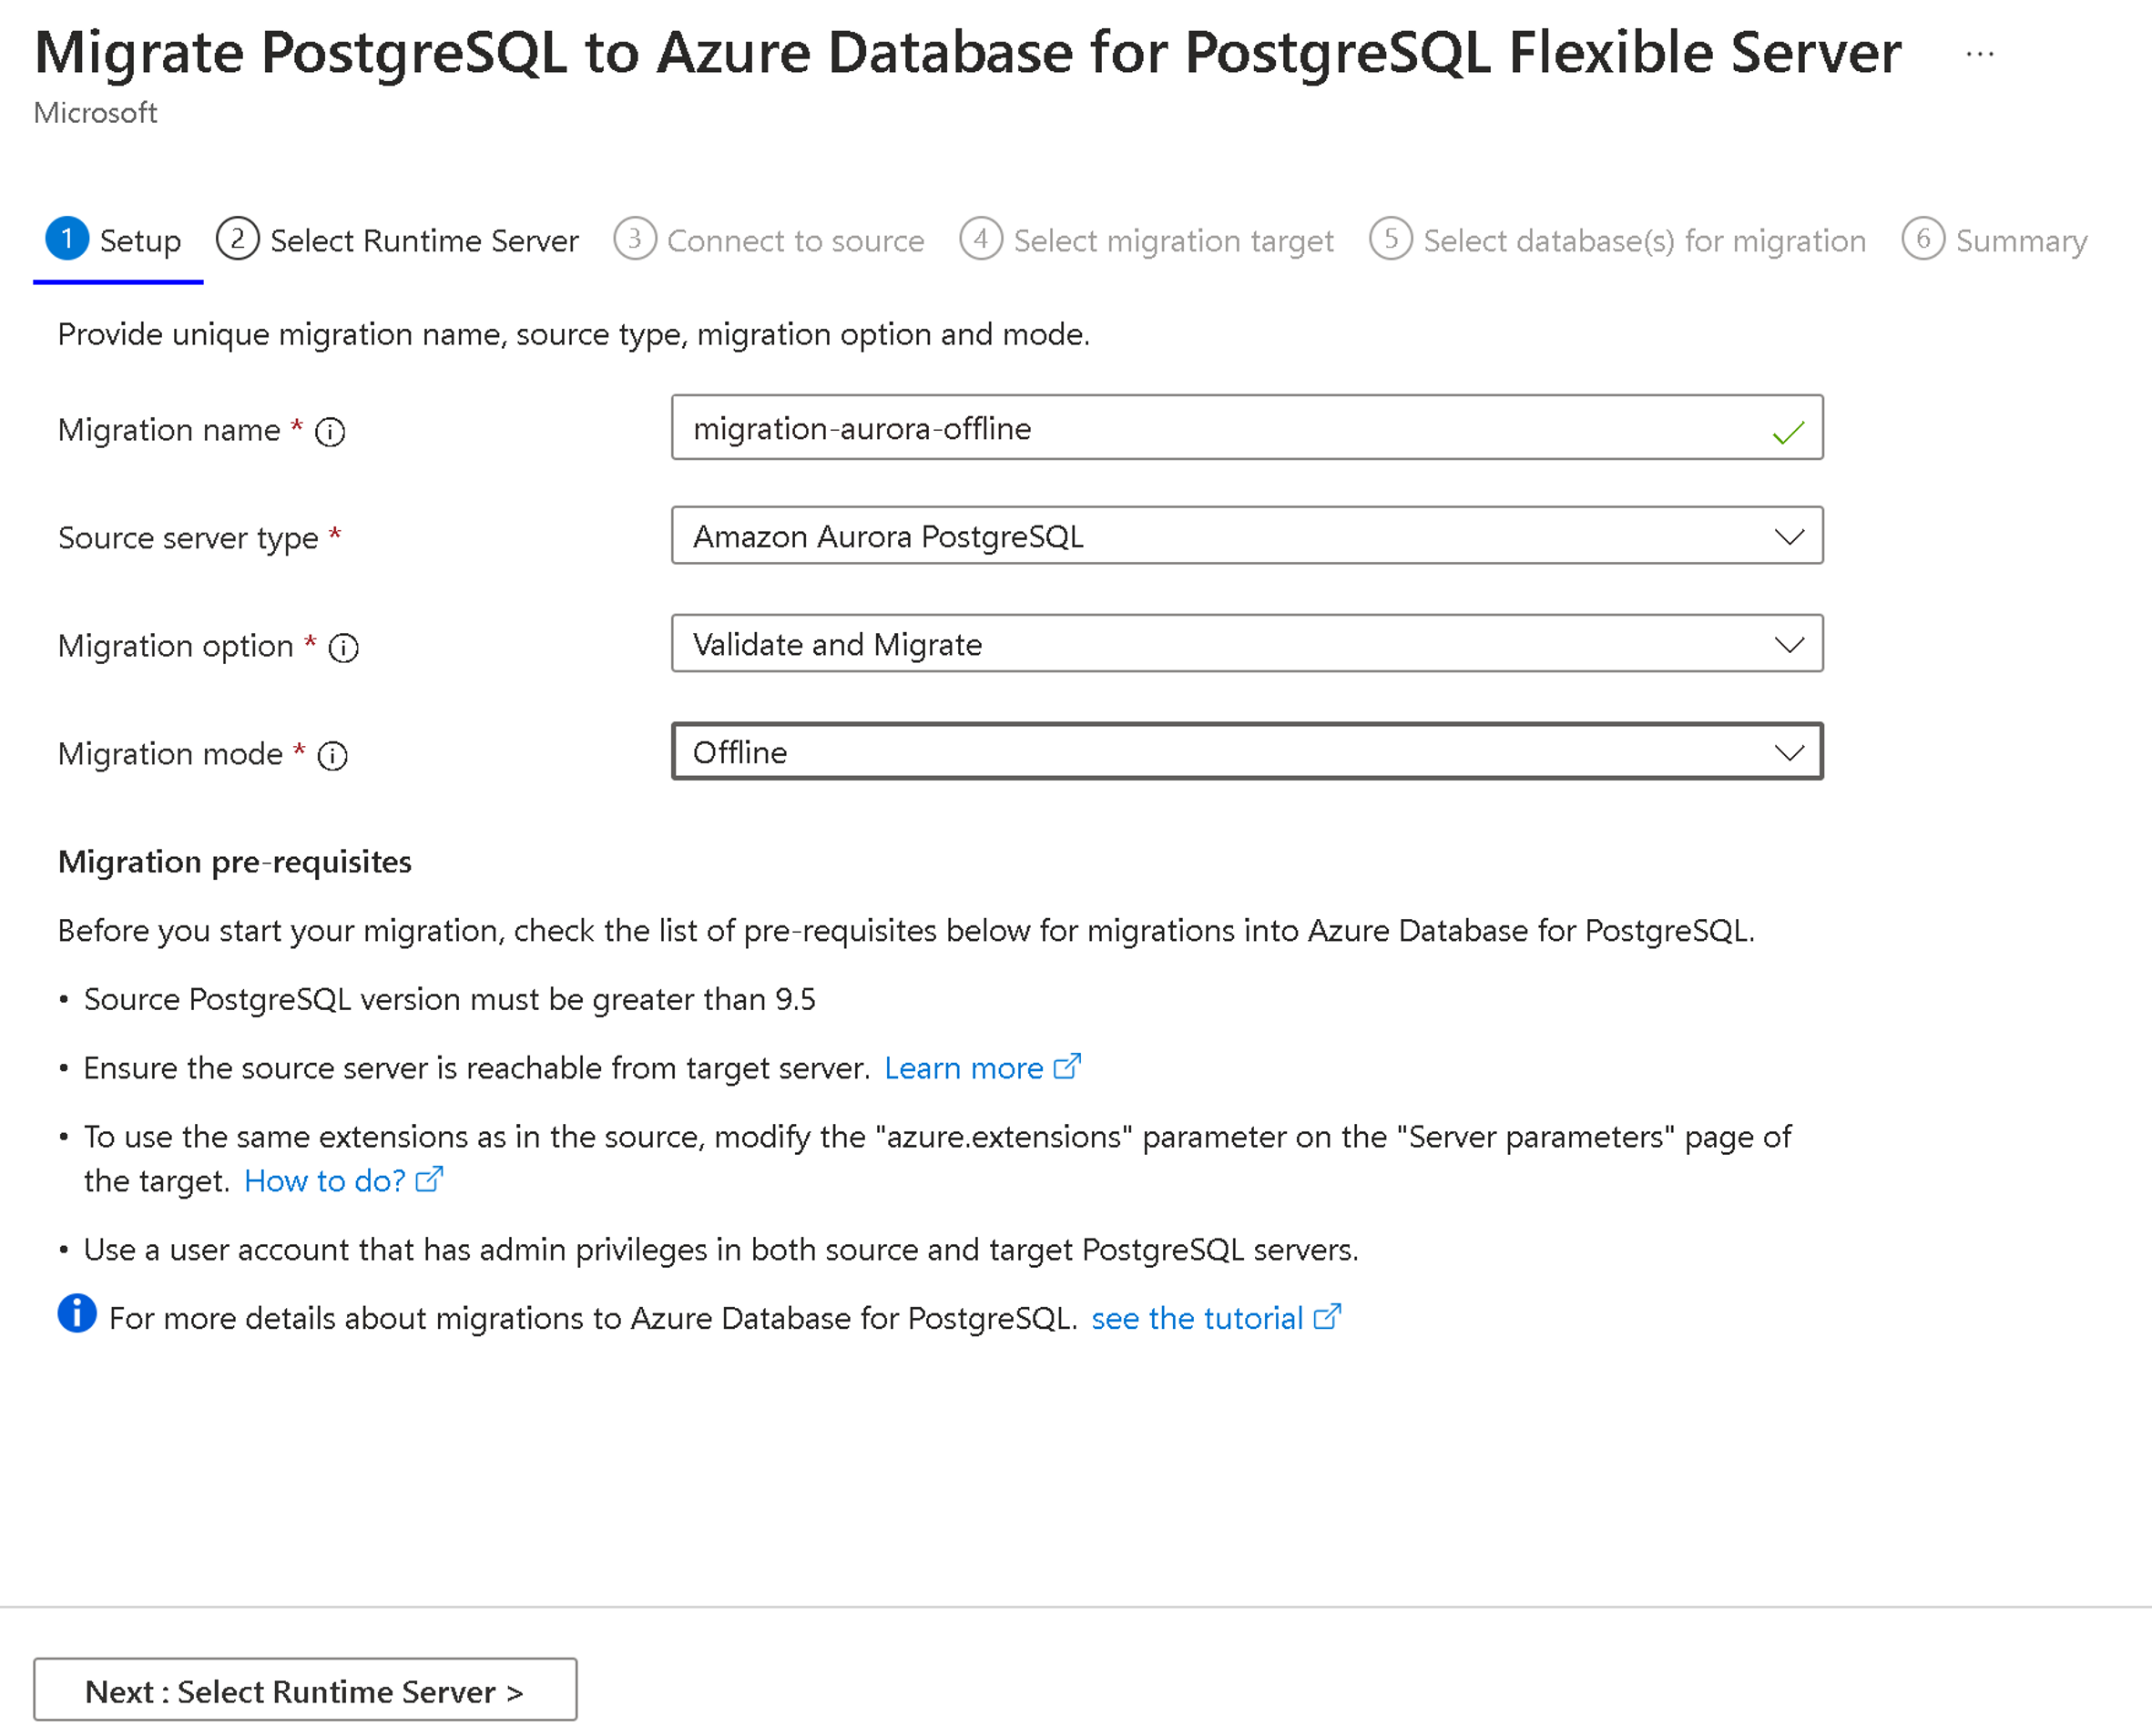
Setup
Enter or select the following information:
Migration name: Enter a unique identifier for each migration to this flexible server target. You can use only alphanumeric characters and hyphens (
-) in the migration name. The name can't start with a hyphen, and it must be unique for a target server. No two migrations to the same flexible server target can have the same name.Source server type: Select the source type that corresponds to your PostgreSQL source, such as a cloud-based PostgreSQL service, an on-premises setup, or a virtual machine.
Migration option: Choose one of the following options for a pre-migration validation:
- Validate. Checks your server and database readiness for migration to the target source.
- Migrate. Skips validations and starts the migration.
- Validate and Migrate. Performs validation before triggering a migration. If there are no validation failures, the migration is triggered.
A good practice is to select the Validate or Validate and Migrate option for pre-migration validations.
For more information, see Premigration validations.
Migration mode: Select the mode for the migration. The default option is Offline.
Select Next: Connect to source.
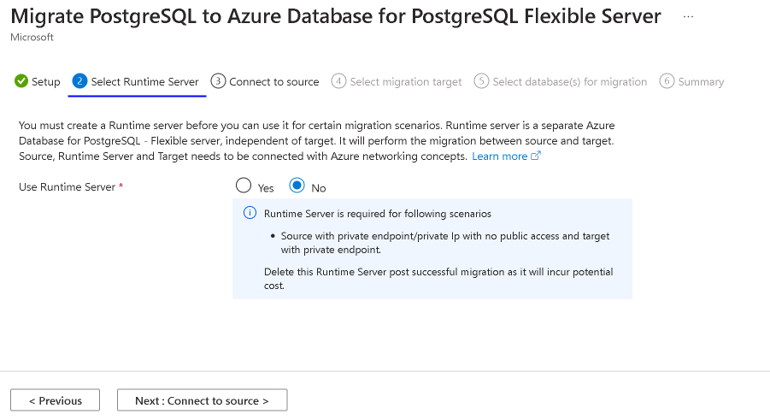
Select the runtime server
The migration runtime server is a specialized feature of the migration service. The runtime server acts as an intermediary server during migration. It's a separate instance of Azure Database for PostgreSQL - Flexible Server that isn't the target server. The runtime server facilitates the migration of databases from a source environment that is accessible only via a private network.
For more information, see Migration runtime server.
Connect to the source
On the Connect to source tab, enter or select the following information for the database source:
Server name: Enter the host name or the IP address of the source PostgreSQL instance.
Port: Enter the port number of the source server.
Server admin login name: Enter the username of the source PostgreSQL server.
Password: Enter the password of the source PostgreSQL server.
SSL mode: Supported values are Prefer and Require. When Secure Sockets Layer (SSL) at the source PostgreSQL server is off, select Prefer. If SSL at the source server is on, select Require. SSL values are set in the postgresql.conf file.
Test Connection: Initiates a connectivity test between the target and the source. When the connection is successful, go to the next step to identify networking issues between the target and source and to verify the username and password for the source. Establishing a test connection takes a few minutes.
After a successful test connection, select Next: Select migration target.

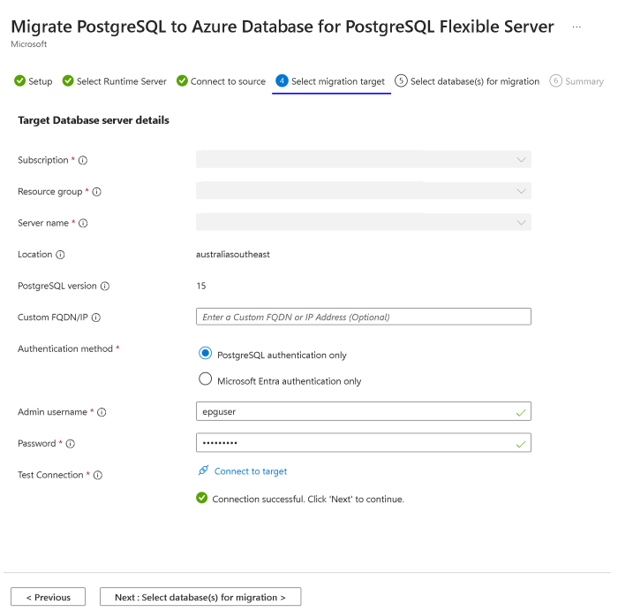
Select the migration target
On the Select migration target tab, enter or select the following information for the flexible server target, in addition to subscription, resource group, and server name:
Admin username: The admin username of the target PostgreSQL server.
Password: The password of the target PostgreSQL server.
Test Connection: Initiates a connectivity test between the target and the source. When the connection is successful, go to the next step to identify networking issues between the target and source and to verify the username and password for the target server. Establishing a test connection takes a few minutes.
After a successful test connection, select Next: Select database(s) for migration.
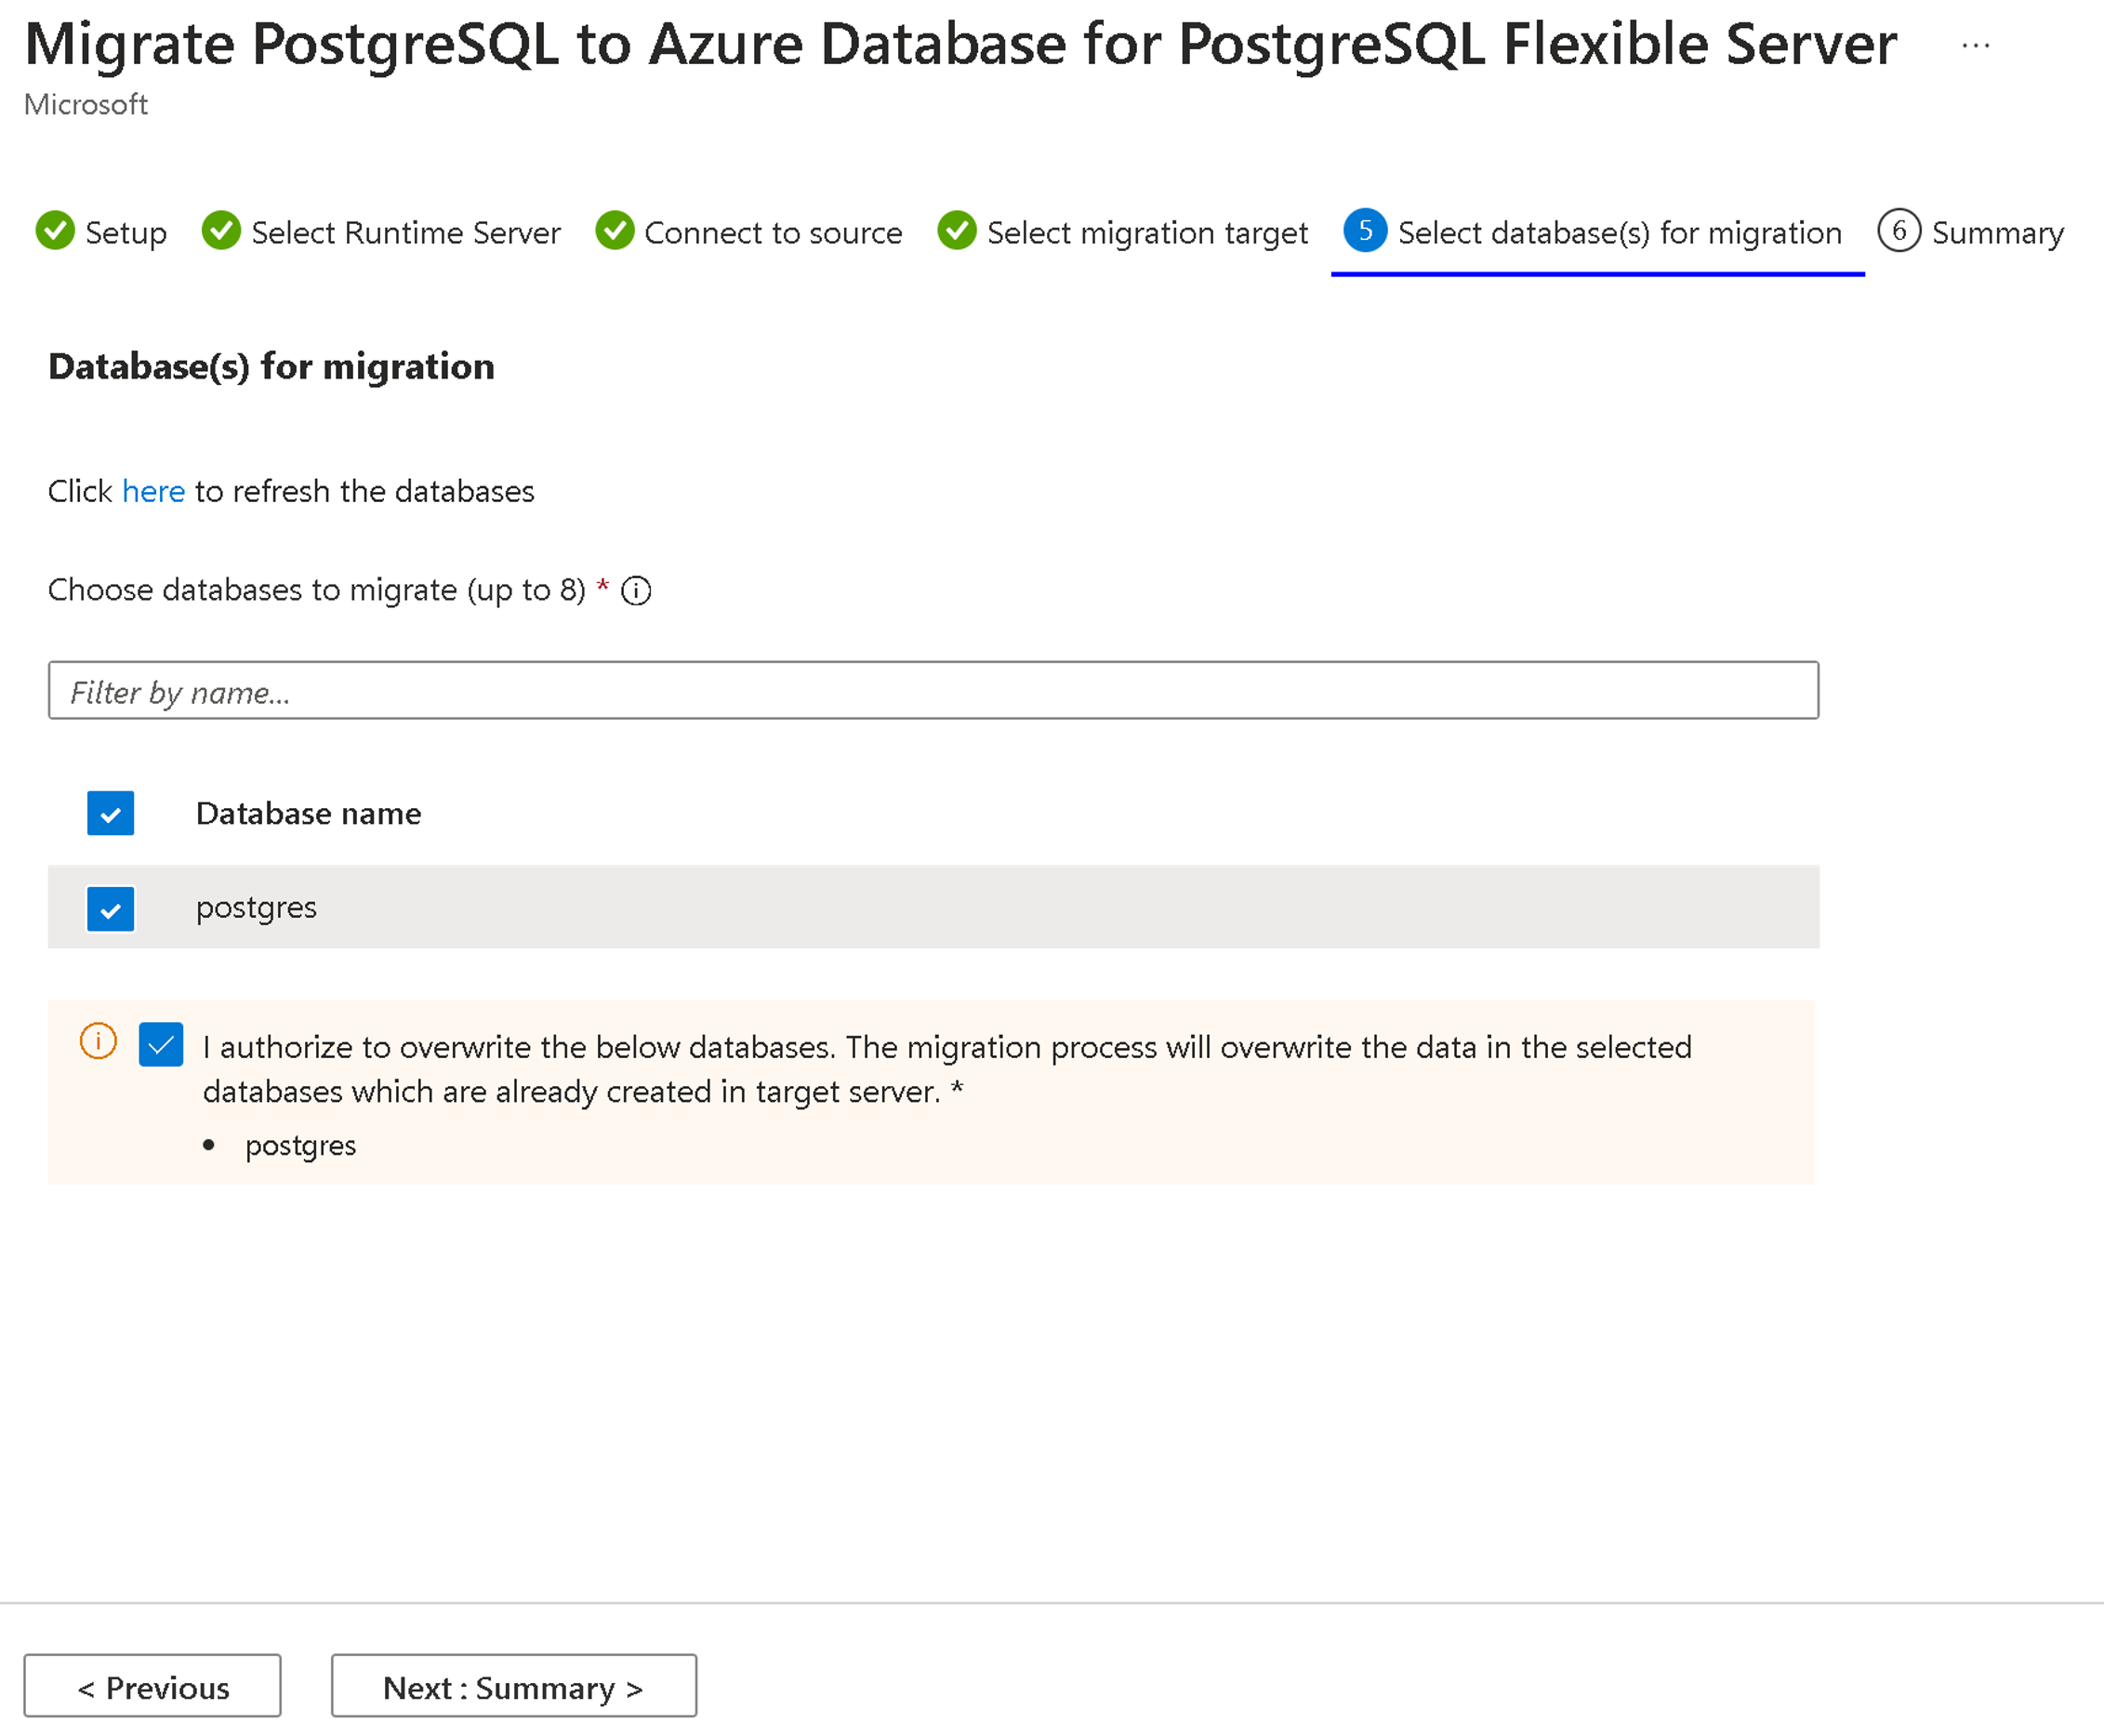
Select databases for migration
On the Select database for migration tab, select from a list of user databases to migrate from your source PostgreSQL server.
After you select the databases, select Next: Summary.
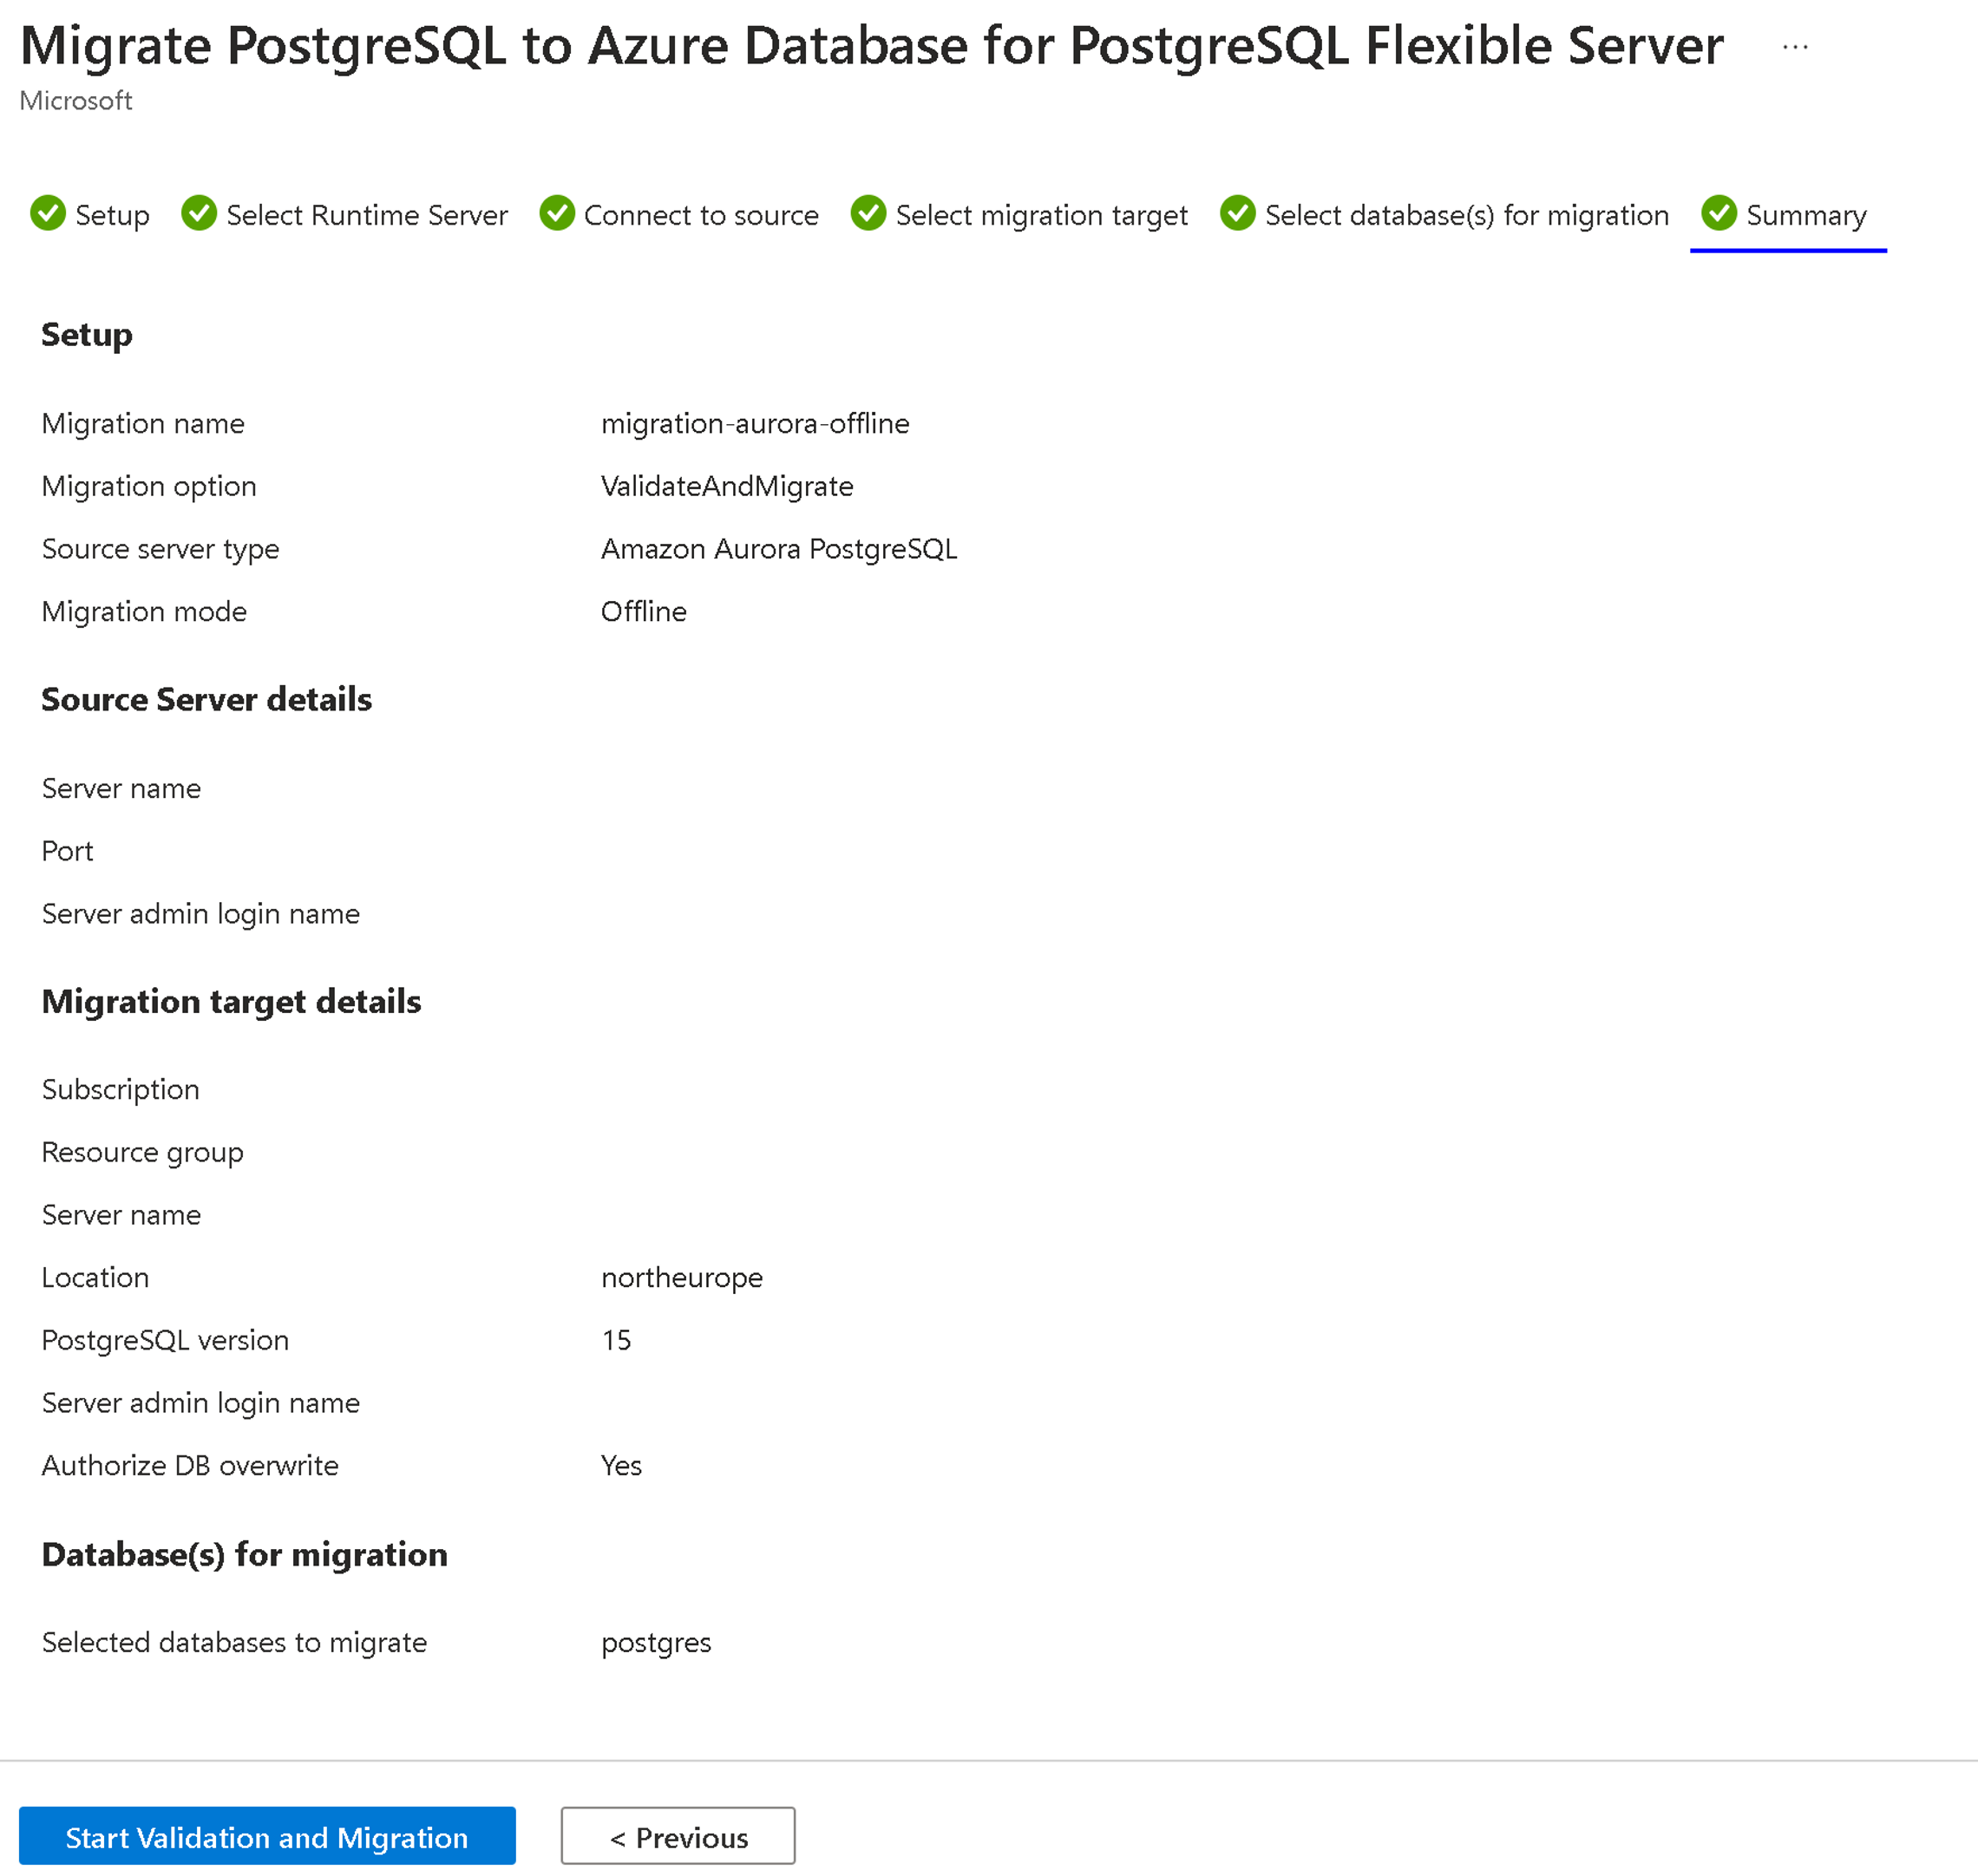
Summary
The Summary tab summarizes all the source and target details for creating the validation or migration. Review the details, and then select Start Validation and Migration.
Monitor the migration
Within a few seconds after you select Start Validation and Migration, a notification appears to say that the validation or migration creation is successful. You're redirected to the Flexible Server instance Migration pane. The state entry is InProgress and the substate is PerformingPreRequisiteSteps. The workflow takes 2 to 3 minutes to set up the migration infrastructure and check network connections.

The grid that displays the migrations has these columns:
- Name
- Status
- Migration mode
- Migration type
- Source server
- Source server type
- Databases
- Duration
- Start time
The entries are displayed in descending order of start time, with the most recent entry on the top. You can select Refresh in the menu bar to refresh the status of the validation or migration run.
Migration details
In the list of migrations, select the name of a migration to see associated details.
On the Setup tab, select the migration option Validate and Migrate. In this scenario, validations are completed before migration starts. After the PerformingPreRequisiteSteps substate is completed, the workflow moves into the Validation in Progress substate.
If validation has errors, the migration moves into a Failed state.
If validation is complete without any error, the migration starts, and the workflow moves into the substate Migrating Data.
You can check validation details at the instance level and at the database level:
Validation at the instance level:
- Check validation related to the connectivity check for the source version (the
PostgreSQL version >= 9.5server parameter check) if the extensions are enabled in the server parameters of the instance of Azure Database for PostgreSQL - Flexible Server.
- Check validation related to the connectivity check for the source version (the
Validation at the database level:
- Check validation of the individual databases related to extensions and collations support in Azure Database for PostgreSQL - Flexible Server.
You can see the current status for the migration and validation on the migration details pane.

The following tables describe some possible migration states and substates.
Migration states
| State | Description |
|---|---|
| InProgress | The migration infrastructure setup is underway, or the actual data migration is in progress. |
| Canceled | The migration is canceled or deleted. |
| Failed | The migration failed. |
| Validation failed | The validation failed. |
| Succeeded | The migration succeeded and is completed. |
| WaitingForUserAction | Applicable only in online migrations. Waiting for a user to perform a cutover. |
Migration substates
| Substate | Description |
|---|---|
| PerformingPreRequisiteSteps | Infrastructure setup is underway for data migration. |
| Validation in Progress | Validation is in progress. |
| MigratingData | Data migration is in progress. |
| CompletingMigration | Migration is in the final stages of completion. |
| Completed | Migration is completed. |
| Failed | Migration failed. |
Validation substates
| Substate | Description |
|---|---|
| Failed | Validation failed. |
| Succeeded | Validation is successful. |
| Warning | Validation shows a warning. |
Cancel the migration
You can cancel any ongoing validations or migrations. The workflow must be in the In progress state to be canceled. You can't cancel a validation or migration that's in the Succeeded or Failed state.
Canceling a migration stops further migration activity on your target server and moves the migration attempt to a Canceled state. The cancel action rolls back all changes made on your target server by the migration service.
Verify the migration
When the database migration is finished, manually validate the data between the source and the target. Verify that all the objects in the target database are successfully created.
After migration, you can complete these tasks:
- Verify the data on your flexible server and ensure that it's an exact copy of the source instance.
- After verification, enable the high-availability option on your flexible server as needed.
- Change the SKU (version) of the flexible server to match the needs of your application. This change requires a restart of the database server.
- If you change any server parameters from their default values in the source instance, copy those server parameter values to the flexible server.
- Copy other server settings, such as tags, alerts, and firewall rules (if applicable), from the source instance to the flexible server.
- Make changes to your application to point the connection strings to a flexible server.
- Monitor the database performance closely to see if it requires performance tuning.