Tutorial: Secure a web server on a Windows virtual machine in Azure with TLS certificates stored in Key Vault
Applies to: ✔️ Windows VMs ✔️ Flexible scale sets
Note
Currently, this doc only works for Generalized images. If you attempt this tutorial by using a Specialized disk you will receive an error.
To secure web servers, a Transport Layer Security (TLS) certificate can be used to encrypt web traffic. TLS certificates can be stored in Azure Key Vault and allow secure deployments of certificates to Windows virtual machines (VMs) in Azure. In this tutorial you learn how to:
- Create an Azure Key Vault.
- Generate or upload a certificate to the Key Vault.
- Create a VM and install the IIS web server.
- Inject the certificate into the VM and configure IIS with a TLS binding.
Launch Azure Cloud Shell
The Azure Cloud Shell is a free interactive shell that you can use to run the steps in this article. It has common Azure tools preinstalled and configured to use with your account.
To open the Cloud Shell, just select Open Cloudshell from the upper right corner of a code block. You can also launch Cloud Shell in a separate browser tab by going to https://shell.azure.com/powershell. Select Copy to copy the blocks of code, paste them into the Cloud Shell, and press enter to run them.
Overview
Azure Key Vault safeguards cryptographic keys and secrets, such as certificates or passwords. Key Vault helps streamline the certificate management process and enables you to maintain control of keys that access those certificates. You can create a self-signed certificate inside Key Vault, or you can upload an existing, trusted certificate that you already own.
Rather than by using a custom VM image that includes certificates baked-in, inject certificates into a running VM. This process ensures that the most up-to-date certificates are installed on a web server during deployment. If you renew or replace a certificate, you don't also have to create a new custom VM image. The latest certificates are automatically injected as you create more VMs. During the whole process, the certificates never leave the Azure platform or are exposed in a script, command-line history, or template.
Create an Azure Key Vault
Before you can create a Key Vault and certificates, create a resource group with New-AzResourceGroup. The following example creates a resource group named myResourceGroupSecureWeb in the East US location:
$resourceGroup = "myResourceGroupSecureWeb"
$location = "East US"
New-AzResourceGroup -ResourceGroupName $resourceGroup -Location $location
Next, create a Key Vault with New-AzKeyVault. Each Key Vault requires a unique name and should be all lower case. Replace mykeyvault with your own unique Key Vault name in the following example:
$keyvaultName="mykeyvault"
New-AzKeyVault -VaultName $keyvaultName `
    -ResourceGroup $resourceGroup `
    -Location $location `
    -EnabledForDeployment
Generate a certificate and store it in Key Vault
For production use, you should import a valid certificate signed by a trusted provider with Import-AzKeyVaultCertificate. For this tutorial, the following example shows how you can generate a self-signed certificate with Add-AzKeyVaultCertificate that uses the default certificate policy from New-AzKeyVaultCertificatePolicy.
$policy = New-AzKeyVaultCertificatePolicy `
    -SubjectName "CN=www.contoso.com" `
    -SecretContentType "application/x-pkcs12" `
    -IssuerName Self `
    -ValidityInMonths 12

Add-AzKeyVaultCertificate `
    -VaultName $keyvaultName `
    -Name "mycert" `
    -CertificatePolicy $policy
Create a virtual machine
Set an administrator username and password for the VM with Get-Credential:
$cred = Get-Credential
Now you can create the VM with New-AzVM. The following example creates a VM named myVM in the EastUS location. If they don't already exist, the supporting network resources are created. To allow secure web traffic, the cmdlet also opens port 443.
# Create a VM
New-AzVm `
    -ResourceGroupName $resourceGroup `
    -Name "myVM" `
    -Location $location `
    -VirtualNetworkName "myVnet" `
    -SubnetName "mySubnet" `
    -SecurityGroupName "myNetworkSecurityGroup" `
    -PublicIpAddressName "myPublicIpAddress" `
    -Credential $cred `
    -OpenPorts 443

# Use the Custom Script Extension to install IIS
Set-AzVMExtension -ResourceGroupName $resourceGroup `
    -ExtensionName "IIS" `
    -VMName "myVM" `
    -Location $location `
    -Publisher "Microsoft.Compute" `
    -ExtensionType "CustomScriptExtension" `
    -TypeHandlerVersion 1.8 `
    -SettingString '{"commandToExecute":"powershell Add-WindowsFeature Web-Server -IncludeManagementTools"}'
It takes a few minutes for the VM to be created. The last step uses the Azure Custom Script Extension to install the IIS web server with Set-AzVmExtension.
Add a certificate to VM from Key Vault
To add the certificate from Key Vault to a VM, obtain the ID of your certificate with Get-AzKeyVaultSecret. Add the certificate to the VM with Add-AzVMSecret:
$certURL=(Get-AzKeyVaultSecret -VaultName $keyvaultName -Name "mycert").id

$vm=Get-AzVM -ResourceGroupName $resourceGroup -Name "myVM"
$vaultId=(Get-AzKeyVault -ResourceGroupName $resourceGroup -VaultName $keyVaultName).ResourceId
$vm = Add-AzVMSecret -VM $vm -SourceVaultId $vaultId -CertificateStore "My" -CertificateUrl $certURL | Update-AzVM
Configure IIS to use the certificate
Use the Custom Script Extension again with Set-AzVMExtension to update the IIS configuration. This update applies the certificate injected from Key Vault to IIS and configures the web binding:
$publicSettings = '{
    "fileUris":["https://raw.githubusercontent.com/Azure-Samples/compute-automation-configurations/master/secure-iis.ps1"],
    "commandToExecute":"powershell -ExecutionPolicy Unrestricted -File secure-iis.ps1"
}'

Set-AzVMExtension -ResourceGroupName $resourceGroup `
    -ExtensionName "IIS" `
    -VMName "myVM" `
    -Location $location `
    -Publisher "Microsoft.Compute" `
    -ExtensionType "CustomScriptExtension" `
    -TypeHandlerVersion 1.8 `
    -SettingString $publicSettings
Test the secure web app
Obtain the public IP address of your VM with Get-AzPublicIPAddress. The following example obtains the IP address for myPublicIP created earlier:
Get-AzPublicIPAddress -ResourceGroupName $resourceGroup -Name "myPublicIPAddress" | select "IpAddress"
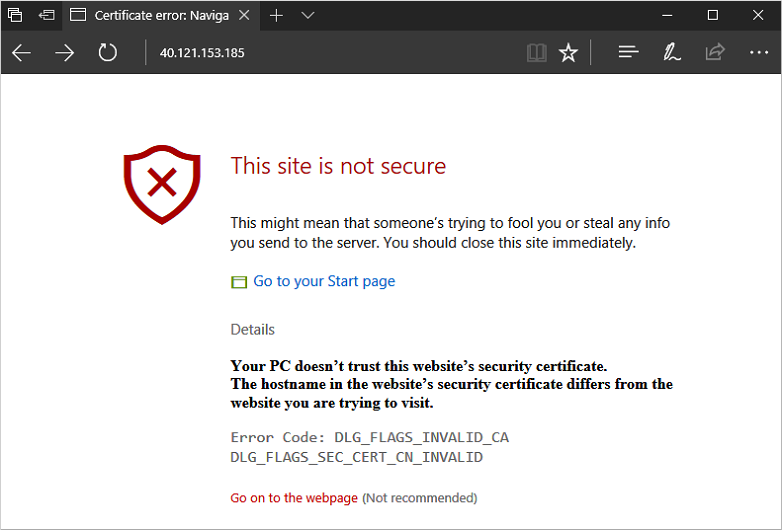
Now you can open a web browser and enter https://<myPublicIP> in the address bar. To accept the security warning if you used a self-signed certificate, select Details and then Go on to the webpage:
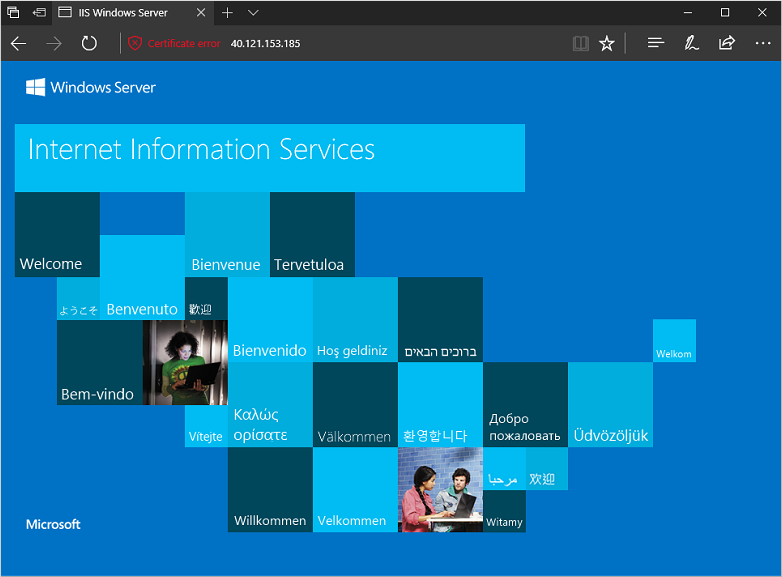
Your secured IIS website is then displayed as in the following example:
Next steps
In this tutorial, you secured an IIS web server with a TLS certificate stored in Azure Key Vault. You learned how to:
- Create an Azure Key Vault.
- Generate or upload a certificate to the Key Vault.
- Create a VM and install the IIS web server.
- Inject the certificate into the VM and configure IIS with a TLS binding.
For prebuilt virtual machine script samples, see:
Feedback
Coming soon: Throughout 2024 we will be phasing out GitHub Issues as the feedback mechanism for content and replacing it with a new feedback system. For more information see: https://aka.ms/ContentUserFeedback.
Submit and view feedback for