Configure the connector for Salesforce
The connector for Salesforce in Dynamics 365 Contact Center allows organizations to engage with customers using omnichannel capabilities while keeping their investments in non-Microsoft CRM solutions.
The omnichannel add-in uses data connectors to work with non-Microsoft CRM solutions. The connector for Salesforce helps bring the contacts and accounts data from Salesforce into Dataverse.
Prerequisites
- Access to Salesforce instance.
- System administrator role for Dynamics 365 Contact Center and Salesforce.
- License for Dynamics 365 Contact Center.
- Salesforce license to access change data capture.
Note
We recommend the following:
- Back up the existing data in the Contact and Account tables in Dataverse before you set up the connector to rollback if any data issues occur.
- For optimal performance, limit the data size to 10 GB. Also, make sure that you have sufficient Salesforce API requests limit to support your data syncing needs.
Configure the data connector
Important
After you configure the data connector and sync it from the Salesforce instance, we recommend that you don't make any changes to the synchronized data in Dataverse as the changes aren't synced back with Salesforce. If you need to, update the data in Salesforce only.
In the site map of Contact Center admin center, go to Workspaces under Agent experience, and select Manage for Data synchronization from external CRMs. You can also select Open under CRM connection wizard on the home page.
On the Data synchronization from external CRMs page, select New.
On Create a CRM connector, select Salesforce, and select Next. The Connection Setup dialog displays Sign in if you're connecting to Salesforce for the first time, or the ellipses.
Note
The system redirects you to Power Apps to connect to your Salesforce instance. The connection is used by Dynamics 365 to sync data.
- Select the displayed option and then select Add new connection.
- On the dialog that appears, select the Salesforce environment and Salesforce API version, and select Sign in.
- On the Salesforce sign in page, sign in with the Salesforce user credentials. Complete the multifactor authentication if necessary. The Allow Access dialog appears.
- Select Allow. A green tick mark on the Connection Setup dialog indicates a successful connection to the Salesforce instance.
- Select Create.
On the Add Third party CRM connector, select I agree to share connector permissions, and select Next.
- On the Enable salesforce permissions page, complete the steps listed on the page by signing into the Salesforce instance that opens on a new tab.
- Go to the setup page in Contact Center admin center, and select the checkbox that indicates you completed the steps in Salesforce.
Select Next.
On the Choose tables to sync page, select the Accounts and Contacts tables that you want to sync. To maintain the relationship about the linked data between the records, we recommend that you select both the tables.
Select Next, and do the following steps in the Column mapping section:
- Map the source and destination columns. You can also update the predefined mappings according to your business needs. The source column shows compatible data type fields only. For the list of compatible data types, see the table in Data types supported in Dataverse.
- Repeat the steps for the selected tables.
Select Next, and on the Teams permissions page, select the Teams permission. The Team ID is used to write the data into Dataverse and therefore the Team ID must have read and write permissions on the selected tables. Otherwise, data sync fails. More information: Teams in Dataverse
On the next page, review the mappings for each of the tables that you selected. You can go back and change a setting.
Select Create. A successfully connected message is displayed on the Summary page.
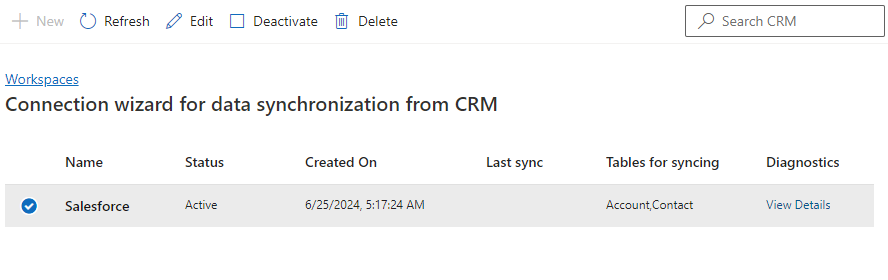
Select the checkbox to activate the connector and data sync, and select Done. You can view the sync status on the Data synchronization from external CRMs page.
Data types supported in Dataverse
Dataverse supports the following data types. Dataverse doesn't support the Virtual and EntityName data types.
| Dataverse columns of attribute type | Salesforce columns of data type type |
|---|---|
| Boolean | boolean |
| Integer, BigInt | integer |
| Integer, BigInt, Decimal, Double, Number | number |
| String/Memo | string: date. datetime Note: ID and reference aren't accepted. |
| Uniqueidentifier, Lookup, Owner, Customer | string with data type: ID, reference |
| DateTime | string with data type: date, datetime |
Predefined data mappings
The predefined data mappings for the Contact table are as follows.
| Salesforce field name | Dataverse field Name |
|---|---|
| AssistantName | AssistantName |
| AssistantPhone | AssistantPhone |
| Birthdate | BirthDate |
| GUID from SF Id (transformed data) | ContactId |
| Department | Department |
| Description | Description |
| EMailAddress1 | |
| Fax | Fax |
| FirstName | FirstName |
| LastName | LastName |
| MobilePhone | MobilePhone |
| Salutation | Salutation |
| Phone | Telephone1 |
The predefined data mappings for the Account table are as follows.
| Salesforce fField name | Dataverse field Name |
|---|---|
| GUID from SF AccountId (transformed data) | AccountId |
| AccountNumber | AccountNumber |
| Description | Description |
| Fax | Fax |
| Name | Name |
| NumberOfEmployees | NumberOfEmployees |
| Sic | SIC |
| Phone | Telephone1 |
| TickerSymbol | TickerSymbol |
Manage the data connector
The actions that you can do with the selected connector are listed in this section.
When you update to add new tables or mappings, the data for the existing tables and mappings is also synced. If a table or mapped field is removed, the data remains in Dataverse and new data only isn't synced.
- Activate or Deactivate the connector.
- View diagnostic details.
- Edit the details of the connector:
- Data tables: Update the tables that you want to sync.
- Field mappings: Update the column mappings. Use the reset option to reset the mappings to the out-of-the-box defined ones.
- Data access permissions: Update the Teams ID that's used to write the data into Dataverse.