Configure assignment methods and rules for queues
Applies to: Dynamics 365 Contact Center—embedded, Dynamics 365 Contact Center—standalone, and Dynamics 365 Customer Service
After creating queues, if you want to use custom assignment methods, you'll create assignment rulesets comprising rules.
You can create the custom assignment methods in the admin center app.
In unified routing, the process of creating assignment rulesets involves the following steps:
Create assignment rulesets: For each assignment ruleset, you'll configure the conditions and order by option.
Create selection criteria: If you create more than one assignment ruleset, you'll need to define the rules for the selection criteria. The selection criteria determines the ruleset that should be run out of the many that exist. Learn more in Configure selection criteria.
Create an assignment method and configure rules
Follow the steps to create a custom assignment method:
In the site map of Customer Service admin center, select Queues in Customer support.
On the Queues page, select Manage for Advanced queues.
Select a queue, and on the Assignment method page, select Create New.
In the Create work assignment dialog, enter a name and description for the ruleset, and select Create.
Select the ruleset, and select Edit. The options to configure prioritization rulesets and assignment rulesets are displayed.
Do the following to set up prioritization rulesets:
a. On the Create Prioritization Ruleset dialog, enter a name and description for the ruleset, and select Create.
b. On the Decision list page, select Create rule, and on the Create prioritization rule dialog, enter a rule name and define the conditions when the rule should be run. By default, the root record for which you're creating the rule is selected and displayed at the top of the condition builder.
c. To route the work item to customer service representatives (service representatives or representatives), select the attribute on which you want to define the order by.
d. Create as many rules as needed.
Note
For routing records, we recommend that you manage the custom prioritization rules through the UI only and not create or update them through scripts.
To create an assignment ruleset, on the Assignment method page, select Create ruleset.
Enter a name and description for the ruleset, and select Create. The ruleset is created.
On the Assignment ruleset page that appears, select Create rule.
In the Create assignment rule dialog, do the following to add conditions and order by attributes:
a. Rule Name: Enter a rule name.
By default, the root record is selected and displayed at the top of the condition builder.
b. Conditions: Select Add to select an attribute or related entity and define condition. You can define conditions for up to two levels of the related records and attributes.
c. Order by: Select an attribute to define the order of work assignment if multiple service representatives match the condition.
- Ordering Attributes:
- Least active: Is available for voice channel queues only. Work item is routed to the representative who is the least active among all who match the skills, presence, and capacity. Learn more in Types of assignment methods.
- Round Robin
- Unit-based available capacity
- Profile-based available capacity
- Proficiency
- Skill count
- User Attributes: These attributes are defined on the system user entity.
d. Select Create.
e. Repeat the steps a through d to configure multiple rules.
Note
We recommend that you reduce the granularity of the conditions for the assignment rules in a descending order.
- Ordering Attributes:
You can sort the order in which the rules should be evaluated during work assignment. For other tasks that you can do, such as copy, edit, and delete, see Options available for rulesets.
If you create more than one assignment ruleset, a warning message is displayed that alerts you to define the selection criteria to run the rulesets.
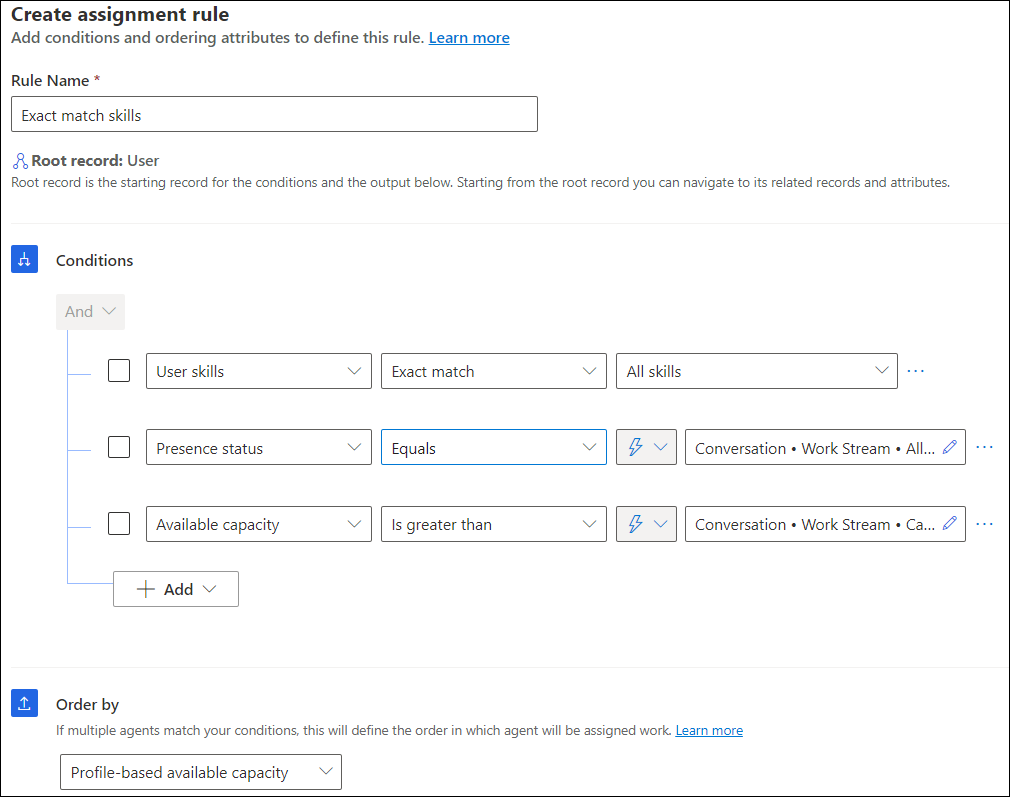
Create a sample assignment rule with the following conditions.
Attribute Operator Match type Attribute value User skills Exact match All skills Presence status Equals Dynamic match Conversation.Workstream.Allowed Presences Available capacity Is greater than Dynamic match Conversation.Workstream.Capacity Note
If you want to define a condition on unit-based capacity of users, then use the Available capacity attribute only as suggested in the example. Use the "is greater than" operator to ensure that available capacity is more than the required capacity.

Configure selection criteria
The selection criterion lets you define a set of conditions to determine the ruleset to be run when the condition is met. You should define the selection criteria when you configure more than one ruleset in the custom assignment method. After the ruleset is picked up by the work assignment engine, if no rule matches in the selection criteria or if no selection criterion is met, the system runs the default ruleset.
Follow these steps to configure the selection criteria for the assignment rulesets:
For the assignment method, in the Assignment section, select Create rule, and in the Decision list area, select Create rule.
In the Create selection criteria rule dialog, enter a rule name, and define the conditions.
In Execute ruleset, select the assignment ruleset that must be run when the conditions are met, and then select Create. The rule is listed in the Decision list area.
Define as many rules as the number of assignment rulesets.
Related information
Create workstreams
Create queues
Set up records for unified routing
Set up skill-based routing for unified routing
FAQ about unified routing in Customer Service, Omnichannel for Customer Service