Move the opportunity through different stages
An opportunity goes through different stages (also known as pipeline phase) as you make progress and get more details about the opportunity. Each stage defines the information that you should collect about the opportunity to methodically progress and increase your chances of winning the deal.

Note
- It's important to keep the stage current as it's used in sales charts and dashboards. For example, the funnel chart displays the opportunities in different stages.
- If your organization has multiple business process flows for the opportunity entity, the Pipeline Phase field stores the last stage change information done on the opportunity record through any business process flow. If you're using multiple business process flows on opportunity, exercise your discretion while using this field.
Move the opportunity to Qualify stage
After you gather the basic details about the customer, move the opportunity to the Qualify stage.
Note
When you qualify a lead, an opportunity is automatically created and moved to the Qualify stage.
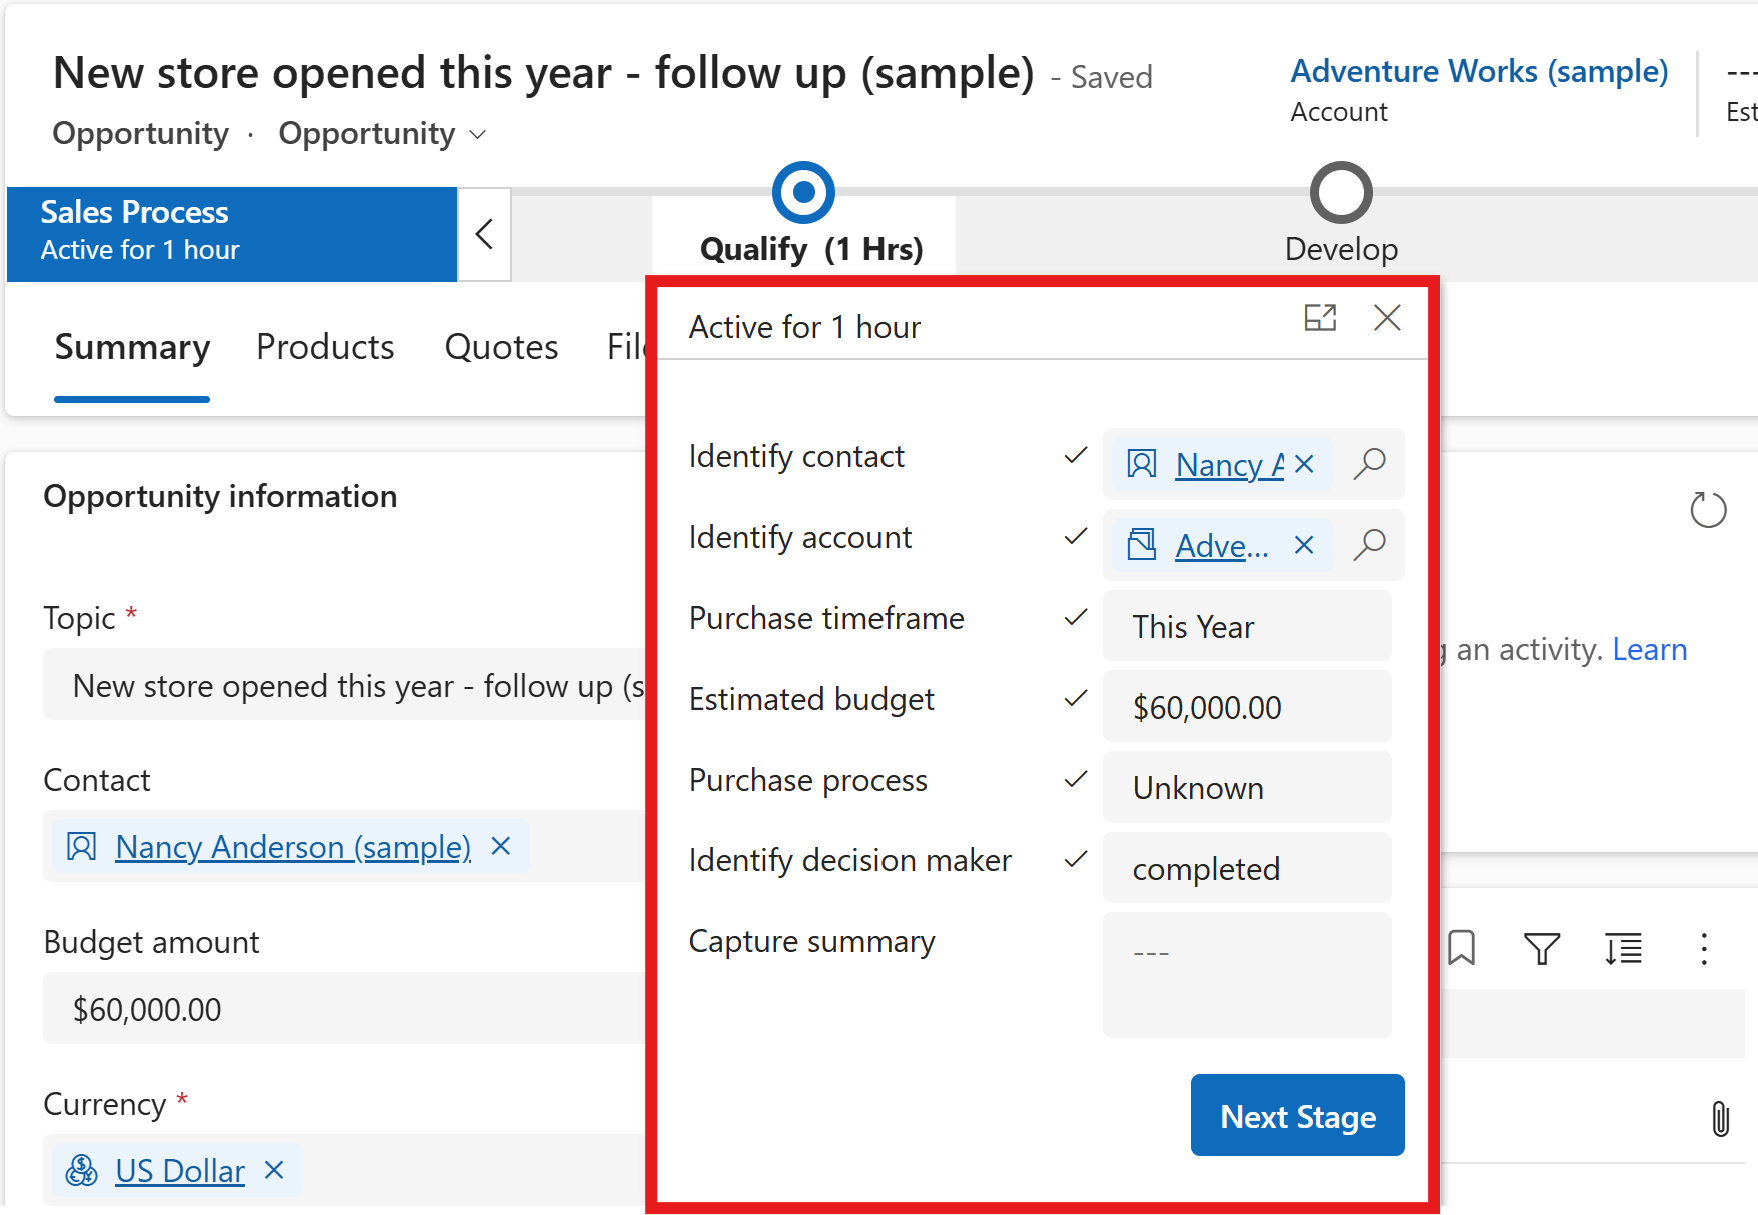
Select Qualify in the process bar and specify the following details about the customer:

Field Description Identify Contact Select the contact who is working on the opportunity from the customer's end. Identify Account Select the customer for the opportunity. Purchase Timeframe Select the purchase timeframe of the customer. Estimated Budget Enter the estimated budget of the customer. This amount is different from the estimated revenue. Depending on the budget the customer has, you can decide the products that best fit the budget. Purchase Process Select whether the purchase decision is made by an individual or committee. Identify Decision Maker Mark as complete after you identify the decision maker. More information: Add stakeholders and decision makers for the opportunity Select Next Stage.
The opportunity moves to the Develop stage of the process.
Move the opportunity to Develop stage
After you gather specific details about the customer need, move the opportunity to the Develop stage.
Select Develop in the process bar and specify the following details:
Field Description Customer Need Enter what interests the customer, such as specific product requirements. Proposed Solution Enter the plan for what your organization can offer the account, such as product details. Identify Stakeholders Select mark complete after you add stakeholders. Stakeholders are contacts from the customer's end who is involved in pursuing the opportunity. More information: Add stakeholders and decision makers for the opportunity Identify Competitors Select mark complete after you add the competitor information. More information: Add competitors for the opportunity Select Next stage.
The opportunity moves to the Propose stage of the process.
Move the opportunity to Propose stage
When you're ready to propose the solution to the customer, move the opportunity to the Propose stage.
In the Propose stage, select mark complete next to each of the following steps that you've completed:
Field Description Identify Sales Team Select mark complete after you add the sales team members. More information: Add sales team for the opportunity Develop Proposal Select mark complete after you create a proposal for the opportunity. This optional step indicates that you've included notes about how the account is approached. You can add the proposal as attachment to the opportunity in the Files tab. Complete Internal Review Select mark complete after you complete an internal review of the proposal. Present Proposal Select mark complete after you present the proposal to the stakeholders. Select Next stage.
The opportunity moves to the Close stage of the process.
The next step is to create a quote and send it to your customer. More information: Create a quote and send it to your customer
Move the opportunity to Close stage
When the opportunity materializes, you can move the opportunity to the Close stage.
In the Close stage, select mark complete next to each of the following steps that you've completed:
Field Description Complete Final Proposal: Select mark complete after you create a final proposal for the opportunity. You can add the proposal as attachment to the opportunity in the Files tab. Present Final Proposal Select mark complete after you present the final proposal to the customer. Confirm Decision Date Select the date by when you're expecting a decision from customer. Send Thank You Select mark complete after you send a thank you note to the customer. File De-brief Select mark complete after you create a de-brief for the opportunity. Select Finished when you're done with all the activities.
You can now close the opportunity as Won or Lost. More information: Close opportunities as won or lost