Tutorial: Configure virtual networking for a Microsoft Entra Domain Services managed domain
To provide connectivity to users and applications, a Microsoft Entra Domain Services managed domain is deployed into an Azure virtual network subnet. This virtual network subnet should only be used for the managed domain resources provided by the Azure platform.
When you create your own VMs and applications, they shouldn't be deployed into the same virtual network subnet. Instead, you should create and deploy your applications into a separate virtual network subnet, or in a separate virtual network that's peered to the Domain Services virtual network.
This tutorial shows you how to create and configure a dedicated virtual network subnet or how to peer a different network to the Domain Services managed domain's virtual network.
In this tutorial, you learn how to:
- Understand the virtual network connectivity options for domain-joined resources to Domain Services
- Create an IP address range and additional subnet in the Domain Services virtual network
- Configure virtual network peering to a network that's separate from Domain Services
If you don't have an Azure subscription, create an account before you begin.
Prerequisites
To complete this tutorial, you need the following resources and privileges:
- An active Azure subscription.
- If you don't have an Azure subscription, create an account.
- A Microsoft Entra tenant associated with your subscription, either synchronized with an on-premises directory or a cloud-only directory.
- You need Application Administrator and Groups Administrator Microsoft Entra roles in your tenant to enable Domain Services.
- You need Domain Services Contributor Azure role to create the required Domain Services resources.
- A Microsoft Entra Domain Services managed domain enabled and configured in your Microsoft Entra tenant.
- If needed, the first tutorial creates and configures a Microsoft Entra Domain Services managed domain.
Sign in to the Microsoft Entra admin center
In this tutorial, you create and configure the managed domain using the Microsoft Entra admin center. To get started, first sign in to the Microsoft Entra admin center.
Application workload connectivity options
In the previous tutorial, a managed domain was created that used some default configuration options for the virtual network. These default options created an Azure virtual network and virtual network subnet. The Domain Services domain controllers that provide the managed domain services are connected to this virtual network subnet.
When you create and run VMs that need to use the managed domain, network connectivity needs to be provided. This network connectivity can be provided in one of the following ways:
- Create an additional virtual network subnet in the managed domain's virtual network. This additional subnet is where you create and connect your VMs.
- As the VMs are part of the same virtual network, they can automatically perform name resolution and communicate with the Domain Services domain controllers.
- Configure Azure virtual network peering from the managed domain's virtual network to one or more separate virtual networks. These separate virtual networks are where you create and connect your VMs.
- When you configure virtual network peering, you must also configure DNS settings to use name resolution back to the Domain Services domain controllers.
Usually, you only use one of these network connectivity options. The choice is often down to how you wish to manage separate your Azure resources.
- If you want to manage Domain Services and connected VMs as one group of resources, you can create an additional virtual network subnet for VMs.
- If you want to separate the management of Domain Services and then any connected VMs, you can use virtual network peering.
- You may also choose to use virtual network peering to provide connectivity to existing VMs in your Azure environment that are connected to an existing virtual network.
In this tutorial, you only need to configure one these virtual network connectivity options.
For more information on how to plan and configure the virtual network, see networking considerations for Microsoft Entra Domain Services.
Create a virtual network subnet
By default, the Azure virtual network created with the managed domain contains a single virtual network subnet. This virtual network subnet should only be used by the Azure platform to provide managed domain services. To create and use your own VMs in this Azure virtual network, create an additional subnet.
To create a virtual network subnet for VMs and application workloads, complete the following steps:
In the Microsoft Entra admin center, select the resource group of your managed domain, such as myResourceGroup. From the list of resources, choose the default virtual network, such as aadds-vnet.
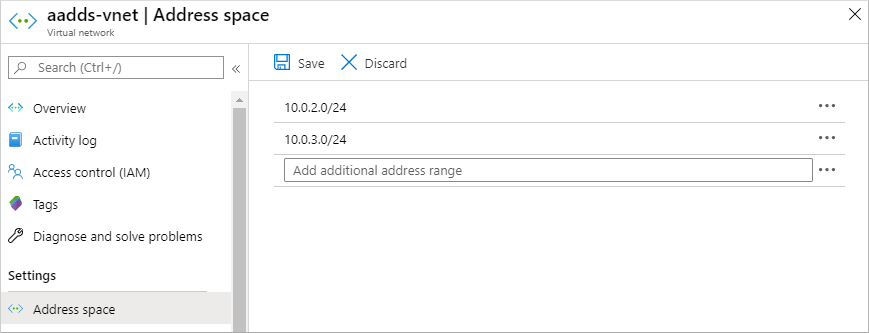
In the left-hand menu of the virtual network window, select Address space. The virtual network is created with a single address space of 10.0.2.0/24, which is used by the default subnet.
Add an additional IP address range to the virtual network. The size of this address range and the actual IP address range to use depends on other network resources already deployed. The IP address range shouldn't overlap with any existing address ranges in your Azure or on-premises environment. Make sure that you size the IP address range large enough for the number of VMs you expect to deploy into the subnet.
In the following example, an additional IP address range of 10.0.3.0/24 is added. When ready, select Save.
Next, in the left-hand menu of the virtual network window, select Subnets, then choose + Subnet to add a subnet.
Enter a name for the subnet, such as workloads. If needed, update the Address range if you want to use a subset of the IP address range configured for the virtual network in the previous steps. For now, leave the defaults for options like network security group, route table, service endpoints.
In the following example, a subnet named workloads is created that uses the 10.0.3.0/24 IP address range:
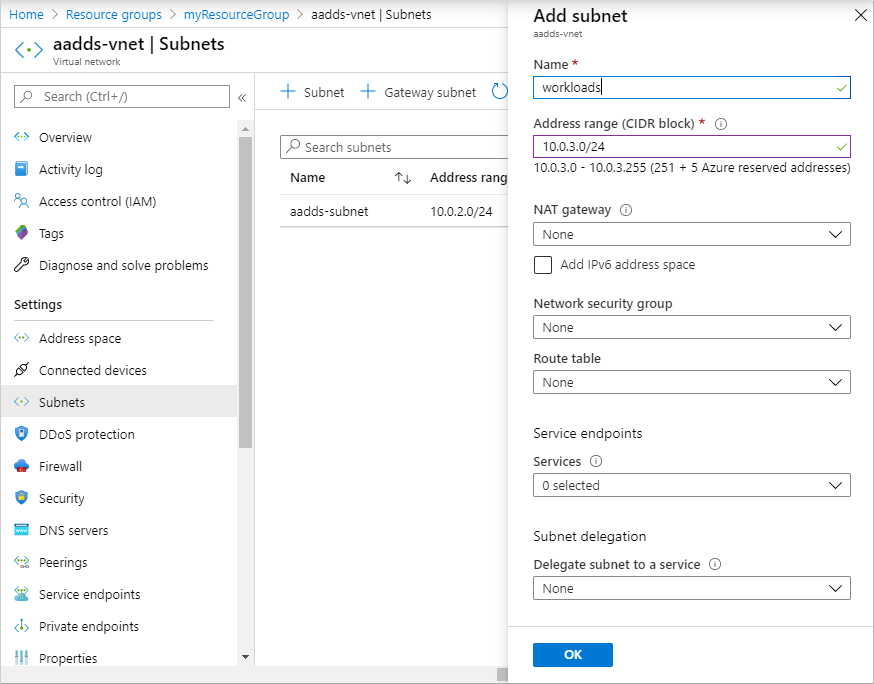
When ready, select OK. It takes a few moments to create the virtual network subnet.
When you create a VM that needs to use the managed domain, make sure you select this virtual network subnet. Don't create VMs in the default aadds-subnet. If you select a different virtual network, there's no network connectivity and DNS resolution to reach the managed domain unless you configure virtual network peering.
Configure virtual network peering
You may have an existing Azure virtual network for VMs, or wish to keep your managed domain virtual network separate. To use the managed domain, VMs in other virtual networks need a way to communicate with the Domain Services domain controllers. This connectivity can be provided using Azure virtual network peering.
With Azure virtual network peering, two virtual networks are connected together, without the need for a virtual private network (VPN) device. Network peering lets you quickly connect virtual networks and define traffic flows across your Azure environment.
For more information on peering, see Azure virtual network peering overview.
To peer a virtual network to the managed domain virtual network, complete the followings steps:
Choose the default virtual network created for your managed domain named aadds-vnet.
In the left-hand menu of the virtual network window, select Peerings.
To create a peering, select + Add. In the following example, the default aadds-vnet is peered to a virtual network named myVnet. Configure the following settings with your own values:
- Name of the peering from aadds-vnet to remote virtual network: A descriptive identifier of the two networks, such as aadds-vnet-to-myvnet
- Virtual network deployment type: Resource Manager
- Subscription: The subscription of the virtual network you want to peer to, such as Azure
- Virtual network: The virtual network you want to peer to, such as myVnet
- Name of the peering from myVnet to aadds-vnet: A descriptive identifier of the two networks, such as myvnet-to-aadds-vnet
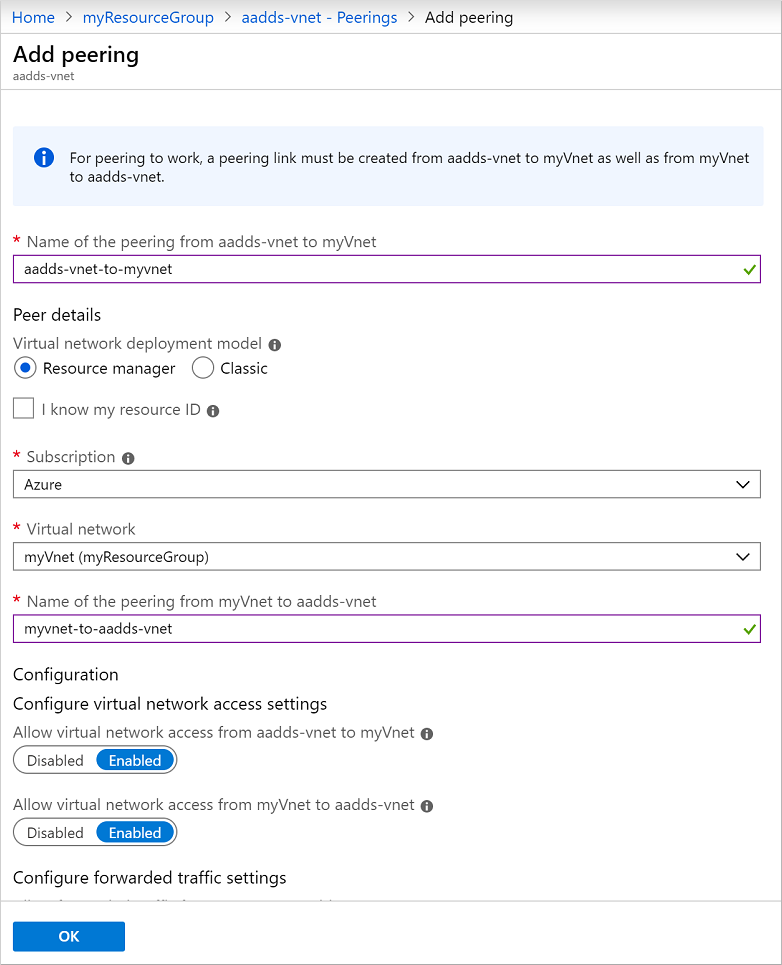
Leave any other defaults for virtual network access or forwarded traffic unless you have specific requirements for your environment, then select OK.
It takes a few moments to create the peering on both the Domain Services virtual network and the virtual network you selected. When ready, the Peering status reports Connected, as shown in the following example:
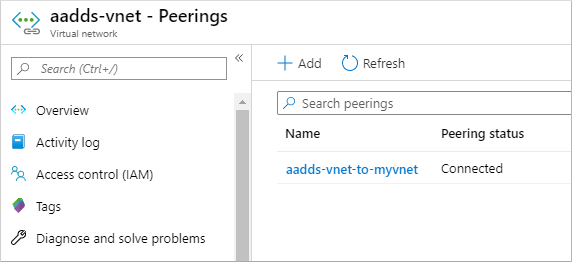
Before VMs in the peered virtual network can use the managed domain, configure the DNS servers to allow for correct name resolution.
Configure DNS servers in the peered virtual network
For VMs and applications in the peered virtual network to successfully talk to the managed domain, the DNS settings must be updated. The IP addresses of the Domain Services domain controllers must be configured as the DNS servers on the peered virtual network. There are two ways to configure the domain controllers as DNS servers for the peered virtual network:
- Configure the Azure virtual network DNS servers to use the Domain Services domain controllers.
- Configure the existing DNS server in use on the peered virtual network to use conditional DNS forwarding to direct queries to the managed domain. These steps vary depending on the existing DNS server in use.
In this tutorial, let's configure the Azure virtual network DNS servers to direct all queries to the Domain Services domain controllers.
In the Microsoft Entra admin center, select the resource group of the peered virtual network, such as myResourceGroup. From the list of resources, choose the peered virtual network, such as myVnet.
In the left-hand menu of the virtual network window, select DNS servers.
By default, a virtual network uses the built-in Azure-provided DNS servers. Choose to use Custom DNS servers. Enter the IP addresses for the Domain Services domain controllers, which are usually 10.0.2.4 and 10.0.2.5. Confirm these IP addresses on the Overview window of your managed domain in the portal.
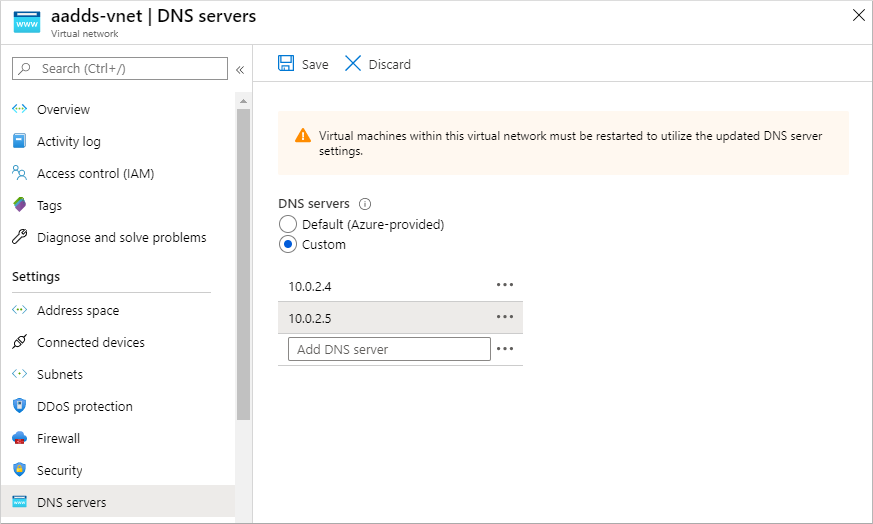
When ready, select Save. It takes a few moments to update the DNS servers for the virtual network.
To apply the updated DNS settings to the VMs, restart VMs connected to the peered virtual network.
When you create a VM that needs to use the managed domain, make sure you select this peered virtual network. If you select a different virtual network, there's no network connectivity and DNS resolution to reach the managed domain.
Next steps
In this tutorial, you learned how to:
- Understand the virtual network connectivity options for domain-joined resources to Domain Services
- Create an IP address range and additional subnet in the Domain Services virtual network
- Configure virtual network peering to a network that's separate from Domain Services
To see this managed domain in action, create and join a virtual machine to the domain.