Authentication setup (preview)
In order to be able to work with authentication, you need to set up its three component parts:
- Microsoft Entra ID Application (formerly Azure AD App)
- Front-end sample
- Back-end sample
To work with authentication in Fabric, follow this guide.
Azure storage service provisioning
This sample demonstrates how to store and read data from and to lakehouses. This requires generating tokens for the Azure Storage service in OBO flows. To generate tokens, users need to consent to the application using Azure Storage. In order to consent, Azure Storage needs to be provisioned in the tenant.
To make sure Azure Storage is provisioned in the tenant:
Log into the Azure portal
Go to Microsoft Entra ID > Enterprise applications
In the filters, choose application type = all aplications. The application ID starts with e406a681-f3d4-42a8-90b6-c2b029497af1
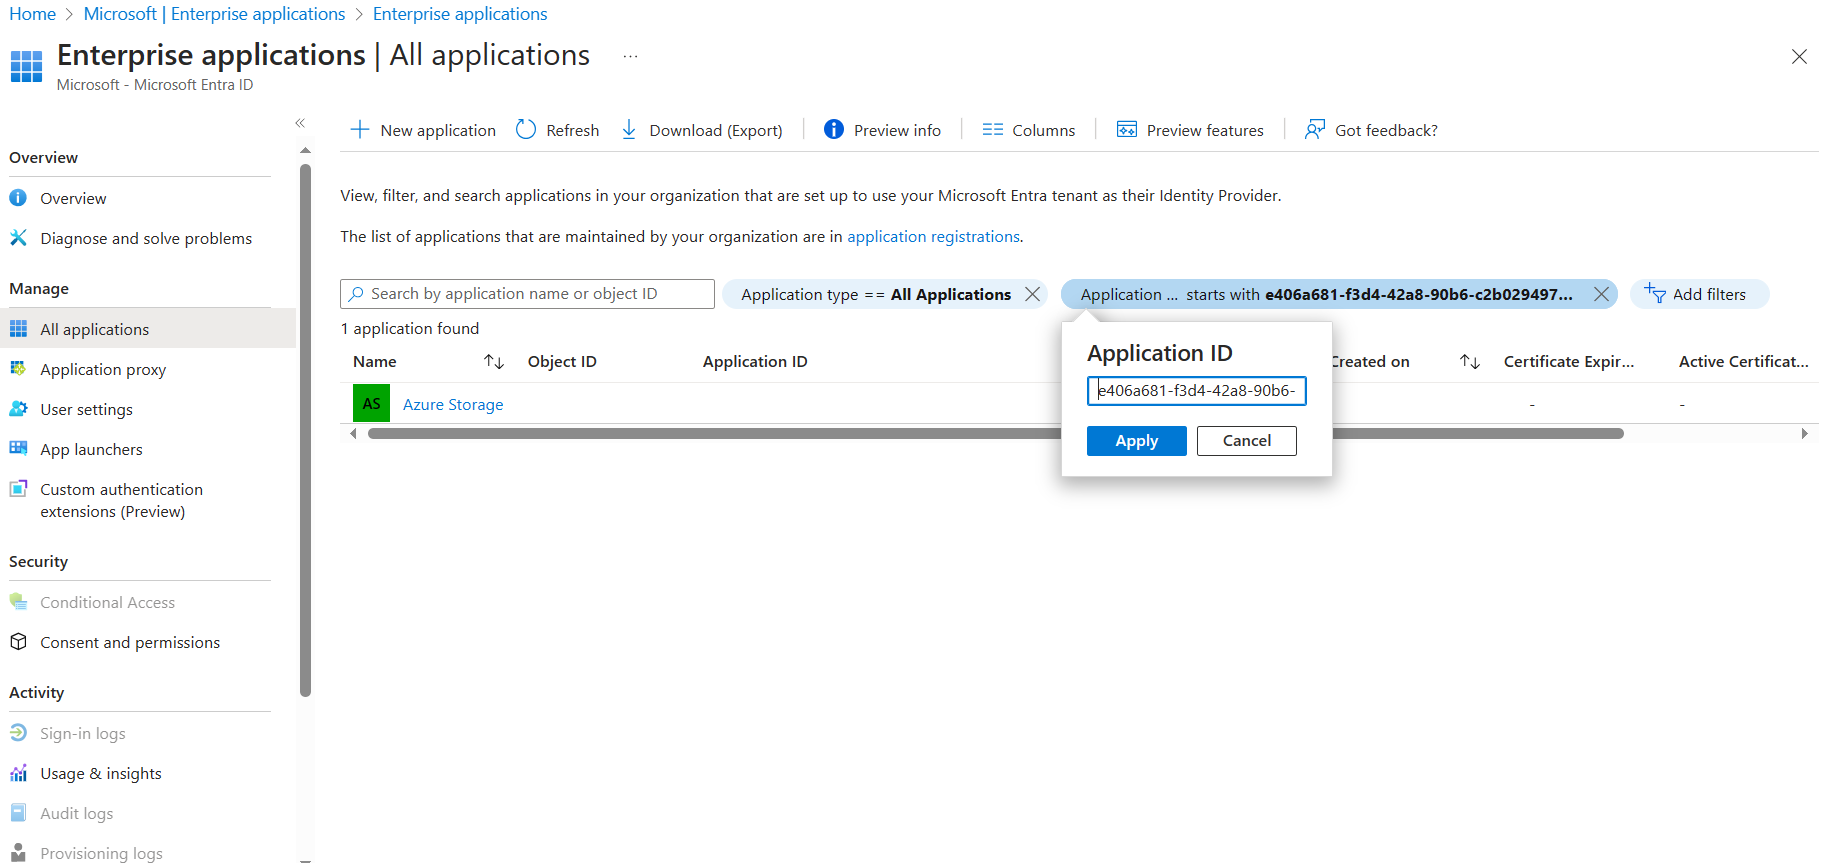

If you see the Azure Storage application, it's already provisioned and you can continue to the next step. If not, a tenant admin needs to provision it.
Ask your tenant admin to open Windows PowerShell as administrator and run the following script:
Install-Module az
Import-Module az
Connect-AzureAD
New-AzureADServicePrincipal -AppId e406a681-f3d4-42a8-90b6-c2b029497af1
Configure your application in Microsoft Entra ID manually
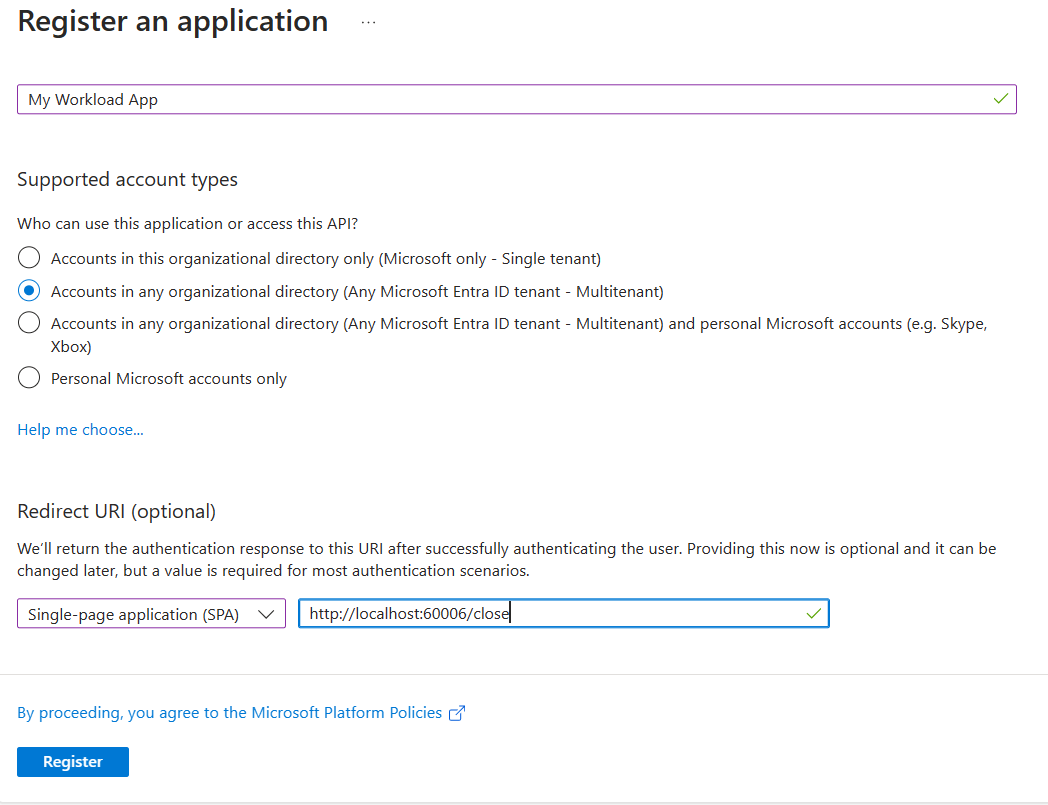
To work with authentication, you need an application registered in Microsoft Entra ID. If you don't have an application registered, follow this guide to create a new application.
Apply the following configurations to your application:
- Make the application a multitenant app.
- For dev applications, configure the redirect URI as
http://localhost:60006/closewith SPA platform. This configuration is required for our consent support. You can add other redirect URIs as desired.
Note
- The redirect URI should be a URI that simply closes the page when navigating to it. The URI
http://localhost:60006/closeis already configured in the frontend sample and you can change it in Frontend/src/index.ts (If you change it, make sure it matches the one configured for your application). - You can configure the redirect URI after creating the application from the Manage menu under Authentication.
Change the Application ID URI for your application. Go to Manage > Expose an API, and edit the Application ID URI for your app:
For the development scenario, the Application ID URI should start with:
api://localdevinstance/<Workload publisher's tenant ID in lower case (the tenant ID of the user used in Fabric to run the sample)>/<Name of your workload>and an optional subpath at the end that starts with/(see examples).Where:
- The workload name is exactly as it's specified in the manifest.
- The ID URI doesn't end with a slash.
- At the end of the ID URI there can be an optional subpath consisting of a string of English lower or upper case letters, numbers, and dashes, up to 36 characters.
Tip
For help finding the tenant ID, see How to find your Microsoft Entra tenant ID.
For example, if the publisher's tenant ID is 853d9f4f-c71b-4420-b6ec-60e503458946, and the workload's name is Fabric.WorkloadSample then:
The following URIs are valid
api://localdevinstance/853d9f4f-c71b-4420-b6ec-60e503458946/Fabric.WorkloadSampleapi://localdevinstance/853d9f4f-c71b-4420-b6ec-60e503458946/Fabric.WorkloadSample/abc
The following URIs aren't valid
api://localdevinstance/853d9f4f-c71b-4420-b6ec-60e503458946/Fabric.WorkloadSample/af/api://localdevinstance/853d9f4f-c71b-4420-b6ec-60e503458946/Fabric.WorkloadSample/af/a- Any ID URI that doesn't start with
api://localdevinstance/853d9f4f-c71b-4420-b6ec-60e503458946/Fabric.WorkloadSample

Add a scope for CRUD/jobs
To work with Create, Read, Update and Delete APIs for workload items, and perform other operations with jobs, add a scope, and add Fabric service application to the preauthorized applications for that scope to indicate that your API (the scope you created) trusts Fabric:
Under Expose an API, select Add a scope. Name the scope FabricWorkloadControl and provide the necessary details for it.
Under Authorized client applications, select Add a client application. Add
00000009-0000-0000-c000-000000000000(Fabric service application) and select your scope.
Add scopes for data plane API
Other scopes need to be registered to represent groups of operations exposed by the data plane API. In the backend sample, we provide four examples. You can see them in Backend/src/Constants/scopes.cs. The scopes are:
Item1.Read.All: Used for reading workload itemsItem1.ReadWrite.All: Used for reading/writing workload itemsFabricLakehouse.Read.All: Used for reading lakehouse filesFabricLakehouse.ReadWrite.All: Used for reading/writing lakehouse files
Preauthorize 871c010f-5e61-4fb1-83ac-98610a7e9110 (the Fabric client application) for these scopes.
The application IDs of these apps can be found under Microsoft Power BI and Power BI Service.
Here's how your Expose an API section should look in your application. In this example, the ID URI is api://localdevinstance/853d9f4f-c71b-4420-b6ec-60e503458946/Fabric.WorkloadSample:

Generate a secret for your application
Under Certificates & secrets, select the Secrets tab and add a secret. Give it any name you want and save it. Use this secret when configuring the backend sample.

Add optional claim 'idtyp'
Under Token configuration, select Add optional claim. Choose Access token and add idtyp.

Add API permissions
Under *API permissions, add the desired permissions for your application. For the backend sample, add Storage user_impersonation (for OneLake APIs) and Power BI Workspace.Read.all (for workload control APIs):

Make sure your application is set to work with auth token v1
Under Manifest, make sure accessTokenAcceptedVersion is set to either null or "1".
Configure your application in Microsoft Entra Identity automatically by using a script
For a streamlined setup of your application in Microsoft Entra Identity, you can opt to use an automated PowerShell script. Follow these steps to configure your application:
- Install Azure CLI: Begin by installing the Azure Command-Line Interface (CLI) Install the Azure CLI for Windows | Microsoft Learn2..
- Execute the CreateDevAADApp.ps1 Script: Execute the CreateDevAADApp script. You will be prompted to sign in by using the credentials of the user account under which you intend to create the application.
- Provide Required Information: When prompted, enter the desired name for your application, the workload name (prefixed with "Org."), and your tenant ID.
Upon successful execution of the script, it will output all necessary details to configure your workload. Additionally, it will provide a direct URL to your application and an administrative consent URL for tenant-wide application authorization.
Example of usage
To create an application named "myWorkloadApp" with the workload name "Org.Myworkload" for the specified tenant, run the following command in PowerShell:
powershell .\CreateDevAADApp.ps1 -applicationName "myWorkloadApp" -workloadName "Org.Myworkload" -tenantId "cb1f79ad-7930-43c0-8d84-c1bf8d15c8c7"
This example demonstrates how to use the CreateDevAADApp.ps1 script with command-line arguments to automate the application setup process. The provided tenant ID is an example and should be replaced with your actual tenant ID.
Configuring your workload (Backend)
In the Backend sample, go to
src/appsettings.jsonfile in the repository and configure the settings:PublisherTenantId: The tenant ID of the publisherClientId: Your application ID (you can find it in Microsoft Entra ID under overview).ClientSecret: The secret you created when configuring the Entra app.Audience: The ID URI we configured in the Entra app.
Configure your workloadManifest.xml. Go to
src/Packages/manifest/files/WorkloadManifest.xmlfile in the repository and configure yourAppId,redirectUriandResourceId(ID URI) under AADApps.
<AADApp>
    <AppId>YourApplicationId</AppId>
    <RedirectUri>YourRedirectUri</RedirectUri>
    <ResourceId>YourResourceId</ResourceId>
</AADApp>
Configure the workload local manifest and acquire a token for your application (frontend)
Note
This step is only applicable to the devmode scenario.
After configuring your application, add the following configurations to the devAADAppConfig section of the Frontend/.env.dev configuration file located in the repository:
"devAADAppConfig": {
    "DEV_AAD_CONFIG_AUDIENCE": "", // The ID URI configured in your application for developer scenario
    "DEV_AAD_CONFIG_REDIRECT_URI": "http://localhost:60006/close", // or the path you configured in index.ts
    "DEV_AAD_CONFIG_APPID": "" // your app Id
}

Ask for a token and consent the application
Note
This step is necessary in order for CRUD/Jobs to work.
Run the frontend sample and create a sample item.
Scroll down and select Navigate to authentication page.
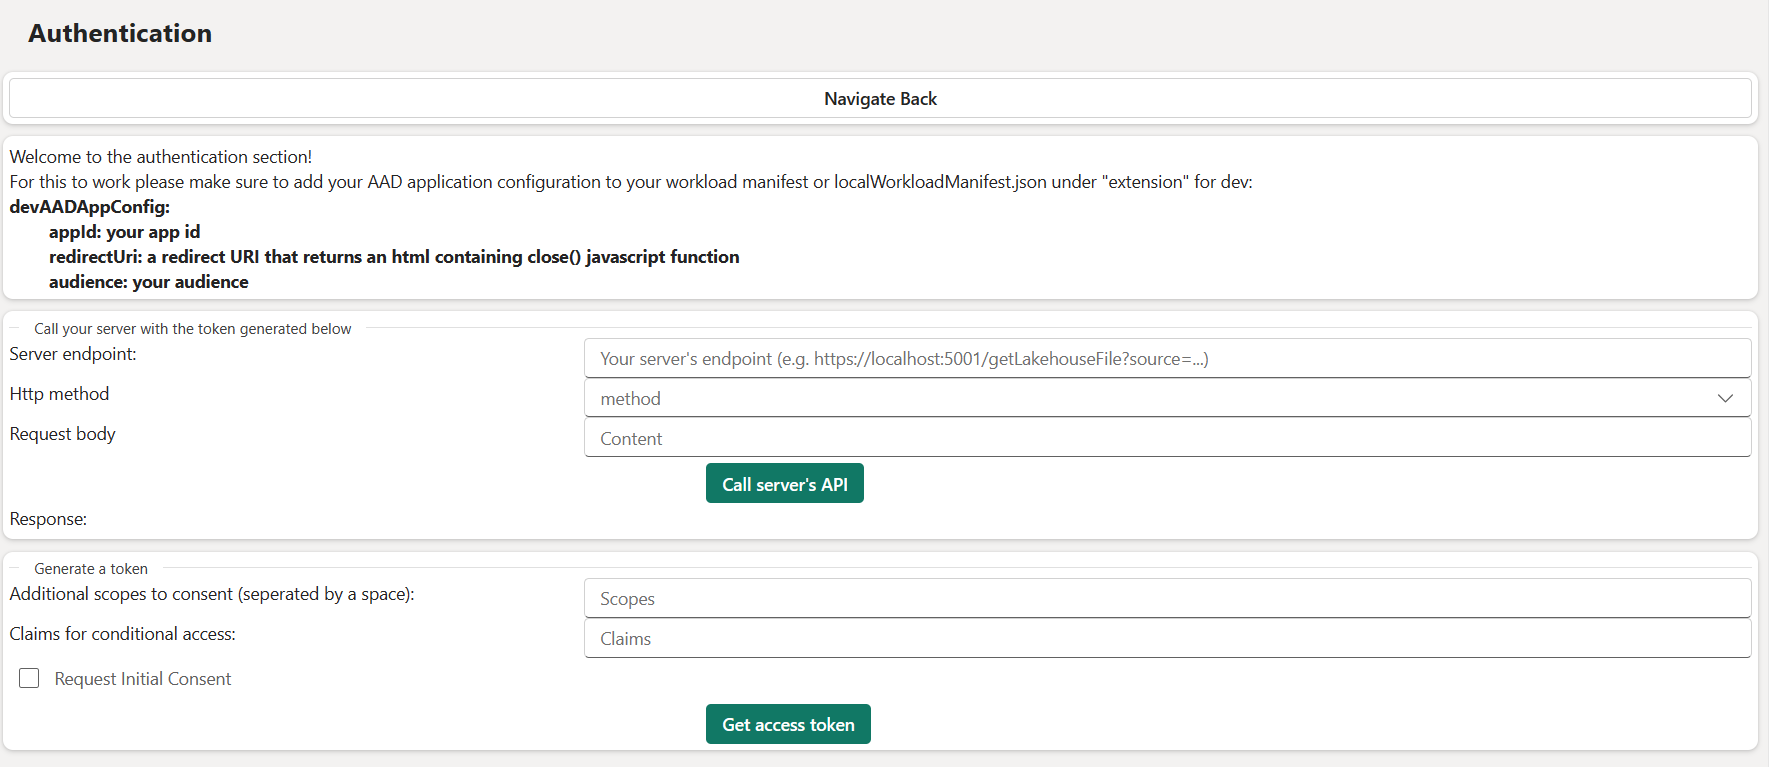
Check Request initial consent and select Get access token. This should trigger a consent for your application:
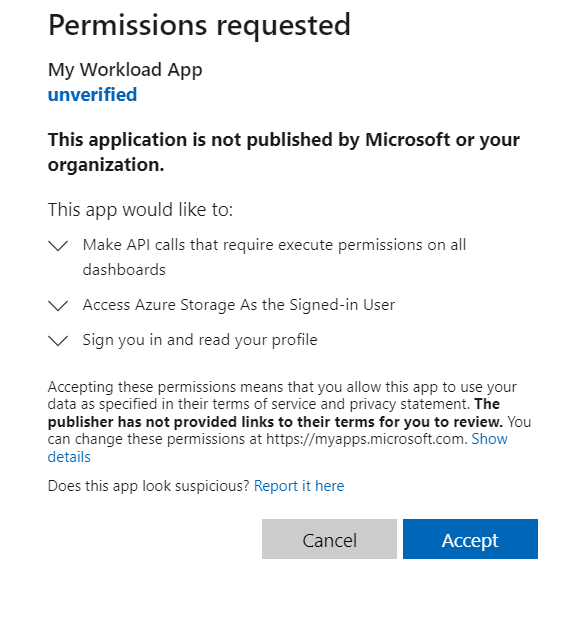

This consent includes the dependencies you added previously under Add API Permissions.
You can now do the following tasks:
- Work with CRUD/Jobs operations.
- Get an access token for your application on the client side.
- Use the authentication page in the frontend sample as a playground to call your workload APIs.
- See what APIs the backend sample offers in Backend/src/controllers.
Feedback
Coming soon: Throughout 2024 we will be phasing out GitHub Issues as the feedback mechanism for content and replacing it with a new feedback system. For more information see: https://aka.ms/ContentUserFeedback.
Submit and view feedback for