Project templates in Visual Studio for PC game development
This topic describes the Windows PC games project templates that are available in Visual Studio.
Project templates
The Microsoft Game Development Kit (GDK) installs the following Visual Studio C++ project templates.
Direct3D 12 Desktop Game (Classic): A project for a Windows game that uses Direct3D 12 and C++ with the 'stock' x64 MSBuild platform.
Direct3D 12 Desktop Game: A project for a Windows game that uses Direct3D 12 and C++ with the Gaming.Desktop.x64 MSBuild custom platform.
Direct3D 12 Desktop Game Makefile: A project for a Windows game that uses Direct3D 12 and C++ by using an external build system.
Desktop Static Library: A project for a Windows static library with the Gaming.Desktop.x64 MSBuild custom platform.
Desktop DLL: A project for a Windows dynamic-link library with the Gaming.Desktop.x64 MSBuild custom platform.
Locating the Microsoft Game Development Kit (GDK) project templates
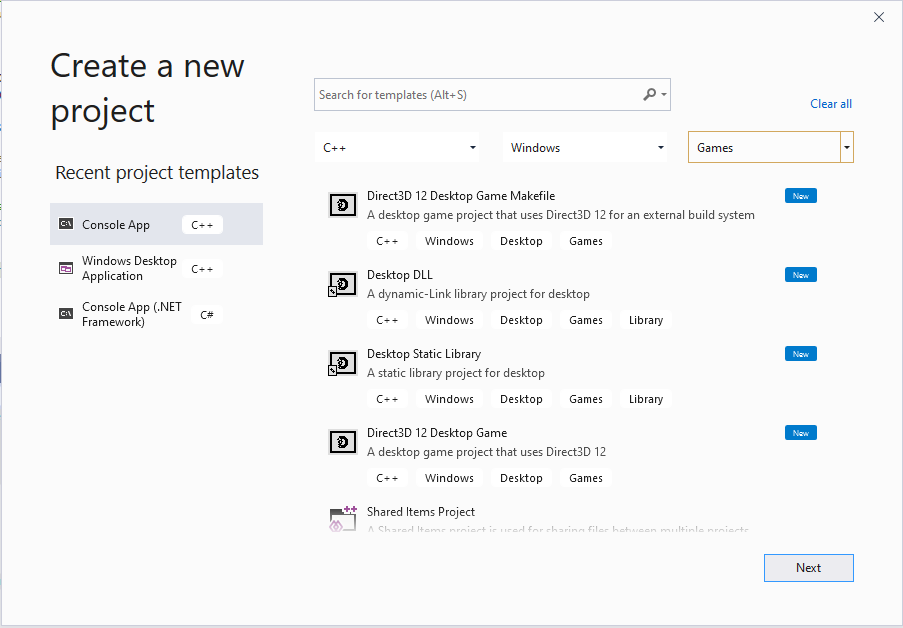
Locate the Microsoft Game Development Kit (GDK) templates by searching and filtering in the Create a new project dialog box of Visual Studio 2019 or Visual Studio 2022. The Microsoft Game Development Kit (GDK) templates can be found by filtering to the C++ language, the Windows platform, and the Games project type as shown in the following screenshot.

The Gaming.Desktop.x64 platform, msbuild files, and properties
The Microsoft Game Development Kit (GDK) defines an msbuild platform named Gaming.Desktop.x64 to be used for Windows PC game development. Gaming.Desktop.x64 includes a set of msbuild properties and targets files that define the required preprocessor directives (such as _GAMING_DESKTOP), and setup paths such that, for example, extension libraries, include files, and libraries are correctly found under C:\Program Files (x86)\Microsoft GDK\edition\GRDK when your game is built. For specific details about the msbuild properties and targets that are defined by the Gaming.Desktop.x64 platform, see Configuring projects without installing the Microsoft Game Development Kit.
Using the x64 platform with the Microsoft Game Development Kit (GDK)
When targeting PC without using the custom Gaming.Desktop.x64 MSBuild platform, the project files must implement all the required functionality.
- To support 'side-by-side' installation, the project has to select the appropriate edition. This can be accomplished through a property set in the Globals section:
<PropertyGroup Label="Globals">
...
  <GDKPCEditionPath>$(GRDKLatest)</GDKPCEditionPath>
</PropertyGroup>
The use of the GRDKLatest environment variable defaults to the latest edition installed on the development PC, and is of the form C:\Program Files (x86)\Microsoft GDK<edition>\GRDK\.
We use the GDKPCEditionPath property in the remainder of the build settings. Direct use of
GRDKLatestas a property in the rest of the project file is not recommended as this makes it more difficult to try out new releases, manage updates, reproduce issues, etc. If using custom .props files to drive your build process, putGDKPCEditionPathin there instead of in each project file. Note also this property needs a trailing slash to meet MSBuild conventions.
For VS 2019, you must also be sure to use the x64 native version of the tools. For VS 2022, this is the default so it's optional.
<PropertyGroup Label="Globals">
...
  <PreferredToolArchitecture>x64</PreferredToolArchitecture>
</PropertyGroup>
- Any required Microsoft Game Development Kit (GDK) extension libraries must have the appropriate include/lib paths and redistribution DLLs included as needed. This can be accomplished by modifying the vcxproj file ExtensionSettings imports:
Microsoft GDK (October 2024) or later:
<ImportGroup Label="ExtensionSettings">
    <Import Project="$(GDKPCEditionPath)ExtensionLibraries\Xbox.Services.API.C\ExtensionLibrary.props" />
    <Import Project="$(GDKPCEditionPath)ExtensionLibraries\Xbox.XCurl.API\ExtensionLibrary.props" />
    <Import Project="$(GDKPCEditionPath)ExtensionLibraries\Xbox.LibHttpClient\ExtensionLibrary.props" />
    <Import Project="$(GDKPCEditionPath)ExtensionLibraries\Xbox.Game.Chat.2.Cpp.API\ExtensionLibrary.props" />
    <Import Project="$(GDKPCEditionPath)ExtensionLibraries\PlayFab.Multiplayer.Cpp\ExtensionLibrary.props" />
    <Import Project="$(GDKPCEditionPath)ExtensionLibraries\PlayFab.Party.Cpp\ExtensionLibrary.props" />
    <Import Project="$(GDKPCEditionPath)ExtensionLibraries\PlayFab.PartyXboxLive.Cpp\ExtensionLibrary.props" />
</ImportGroup>
Microsoft GDK (June 2024) or earlier:
<ImportGroup Label="ExtensionSettings">
    <Import Project="$(GDKPCEditionPath)ExtensionLibraries\Xbox.Services.API.C\DesignTime\CommonConfiguration\Neutral\ExtensionLibrary.props" />
    <Import Project="$(GDKPCEditionPath)ExtensionLibraries\Xbox.XCurl.API\DesignTime\CommonConfiguration\Neutral\ExtensionLibrary.props" />
    <Import Project="$(GDKPCEditionPath)ExtensionLibraries\Xbox.LibHttpClient\DesignTime\CommonConfiguration\Neutral\ExtensionLibrary.props" />
    <Import Project="$(GDKPCEditionPath)ExtensionLibraries\Xbox.Game.Chat.2.Cpp.API\DesignTime\CommonConfiguration\Neutral\ExtensionLibrary.props" />
    <Import Project="$(GDKPCEditionPath)ExtensionLibraries\PlayFab.Multiplayer.Cpp\DesignTime\CommonConfiguration\Neutral\ExtensionLibrary.props" />
    <Import Project="$(GDKPCEditionPath)ExtensionLibraries\PlayFab.Party.Cpp\DesignTime\CommonConfiguration\Neutral\ExtensionLibrary.props" />
    <Import Project="$(GDKPCEditionPath)ExtensionLibraries\PlayFab.PartyXboxLive.Cpp\DesignTime\CommonConfiguration\Neutral\ExtensionLibrary.props" />
</ImportGroup>
- The VC++ Directories properties ExecutablePath, IncludePath, and LibraryPath should be updated to include the Microsoft Game Development Kit (GDK) paths.
<PropertyGroup Condition="'$(Configuration)|$(Platform)'=='Debug|x64'">
  <ExecutablePath>$(GameDK)bin;$(ExecutablePath)</ExecutablePath>
  <IncludePath>$(GDKPCEditionPath)GameKit\Include;$(Console_SdkIncludeRoot);$(IncludePath);</IncludePath>
  <LibraryPath>$(GDKPCEditionPath)GameKit\lib\amd64;$(Console_SdkLibPath);$(LibraryPath)</LibraryPath>
</PropertyGroup>
<PropertyGroup Condition="'$(Configuration)|$(Platform)'=='Release|x64'">
  <ExecutablePath>$(GameDK)bin;$(ExecutablePath)</ExecutablePath>
  <IncludePath>$(GDKPCEditionPath)GameKit\Include;$(Console_SdkIncludeRoot);$(IncludePath);</IncludePath>
  <LibraryPath>$(GDKPCEditionPath)GameKit\lib\amd64;$(Console_SdkLibPath);$(LibraryPath)</LibraryPath>
</PropertyGroup>
For the executable path we use the GameDK environment variable directly since this is not 'side-by-side'. This can also be overridden as a property in a custom .props file if needed.
The Console_SdkIncludeRoot and Console_SdkLibPath properties are the provided by the Microsoft Game Development Kit (GDK) ExtensionLibrary.props which are compatible with both x64 PC and Xbox.
- For your plaform ItemDefinitionGroups, be sure to add
_GAMING_DESKTOPto the preprocessor defines for consistency with Gaming.Desktop.x64 when using libraries or other middleware.
<PreprocessorDefinitions>_GAMING_DESKTOP;WIN32;_DEBUG;_WINDOWS;%(PreprocessorDefinitions)</PreprocessorDefinitions>
<PreprocessorDefinitions>_GAMING_DESKTOP;WIN32;NDEBUG;_WINDOWS;%(PreprocessorDefinitions)</PreprocessorDefinitions>
- Also in the ItemDefinitionGroups, add the following libraries to your additional library dependencies. Specifically
xgameruntime.libfor the GameRuntime andgameinput.libfor GameInput on PC.
<AdditionalDependencies>xgameruntime.lib;gameinput.lib;d3d12.lib;dxgi.lib;dxguid.lib;uuid.lib;kernel32.lib;user32.lib;%(AdditionalDependencies)</AdditionalDependencies>
- The last required element is to convert the source MicrosoftGameConfig.mgc file to the required MicrosoftGame.config in the build output. This can be implemented as a build customization:
<CustomBuild Include="MicrosoftGameConfig.mgc">
  <Command>copy %(Identity) "$(OutDir)MicrosoftGame.config"
makepkg.exe localize /d "$(OutDir)" /pd "$(OutDir)" /gc "%(Identity)"</Command>
  <Message>MGC Compile</Message>
  <Outputs>$(OutDir)MicrosoftGame.config</Outputs>
</CustomBuild>
The MicrosoftGame.config will need the required logo assets to be valid as well, which can be accomplished with a copy files:
<ItemGroup>
  <CopyFileToFolders Include="GraphicsLogo.png" />
  <CopyFileToFolders Include="LargeLogo.png" />
  <CopyFileToFolders Include="SmallLogo.png" />
  <CopyFileToFolders Include="SplashScreen.png" />
  <CopyFileToFolders Include="StoreLogo.png" />
</ItemGroup>
Create a project from the Direct3D 12 Desktop Game (Classic) template and review it for the settings above as well as some additional recommendations.