Enable the simplified admin experience for your Microsoft Graph connector
This article describes how to enable the simplified admin experience for your Microsoft Graph connector in the Teams admin center. When you enable this experience, Teams admins can enable or disable your custom Microsoft Graph connector seamlessly in the Teams admin center.

To enable the simplified admin experience in the Teams admin center:
- Update the Teams app manifest.
- Update Microsoft Graph permissions.
- Handle Microsoft Graph webhook notifications.
- Create or delete Microsoft Graph connections.
- Validate the experience by enabling the Microsoft Graph Connector in the Teams admin center.
Update the Teams app manifest
In the Teams app manifest, at the root, at the same level as properties like name, description, and icons, add the graphConnector property (introduced in v1.11 of the app manifest) with a notificationUrl. This field contains the URL to which Microsoft Graph connector notifications for the application are sent. The app manifest version must be v1.13 or higher for the simplified admin experience to work.
Ensure that the webApplicationInfo property is added to the manifest. After you update the manifest, upload it by sideloading the app or publishing the app to the store.
{
 "$schema":"https://developer.microsoft.com/json-schemas/teams/v1.13/MicrosoftTeams.schema.json",
  "manifestVersion": "1.13",
  ...
  "webApplicationInfo": {
    "id": "<AAD_APP_ID>",  // e.g. "7e47846e-4bef-4c42-9817-a14e92287f28"
    "resource": "<AAD_APP_RESOURCE>" // e.g. "api://xmngc.loca.lt/7e47846e-4bef-4c42-9817-a14e92287f28"

  },
  "graphConnector": {
    "notificationUrl": "<AAD_APP_NOTIFICATION_URL>"
  }
}
Update Microsoft Graph permissions
- Go to Microsoft Entra admin center.
- Expand the Identity menu and go to Applications > App registrations.
- Select your app registration.
- Go to API permissions > Add a permission > Microsoft Graph.
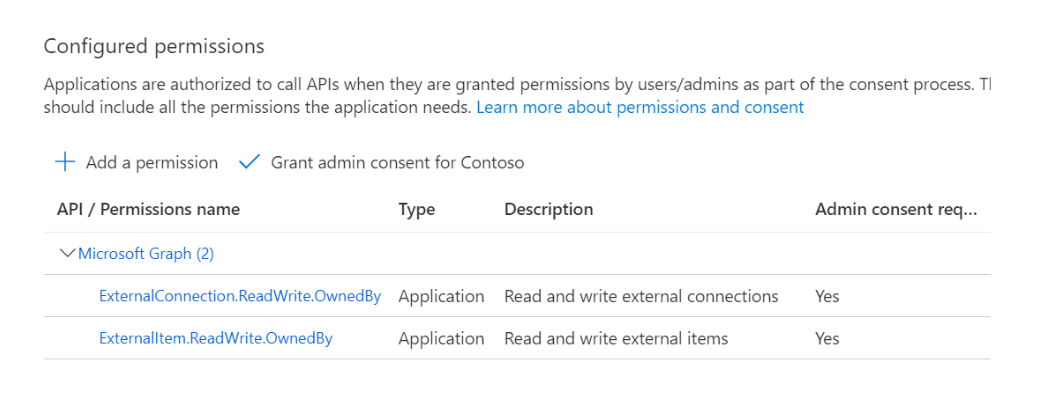
- Select the
ExternalConnection.ReadWrite.OwnedByandExternalItem.ReadWrite.OwnedByMicrosoft Graph permissions as shown in the following example.

Handle Microsoft Graph webhook notifications
When the admin turns on or off the Microsoft Graph connector from the Teams admin center, Microsoft Graph sends a change notification to the URL specified in the notificationUrl property in the manifest. Your app needs to manage these Microsoft Graph connections accordingly.
Change notifications
For more information about how to set up change notifications, see Set up notifications for changes in resource data. The following example shows a payload:
{
  "validationTokens": [
    "[jwt validation token]"
  ],
  "value": [
    {
      "changeType": "updated",
      "clientState": null,
      "resource": "external",
      "resourceData": {
        "@odata.id": "external",
        "id": "[graph connector id]",
        "state": "enabled", // or disabled
        "connectorsTicket": "[An opaque encoded string]",
        "@odata.type": "#Microsoft.Graph.connector"
      },
      "subscriptionExpirationDateTime": "2024-08-30T13:01:48.3441108-07:00",
      "subscriptionId": "[change notification's subscription id]",
      "tenantId": "[customer's tenant id]"
    }
  ]
}
To understand how to validate the inbound change notification, see Validating the authenticity of notifications.
Keep the following tips in mind:
- You can ignore subscriptionExpirationDateTime and subscriptionId.
- The change notification is for Microsoft Graph connector management only when the @odata.type of the resource data matches the one in the sample payload.
- The tenantId identified is the customer's tenant ID. When you call the Microsoft Graph API to manage Microsoft Graph connections, you must generate the app token on behalf of this customer's tenant ID.
- You can call the Microsoft Graph API to get the customer's display name and default domain name. This information can help you map the tenantId to the unique identifier in your system. To learn more, see find tenant information by tenant ID.
- Within resourceData, use state to determine whether to create or delete connections. You need the connectorsTicket to create the connections.
Handling "connector enable" notification
To handle "connector enable" notifications:
- Determine which Microsoft Graph connections to create (how many connections and which schema for each connection) by using the External connection List API to query for all connections. Determine whether to create all connections from scratch, resume creation of connections (in resiliency flow), or no-op (when all desired connections are already in the ready state).
- The connection is created in a draft state. Pass the
connectorsTicketopaque encoded string to the connection creation API in theGraphConnectors-TicketHTTP header. - Register the schema.
- After a successful schema creation or update, the connection should reach a ready state.
Handling "connector disable" notification
To handle "connector disable" notifications:
- Determine which Microsoft Graph connections to delete by using the External connection List API to query for all connections.
- Delete all connections by using the External connection Delete API.
- We recommend that you build resiliency logic to retry the deleted connection to verify that it's deleted.
Request
POST https://example.com/notificationEndpoint
Content-type: application/json
Content-length: 100

{
  "value": [
    {
      "changeType": "updated",
      "subscriptionId": "79f3b611-7f15-4bdd-9422-9606a24e49f3",
      "resource": "external",
      "clientState": null,
      "resourceData": {
        "@odata.type": "#Microsoft.Graph.connector",
        "@odata.id": "external",
        "id": "{{connectorId}}",
        "state": "enabled" //e.g. enabled or disabled
        "connectorsTicket":"eyJhbGciOiJIUzI1…"
      },
      "subscriptionExpirationDateTime": "2021-06-26T12:40:26.4436785-07:00",
      "tenantId": "9f4ebab6-520d-49c0-85cc-7b25c78d4a93"
    }
  ],
  "validationTokens": [ "eyJ0eXAiOiJKV…" ]
}
Response
HTTP/1.1 202 Accepted
Content-type: application/json
Content-length: 0
You need to send a 202 - Accepted status code in your response to Microsoft Graph. If Microsoft Graph doesn't receive a 2xx class code, it tries to publish the change notification multiple times for about four hours. After that, the change notification is dropped and isn't delivered.
To validate the authenticity of a validatonToken:
- Verify that the token hasn't expired.
- Verify that the token hasn't been tampered with and was issued by the Microsoft identity platform.
- Verify that the appId claim in the validationToken.
- Verify the aud claim in the validationToken is the same as the "{{Teams-appid}}" you specified.
For more information, see Validating the authenticity of notification.
The following example shows a validation token.
{ "typ": "JWT", "alg": "RS256", "x5t": "nOo3ZDrODXEK1jKWhXslHR_KXEg", "kid": "nOo3ZDrODXEK1jKWhXslHR_KXEg" }.{ "aud": "e478830d-8f49-4c26-80c6-58f68e0f064b", "iss": "https://sts.windows.net/9f4ebab6-520d-49c0-85cc-7b25c78d4a93/", "iat": 1624649764, "nbf": 1624649764, "exp": 1624736464, "aio": "E2ZgYGjnuFglnX7mtjJzwR5lYaWvAA==", "appid": "0bf30f3b-4a52-48df-9a82-234910c4a086", "appidacr": "2", "idp": "https://sts.windows.net/9f4ebab6-520d-49c0-85cc-7b25c78d4a93/", "oid": "1e7d79fa-7893-4d50-bdde-164260d9c5ba", "rh": "0.AX0AtrpOnw1SwEmFzHslx41KkzsP8wtSSt9ImoIjSRDEoIZ9AAA.", "sub": "1e7d79fa-7893-4d50-bdde-164260d9c5ba", "tid": "9f4ebab6-520d-49c0-85cc-7b25c78d4a93", "uti": "mIB4QKCeZE6hK71XUHJ3AA", "ver": "1.0" }.[Signature]
Create or delete Microsoft Graph connections
You need to send the connectorTickets from the payload you received as a GraphConnectors-Ticket header when you initiate the creation of the Teams app connection. The following example shows this process.
Request
POST https://graph.microsoft.com/v1.0/external/connection
GraphConnectors-Ticket: {{connectorsTicket}}
Content-type: application/json
Authorization: bearer {{accessToken}}

{
    "id": "{{connectionId}}",
    "name": "Contoso HR",
    "description": "Connection to index Contoso HR system",
    "connectorId": "{{connectorId}}",
    "enabledContentExperiences": "MicrosoftSearch, Compliance, …",
    "searchSettings": { … },
    "complianceSettings": { … },
    …
}
Note
- You must set the {{connectorId}} to the value provided in the notification from Graph Connectors when you create the connection.
- You should acquire the {{accessToken}} from the Microsoft identity platform for the tenant that is notified.
Response
HTTP/1.1 200 Accepted
Content-type: application/json
Content-length: 0
Note
Various Microsoft 365 experiences can be enabled for the connections created. For more information, see Microsoft Graph connectors overview.
To learn how to ingest external items into a working Microsoft Graph connection, see Create, update, and delete items added by your application via Microsoft Graph connectors.
Validate the experience by enabling the Microsoft Graph connector in the Teams admin center
To validate the experience:
- Sign in to the Teams admin center as a Teams admin or Global admin of the tenant.
- Select the Manage apps blade in the left rail.
- Go to your Teams application.
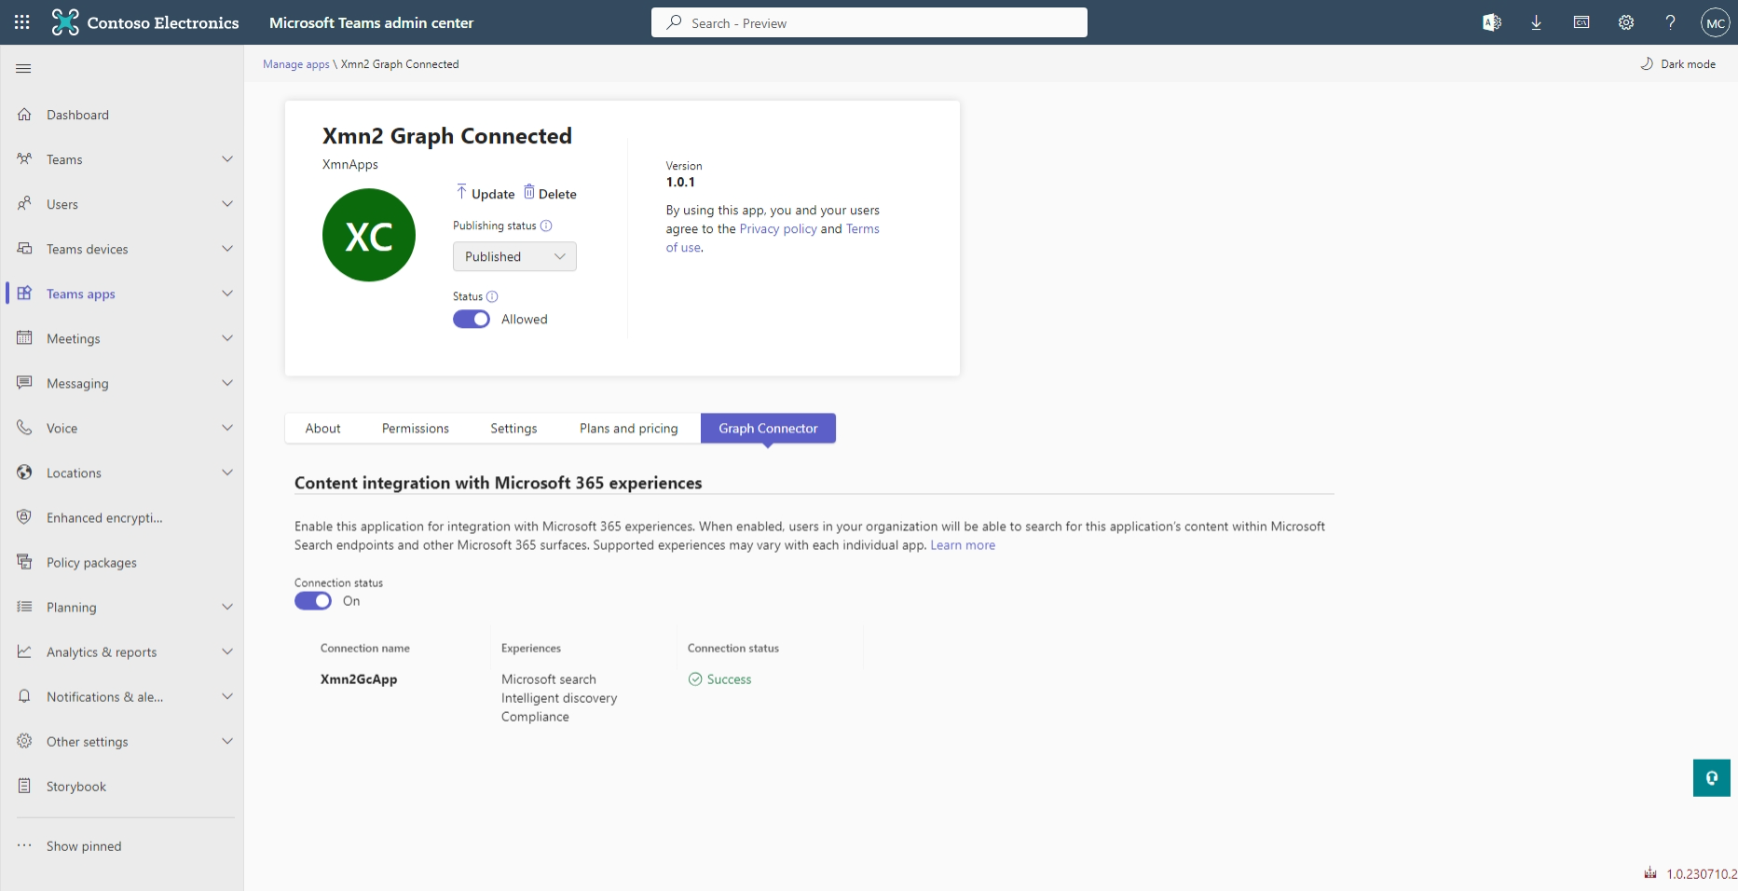
- On the detail page of the Teams app, you notice a new Graph Connector tab that allows an admin to enable or disable the Microsoft Graph connector.
- Select the toggle button to send the enable or disable notifications to the notification endpoint of the app, as specified by the graphConnector.notificationUrl property in the app manifest.
Make your Microsoft Graph connector available for other organizations in the Teams admin center
You can submit your Microsoft Graph connector packaged as a Teams app extended across Microsoft 365 to Microsoft Partner Center. This allows Microsoft to validate your Microsoft Graph connector, so that other organizations can discover and deploy it in the Microsoft Teams admin center.
You can use the step-by-step submission guide to learn how to submit your app. Make sure that you submit a Teams app in the Microsoft 365 and Copilot tab in Marketplace offers.
You need to submit a PDF in the Additional certification info step. Microsoft uses the information you provide in this PDF to make sure that your Microsoft Graph connector performs as expected in Microsoft 365 Copilot. Your PDF must have the following sections:
- Test accounts, license keys, and credentials
- Custom Vertical Name
- Semantic Labels
- Sample Prompts
- Connection Description
- Activity Settings
Test accounts, license keys, and credentials
Create a user account on your demo tenant that Microsoft can use to validate your Microsoft Graph connector. This can be done in the Users section of the Microsoft 365 Admin Center. Ensure that this new user account has a Microsoft 365 Copilot license.
In this section of the PDF, provide the credentials and any applicable license keys for this new user account. This information is mandatory. To learn more about how to prepare the user account for validation, see best practices for providing test notes.
After Microsoft validates your app, you can revoke access to the user account.
Custom Vertical Name
Create a custom vertical that only returns results from your custom Microsoft Graph connector. Do this in the Verticals section of the Customization tab of the Search & Intelligence Portal. In this section of the PDF, provide the name of this custom vertical. A name for the custom vertical is mandatory.
Semantic Labels
In the Semantic Labels section, indicate which properties from your connection schema have the title, url, and iconUrl semantic labels. This schema mapping is mandatory.
Sample Prompts
In the Sample Prompts section, provide two sample prompts that Microsoft can use to validate your Microsoft Graph connector in Microsoft 365 Copilot. These prompts should include at least a partial match to the title semantic label. These prompts are mandatory.
Connection Description
In Connection Description section, provide the description property for your custom Microsoft Graph connection. Microsoft uses this to ensure that your Microsoft Graph connection has a rich description for Microsoft 365 Copilot. This description is optional.
Activity Settings
In the Activity Settings section, provide the activity settings for your Microsoft Graph connection with a urlToItemResolvers resource. The activity settings are optional but we highly recommend that you provide them.