Publish custom connectors to the Microsoft 365 admin center
When you use the Microsoft Graph connectors SDK, you can publish your custom connectors through the Microsoft 365 admin center, the same way that Microsoft built-in connectors are published.
Note
Read the Setup for your Graph connector article to understand the general Graph connectors setup instructions.
Use the following steps to publish a connection for your custom connector:
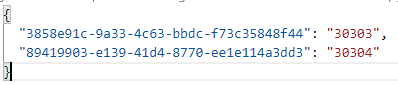
Ensure that the CustomConnectorPortMap.json file is updated. After you develop the custom connector code, add the mapping of the connector ID and the port it's running on to this file. This file is in the Microsoft Graph connector agent installation folder.
Note
- You can add multiple connector IDs and their corresponding port information to this file using the <Connector Id>:<Port> format. Each unique connector should be running on a different port.
- If you have upgraded from a GCA version lower than 1.8.0.0, please follow the troubleshooting steps to fix connection failures.
Add a Microsoft Graph connector in the Microsoft 365 admin center from the Data Sources tab in the Search & Intelligence section. For details, see Add a Microsoft Graph connector in the Microsoft 365 admin center.
Choose Custom Connector and provide the manifest validated by the test application.
Name the connection. For details, see Step 2: Name the connection.
Provide the URL to the data source you're connecting to and credentials to access it. Choose the Microsoft Graph connector agent, and validate the information provided. Choose Next.
Provide any extra configuration if required by your connector. You can pass any information specific to the connection to the datasource.
For example, if you're building a connector for Azure DevOps Services, the projects that need to be indexed can be the extra parameters. For a Wiki connector, the subsections that need to be indexed can be the extra parameters. The API to query the wiki can take the filters specified in the extra parameters and get the items from data source.
The data in the parameter is opaque to the platform. It's serialized and stored as a string and passed to the connector. The connector can deserialize this data as required and use it.
On the Assign property labels page, assign semantic labels to your source properties. The default result type will not work if semantic labels are not assigned.
Manage the schema:
- Select a Content Property. We recommend that you select a Content Property from the drop-down menu of options, or keep the default, if one is present. This property is used for full-text indexing of content and improving your search relevance.
- Define aliases for your properties. You can add aliases to your properties on the Manage schema page in the Alias column. Aliases are friendly names for your properties.
- Set the search schema attributes. You can set the search schema attributes to control the search functionality of each source property. A search schema helps determine what results display on the search results page and what information end users can view and access.
For details, see Step 7: Manage schema.
You can manage search permissions basis Access control lists (ACLs) that determine which users in your organization can access each item. Only Microsoft Entra ID-based Access Control Lists are supported for people with access to the data source. For details, see Step 5: Manage search permissions.
Choose the refresh frequencies of crawls. The refresh interval determines how often your data is synced between the data source and Microsoft Search. For details, see Step 8: Refresh frequencies.
Review the details provided and choose Finish. For details, see Step 9: Review connection.
Customize the search results page by setting up verticals and result types. For details, see Step 10: Customize the search results page.
Review the published connection under the Data sources tab to confirm that the connection setup worked. For details, see Step 11: Confirm that the connection setup worked.