Step 1 - Prepare your account for private offers
This article explains how to perform a precheck to ensure that your billing account and subscription settings, roles and permissions, and policies are configured to allow you to accept and purchase private offers. Private offers align to your billing account, during purchase you need your organization's billing account ID. The billing account ID is also needed when requesting a private offer from your vendor.
If your organization created a private Azure Marketplace, your Marketplace Admin must add the Enable Private Products collection rule to allow private offer purchases for your organization.
Check billing account and subscription settings
Check billing account and subscription settings by running the private offer eligibility report. You must have an eligible Azure subscription associated with the billing account used for the private offer. Your billing account policy must be enabled for Azure Marketplace purchases and must have a valid payment instrument associated. Check your purchase controls on the billing account that might block marketplace purchases on your subscription. To learn more, see Private offer eligibility report.
Check permissions
There are two steps needed to procure a private offer: accept and purchase. The person accepting the private offer and the person purchasing the private offer require different permissions, depending on the type of agreement—Microsoft Customer Agreement (MCA) or Enterprise Agreement (EA). The private offer eligibility report can help identify who in an organization has the correct permissions—the roles needed are summarized in the following table:
| Agreement type | Permissions to accept offer | Permissions to purchase or subscribe |
|---|---|---|
| Microsoft Customer Agreement (MCA) | Billing account owner or contributor | Subscription owner or subscription contributor |
| Enterprise Agreement (EA) | Enterprise administrator | Subscription owner or subscription contributor |
| Microsoft online service program (MOSP) | Account administrator | Account administrator |
Note
For virtual machine service reservation (VMSR) private offers, the subscription owner or reservation purchaser role has permission to purchase. The subscription contributor doesn't have this permission.
Identify the individual in your organization who can accept the private offer, then provide the email address to your vendor. Once your vendor completes the private offer, there's a prompt in Partner Center to send an email notification to that person that the offer is ready for acceptance. More details are available in the roles and permissions article.
Note
Marketplace permissions used to accept and purchase a private offer are aligned with billing roles and Azure role-based access controls. To prevent accidental or unauthorized purchasing, the private offer eligibility report helps you understand if you have the correct permissions, subscription, and billing account settings for purchasing and subscribing to private offers.
Locate your billing account ID
You need to provide your billing account ID to the Microsoft partner to create the private offer. Your billing account ID can be found in three different ways:
On the private offer eligibility report, follow the instructions to download the eligibility report. In the report, go to the row with the specific subscription, for example, the billing account ID in column D.
If you have access to Cost Management + Billing, then go to the Azure portal under Cost management + Billing > Properties > ID.
Note
You will need the right permissions to access billing information on the Azure Portal.

If you know the subscription you plan to use for your purchase, select Subscriptions and then the relevant subscription > Properties (or Billing Properties) > Billing account ID.
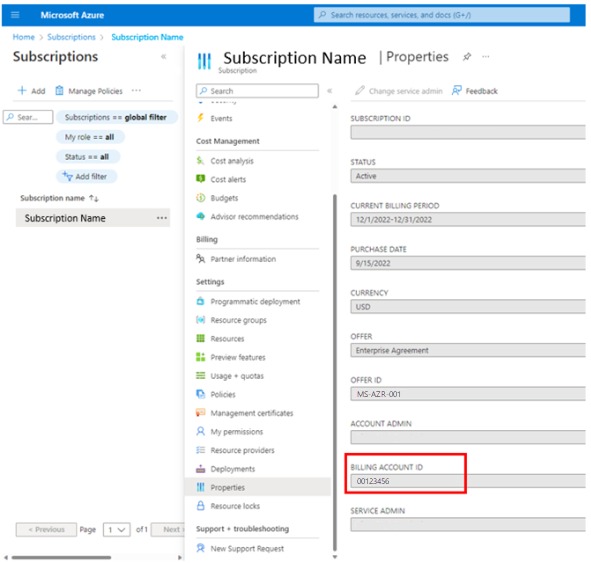
The Billing Account ID for Microsoft Online Service Programs (MOSP) can be found in the Pay-As-You-Go subscription properties tab in Settings > Properties.
Note
There're several ways to get to the Pay-As-You-Go -> Properties screen:
In the Azure portal, select Subscriptions under Azure services near the top of the page.

If you have recently viewed your subscriptions, select Subscriptions in Resources -> Recent.

Select Navigate -> Subscriptions in the middle of the page.


Check the billing account type
If you have access to one Billing Scope: In the Azure portal, go to Cost Management + Billing, and select Settings > Properties. The Billing account type is displayed as either Microsoft Customer Agreement (MCA), Enterprise Agreement (EA), or Microsoft Online Services Program (MOSP).

If you have access to multiple billing scopes: In the Azure portal, go to Cost Management + Billing, and select Settings > Properties. The Billing account type is displayed as either Microsoft Customer Agreement (MCA), Enterprise Agreement (EA), or Microsoft Online Services Program (MOSP).


By completing the above steps, you're prepared to successfully purchase a private offer. You'll need people with the proper permissions to accept the private offer terms and complete purchasing the private offer. This process typically involves collaboration within your organization by different individuals.
Reach out to support if you have questions to get ready for a private offer purchase, and we can help you to get started!