Configure eSIM download server using the settings catalog in Microsoft Intune
The identity of a cellular-enabled device, such as a Windows Connected PC, is typically encapsulated in a device called SIM (Subscriber Identity Module), and packaged as a discrete SIM card. Management of SIM cards for many devices can be costly and time-consuming. Therefore, Windows 10 and Windows 11 support eSIM (embedded Subscriber Identity Module) technology as a digital alternative to discrete SIM cards.
Windows 11 provides more capabilities for the deployment and management of eSIM content using Mobile Device Management (MDM) services, like Microsoft Intune.
This feature applies to:
- Windows 11
In Intune, you can bulk activate eSIM codes using the following options:
| Option | Platform support | Description |
|---|---|---|
| eSIM download server (this article) |
✅ Windows 11 (recommended) ❌ Windows 10 - Use import activation codes using a CSV file. |
In a settings catalog policy, add your mobile operator's download server FQDN. The device contacts the download server, authenticates, and receives eSIM connection info. No individual activation codes needed. |
| Import activation codes using a CSV file | ✅ Windows 11 (supported, but not recommended) - Use an eSIM download server instead ✅ Windows 10 |
In an eSIM policy, import one-time-use activation codes. The eSIM hardware uses the activation codes to contact the mobile operator, download the eSIM policy, and configure cellular activation. Requires individual activation codes. |
Using an Intune settings catalog policy, you can add eSIM to your supported devices using an eSIM download server. This article gives more information about eSIM, describes the process, lists the prerequisites, and lists the steps to configure eSIM using the settings catalog.
About eSIM technology
eSIM technology created a worldwide ecosystem of cellular devices and mobile operators. It's based on a common specification from the Global System for Mobile Communications Association (GSMA). The adoption of eSIM technology continues to grow due to its incorporation in popular smart phones. Windows supports eSIM for PCs, and has supported eSIM since 2017.
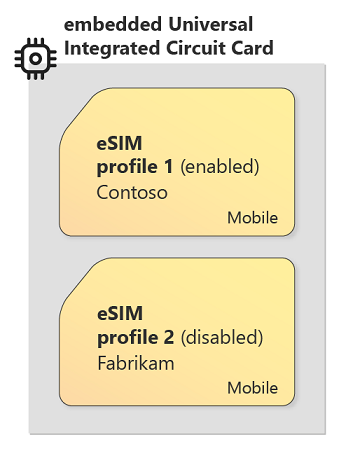
eSIM decouples the secure execution environment of the plastic SIM card from the SIM credentials it contains. The secure container is called an eUICC (embedded Universal Integrated Circuit Card). In the same way that each physical SIM card has a unique identity, each eUICC has a unique identity called eUICC Identifier (EID).

The credentials and associated other configuration that uniquely identify a cellular subscription are contained in a digital (software) package called an eSIM Profile. Multiple eSIM Profiles can be installed into an eUICC. One of the installed eSIM Profiles is enabled (and the rest are disabled). The combination of the enabled eSIM Profile and its eUICC container behaves exactly like a traditional SIM card.
At-Scale Configuration of eSIM PCs
eSIM digitizes the delivery of SIMs to devices such as PCs, eliminating the need to obtain and deploy physical SIM cards. The Mobile Plans application in Windows further reduces friction by providing a user-friendly interface for a user to interact with a chosen mobile operator and coordinate the download and installation of the corresponding eSIM profile.
The Mobile Plans application is well suited to the needs of consumers and businesses with a few PCs. However, it requires user interaction on each device that is provisioned, an effort and cost that can become significant at large scale. To support larger-scale managed environments (such as an enterprise or an educational organization), Windows provides eSIM provisioning through mobile device management (MDM) such as Microsoft Intune.
When you provision an eSIM through an MDM like Microsoft Intune, it configures the eSIM deployment with other settings and policies you create. When the MDM server is enrolled to the end user's work or school account, it pushes the configuration to the PC throughout its lifecycle. After the PC is configured with the eSIM information, it downloads the eSIM profile from the mobile operator's download server (SM-DP+).
Within Windows, the eUICCs Configuration Service Provider (CSP) handles eSIM configuration. You can also configure some eSIM policies through the CSP and each PC obtains its eSIM profile from the CSP.
Prerequisites
To deploy eSIM to your devices using Intune, you need the following prerequisites:
Windows 11 version 22H2 (Build 22621) or higher devices that are enrolled and MDM managed by Intune
eSIM capable devices, like the Surface Pro 9 with 5G
If you're unsure if your devices support eSIM, then contact your device manufacturer. On Windows devices, you can confirm eSIM supportability. For more information, see Use an eSIM to get a cellular data connection on your Windows client device.
A mobile operator who can provide eSIM profiles to a set of known devices based on their eUICC Identifier (EID). Your organization must also provide the EIDs of your PCs to the mobile operator as part of your contract with the mobile operator.
To give the EIDs of your PCs to the mobile operator, you have some options:
Option 1 - Your organization gets the EIDs of the PCs from the device packaging and send the EIDs to the operator directly.
Option 1 - For bulk device purchases, the EIDs of the PCs can come in a manifest file created by the device OEM or a reseller/distributor. Then, the manifest file can be sent to you or sent directly to the mobile operator.
After the mobile operator knows the EIDs of the PCs, the mobile operator sets up eSIM profiles for each PC on its download server (SM-DP+).
eSIM Download Server (SM-DP+ or SM-DS) fully qualified domain name (FQDN) provided by your mobile operator
You need the fully qualified domain name (FQDN) of the mobile operator's download server (SM-DP+), like
smdp.example.com. You enter this FQDN in the Intune policy. When each PC contacts the download server (SM-DP+), the download server (SM-DP+) authenticates the PC's EID and provides it with the eSIM profile that's specific to that device.You don't need the individual activation codes.
Process flow

The overall process flow is as follows:
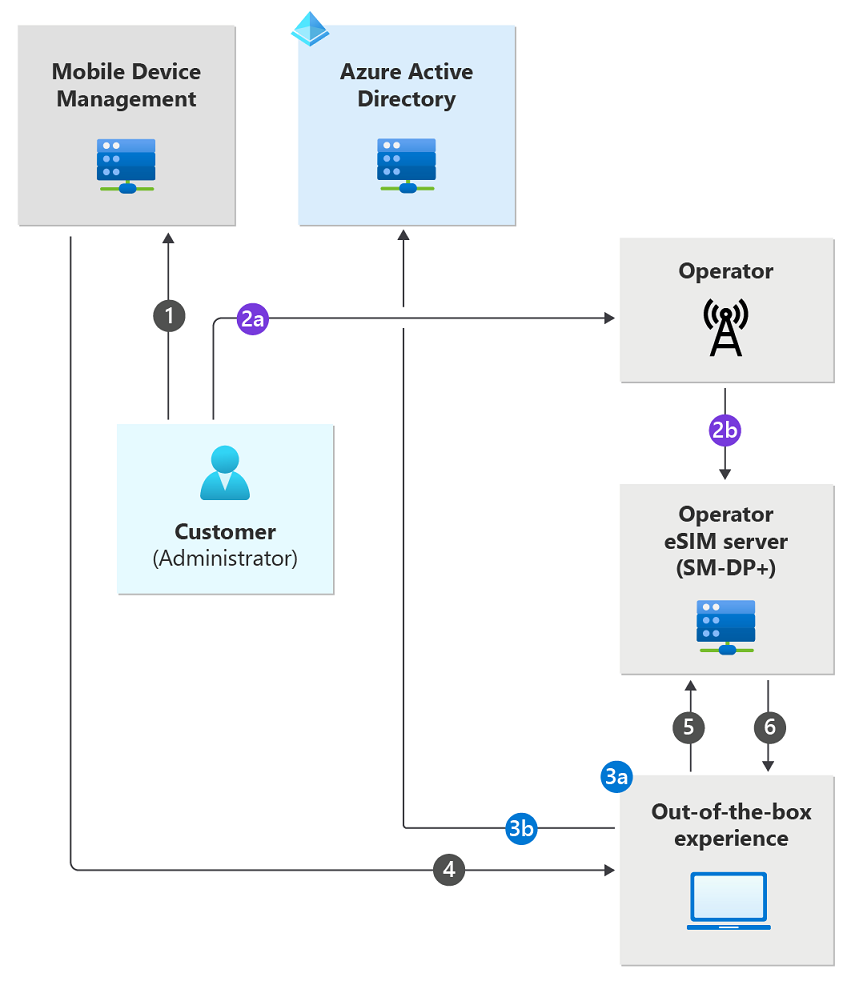
To set up a managed eSIM deployment, you must have a contract with a mobile operator and obtain information from the operator about its eSIM download server (SM-DP+). Then, you configure the policies and settings to be applied to all of their eSIM-capable Connected PCs, including the fully qualified domain name of the operator's SM-DP+.
Note
The MDM administrator creates the eSIM configuration profile pointing to the download server (SM-DP+) provided by the mobile operator and assigns the profile to the required group(s).
As described earlier, you or your supplier (PC manufacturer or distributor) provides the EIDs of the Connected PCs to the operator. For each EID, the operator creates an eSIM profile on its download server (SM-DP+) for that device. After the initial configuration is complete, the following process unfolds for each PC:
The end user unboxes the PC, powers it on, and goes through the initial Windows out of box experience. As part of this process, the end user connects the PC to a Wi-Fi network, and signs into their work or school account.
After the user authenticates with their Microsoft Entra ID, the work or school account is set up on the device. As part of this process, the PC is enrolled to MDM, which then provisions it as configured by you (in step 1). This configuration includes the FQDN of the operator's download server (SM-DP+).
After configuration is complete, the PC connects to the download server (SM-DP+) according to the standard eSIM download protocol. As part of this process, the download server (SM-DP+) receives and authenticates the EID of the PC. The download server (SM-DP+) looks up the eSIM profile for that EID (created in step 2) and downloads that eSIM profile to the PC.
The PC installs and enables the eSIM profile. Windows recognizes the mobile operator and configures the cellular settings such as access point name (APNs), and the PC is now connected over cellular.
Note
The process flow described focuses on the initial device setup experience. However, eSIM provisioning can also be done anytime throughout the lifecycle of the device for managed devices.
Step 1 - Create a devices group
Create a device group that includes the eSIM capable devices. Add groups lists the steps.
Note
We recommend creating a static Microsoft Entra device group that includes your eSIM devices. Using a group confirms that you target only eSIM devices.
Step 2 - Create a profile in Intune
This profile uses the FQDN of your mobile operator's download server (SM-DP+), and enables eSIM on the devices.
Sign in to the Microsoft Intune admin center.
Select Devices > Manage devices > Configuration > Create > New policy.
Enter the following properties:
- Platform: Select Windows 10 and later.
- Profile type: Select Settings catalog.
Select Create.
In Basics, enter the following properties:
- Name: Enter a descriptive name for the new policy.
- Description: Enter a description for the policy. This setting is optional, but recommended.
Select Next.
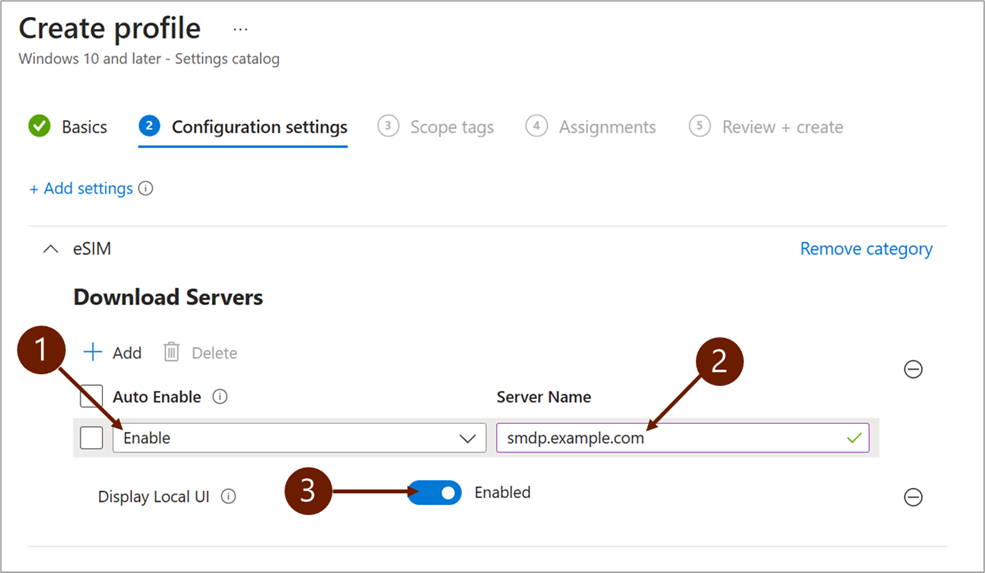
In the Configuration Settings tab, select + Add settings and search for eSIM in the Settings Picker. After you select eSIM, you can select the settings that you want to make available on your policy.

In the Download Servers area:
1 - Auto Enable: It indicates whether the discovered profile must be automatically enabled after installation. The default value of the dropdown list is Enable. Select Auto Enable if the eSIM profile should be automatically enabled (independently of any other eSIM profiles stored in eUICC).
2 - Server Name: It's the fully qualified domain name of the SM-DP+ server that is used for profile discovery. For example, enter
smdp.example.com(don't includehttps://).3 - Display Local UI: Determines whether eSIM settings can be viewed and changed in the Settings app on the eSIM capable devices that are being provisioned. True if available, false otherwise. If Display Local UI is set to Disabled, Auto Enable must be checked.
Enter the Server Name, select the desired settings, and then select Next.
In the Scope tags tab, add the required tags, and select Next.
In the Assignments tab, select the device group you created in Step 1 - Create a devices group. For more information on assigning the profile, go to Assign device profiles in Microsoft Intune.
In the Review + create tab, review all the details, and select Create.
Best practices & troubleshooting
Create a device Microsoft Entra group that only includes the targeted eSIM devices. If the policy is deployed to a non-eSIM-capable device, the Assignment Status shows an Error.
The current implementation only supports a single Server Name. Even if more Server Names are added, only the first one is used.
If the Local UI isn't disabled as part of the Configuration Profile, you can change the active profile, stop using, or remove any of the eSIM profiles stored in the device.
As with other settings in Intune, when the deployment status shows as successful, it means that the settings applied. It doesn't necessarily mean that the eSIM Profile is downloaded and activated.
There's currently no method to remove an eSIM profile using Intune. The profile must be manually removed from the device.
Intune can't distinguish between an eSIM and a non-eSIM device.