Audio/Video Calling from a Custom App into a Teams Meeting
Level: Intermediate
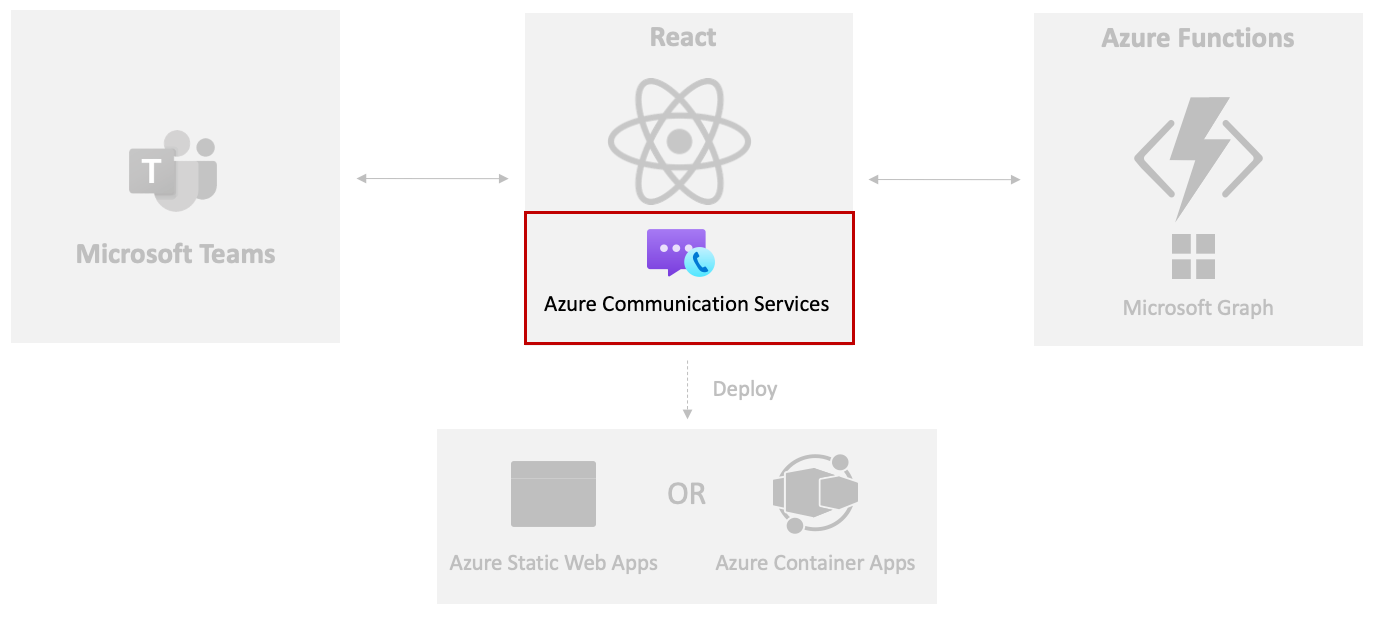
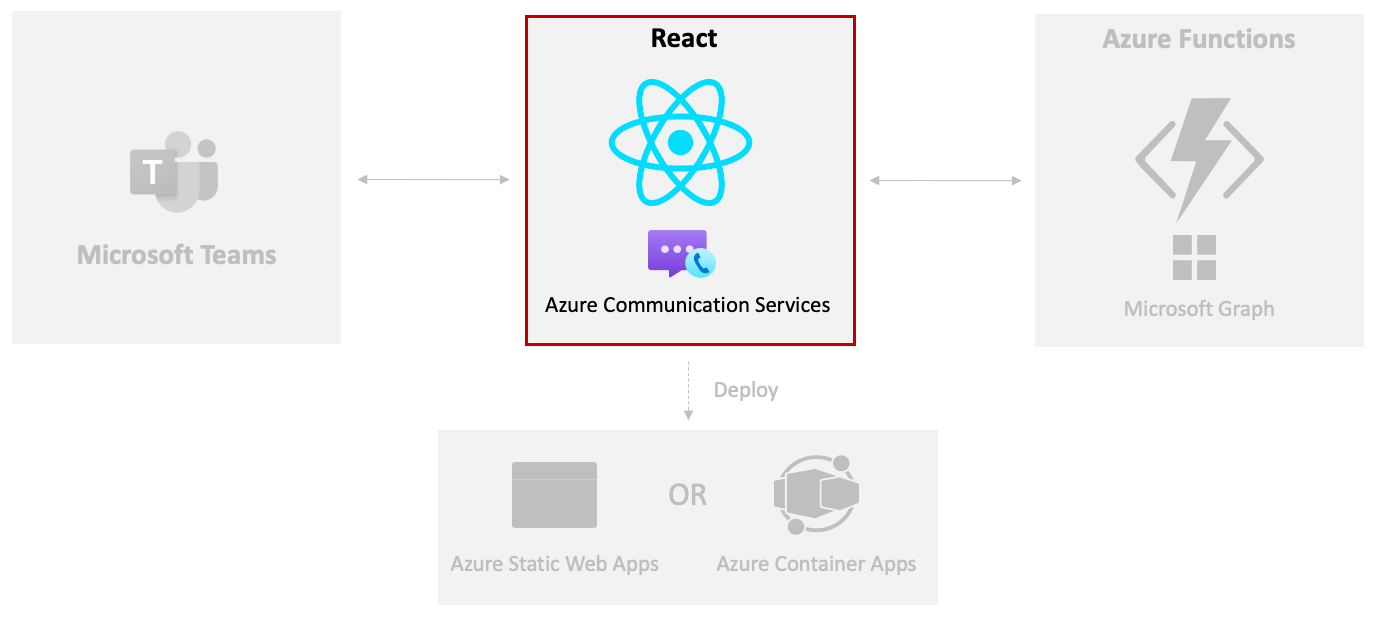
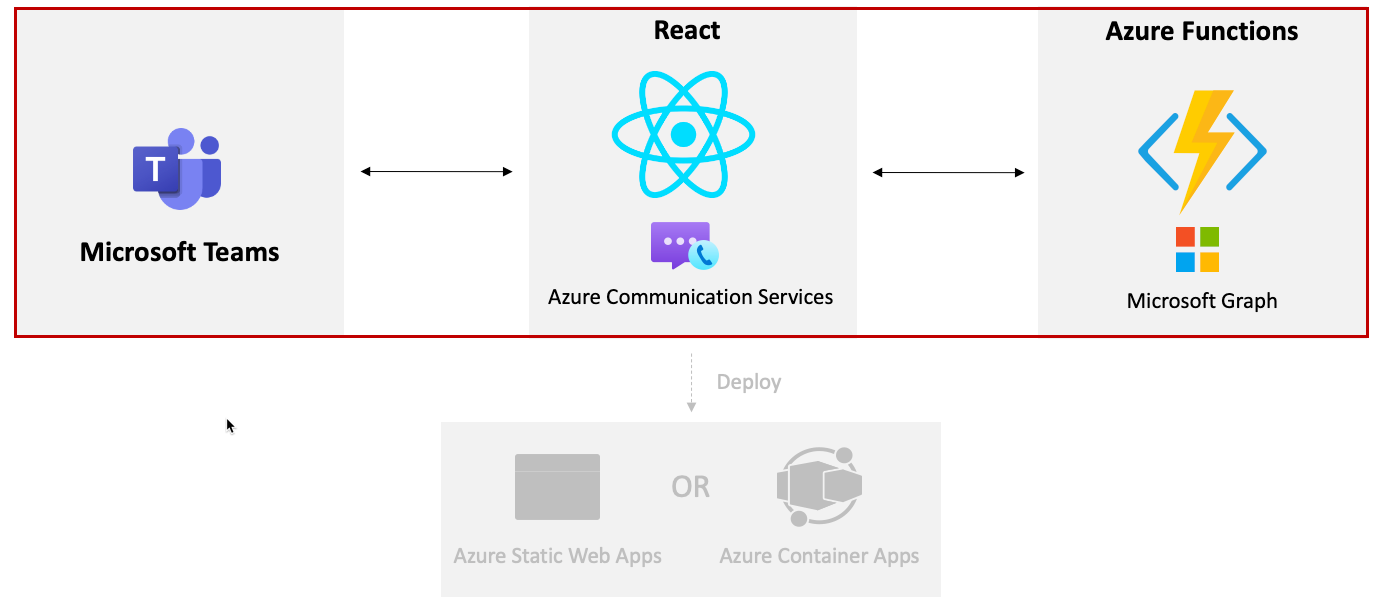
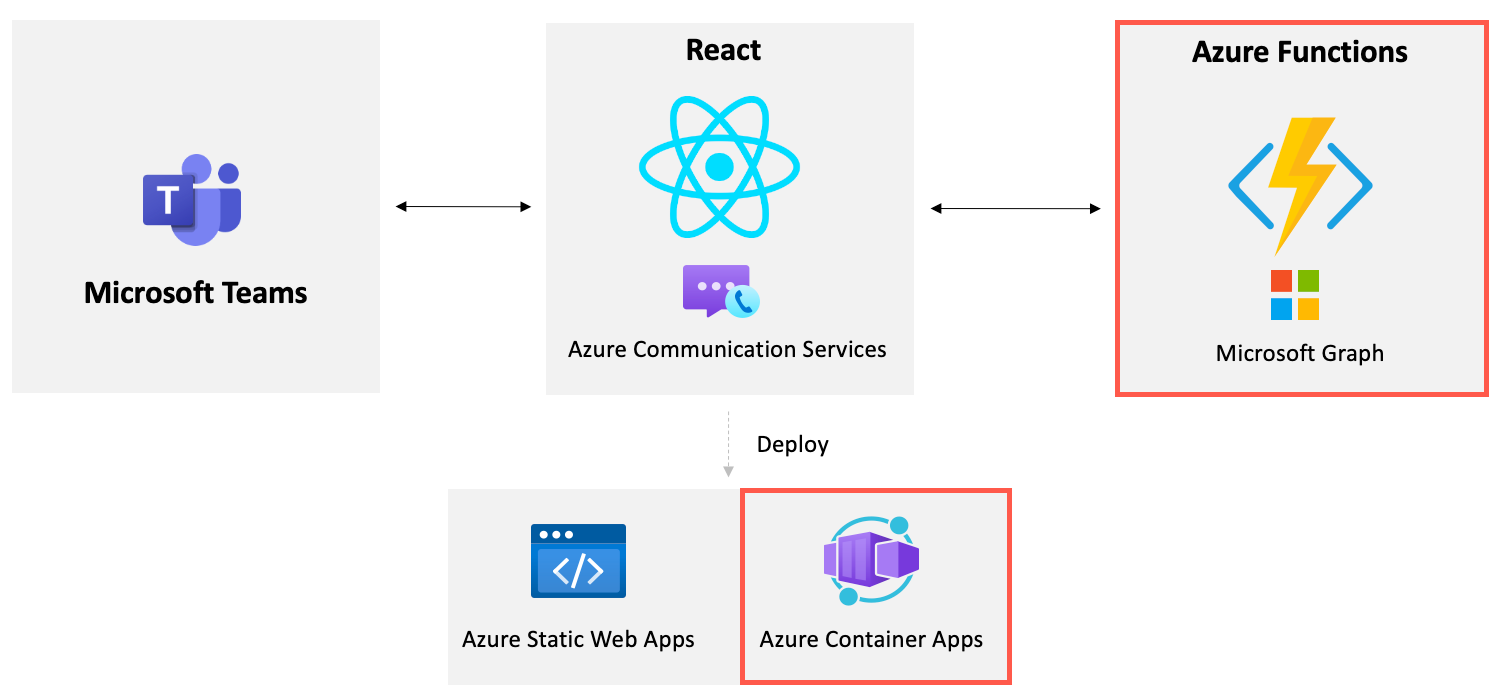
In this tutorial, you'll learn how Azure Communication Services can be used in a custom React application to allow a user to make an audio/video call into a Microsoft Teams meeting. You'll learn about the different building blocks that can be used to make this scenario possible and be provided with hands-on steps to walk you through the different Microsoft Cloud services involved.
What You'll Build in this Tutorial
Overview of the Application Solution

Prerequisites
- Node LTS - Node LTS is used for this project
- git
- Visual Studio Code or another IDE of your choice.
- Azure Functions Extension for VS Code
- Azure Functions Core Tools
- Azure subscription
- Microsoft 365 developer tenant
- GitHub account
- Visual Studio if using the C# version of the tutorial. Visual Studio Code can also be used if preferred.
Technologies used in this tutorial include
- React
- Azure Communication Services
- Azure Functions
- Microsoft Graph
- Microsoft Teams
Stay on this site and follow instructions with your own machine.
Continue to first stepVisit the Hands-on Lab site for integrated instruction.
Hands-on LabIn this exercise you'll create an Azure Communication Services (ACS) resource in the Azure portal.
To get started, perform the following tasks:
Visit the Azure portal in your browser and sign in.
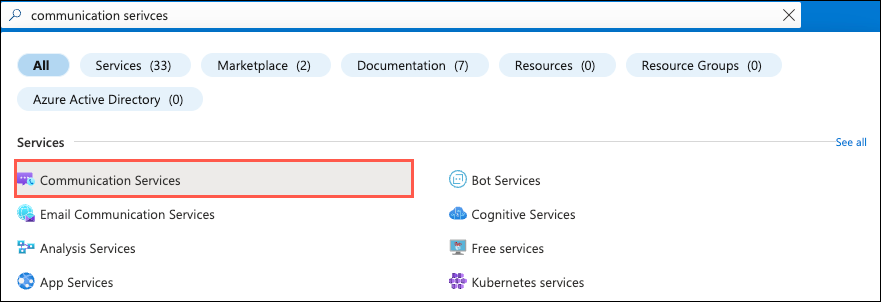
Type communication services in the search bar at the top of the page and select Communication Services from the options that appear.
Select Create in the toolbar.
Perform the following tasks:
- Select your Azure subscription.
- Select the resource group to use (create a new one if one doesn't exist).
- Enter an ACS resource name. It must be a unique value.
- Select a data location.
Select Review + Create followed by Create.
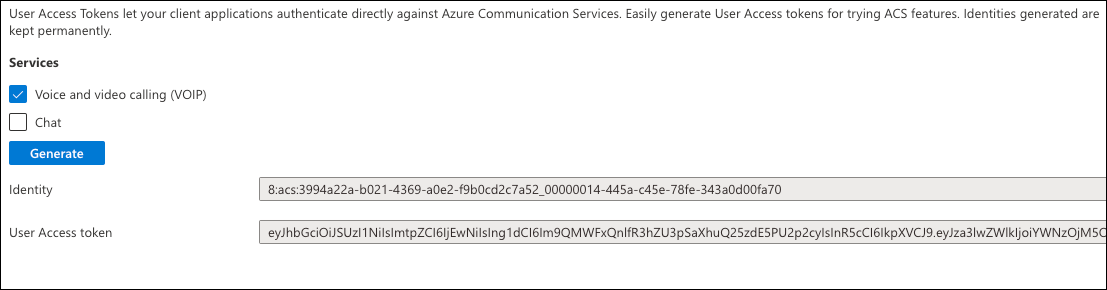
Once your ACS resource is created, navigate to it, and select Settings --> Identities & User Access Tokens.
Select the Voice and video calling (VOIP) checkbox.
Select Generate.
Copy the Identity and User Access token values to a local file. You'll need the values later in this exercise.
Select Settings --> Keys and copy the Primary key connection string value to the local file where you copied the user identity and token values.
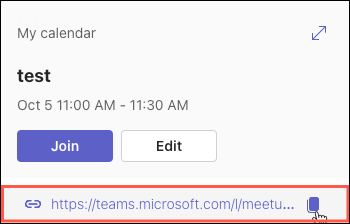
To run the application you'll need a Teams meeting link. Go to Microsoft Teams, sign in with your Microsoft 365 developer tenant, and select the Calendar option on the left.
Tip
If you don't currently have a Microsoft 365 account, you can sign up for the Microsoft 365 Developer Program subscription. It's free for 90 days and will continually renew as long as you're using it for development activity. If you have a Visual Studio Enterprise or Professional subscription, both programs include a free Microsoft 365 developer subscription, active for the life of your Visual Studio subscription.
Select a any date/time on the calendar, add a title for the meeting, invite a user from your Microsoft 365 developer tenant, and select Save.
Select the new meeting you added in the calendar and copy the Teams meeting link that is displayed into the same file where you stored the ACS user identity, token, and connection string.
Now that your ACS resource is setup and you have a Teams meeting join link, let's get the React application up and running.
Stay on this site and follow instructions with your own machine.
Continue to first stepVisit the Hands-on Lab site for integrated instruction.
Hands-on LabIn this exercise you'll add the ACS UI calling composite into a React app to enable making audio/video calls from a custom app into a Microsoft Teams meeting.
Visit GitHub and sign in. If you don't already have a GitHub account, you can select the Sign up option to create one.
Visit the Microsoft Cloud GitHub Repository.
Select the Fork option to add the repository to your desired GitHub organization/account.

Run the following command to clone this repository to your machine. Replace <YOUR_ORG_NAME> with your GitHub organization/account name.
git clone https://github.com/<YOUR_ORG_NAME>/MicrosoftCloudOpen the samples/acs-to-teams-meeting project folder in Visual Studio Code.
Expand the client/react folder.
Open the package.json file in VS Code and note the following ACS packages are included:
@azure/communication-common
@azure/communication-react
Double-check that you have npm 10 or higher installed by opening a terminal window and running the following command:
npm --versionTip
If you don't have npm 10 or higher installed you can update npm to the latest version by running
npm install -g npm.Open a terminal window and run the
npm installcommand in the react folder to install the application dependencies.Open App.tsx and take a moment to explore the imports at the top of the file. These handle importing ACS security and audio/video calling symbols that will be used in the app.
import {
    AzureCommunicationTokenCredential,
    CommunicationUserIdentifier
} from '@azure/communication-common';
import {
  CallComposite,
  fromFlatCommunicationIdentifier,
  useAzureCommunicationCallAdapter
} from '@azure/communication-react';
import React, { useState, useMemo, useEffect } from 'react';
import './App.css';
Note
You'll see how the
CallCompositecomponent is used later in this exercise. It provides the core UI functionality for Azure Communication Services to enable making an audio/video call from the app into a Microsoft Teams meeting.Locate the
Appcomponent and perform the following tasks:- Take a moment to examine the
useStatedefinitions in the component. - Replace the
userIduseStatefunction's empty quotes with the ACS user identity value you copied in the previous exercise. - Replace the
tokenuseStatefunction's empty quotes with the ACS token value you copied in the previous exercise. - Replace the
teamsMeetingLinkuseStatefunction's empty quotes with the Teams meeting link value you copied in the previous exercise.
// Replace '' with the ACS user identity value
const [userId, setUserId] = useState<string>('');

// Replace '' with the ACS token value
const [token, setToken] = useState<string>('');

// Replace '' with the Teams meeting link value
const [teamsMeetingLink, setTeamsMeetingLink] = useState<string>('');
Note
Later in this tutorial you'll see how to retrieve the
userId,token, andteamsMeetingLinkvalues dynamically.- Take a moment to examine the
Take a moment to explore the
useMemofunctions in theAppcomponent.- The
credentialuseMemofunction creates a newAzureCommunicationTokenCredentialinstance once the token has a value. - The
callAdapterArgsuseMemofunction returns an object that has the arguments that are used to make an audio/video call. Notice that is uses theuserId,credential, andteamsMeetingLinkvalues in the ACS call arguments.
const credential = useMemo(() => {
    if (token) {
        return new AzureCommunicationTokenCredential(token)
    }
    return;
}, [token]);

const callAdapterArgs = useMemo(() => {
    if (userId && credential && displayName && teamsMeetingLink) {
        return {
            userId: fromFlatCommunicationIdentifier(userId) as CommunicationUserIdentifier,
            displayName,
            credential,
            locator: { meetingLink: teamsMeetingLink },
        }
    }
    return {};
}, [userId, credential, displayName, teamsMeetingLink]);
Note
useMemois used in this scenario because we only want theAzureCommunicationTokenCredentialobject and the call adapter args to be created once as the necessary parameters are passed in. View additional details about useMemo here.- The
Once the
credentialsandcallAdapterArgsare ready, the following line handles creating an ACS call adapter using theuseAzureCommunicationCallAdapterReact hook provided by ACS. ThecallAdapterobject will be used later in the UI calling composite component.const callAdapter = useAzureCommunicationCallAdapter(callAdapterArgs);Note
Because
useAzureCommunicationCallAdapteris a React hook, it won't assign a value tocallAdapteruntil thecallAdapterArgsvalue is valid.Earlier you assigned the user identity, token, and Teams meeting link to state values in the
Appcomponent. That works fine for now, but in a later exercise you'll see how to dynamically retrieve those values. Since you set the values earlier, comment out the code in theuseEffectfunction as shown next. Once you get the Azure Functions running in the next exercises, you'll revisit this code.useEffect(() => { /* Commenting out for now const init = async () => { setMessage('Getting ACS user'); //Call Azure Function to get the ACS user identity and token let res = await fetch(process.env.REACT_APP_ACS_USER_FUNCTION as string); let user = await res.json(); setUserId(user.userId); setToken(user.token); setMessage('Getting Teams meeting link...'); //Call Azure Function to get the meeting link res = await fetch(process.env.REACT_APP_TEAMS_MEETING_FUNCTION as string); let link = await res.text(); setTeamsMeetingLink(link); setMessage(''); console.log('Teams meeting link', link); } init(); */ }, []);Locate the following JSX code. It uses the
CallCompositesymbol you saw imported to render the user interface used to make an audio/video call from the React app into a Teams meeting. ThecallAdapteryou explored earlier is passed to itsadapterproperty to provide the required arguments.if (callAdapter) { return ( <div> <h1>Contact Customer Service</h1> <div className="wrapper"> <CallComposite adapter={callAdapter} /> </div> </div> ); }Save the file before continuing.
Run
npm startin your terminal window to run the application. Ensure you run the command within the react folder.After the applications builds you should see a calling UI displayed. Enable selecting your microphone and camera and initiate the call. You should see that you're placed in a waiting room. If you join the meeting you setup earlier in Microsoft Teams, you can allow the guest to enter the meeting.
Press Ctrl + C to stop the application. Now that you've successfully run it, let's explore how you can dynamically get the ACS user identity and token and automatically create a Microsoft Teams meeting and return the join URL using Microsoft Graph.
Stay on this site and follow instructions with your own machine.
Continue to first stepVisit the Hands-on Lab site for integrated instruction.
Hands-on LabIn this exercise, you'll automate the process of creating a Microsoft Teams meeting link and passing to the ACS by using Azure Functions and Microsoft Graph.
You'll need to create a Microsoft Entra ID app for Daemon app authentication. In this step, authentication will be handled in the background with app credentials, and a Microsoft Entra ID app will use Application Permissions to make Microsoft Graph API calls. Microsoft Graph will be used to dynamically create a Microsoft Teams meeting and return the Teams meeting URL.
Perform the following steps to create a Microsoft Entra ID app:
- Go to Azure portal and select Microsoft Entra ID.
- Select the App registration tab followed by + New registration.
- Fill in the new app registration form details as shown below and select Register:
- Name: ACS Teams Interop App
- Supported account types: Accounts in any organizational directory (Any Microsoft Entra ID directory - Multitenant) and personal Microsoft accounts (e.g. Skype, Xbox)
- Redirect URI: leave this blank
- After the app is registered, go to API permissions and select + Add a permission.
- Select Microsoft Graph followed by Application permissions.
- Select the
Calendars.ReadWritepermission and then select Add. - After adding the permissions, select Grant admin consent for <YOUR_ORGANIZATION_NAME>.
- Go to the Certificates & secrets tab, select + New client secret, and then select Add.
- Copy the value of the secret into a local file. You'll use the value later in this exercise.
- Go to the Overview tab and copy the
Application (client) IDandDirectory (tenant) IDvalues into the same local file that you used in the previous step.
Creating a local.settings.json File
Open the
samples/acs-to-teams-meeting/server/csharp/GraphACSFunctions.slnin Visual Studio or open the GraphACSFunctions folder in Visual Studio Code.Go to the
GraphACSFunctionsproject and create alocal.settings.jsonfile with the following values:{ "IsEncrypted": false, "Values": { "FUNCTIONS_WORKER_RUNTIME": "dotnet-isolated", "TENANT_ID": "", "CLIENT_ID": "", "CLIENT_SECRET": "", "USER_ID": "", "ACS_CONNECTION_STRING": "" }, "Host": { "LocalHttpPort": 7071, "CORS": "*", "CORSCredentials": false }, "watchDirectories": [ "Shared" ] }- Use the values you copied into the local file in an earlier exercise to update the
TENANT_ID,CLIENT_IDandCLIENT_SECRETvalues. - Define
USER_IDwith the user id that you'd like to create a Microsoft Teams Meeting.
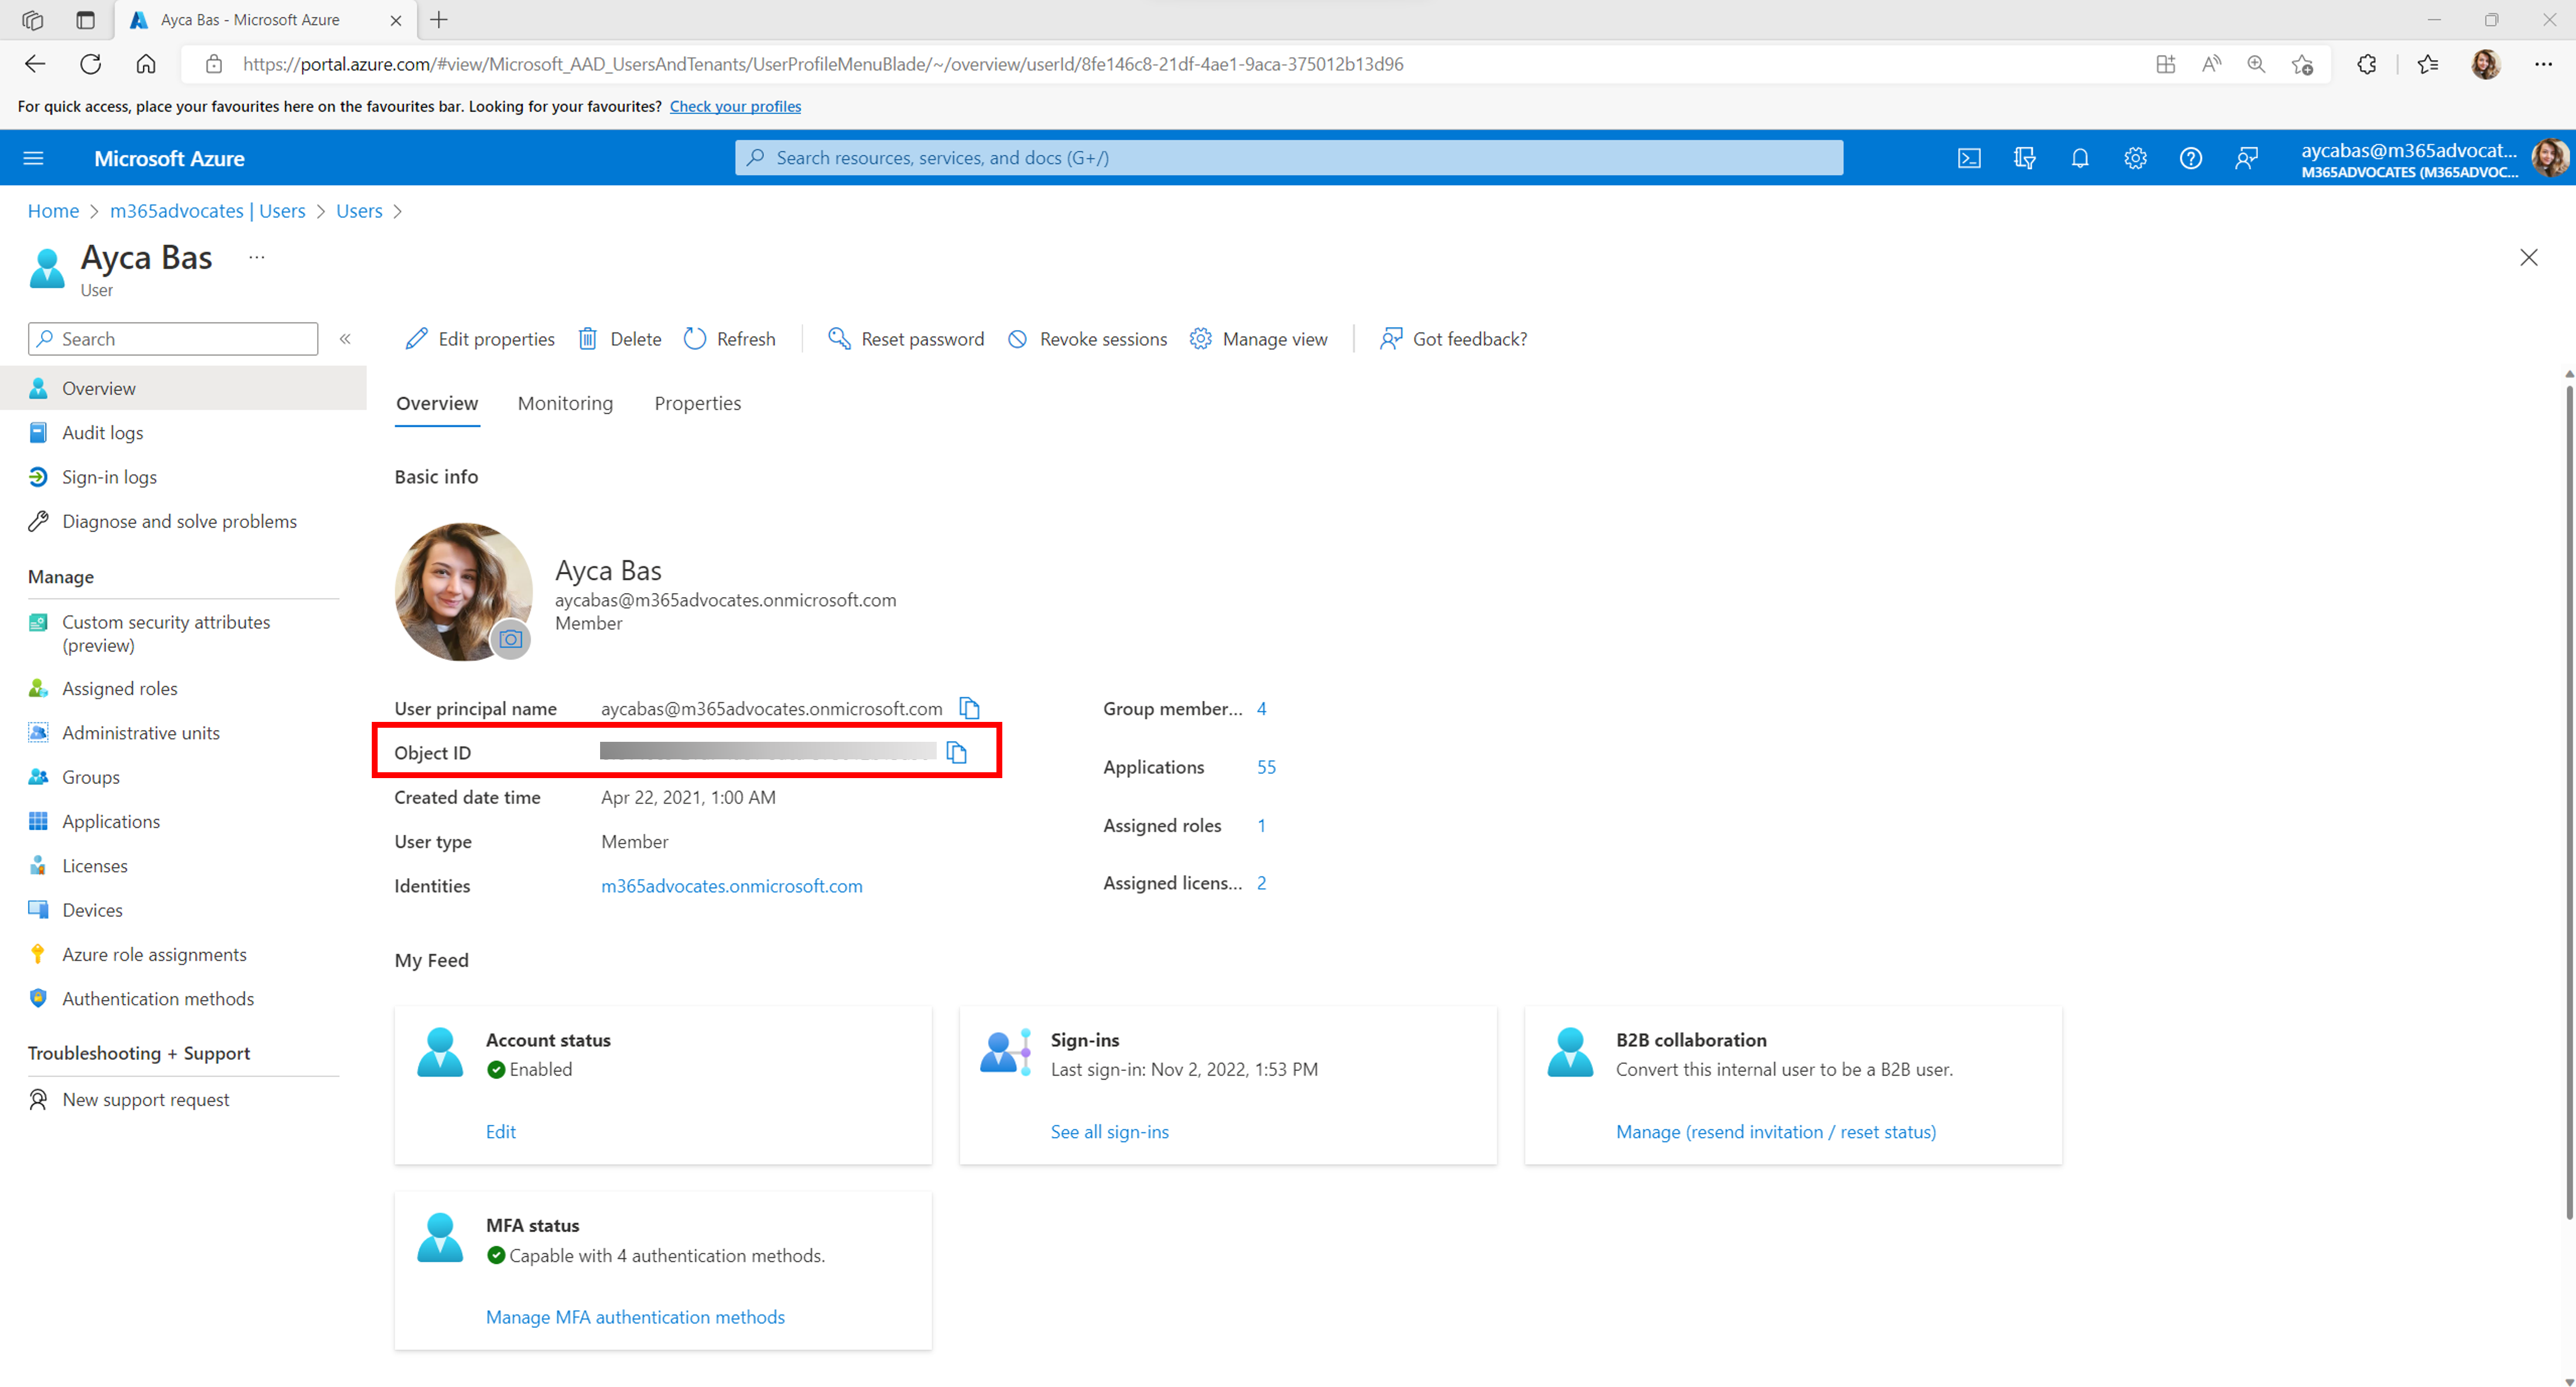
You can get the User ID from the Azure portal.
- Login using your Microsoft 365 developer tenant admin account.
- Select Microsoft Entra ID
- Navigate to the Users tab on the side bar.
- Search for your user name and select it to see the user details.
- Inside the user details,
Object IDrepresents theUser ID. Copy theObject IDvalue and use it for theUSER_IDvalue in local.settings.json.
Note
ACS_CONNECTION_STRINGwill be used in the next exercise so you don't need to update it yet.- Use the values you copied into the local file in an earlier exercise to update the
Open
GraphACSFunctions.slnlocated in the acs-to-teams-meeting/server/csharp folder and note that it includes the following Microsoft Graph and Identity packages:<PackageReference Include="Azure.Communication.Identity" Version="1.3.1" /> <PackageReference Include="Azure.Identity" Version="1.11.2" /> <PackageReference Include="Microsoft.Graph" Version="5.51.0" />Go to Program.cs and note the following code in the
ConfigureServicesmethod:var host = new HostBuilder() .ConfigureFunctionsWebApplication() .ConfigureServices(services => { services.AddApplicationInsightsTelemetryWorkerService(); services.ConfigureFunctionsApplicationInsights(); services.AddSingleton(static p => { var config = p.GetRequiredService<IConfiguration>(); var clientSecretCredential = new ClientSecretCredential( config.GetValue<string>("TENANT_ID"), config.GetValue<string>("CLIENT_ID"), config.GetValue<string>("CLIENT_SECRET") ); return new GraphServiceClient( clientSecretCredential, ["https://graph.microsoft.com/.default"] ); }); ... services.AddSingleton<IGraphService, GraphService>(); }) .Build(); }- This code creates a
GraphServiceClientobject that can be used to call Microsoft Graph from Azure Functions. It's a singleton and can be injected into other classes. - You can make Microsoft Graph API calls with app-only permissions (such as Calendars.ReadWrite) by passing a
ClientSecretCredentialvalue to theGraphServiceClientconstructor. TheClientSecretCredentialuses theTenant Id,Client IdandClient Secretvalues from the Microsoft Entra ID app.
- This code creates a
Open Services/GraphService.cs.
Take a moment to explore the
CreateMeetingEventAsyncmethod:using System; using System.Threading.Tasks; using Microsoft.Graph; using Microsoft.Extensions.Configuration; namespace GraphACSFunctions.Services; public class GraphService : IGraphService { private readonly GraphServiceClient _graphServiceClient; private readonly IConfiguration _configuration; public GraphService(GraphServiceClient graphServiceClient, IConfiguration configuration) { _graphServiceClient = graphServiceClient; _configuration = configuration; } public async Task<string> CreateMeetingAsync() { var userId = _configuration.GetValue<string>("USER_ID"); var newMeeting = await _graphServiceClient .Users[userId] .Calendar .Events .PostAsync(new() { Subject = "Customer Service Meeting", Start = new() { DateTime = DateTime.UtcNow.ToString("yyyy-MM-ddTHH:mm:ss"), TimeZone = "UTC" }, End = new() { DateTime = DateTime.UtcNow.AddHours(1).ToString("yyyy-MM-ddTHH:mm:ss"), TimeZone = "UTC" }, IsOnlineMeeting = true }); return newMeeting.OnlineMeeting.JoinUrl; } }GraphServiceClientandIConfigurationobjects are injected into the constructor and assigned to fields.- The
CreateMeetingAsync()function posts data to the Microsoft Graph Calendar Events API, which dynamically creates an event in a user's calendar and returns the join URL.
Open TeamsMeetingFunctions.cs and take a moment to examine it's constructor. The
GraphServiceClientyou looked at earlier is injected and assigned to the_graphServicefield.private readonly IGraphService _graphService; public TeamsMeetingFunction(IGraphService graphService) => _graphService = graphService;Locate the
Runmethod:[Function("HttpTriggerTeamsUrl")] public async Task<HttpResponseData> Run( [HttpTrigger(AuthorizationLevel.Anonymous, "get", Route = null)] HttpRequestData req, ILogger log) { var response = req.CreateResponse(HttpStatusCode.OK); await response.WriteStringAsync(await _graphService.CreateMeetingAsync()); return response; }- It defines a function name of
HttpTriggerTeamsUrlthat can be called with an HTTP GET request. - It calls
_graphService.CreateMeetingAsync(), which creates a new event and returns the join URL.
- It defines a function name of
Run the program by pressing F5 in Visual Studio or by selecting Debug --> Start Debugging from the menu. This action starts the Azure Functions project and make the
ACSTokenFunctionavailable to call.
Note
If you're using VS Code you can open a terminal window in the GraphACSFunctions folder and run func start. This assumes that you have the Azure Functions Core Tools installed on your machine.
Calling the Azure Function from React
Now that the
httpTriggerTeamsUrlfunction is ready to use, let's call it from the React app.Expand the client/react folder.
Add an .env file into the folder with the following values:
REACT_APP_TEAMS_MEETING_FUNCTION=http://localhost:7071/api/httpTriggerTeamsUrl
REACT_APP_ACS_USER_FUNCTION=http://localhost:7071/api/httpTriggerAcsToken
These values will be passed into React as it builds so that you can easily change them as needed during the build process.
Open client/react/App.tsx file in VS Code.
Locate the
teamsMeetingLinkstate variable in the component. Remove the hardcoded teams link and replace it with empty quotes:const [teamsMeetingLink, setTeamsMeetingLink] = useState<string>('');Locate the
useEffectfunction and change it to look like the following. This handles calling the Azure Function you looked at earlier which creates a Teams meeting and returns the meeting join link:useEffect(() => { const init = async () => { /* Commenting out for now setMessage('Getting ACS user'); //Call Azure Function to get the ACS user identity and token const res = await fetch(process.env.REACT_APP_ACS_USER_FUNCTION as string); const user = await res.json(); setUserId(user.userId); setToken(user.token); */ setMessage('Getting Teams meeting link...'); //Call Azure Function to get the meeting link const resTeams = await fetch(process.env.REACT_APP_TEAMS_MEETING_FUNCTION as string); const link = await resTeams.text(); setTeamsMeetingLink(link); setMessage(''); console.log('Teams meeting link', link); } init(); }, []);Save the file before continuing.
Open a terminal window,
cdinto the *react folder, and runnpm startto build and run the application.After the application builds and loads, you should see the ACS calling UI displayed and can then call into the Teams meeting that was dynamically created by Microsoft Graph.
Stop the terminal process by entering Ctrl + C in the terminal window.
Stop the Azure Functions project.
Note
Visit the Azure Communication Services documentation to learn more about extending Microsoft Teams meetings in other ways.
Stay on this site and follow instructions with your own machine.
Continue to first stepVisit the Hands-on Lab site for integrated instruction.
Hands-on LabIn this exercise you'll learn how to dynamically retrieve user identity and token values from Azure Communication Services using Azure Functions. Once retrieved, the values will be passed to the ACS UI composite to enable a call to be made by a customer.
Open local.settings.json and update the
ACS_CONNECTION_STRINGvalue with the ACS connection string you saved in an earlier exercise.Open Startup.cs in Visual Studio and explore the second
AddSingleton()call in theConfigureServices()method.var host = new HostBuilder() .ConfigureFunctionsWebApplication() .ConfigureServices(services => { ... services.AddSingleton(static p => { var config = p.GetRequiredService<IConfiguration>(); var connectionString = config.GetValue<string>("ACS_CONNECTION_STRING"); return new CommunicationIdentityClient(connectionString); }); ... }) .Build(); }The
AddSingleton()call creates aCommunicationIdentityClientobject using theACS_CONNECTION_STRINGvalue from local.settings.json.Open ACSTokenFunction.cs and locate the constructor and field definitions.
A field named
Scopesis defined that includes theCommunicationTokenScope.VoIPscope. This scope is used to create the access token for the video call.private static readonly CommunicationTokenScope[] Scopes = [ CommunicationTokenScope.VoIP, ];The
CommunicationIdentityClientsingleton instance created in Startup.cs is injected into the constructor and assigned to the_tokenClientfield.private readonly CommunicationIdentityClient _tokenClient; public ACSTokenFunction(CommunicationIdentityClient tokenClient) { _tokenClient = tokenClient; }
Explore the
Run()method in ACSTokenFunction.cs:[Function("HttpTriggerAcsToken")] public async Task<HttpResponseData> Run( [HttpTrigger(AuthorizationLevel.Anonymous, "get", Route = null)] HttpRequestData req, ILogger log) { var user = await _tokenClient.CreateUserAsync(); var userToken = await _tokenClient.GetTokenAsync(user, Scopes); var response = req.CreateResponse(HttpStatusCode.OK); await response.WriteAsJsonAsync( new { userId = user.Value.Id, userToken.Value.Token, userToken.Value.ExpiresOn } ); return response; }- It defines a function named of
HttpTriggerAcsTokenthat can be called with an HTTP GET request. - A new ACS user is created by calling the
_tokenClient.CreateUserAsync()method. - An access token used for video calls is created by calling the
_tokenClient. GetTokenAsync()method. - The user ID and token are returned from the function as a JSON object.
- It defines a function named of
Run the program by pressing F5 in Visual Studio or by selecting Debug --> Start Debugging from the menu. This will start the Azure Functions project and make the
ACSTokenFunctionavailable to call.Note
If you're using VS Code you can open a terminal window in the GraphACSFunctions folder and run
func start. This assumes that you have the Azure Functions Core Tools installed on your machine.Now that the Azure Functions are running locally, the client needs to be able to call into them to get the ACS user identity and token values.
Open samples/acs-to-teams-meeting/client/react/App.tsx file in your editor.
Locate the
userIdandtokenstate variables in the component. Remove the hardcoded values and replace them with empty quotes:const [userId, setUserId] = useState<string>(''); const [token, setToken] = useState<string>('');Locate the
useEffectfunction and change it to look like the following to enable calling the Azure Function to retrieve an ACS user identity and token:useEffect(() => { const init = async () => { setMessage('Getting ACS user'); //Call Azure Function to get the ACS user identity and token let res = await fetch(process.env.REACT_APP_ACS_USER_FUNCTION as string); let user = await res.json(); setUserId(user.userId); setToken(user.token); setMessage('Getting Teams meeting link...'); //Call Azure Function to get the meeting link res = await fetch(process.env.REACT_APP_TEAMS_MEETING_FUNCTION as string); let link = await res.text(); setTeamsMeetingLink(link); setMessage(''); console.log('Teams meeting link', link); } init(); }, []);Save the file before continuing.
Open a terminal window and run
npm startin thereactfolder. After it builds and loads you should see the ACS calling UI displayed and you can call into the Teams meeting that was dynamically created by Microsoft Graph.Stop the React app by pressing Ctrl + C in the terminal window.
Stop the Azure Functions project.
Commit your git changes and push them to your GitHub repository using Visual Studio Code:
- Select the Source Control icon (3rd one down in the Visual Studio Code toolbar).
- Enter a commit message and select Commit.
- Select Sync Changes.
Stay on this site and follow instructions with your own machine.
Continue to first stepVisit the Hands-on Lab site for integrated instruction.
Hands-on LabImportant
In addition to the pre-requisites listed for this tutorial, you'll also need to install the following tools on your machine to complete this exercise.
- Azure CLI
- If you're using VS Code, install the Azure Functions extension
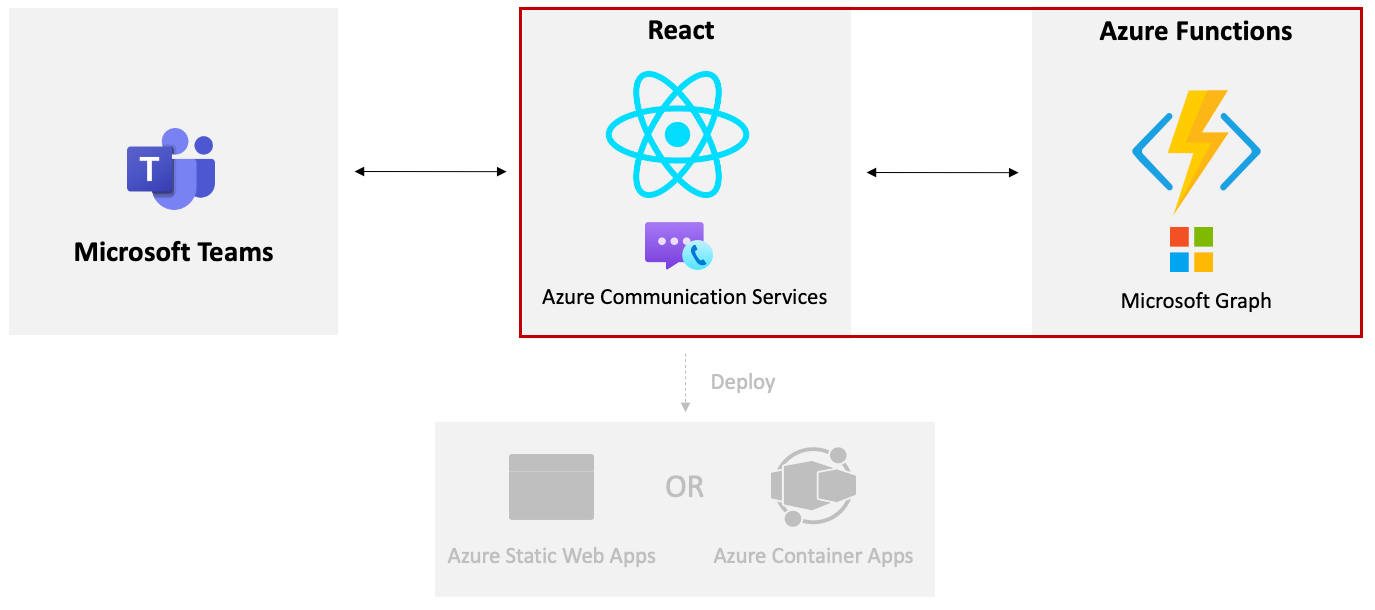
In this exercise you'll learn how to deploy the Microsoft Graph and ACS functions discussed in earlier exercises to Azure Functions. You'll also build a container image and deploy it to Azure Container Apps.
Deploy to Azure Functions
Note
This section uses Visual Studio to publish the C# functions to Azure. If you'd prefer to use Visual Studio Code, you can follow the instructions in the Create a C# function in Azure using Visual Studio Code quickstart.
Open the
samples/acs-video-to-teams-meeting/server/csharp/GraphACSFunctions.slnproject in Visual Studio.Right-click on the
GraphACSFunctionsproject and select Publish.Select Azure in the target section, then click Next.
Select Azure Function App (Windows), then click Next.
Select your subscription, then select + Create New.
Enter the following information:
- Function name: A globally unique name is required. Example: acsFunctions<YOUR_LAST_NAME>.
- Subscription: Select your subscription.
- Resource Group: Select a resource group you created earlier in this tutorial, or you can also create a new one.
- Hosting Plan: Consumption plan.
- Location: Select the region you'd like to deploy to.
- Azure Storage: Create a new one. (You can also select an existing storage account.)
- Azure Insights: Create a new one. (You can also select an existing storage account.)
Note
A globally unique name is required. You can make the name more unique by adding a number or your last name to the end of the name.
Once the Azure Function App is created you'll see a confirmation screen. Make sure the Run from package option is selected, then select Finish.
Select Publish to deploy the function to Azure.
Once the function is deployed to Azure, go to the Azure portal and select the Function App you created.
Copy the URL for the function you deployed. You'll use the value later in this exercise.
Select Settings --> Configuration in the left menu.
Select + New application setting button and add the following keys and values in the Application settings. You can retreive these values from
local.settings.jsonin theGraphACSFunctionsproject.# Retrieve these values from local.settings.json TENANT_ID: <YOUR_VALUE> CLIENT_ID: <YOUR_VALUE> CLIENT_SECRET: <YOUR_VALUE> USER_ID: <YOUR_VALUE> ACS_CONNECTION_STRING: <YOUR_VALUE>Select the Save button to save the settings.
Finally, you need to enable CORS (Cross-Origin Resource Sharing) for the function app to make the function app's APIs accessible from outside of your domain. Select Settings --> CORS in the left menu.
Enter
*(accessible from any domains) in the Allowed Origins textbox, then select the Save button.
Deploy to Azure Container Apps
The first task you'll perform is to create a new Azure Container Registry (ACR) resource. Once the registry is created, you'll build an image and push it to the registry.
Open a command window and run the following command to login to your Azure subscription:
az loginAdd the following shell variables substituting your values for the placeholders as appropriate. Add your <GITHUB_USERNAME> as a lowercase value and substitute your Azure Functions domain for the <AZURE_FUNCTIONS_DOMAIN> value (include the
https://in the domain value).GITHUB_USERNAME="<YOUR_GITHUB_USERNAME>" RESOURCE_GROUP="<YOUR_RESOURCE_GROUP_NAME>" ACR_NAME="aca"$GITHUB_USERNAME AZURE_FUNCTIONS_DOMAIN="<YOUR_AZURE_FUNCTIONS_URL>"Create a new Azure Container Registry resource by running the following command:
az acr create \ --resource-group $RESOURCE_GROUP \ --name $ACR_NAME \ --sku Basic \ --admin-enabled trueOpen the client/react/Dockerfile file in your editor and notice that the following tasks are performed:
- The React application is built and assigned to the build stage.
- The nginx server is configured and the output of the build stage is copied into the nginx server image.
Build the container image in Azure by running the following command from the root of the client/react folder. Replace <YOUR_FUNCTIONS_DOMAIN> with your Azure Functions domain that you copied to a local file earlier in this exercise.
az acr build --registry $ACR_NAME --image acs-to-teams-meeting \ --build-arg REACT_APP_ACS_USER_FUNCTION=$AZURE_FUNCTIONS_DOMAIN/api/httpTriggerAcsToken \ --build-arg REACT_APP_TEAMS_MEETING_FUNCTION=$AZURE_FUNCTIONS_DOMAIN/api/httpTriggerTeamsUrl .Run the following command to list the images in your registry. You should see your new image listed.
az acr repository list --name $ACR_NAME --output tableNow that the image is deployed, you need to create an Azure Container App that can run the container.
Visit the Azure portal in your browser and sign in.
Type container apps in the top search bar and select Container Apps from the options that appear.
Select Create in the toolbar.
Note
Although you're using the Azure portal, a Container App can also be created by using the Azure CLI. For more information, see Quickstart: Deploy your first container app. You'll see an example of how the Azure CLI can be used at the end of this exercise as well.
Perform the following tasks:
- Select your subscription.
- Select the resource group to use (create a new one if needed). You can use the same resource group that you used for your ACS resource if you'd like. Copy your resource group name to the same local file where you stored your Azure Functions domain.
- Enter a Container app name of acs-to-teams-meeting.
- Select a region.
- Select Create new in the Container Apps Environment section.
- Enter an Environment name of acs-to-teams-meeting-env.
- Select the Create button.
- Select Next: App settings >.
Enter the following values in the Create Container App screen:
- Deselect the Use quickstart image checkbox.
- Name: acs-to-teams-meeting
- Image source: Azure Container Registry
- Registry: <YOUR_ACR_REGISTRY_NAME>.azurecr.io
- Image: acs-to-teams-meeting
- Image tag: latest
- CPU and Memory: 0.25 CPU cores, -.5 Gi memory
In the Application ingress settings section, do the following:
- Select the Enabled checkbox.
- Select the Accepting traffic from anywhere radio button.
This will create an entry point (ingress) for your React application and allow it to be called from anywhere. Azure Container Apps redirects all traffic to HTTPS.
- Target Port: 80
Select Review + create. Once validation passes, select the Create button.
If you get an error it may be due to your container apps environment being inactive for too long. The simplest solution will be to go through the process of creating the container app again. Alternatively, you can run the following command to create the container app using the Azure CLI:
az containerapp create --name acs-to-teams-meeting --resource-group $RESOURCE_GROUP \ --location westus --image acs-to-teams-meeting \ --cpu 0.25 --memory 0.5 --environment-name acs-to-teams-meeting-env \ --ingress-enabled true --ingress-target-port 80 --ingress-type External \ --ingress-protocol Https --ingress-traffic AnywhereOnce your container app deployment completes, navigate to it in the Azure portal and select the Application Url on the Overview screen to view the application running in the nginx container!
Stay on this site and follow instructions with your own machine.
Continue to first stepVisit the Hands-on Lab site for integrated instruction.
Hands-on LabYou've completed this tutorial
Stay on this site and follow instructions with your own machine.
Continue to first stepVisit the Hands-on Lab site for integrated instruction.
Hands-on LabHave an issue with this section? If so, please give us some feedback so we can improve this section.