Integrate OpenAI, Communication, and Organizational Data Features into a Line of Business App
Level: Intermediate
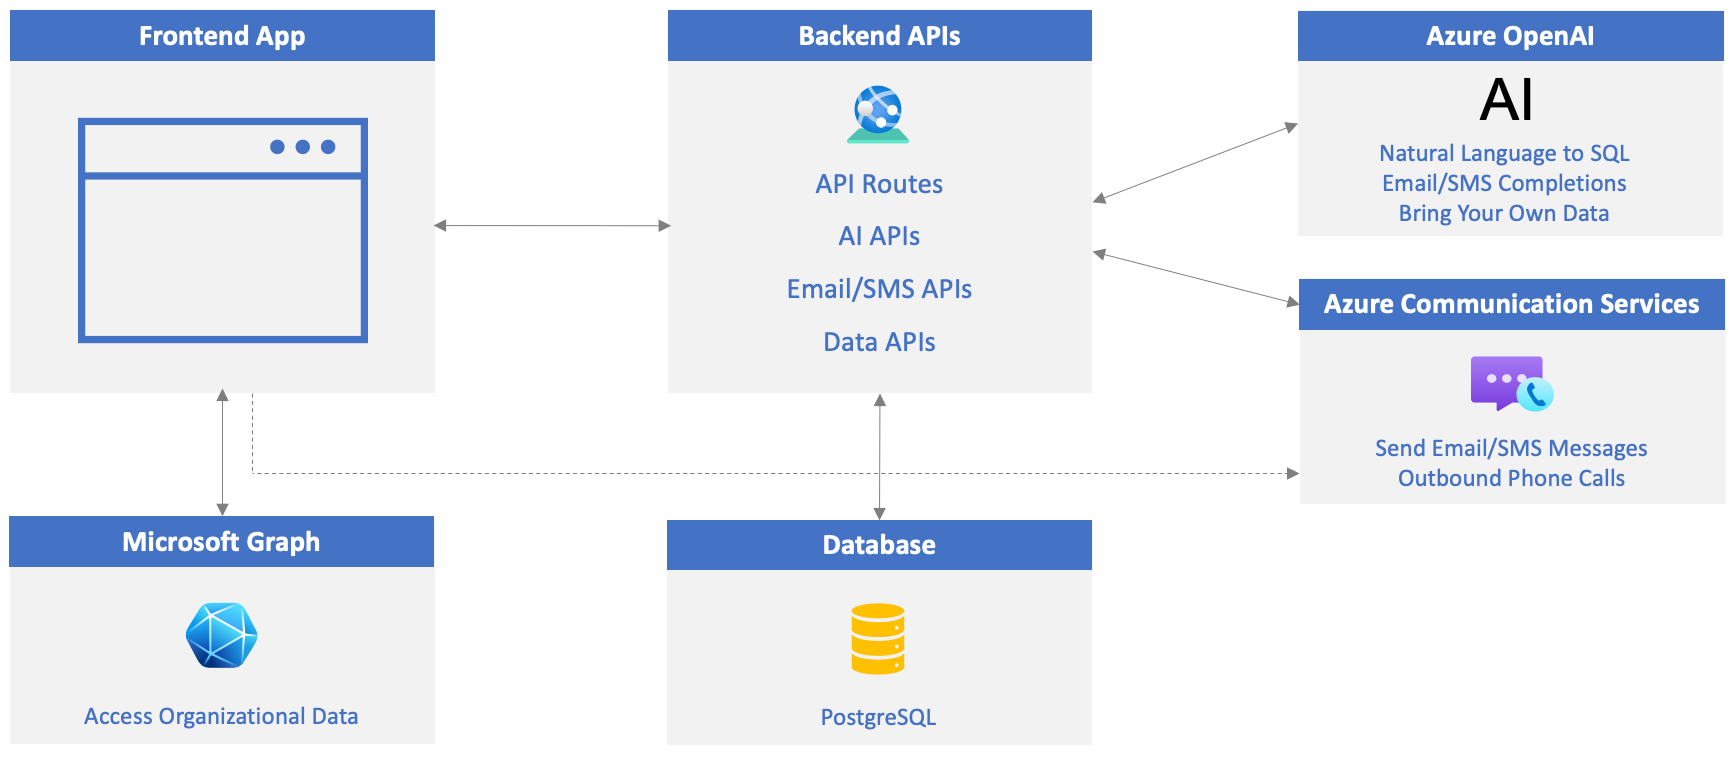
This tutorial demonstrates how Azure OpenAI, Azure Communication Services, and Microsoft Graph/Microsoft Graph Toolkit can be integrated into a Line of Business (LOB) application to enhance user productivity, elevate the user experience, and take LOB apps to the next level. Key features in the application include:
- AI: Enable users to ask questions in natural language and convert their answers to SQL that can be used to query a database, allow users to define rules that can be used to automatically generate email and SMS messages, and learn how natural language can be used to retrieve data from your own custom data sources. Azure OpenAI is used for these features.
- Communication: Enable in-app phone calling to customers and Email/SMS functionality using Azure Communication Services.
- Organizational Data: Pull in related organizational data that users may need (documents, chats, emails, calendar events) as they work with customers to avoid context switching. Providing access to this type of organizational data reduces the need for the user to switch to Outlook, Teams, OneDrive, other custom apps, their phone, etc. since the specific data and functionality they need is provided directly in the app. Microsoft Graph and Microsoft Graph Toolkit are used for this feature.
The application is a simple customer management app that allows users to manage their customers and related data. It consists of a front-end built using TypeScript that calls back-end APIs to retrieve data, interact with AI functionality, send email/SMS messages, and pull in organizational data. Here's an overview of the application solution that you'll walk through in this tutorial:
The tutorial will walk you through the process of setting up the required Azure and Microsoft 365 resources. It'll also walk you through the code that is used to implement the AI, communication, and organizational data features. While you won't be required to copy and paste code, some of the exercises will have you modify code to try out different scenarios.
What You'll Build in this Tutorial
Choose Your Own Adventure
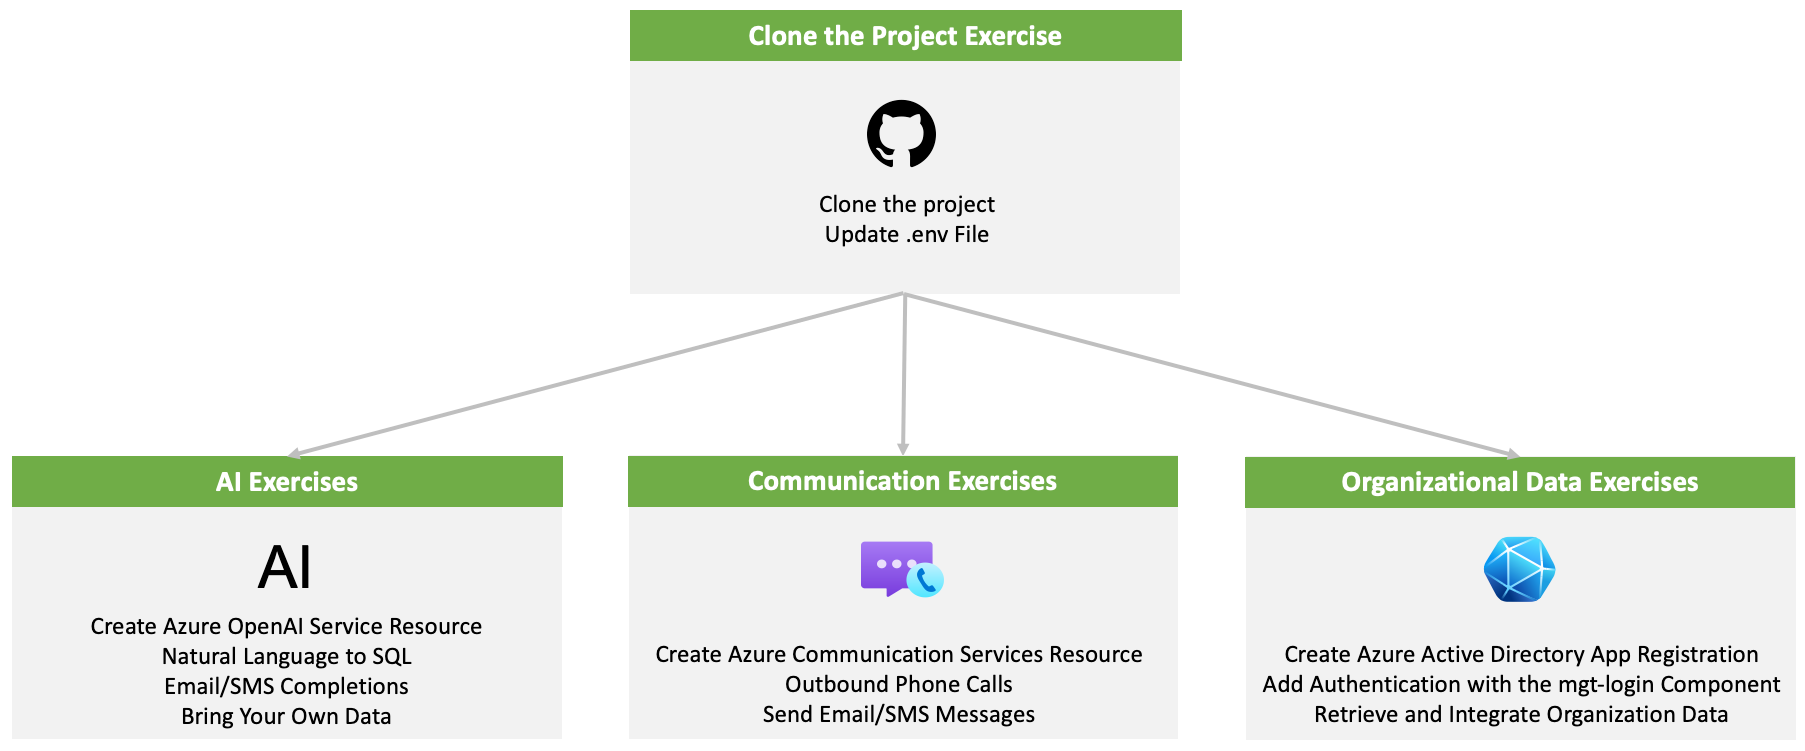
You can complete the entire tutorial from start to finish or complete specific topics of interest. The tutorial is broken down into the following topics:
- Clone the Project Exercise (required exercise).
- AI Exercises: Create an Azure OpenAI resource and use it to convert natural language to SQL, generate email/SMS messages, and work with your own data and documents.
- Communication Exercises: Create an Azure Communication Services resource and use it to make phone calls from the app and send email/SMS messages.
- Organizational Data Exercises: Create a Microsoft Entra ID app registration so that Microsoft Graph and Microsoft Graph Toolkit can be used to authenticate and pull organizational data into the application.
Prerequisites
- Node - Node 20+ and npm 10+ will be used for this project
- git
- Visual Studio Code (although Visual Studio Code is recommended, any editor can be used)
- Azure subscription
- Microsoft 365 developer tenant
- Docker Desktop or another OCI (Open Container Initiative) compliant container runtime such as Podman, or nerdctl capable of running a container.
Microsoft Cloud Technologies used in this Tutorial
- Azure Communication Services
- Azure OpenAI Service
- Microsoft Entra ID
- Microsoft Graph
- Microsoft Graph Toolkit
Stay on this site and follow instructions with your own machine.
Continue to first stepVisit the Hands-on Lab site for integrated instruction.
Hands-on LabThe code project used in this tutorial is available at https://github.com/microsoft/MicrosoftCloud. The project's repository includes both client-side and server-side code required to run the project, enabling you to explore the integrated features related to artificial intelligence (AI), communication, and organizational data. Additionally, the project serves as resource to guide you in incorporating similar features into your own applications.
In this exercise you will:
- Clone the GitHub repository.
- Add an .env file into the project and update it.
Before proceeding, ensure that you have all of the prerequisites installed and configured as outlined in the Prerequisites section of this tutorial.
Clone the GitHub Repository and Create an .env File
Run the following command to clone the Microsoft Cloud GitHub Repository to your machine.
git clone https://github.com/microsoft/MicrosoftCloudOpen the MicrosoftCloud/samples/openai-acs-msgraph folder in Visual Studio Code.
Note
Although we'll use Visual Studio Code throughout this tutorial, any code editor can be used to work with the sample project.
Notice the following folders and files:
- client: Client-side application code.
- server: Server-side API code.
- docker-compose.yml: Used to run a local PostgreSQL database.
Rename the .env.example in the root of the project to .env.
Open the .env file and take a moment to look through the keys that are included:
ENTRAID_CLIENT_ID=
TEAM_ID=
CHANNEL_ID=
OPENAI_API_KEY=
OPENAI_ENDPOINT=
OPENAI_MODEL=gpt-4o
OPENAI_API_VERSION=2024-05-01-preview
POSTGRES_USER=
POSTGRES_PASSWORD=
ACS_CONNECTION_STRING=
ACS_PHONE_NUMBER=
ACS_EMAIL_ADDRESS=
CUSTOMER_EMAIL_ADDRESS=
CUSTOMER_PHONE_NUMBER=
API_PORT=3000
AZURE_AI_SEARCH_ENDPOINT=
AZURE_AI_SEARCH_KEY=
AZURE_AI_SEARCH_INDEX=
Update the following values in .env. These values will be used by the API server to connect to the local PostgreSQL database.
POSTGRES_USER=web
POSTGRES_PASSWORD=web-password
Now that you have the project in place, let's try out some of the application features and learn how they're built. Select the Next button below to continue or jump to a specific exercise using the table of contents.
Stay on this site and follow instructions with your own machine.
Continue to first stepVisit the Hands-on Lab site for integrated instruction.
Hands-on LabTo get started using Azure OpenAI in your applications, you need to create an Azure OpenAI Service and deploy a model that can be used to perform tasks such as converting natural language to SQL, generating email/SMS message content, and more.
In this exercise you will:
- Create an Azure OpenAI Service resource.
- Deploy a model.
- Update the .env file with values from your Azure OpenAI service resource.
Create an Azure OpenAI Service Resource
Visit the Azure portal in your browser and sign in.
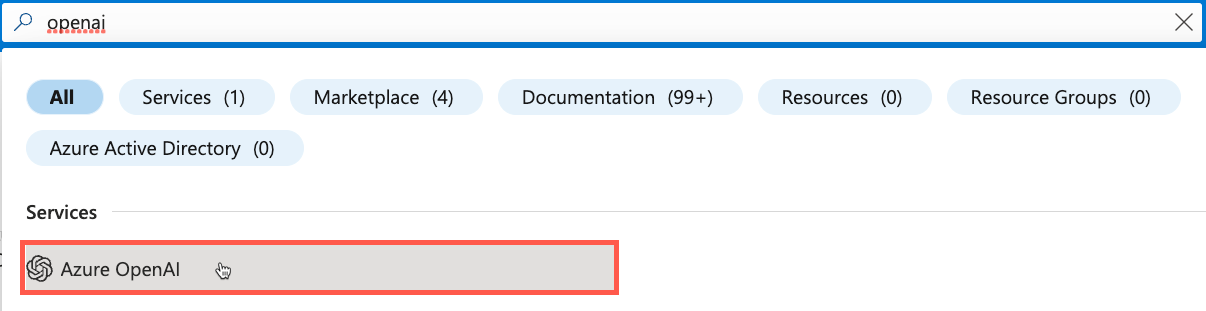
Enter openai in the search bar at the top of the portal page and select Azure OpenAI from the options that appear.
Select Create in the toolbar.
Note
While this tutorial focuses on Azure OpenAI, if you have an OpenAI API key and would like to use it, you can skip this section and go directly to the Update the Project's .env File section below. Assign your OpenAI API key to
OPENAI_API_KEYin the .env file (you can ignore any other.envinstructions related to OpenAI).Azure OpenAI models are available in specific regions. Visit the Azure OpenAI model availability document to learn which regions support the gpt-4o model used in this tutorial.
Perform the following tasks:
- Select your Azure subscription.
- Select the resource group to use (create a new one if needed).
- Select a region where the gpt-4o model is supported based on the document you looked at earlier.
- Enter the resource name. It must be a unique value.
- Select the Standard S0 pricing tier.
Select Next until you get to the Review + submit screen. Select Create.
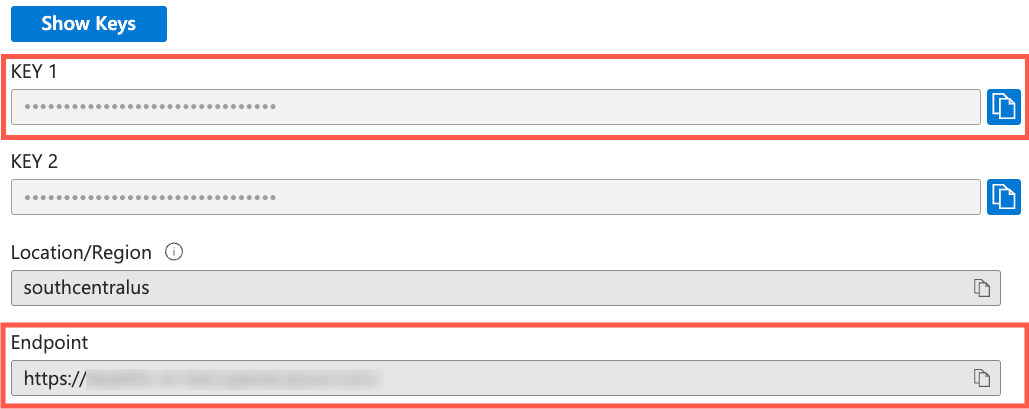
Once your Azure OpenAI resource is created, navigate to it and select Resource Management --> Keys and Endpoint .
Locate the KEY 1 and Endpoint values. You'll use both values in the next section so copy them to a local file.
Select Resource Management --> Model deployments.
Select the Manage Deployments button to go to Azure OpenAI Studio.
Select Deploy model --> Deploy base model in the toolbar.
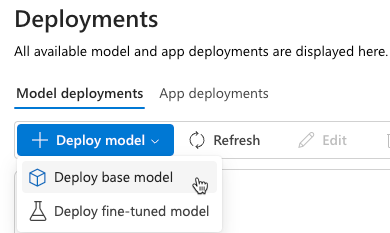
Select gpt-4o from the list of models and select Confirm.
Note
Azure OpenAI supports several different types of models. Each model can be used to handle different scenarios.
The following dialog will display. Take a moment to examine the default values that are provided.
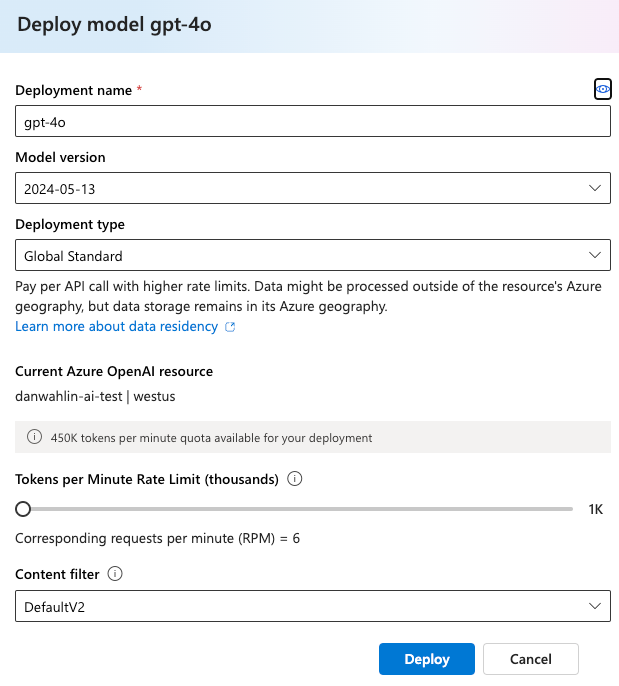
Change the Tokens per Minute Rate Limit (thousands) value to 100K. This will allow you to make more requests to the model and avoid hitting the rate limit as you perform the steps that follow.
Select Deploy.
Once the model is deployed, select Playgrounds --> Chat.
The Deployment dropdown should display the gpt-4o model.
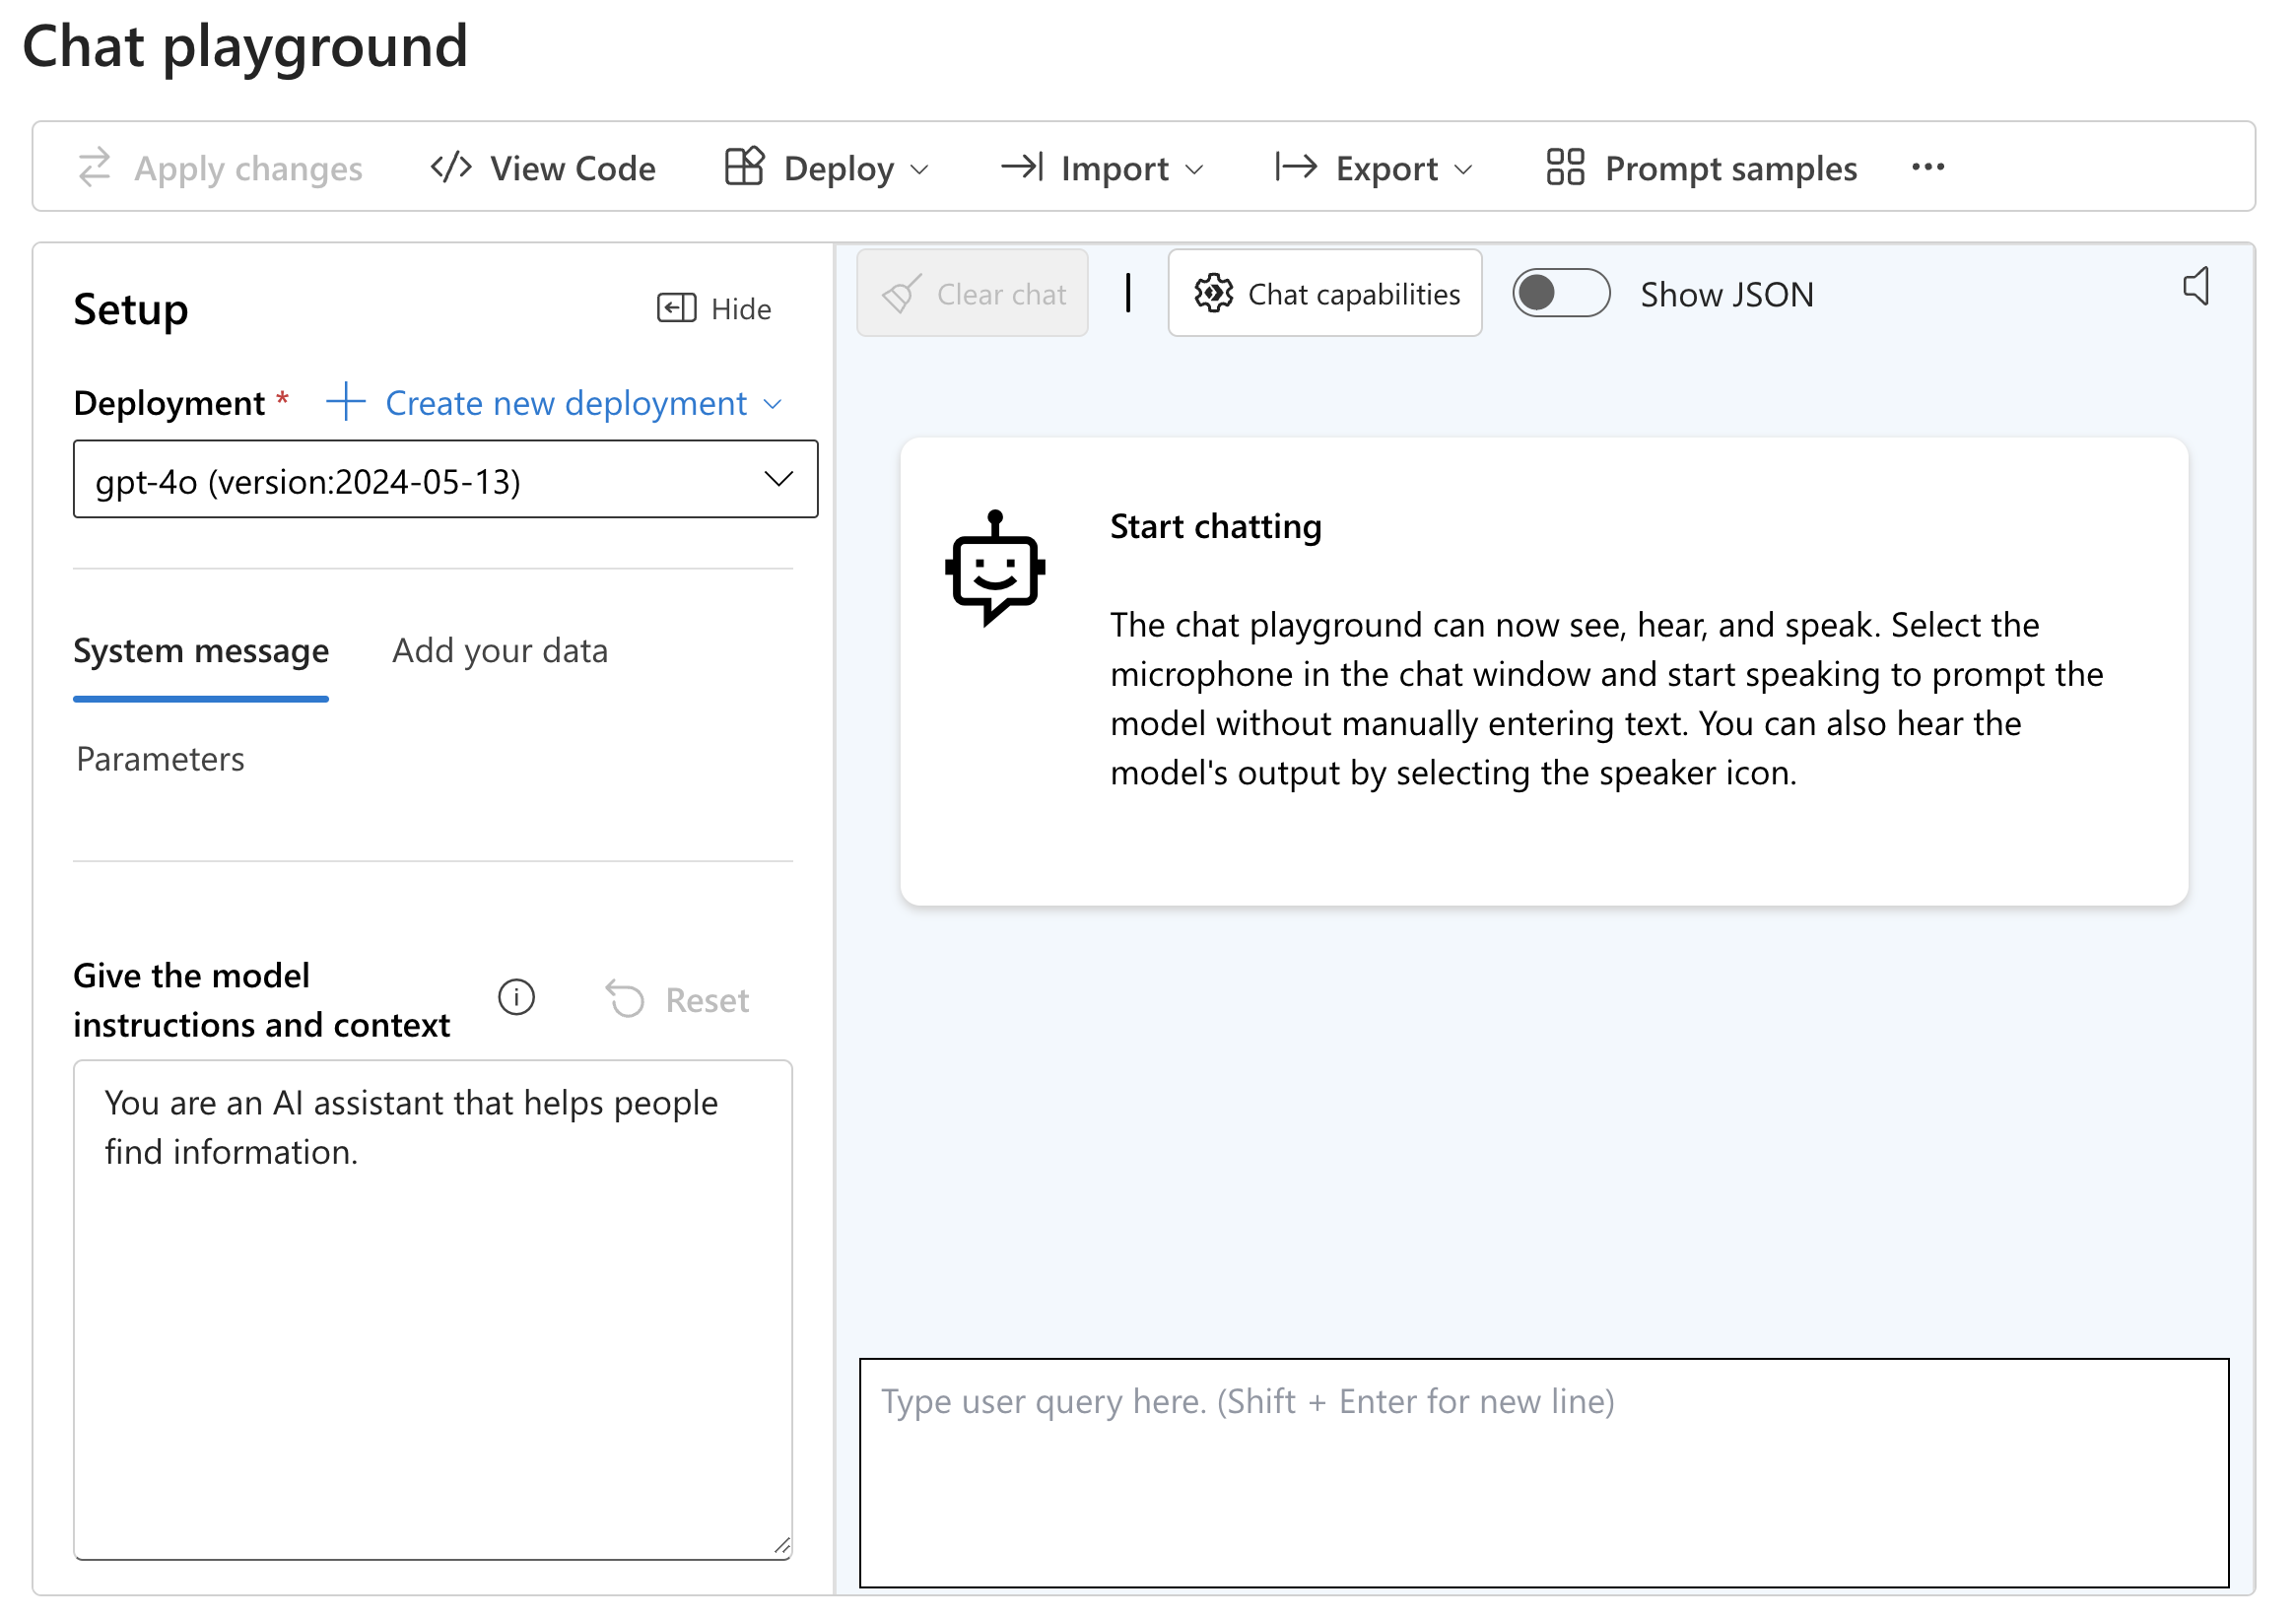
Take a moment to read through the System message text that's provided. This tells the model how to act as the user interacts with it.
Locate the textbox in the chat area and enter Summarize what Generative AI is and how it can be used. Select Enter to send the message to the model and have it generate a response.
Experiment with other prompts and responses. For example, enter Provide a short history about the capital of France and notice the response that's generated.
Update the Project's .env File
Go back to Visual Studio Code and open the
.envfile at the root of the project.Copy the KEY 1 value from your Azure OpenAI resource and assign it to
OPENAI_API_KEYin the .env file located in the root of the openai-acs-msgraph folder:OPENAI_API_KEY=<KEY_1_VALUE>Copy the *Endpoint value and assign it to
OPENAI_ENDPOINTin the .env file. Remove the/character from the end of the value if it's present.OPENAI_ENDPOINT=<ENDPOINT_VALUE>Note
You'll see that values for
OPENAI_MODELandOPENAI_API_VERSIONare already set in the .env file. The model value is set to gpt-4o which matches the model deployment name you created earlier in this exercise. The API version is set to a supported value defined in the Azure OpenAI reference documentation.Save the .env file.
Start the Application Services
It's time to start up your application services including the database, API server, and web server.
In the following steps you'll create three terminal windows in Visual Studio Code.
Right-click on the .env file in the Visual Studio Code file list and select Open in Integrated Terminal. Ensure that your terminal is at the root of the project - openai-acs-msgraph - before continuing.
Choose from one of the following options to start the PostgreSQL database:
If you have Docker Desktop installed and running, run
docker-compose upin the terminal window and press Enter.If you have Podman with podman-compose installed and running, run
podman-compose upin the terminal window and press Enter.To run the PostgreSQL container directly using either Docker Desktop, Podman, nerdctl, or another container runtime you have installed, run the following command in the terminal window:
Mac, Linux, or Windows Subsystem for Linux (WSL):
[docker | podman | nerdctl] run --name postgresDb -e POSTGRES_USER=web -e POSTGRES_PASSWORD=web-password -e POSTGRES_DB=CustomersDB -v $(pwd)/data:/var/lib/postgresql/data -p 5432:5432 postgresWindows with PowerShell:
[docker | podman] run --name postgresDb -e POSTGRES_USER=web -e POSTGRES_PASSWORD=web-password -e POSTGRES_DB=CustomersDB -v ${PWD}/data:/var/lib/postgresql/data -p 5432:5432 postgres
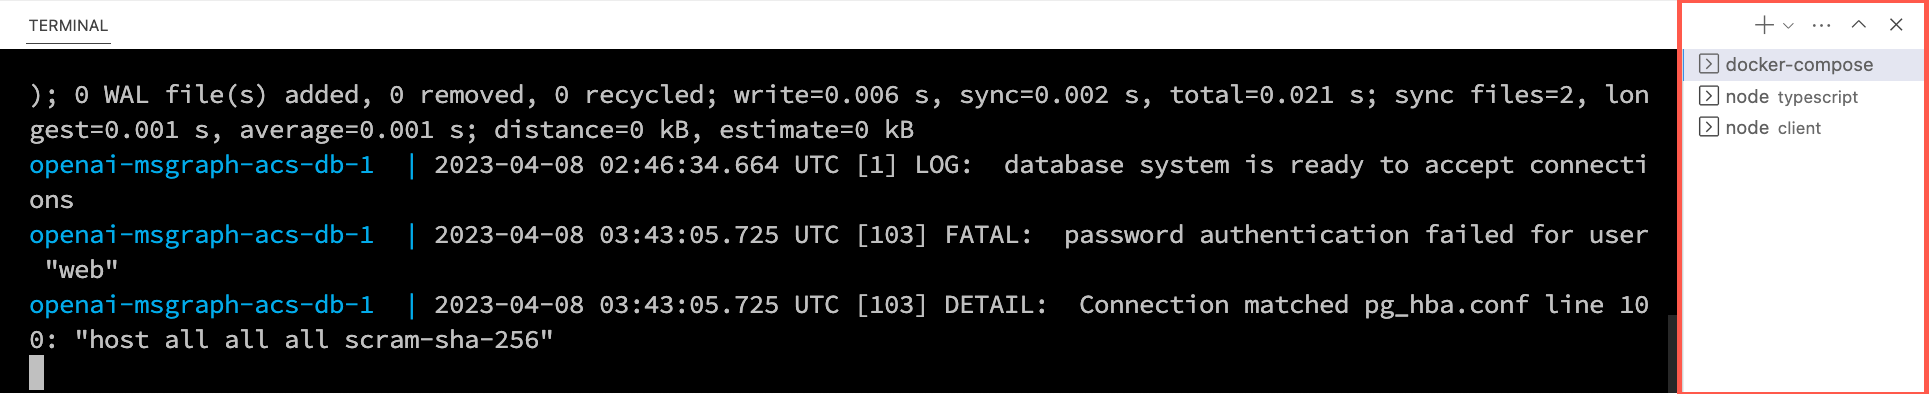
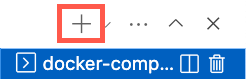
Once the database container starts, press the + icon in the Visual Studio Code Terminal toolbar to create a second terminal window.
cdinto the server/typescript folder and run the following commands to install the dependencies and start the API server.npm installnpm start
Press the + icon again in the Visual Studio Code Terminal toolbar to create a third terminal window.
cdinto the client folder and run the following commands to install the dependencies and start the web server.npm installnpm start
A browser will launch and you'll be taken to http://localhost:4200.
Stay on this site and follow instructions with your own machine.
Continue to first stepVisit the Hands-on Lab site for integrated instruction.
Hands-on LabThe quote "Just because you can doesn't mean you should" is a useful guide when thinking about AI capabilities. For example, Azure OpenAI's natural language to SQL feature allows users to make database queries in plain English, which can be a powerful tool to enhance their productivity. However, powerful doesn't always mean appropriate or safe. This exercise will demonstrate how to use this AI feature while also discussing important considerations to keep in mind before deciding to implement it.
Here's an example of a natural language query that can be used to retrieve data from a database:
Get the the total revenue for all companies in London.
With the proper prompts, Azure OpenAI will convert this query to SQL that can be used to return results from the database. As a result, non-technical users including business analysts, marketers, and executives can more easily retrieve valuable information from databases without grappling with intricate SQL syntax or relying on constrained datagrids and filters. This streamlined approach can boost productivity by eliminating the need for users to seek assistance from technical experts.
This exercise provides a starting point that will help you understand how natural language to SQL works, introduce you to some important considerations, get you thinking about pros and cons, and show you the code to get started.
In this exercise, you will:
- Use GPT prompts to convert natural language to SQL.
- Experiment with different GPT prompts.
- Use the generated SQL to query the PostgreSQL database started earlier.
- Return query results from PostgreSQL and display them in the browser.
Let's start by experimenting with different GPT prompts that can be used to convert natural language to SQL.
Using the Natural Language to SQL Feature
In the previous exercise you started the database, APIs, and application. You also updated the
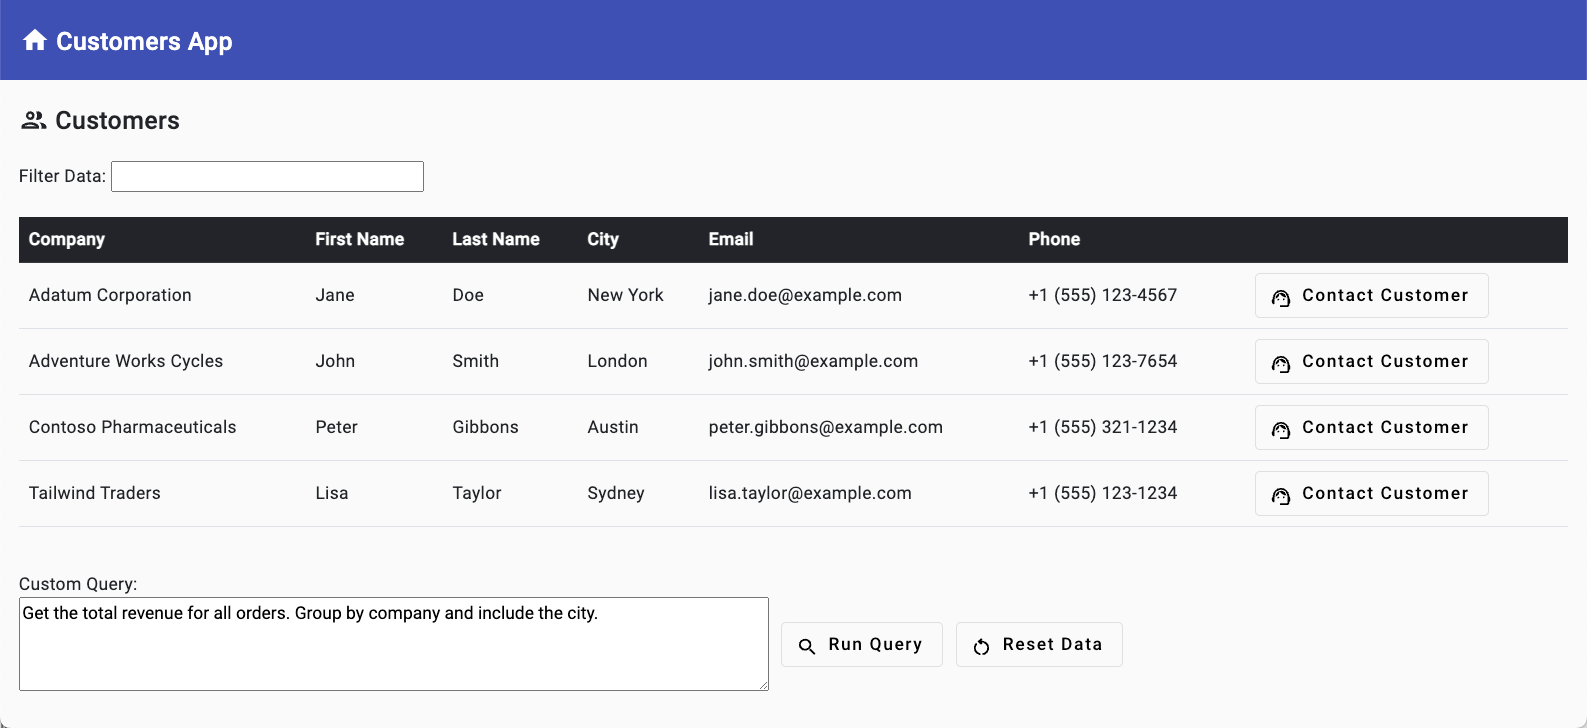
.envfile. If you didn't complete those steps, follow the instructions at the end of the exercise before continuing.Go back to the browser (http://localhost:4200) and locate the Custom Query section of the page below the datagrid. Notice that a sample query value is already included: Get the total revenue for all orders. Group by company and include the city.

Select the Run Query button. This will pass the user's natural language query to Azure OpenAI which will convert it to SQL. The SQL query will then be used to query the database and return any potential results.
Run the following Custom Query:
Get the total revenue for Adventure Works Cycles. Include the contact information as well.View the terminal window running the API server in Visual Studio Code and notice it displays the SQL query returned from Azure OpenAI. The JSON data is used by the server-side APIs to query the PostgreSQL database. Any string values included in the query are added as parameter values to prevent SQL injection attacks:
{
    "sql": "SELECT c.company, c.city, c.email, SUM(o.total) AS revenue FROM customers c INNER JOIN orders o ON c.id = o.customer_id WHERE c.company = $1 GROUP BY c.company, c.city, c.email",
    "paramValues": ["Adventure Works Cycles"]
}
Go back to the browser and select Reset Data to view all of the customers again in the datagrid.
Exploring the Natural Language to SQL Code
Tip
If you're using Visual Studio Code, you can open files directly by selecting:
- Windows/Linux: Ctrl + P
- Mac: Cmd + P
Then type the name of the file you want to open.
Note
The goal of this exercise is to show what's possible with natural language to SQL functionality and demonstrate how to get started using it. As mentioned earlier, it's important to discuss if this type of AI is appropriate for your organization before proceeding with any implementation. It's also imperative to plan for proper prompt rules and database security measures to prevent unauthorized access and protect sensitive data.
Now that you've seen the natural language to SQL feature in action, let's examine how it is implemented.
Open the server/apiRoutes.ts file and locate the
generateSqlroute. This API route is called by the client-side application running in the browser and used to generate SQL from a natural language query. Once the SQL query is retrieved, it's used to query the database and return results.router.post('/generateSql', async (req, res) => { const userPrompt = req.body.prompt; if (!userPrompt) { return res.status(400).json({ error: 'Missing parameter "prompt".' }); } try { // Call Azure OpenAI to convert the user prompt into a SQL query const sqlCommandObject = await getSQLFromNLP(userPrompt); let result: any[] = []; // Execute the SQL query if (sqlCommandObject && !sqlCommandObject.error) { result = await queryDb(sqlCommandObject) as any[]; } else { result = [ { query_error : sqlCommandObject.error } ]; } res.json(result); } catch (e) { console.error(e); res.status(500).json({ error: 'Error generating or running SQL query.' }); } });Notice the following functionality in the
generateSqlroute:- It retrieves the user query value from
req.body.promptand assigns it to a variable nameduserPrompt. This value will be used in the GPT prompt. - It calls a
getSQLFromNLP()function to convert natural language to SQL. - It passes the generated SQL to a function named
queryDbthat executes the SQL query and returns results from the database.
- It retrieves the user query value from
Open the server/openAI.ts file in your editor and locate the
getSQLFromNLP()function. This function is called by thegeneratesqlroute and is used to convert natural language to SQL.async function getSQLFromNLP(userPrompt: string): Promise<QueryData> { // Get the high-level database schema summary to be used in the prompt. // The db.schema file could be generated by a background process or the // schema could be dynamically retrieved. const dbSchema = await fs.promises.readFile('db.schema', 'utf8'); const systemPrompt = ` Assistant is a natural language to SQL bot that returns a JSON object with the SQL query and the parameter values in it. The SQL will query a PostgreSQL database. PostgreSQL tables with their columns: ${dbSchema} Rules: - Convert any strings to a PostgreSQL parameterized query value to avoid SQL injection attacks. - Return a JSON object with the following structure: { "sql": "", "paramValues": [] } Examples: User: "Display all company reviews. Group by company." Assistant: { "sql": "SELECT * FROM reviews", "paramValues": [] } User: "Display all reviews for companies located in cities that start with 'L'." Assistant: { "sql": "SELECT r.* FROM reviews r INNER JOIN customers c ON r.customer_id = c.id WHERE c.city LIKE 'L%'", "paramValues": [] } User: "Display revenue for companies located in London. Include the company name and city." Assistant: { "sql": "SELECT c.company, c.city, SUM(o.total) AS revenue FROM customers c INNER JOIN orders o ON c.id = o.customer_id WHERE c.city = $1 GROUP BY c.company, c.city", "paramValues": ["London"] } User: "Get the total revenue for Adventure Works Cycles. Include the contact information as well." Assistant: { "sql": "SELECT c.company, c.city, c.email, SUM(o.total) AS revenue FROM customers c INNER JOIN orders o ON c.id = o.customer_id WHERE c.company = $1 GROUP BY c.company, c.city, c.email", "paramValues": ["Adventure Works Cycles"] } `; let queryData: QueryData = { sql: '', paramValues: [], error: '' }; let results = ''; try { results = await callOpenAI(systemPrompt, userPrompt); if (results) { console.log('results', results); const parsedResults = JSON.parse(results); queryData = { ...queryData, ...parsedResults }; if (isProhibitedQuery(queryData.sql)) { queryData.sql = ''; queryData.error = 'Prohibited query.'; } } } catch (error) { console.log(error); if (isProhibitedQuery(results)) { queryData.sql = ''; queryData.error = 'Prohibited query.'; } else { queryData.error = results; } } return queryData; }- A
userPromptparameter is passed into the function. TheuserPromptvalue is the natural language query entered by the user in the browser. - A
systemPromptdefines the type of AI assistant to be used and rules that should be followed. This helps Azure OpenAI understand the database structure, what rules to apply, and how to return the generated SQL query and parameters. - A function named
callOpenAI()is called and thesystemPromptanduserPromptvalues are passed to it. - The results are checked to ensure no prohibited values are included in the generated SQL query. If prohibited values are found, the SQL query is set to an empty string.
- A
Let's walk through the system prompt in more detail:
const systemPrompt = `
  Assistant is a natural language to SQL bot that returns a JSON object with the SQL query and
  the parameter values in it. The SQL will query a PostgreSQL database.

  PostgreSQL tables with their columns:

  ${dbSchema}

  Rules:
  - Convert any strings to a PostgreSQL parameterized query value to avoid SQL injection attacks.
  - Return a JSON object with the following structure: { "sql": "", "paramValues": [] }

  Examples:

  User: "Display all company reviews. Group by company."
  Assistant: { "sql": "SELECT * FROM reviews", "paramValues": [] }

  User: "Display all reviews for companies located in cities that start with 'L'."
  Assistant: { "sql": "SELECT r.* FROM reviews r INNER JOIN customers c ON r.customer_id = c.id WHERE c.city LIKE 'L%'", "paramValues": [] }

  User: "Display revenue for companies located in London. Include the company name and city."
  Assistant: {
    "sql": "SELECT c.company, c.city, SUM(o.total) AS revenue FROM customers c INNER JOIN orders o ON c.id = o.customer_id WHERE c.city = $1 GROUP BY c.company, c.city",
    "paramValues": ["London"]
  }

  User: "Get the total revenue for Adventure Works Cycles. Include the contact information as well."
  Assistant: {
    "sql": "SELECT c.company, c.city, c.email, SUM(o.total) AS revenue FROM customers c INNER JOIN orders o ON c.id = o.customer_id WHERE c.company = $1 GROUP BY c.company, c.city, c.email",
    "paramValues": ["Adventure Works Cycles"]
  }
`;
The type of AI assistant to be used is defined. In this case a "natural language to SQL bot".
Table names and columns in the database are defined. The high-level schema included in the prompt can be found in the server/db.schema file and looks like the following.
- customers (id, company, city, email)
- orders (id, customer_id, date, total)
- order_items (id, order_id, product_id, quantity, price)
- reviews (id, customer_id, review, date, comment)
Tip
You may consider creating read-only views that only contain the data users are allowed to query using natural language to SQL.
A rule is defined to convert any string values to a parameterized query value to avoid SQL injection attacks.
A rule is defined to always return a JSON object with the SQL query and the parameter values in it.
Example user prompts and the expected SQL query and parameter values are provided. This is referred to as "few-shot" learning. Although LLMs are trained on large amounts of data, they can be adapted to new tasks with only a few examples. An alternative approach is "zero-shot" learning where no example is provided and the model is expected to generate the correct SQL query and parameter values.
The
getSQLFromNLP()function sends the system and user prompts to a function namedcallOpenAI()which is also located in the server/openAI.ts file. ThecallOpenAI()function determines if the Azure OpenAI service or OpenAI service should be called by checking environment variables. If a key, endpoint, and model are available in the environment variables then Azure OpenAI is called, otherwise OpenAI is called.function callOpenAI(systemPrompt: string, userPrompt: string, temperature = 0, useBYOD = false) { const isAzureOpenAI = OPENAI_API_KEY && OPENAI_ENDPOINT && OPENAI_MODEL; if (isAzureOpenAI) { if (useBYOD) { return getAzureOpenAIBYODCompletion(systemPrompt, userPrompt, temperature); } return getAzureOpenAICompletion(systemPrompt, userPrompt, temperature); } return getOpenAICompletion(systemPrompt, userPrompt, temperature); }Note
Although we'll focus on Azure OpenAI throughout this tutorial, if you only supply an
OPENAI_API_KEYvalue in the .env file, the application will use OpenAI instead. If you choose to use OpenAI instead of Azure OpenAI you may see different results in some cases.Locate the
getAzureOpenAICompletion()function.async function getAzureOpenAICompletion(systemPrompt: string, userPrompt: string, temperature: number): Promise<string> { const completion = await createAzureOpenAICompletion(systemPrompt, userPrompt, temperature); let content = completion.choices[0]?.message?.content?.trim() ?? ''; console.log('Azure OpenAI Output: \n', content); if (content && content.includes('{') && content.includes('}')) { content = extractJson(content); } return content; }This function does the following:
Parameters:
systemPrompt,userPrompt, andtemperatureare the main parameters.systemPrompt: Informs the Azure OpenAI model of its role and the rules to follow.userPrompt: Contains the user-provided information such as natural language input or rules for generating the output.temperature: Dictates the creativity level of the model's response. A higher value results in more creative outputs.
Completion Generation:
- The function calls
createAzureOpenAICompletion()withsystemPrompt,userPrompt, andtemperatureto generate a completion. - It extracts the content from the first choice in the completion, trimming any extra whitespace.
- If the content contains JSON-like structures (indicated by the presence of
{and}), it extracts the JSON content.
- The function calls
Logging and Return Value:
- The function logs the Azure OpenAI output to the console.
- It returns the processed content as a string.
Locate the
createAzureOpenAICompletion()function.async function createAzureOpenAICompletion(systemPrompt: string, userPrompt: string, temperature: number, dataSources?: any[]): Promise<any> { const baseEnvVars = ['OPENAI_API_KEY', 'OPENAI_ENDPOINT', 'OPENAI_MODEL']; const byodEnvVars = ['AZURE_AI_SEARCH_ENDPOINT', 'AZURE_AI_SEARCH_KEY', 'AZURE_AI_SEARCH_INDEX']; const requiredEnvVars = dataSources ? [...baseEnvVars, ...byodEnvVars] : baseEnvVars; checkRequiredEnvVars(requiredEnvVars); const config = { apiKey: OPENAI_API_KEY, endpoint: OPENAI_ENDPOINT, apiVersion: OPENAI_API_VERSION, deployment: OPENAI_MODEL }; const aoai = new AzureOpenAI(config); const completion = await aoai.chat.completions.create({ model: OPENAI_MODEL, // gpt-4o, gpt-3.5-turbo, etc. Pulled from .env file max_tokens: 1024, temperature, response_format: { type: "json_object", }, messages: [ { role: 'system', content: systemPrompt }, { role: 'user', content: userPrompt } ], // @ts-expect-error data_sources is a custom property used with the "Azure Add Your Data" feature data_sources: dataSources }); return completion; } function checkRequiredEnvVars(requiredEnvVars: string[]) { for (const envVar of requiredEnvVars) { if (!process.env[envVar]) { throw new Error(`Missing ${envVar} in environment variables.`); } } }This function does the following:
Parameters:
systemPrompt,userPrompt, andtemperatureare the main parameters discussed earlier.- An optional
dataSourcesparameter supports the "Azure Bring Your Own Data" feature, which will be covered later in this tutorial.
Environment Variables Check:
- The function verifies the presence of essential environment variables, throwing an error if any are missing.
Configuration Object:
- A
configobject is created using values from the.envfile (OPENAI_API_KEY,OPENAI_ENDPOINT,OPENAI_API_VERSION,OPENAI_MODEL). These values are used to construct the URL for calling Azure OpenAI.
- A
AzureOpenAI Instance:
- An instance of
AzureOpenAIis created using theconfigobject. TheAzureOpenAIsymbol is part of theopenaipackage, which should be imported at the top of your file.
- An instance of
Generating a Completion:
- The
chat.completions.create()function is called with the following properties:model: Specifies the GPT model (e.g., gpt-4o, gpt-3.5-turbo) as defined in your.envfile.max_tokens: Defines the maximum number of tokens for the completion.temperature: Sets the sampling temperature. Higher values (e.g., 0.9) yield more creative responses, while lower values (e.g., 0) produce more deterministic answers.response_format: Defines the response format. Here, it's set to return a JSON object. More details on JSON mode can be found in the Azure OpenAI reference documentation.messages: Contains the messages for generating chat completions. This example includes two messages: one from the system (defining behavior and rules) and one from the user (containing the prompt text).
- The
Return Value:
- The function returns the completion object generated by Azure OpenAI.
Comment out the following lines in the
getSQLFromNLP()function:// if (isProhibitedQuery(queryData.sql)) { // queryData.sql = ''; // }Save openAI.ts. The API server will automatically rebuild the TypeScript code and restart the server.
Go back to the browser and enter Select all table names from the database into the Custom Query input. Select Run Query. Are table names displayed?
Go back to the
getSQLFromNLP()function in server/openAI.ts and add the following rule into theRules:section of the system prompt and then save the file.- Do not allow the SELECT query to return table names, function names, or procedure names.Go back to the browser and perform the following tasks:
- Enter Select all table names from the database into the Custom Query input. Select Run Query. Are table names displayed?
- Enter Select all function names from the database. into the Custom Query input and select Run Query again. Are function names displayed?
QUESTION: Will a model always follow the rules you define in the prompt?
ANSWER: No! It's important to note that OpenAI models can return unexpected results on occasion that may not match the rules you've defined. It's important to plan for that in your code.
Go back to server/openAI.ts and locate the
isProhibitedQuery()function. This is an example of post-processing code that can be run after Azure OpenAI returns results. Notice that it sets thesqlproperty to an empty string if prohibited keywords are returned in the generated SQL query. This ensures that if unexpected results are returned from Azure OpenAI, the SQL query will not be run against the database.function isProhibitedQuery(query: string): boolean { if (!query) return false; const prohibitedKeywords = [ 'insert', 'update', 'delete', 'drop', 'truncate', 'alter', 'create', 'replace', 'information_schema', 'pg_catalog', 'pg_tables', 'pg_proc', 'pg_namespace', 'pg_class', 'table_schema', 'table_name', 'column_name', 'column_default', 'is_nullable', 'data_type', 'udt_name', 'character_maximum_length', 'numeric_precision', 'numeric_scale', 'datetime_precision', 'interval_type', 'collation_name', 'grant', 'revoke', 'rollback', 'commit', 'savepoint', 'vacuum', 'analyze' ]; const queryLower = query.toLowerCase(); return prohibitedKeywords.some(keyword => queryLower.includes(keyword)); }Note
It's important to note that this is only demo code. There may be other prohibited keywords required to cover your specific use cases if you choose to convert natural language to SQL. This is a feature that you must plan for and use with care to ensure that only valid SQL queries are returned and run against the database. In addition to prohibited keywords, you will also need to factor in security as well.
Go back to server/openAI.ts and uncomment the following code in the
getSQLFromNLP()function. Save the file.if (isProhibitedQuery(queryData.sql)) { queryData.sql = ''; }Remove the following rule from
systemPromptand save the file.- Do not allow the SELECT query to return table names, function names, or procedure names.Go back to the browser, enter Select all table names from the database into the Custom Query input again and select the Run Query button.
Do any table results display? Even without the rule in place, the
isProhibitedQuery()post-processing code prohibits that type of query from being run against the database.As discussed earlier, integrating natural language to SQL in line of business applications can be quite beneficial to users, but it does come with its own set of considerations.
Advantages:
User-friendliness: This feature can make database interaction more accessible to users without technical expertise, reducing the need for SQL knowledge and potentially speeding up operations.
Increased productivity: Business analysts, marketers, executives, and other non-technical users can retrieve valuable information from databases without having to rely on technical experts, thereby increasing efficiency.
Broad application: By using advanced language models, applications can be designed to cater to a wide range of users and use-cases.
Considerations:
Security: One of the biggest concerns is security. If users can interact with databases using natural language, there needs to be robust security measures in place to prevent unauthorized access or malicious queries. You may consider implementing a read-only mode to prevent users from modifying data.
Data Privacy: Certain data might be sensitive and should not be easily accessible, so you'll need to ensure proper safeguards and user permissions are in place.
Accuracy: While natural language processing has improved significantly, it's not perfect. Misinterpretation of user queries could lead to inaccurate results or unexpected behavior. You'll need to plan for how unexpected results will be handled.
Efficiency: There are no guarantees that the SQL returned from a natural language query will be efficient. In some cases, additional calls to Azure OpenAI may be required if post-processing rules detect issues with SQL queries.
Training and User Adaptation: Users need to be trained to formulate their queries correctly. While it's easier than learning SQL, there can still be a learning curve involved.
A few final points to consider before moving on to the next exercise:
- Remember that, "Just because you can doesn't mean you should" applies here. Use extreme caution and careful planning before integrating natural language to SQL into an application. It's important to understand the potential risks and to plan for them.
- Before using this type of technology, discuss potential scenarios with your team, database administrators, security team, stakeholders, and any other relevant parties to ensure that it's appropriate for your organization. It's important to discuss if natural language to SQL meets security, privacy, and any other requirements your organization may have in place.
- Security should be a primary concern and built into the planning, development, and deployment process.
- While natural language to SQL can be very powerful, careful planning must go into it to ensure prompts have required rules and that post-processing functionality is included. Plan for additional time to implement and test this type of functionality and to account for scenarios where unexpected results are returned.
- With Azure OpenAI, customers get the security capabilities of Microsoft Azure while running the same models as OpenAI. Azure OpenAI offers private networking, regional availability, and responsible AI content filtering. Learn more about Data, privacy, and security for Azure OpenAI Service.
You've now seen how to use Azure OpenAI to convert natural language to SQL and learned about the pros and cons of implementing this type of functionality. In the next exercise, you'll learn how email and SMS messages can be generated using Azure OpenAI.
Stay on this site and follow instructions with your own machine.
Continue to first stepVisit the Hands-on Lab site for integrated instruction.
Hands-on LabIn addition to the natural language to SQL feature, you can also use Azure OpenAI Service to generate email and SMS messages to enhance user productivity and streamline communication workflows. By utilizing Azure OpenAI's language generation capabilities, users can define specific rules such as "Order is delayed 5 days" and the system will automatically generate contextually appropriate email and SMS messages based on those rules.
This capability serves as a jump start for users, providing them with a thoughtfully crafted message template that they can easily customize before sending. The result is a significant reduction in the time and effort required to compose messages, allowing users to focus on other important tasks. Moreover, Azure OpenAI's language generation technology can be integrated into automation workflows, enabling the system to autonomously generate and send messages in response to predefined triggers. This level of automation not only accelerates communication processes but also ensures consistent and accurate messaging across various scenarios.
In this exercise, you will:
- Experiment with different prompts.
- Use prompts to generate completions for email and SMS messages.
- Explore code that enables AI completions.
- Learn about the importance of prompt engineering and including rules in your prompts.
Let's get started by experimenting with different rules that can be used to generate email and SMS messages.
Using the AI Completions Feature
In a previous exercise you started the database, APIs, and application. You also updated the
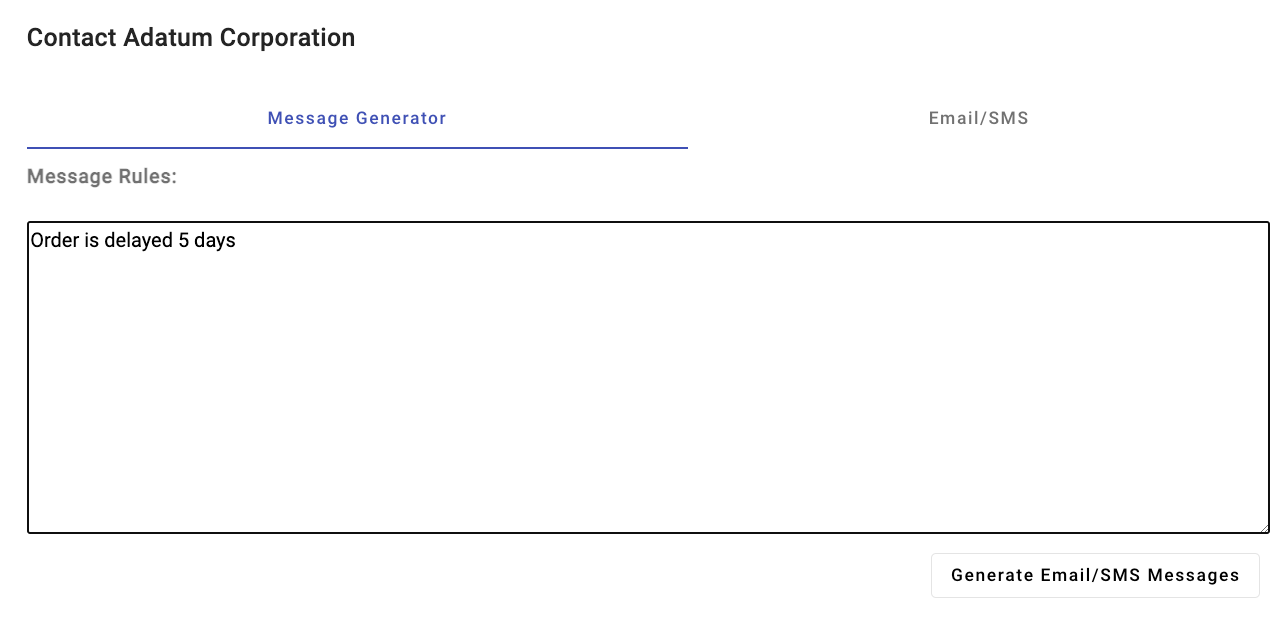
.envfile. If you didn't complete those steps, follow the instructions at the end of the exercise before continuing.Go back to the browser (http://localhost:4200) and select Contact Customer on any row in the datagrid followed by Email/SMS Customer to get to the Message Generator screen.
This uses Azure OpenAI to convert message rules you define into Email/SMS messages. Perform the following tasks:
Enter a rule such as Order is delayed 5 days into the input and select the Generate Email/SMS Messages button.
You will see a subject and body generated for the email and a short message generated for the SMS.
Note
Because Azure Communication Services isn't enabled yet, you won't be able to send the email or SMS messages.
Close the email/SMS dialog window in the browser. Now that you've seen this feature in action, let's examine how it's implemented.
Exploring the AI Completions Code
Tip
If you're using Visual Studio Code, you can open files directly by selecting:
- Windows/Linux: Ctrl + P
- Mac: Cmd + P
Then type the name of the file you want to open.
Open the server/apiRoutes.ts file and locate the
completeEmailSmsMessagesroute. This API is called by front-end portion of the app when the Generate Email/SMS Messages button is selected. It retrieves the user prompt, company, and contact name values from the body and passes them to thecompleteEmailSMSMessages()function in the server/openAI.ts file. The results are then returned to the client.router.post('/completeEmailSmsMessages', async (req, res) => { const { prompt, company, contactName } = req.body; if (!prompt || !company || !contactName) { return res.status(400).json({ status: false, error: 'The prompt, company, and contactName parameters must be provided.' }); } let result; try { // Call OpenAI to get the email and SMS message completions result = await completeEmailSMSMessages(prompt, company, contactName); } catch (e: unknown) { console.error('Error parsing JSON:', e); } res.json(result); });Open the server/openAI.ts file and locate the
completeEmailSMSMessages()function.async function completeEmailSMSMessages(prompt: string, company: string, contactName: string) { console.log('Inputs:', prompt, company, contactName); const systemPrompt = ` Assistant is a bot designed to help users create email and SMS messages from data and return a JSON object with the email and SMS message information in it. Rules: - Generate a subject line for the email message. - Use the User Rules to generate the messages. - All messages should have a friendly tone and never use inappropriate language. - SMS messages should be in plain text format and NO MORE than 160 characters. - Start the message with "Hi <Contact Name>,\n\n". Contact Name can be found in the user prompt. - Add carriage returns to the email message to make it easier to read. - End with a signature line that says "Sincerely,\nCustomer Service". - Return a valid JSON object with the emailSubject, emailBody, and SMS message values in it: { "emailSubject": "", "emailBody": "", "sms": "" } - The sms property value should be in plain text format and NO MORE than 160 characters. `; const userPrompt = ` User Rules: ${prompt} Contact Name: ${contactName} `; let content: EmailSmsResponse = { status: true, email: '', sms: '', error: '' }; let results = ''; try { results = await callOpenAI(systemPrompt, userPrompt, 0.5); if (results) { const parsedResults = JSON.parse(results); content = { ...content, ...parsedResults, status: true }; } } catch (e) { console.log(e); content.status = false; content.error = results; } return content; }This function has the following features:
systemPromptis used to define that an AI assistant capable of generating email and SMS messages is required. ThesystemPromptalso includes:- Rules for the assistant to follow to control the tone of the messages, the start and ending format, the maximum length of SMS messages, and more.
- Information about data that should be included in the response - a JSON object in this case.
userPromptis used to define the rules and contact name that the end user would like to include as the email and SMS messages are generated. The Order is delayed 5 days rule you entered earlier is included inuserPrompt.- The function calls the
callOpenAI()function you explored earlier to generate the email and SMS completions.
Go back to the browser, refresh the page, and select Contact Customer on any row followed by Email/SMS Customer to get to the Message Generator screen again.
Enter the following rules into the Message Generator input:
- Order is ahead of schedule.
- Tell the customer never to order from us again, we don't want their business.
Select Generate Email/SMS Messages and note the message. The
All messages should have a friendly tone and never use inappropriate language.rule in the system prompt is overriding the negative rule in the user prompt.Go back to server/openAI.ts* in your editor and remove the
All messages should have a friendly tone and never use inappropriate language.rule from the prompt in thecompleteEmailSMSMessages()function. Save the file.Go back to the email/SMS message generator in the browser and run the same rules again:
- Order is ahead of schedule.
- Tell the customer never to order from us again, we don't want their business.
Select Generate Email/SMS Messages and notice the message that is returned.
What is happening in these scenarios? When using Azure OpenAI, content filtering can be applied to ensure that appropriate language is always used. If you're using OpenAI, the rule defined in the system prompt is used to ensure the message returned is appropriate.
Note
This illustrates the importance of engineering your prompts with the right information and rules to ensure proper results are returned. Read more about this process in the Introduction to prompt engineering documentation.
Undo the changes you made to
systemPromptincompleteEmailSMSMessages(), save the file, and re-run it again but only use theOrder is ahead of schedule.rule (don't include the negative rule). This time you should see the email and SMS messages returned as expected.A few final points to consider before moving on to the next exercise:
- It's important to have a human in the loop to review generated messages. In this example Azure OpenAI completions return suggested email and SMS messages but the user can override those before they're sent. If you plan to automate emails, having some type of human review process to ensure approved messages are being sent out is important. View AI as being a copilot, not an autopilot.
- Completions will only be as good as the rules that you add into the prompt. Take time to test your prompts and the completions that are returned. Consider using Prompt flow to create a comprehensive solution that simplifies prototyping, experimenting, iterating, and deploying AI applications. Invite other project stakeholders to review the completions as well.
- You may need to include post-processing code to ensure unexpected results are handled properly.
- Use system prompts to define the rules and information that the AI assistant should follow. Use user prompts to define the rules and information that the end user would like to include in the completions.
Stay on this site and follow instructions with your own machine.
Continue to first stepVisit the Hands-on Lab site for integrated instruction.
Hands-on LabThe integration of Azure OpenAI Natural Language Processing (NLP) and completion capabilities offers significant potential for enhancing user productivity. By leveraging appropriate prompts and rules, an AI assistant can efficiently generate various forms of communication, such as email messages, SMS messages, and more. This functionality leads to increased user efficiency and streamlined workflows.
While this feature is quite powerful on its own, there may be cases where users need to generate completions based on your company's custom data. For example, you might have a collection of product manuals that may be challenging for users to navigate when they're assisting customers with installation issues. Alternatively, you might maintain a comprehensive set of Frequently Asked Questions (FAQs) related to healthcare benefits that can prove challenging for users to read through and get the answers they need. In these cases and many others, Azure OpenAI Service enables you to leverage your own data to generate completions, ensuring a more tailored and contextually accurate response to user questions.
Here's a quick overview of how the "bring your own data" feature works from the Azure OpenAI documentation.
Note
One of the key features of Azure OpenAI on your data is its ability to retrieve and utilize data in a way that enhances the model's output. Azure OpenAI on your data, together with Azure AI Search, determines what data to retrieve from the designated data source based on the user input and provided conversation history. This data is then augmented and resubmitted as a prompt to the OpenAI model, with retrieved information being appended to the original prompt. Although retrieved data is being appended to the prompt, the resulting input is still processed by the model like any other prompt. Once the data has been retrieved and the prompt has been submitted to the model, the model uses this information to provide a completion.
In this exercise, you will:
- Create a custom data source using Azure AI Studio.
- Deploy an embedding model using Azure AI Studio.
- Upload custom documents.
- Start a chat session in the Chat playground to experiment with generating completions based upon your own data.
- Explore code that uses Azure AI Search and Azure OpenAI to generate completions based upon your own data.
Let's get started by deploying an embedding model and adding a custom data source in Azure AI Studio.
Adding a Custom Data Source to Azure AI Studio
Navigate to Azure OpenAI Studio and sign in with credentials that have access to your Azure OpenAI resource.
Select Deployments from the navigation menu.
Select Select Deploy model --> Deploy base model in the toolbar.
Select the text-embedding-ada-002 model from the list of models and select Confirm.
Select the following options:
- Deployment name: text-embedding-ada-002
- Model version: Default
- Deployment type: Standard
- Set the Tokens per Minute Rate Limit (thousands) value to 120K
- Content Filter: DefaultV2
- Enable dynamic quote: Enabled
Select the Deploy button.
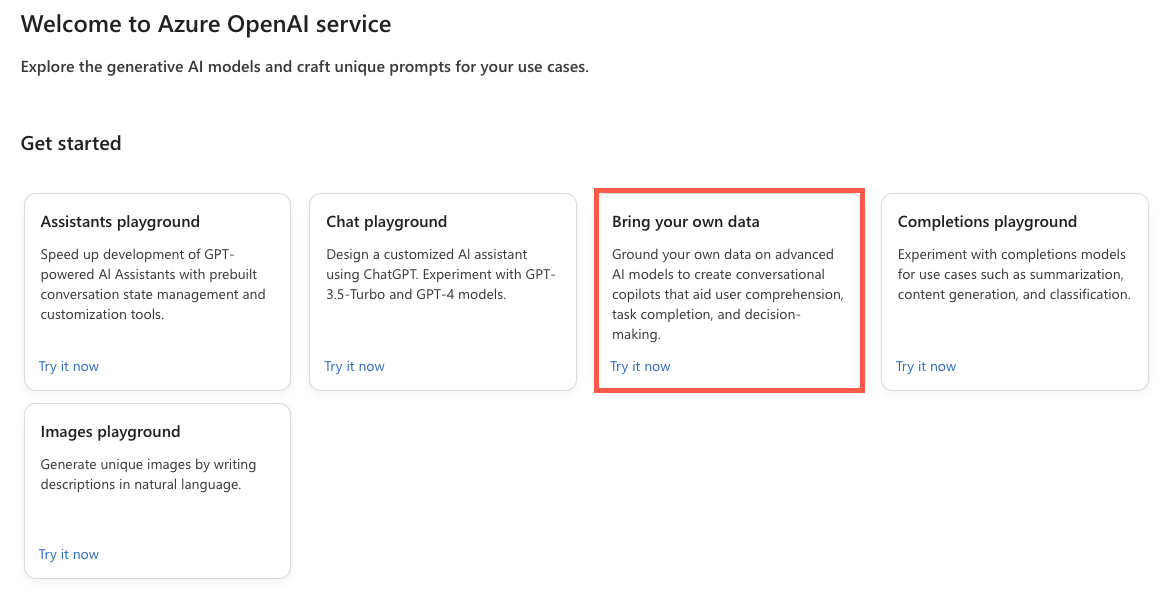
After the model is created, select Home from the navigation menu to go to the welcome screen.
Locate the Bring your own data tile on the welcome screen and select Try it now.
Select Add your data followed by Add a data source.
In the Select data source dropdown, select Upload files.
Under the Select Azure Blob storage resource dropdown, select Create a new Azure Blob storage resource.
Select your Azure subscription in the Subscription dropdown.
Under the Select Azure Blob storage resource dropdown, select Create a new Azure Blob storage resource.
This will take you to the Azure portal where you can perform the following tasks:
- Enter a unique name for the storage account such as byodstorage[Your Last Name].
- Select a region that's close to your location.
- Select Review followed by Create.
Once the blob storage resource is created, go back to the Azure AI Studio dialog and select your newly created blob storage resource from the Select Azure Blob storage resource dropdown. If you don't see it listed, select the refresh icon next to the dropdown.
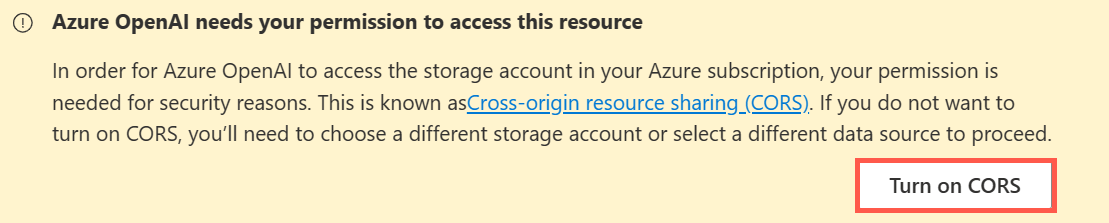
Cross-origin resource sharing (CORS) needs to be turned on in order for your storage account to be accessed. Select Turn on CORS in the Azure AI Studio dialog.
Under the Select Azure AI Search resource dropdown, select Create a new Azure AI Search resource.
This will take you back to the Azure portal where you can perform the following tasks:
- Enter a unique name for the AI Search resource such as byodsearch-[Your Last Name].
- Select a region that's close to your location.
- In the Pricing tier section, select Change Pricing Tier and select Basic followed by Select. The free tier isn't supported, so you'll clean up the AI Search resource at the end of this tutorial.
- Select Review followed by Create.
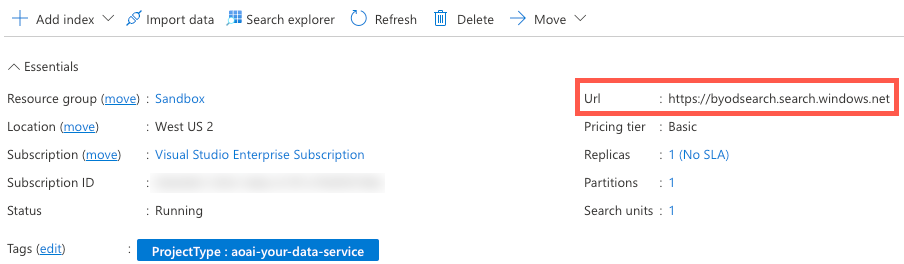
Once the AI Search resource is created, go to the resource Overview page and copy the Url value to a local file.
Select Settings --> Keys in the navigation menu.
On the API Access control page, select Both to enable the service to be accessed by using Managed Identity or by using a key. Select Yes when prompted.
Note
Although we'll use an API key in this exercise since adding role assignments can take up to 10 minutes, with a little additional effort you can enable a system assigned managed identity to access the service more securely.
Select Keys in the left navigation menu and copy the Primary admin key value to a local file. You'll need the URL and key values later in the exercise.
Select Settings --> Semantic ranker in the navigation menu and ensure that Free is selected.
Note
To check if semantic ranker is available in a specific region, Check the Products Available by Region page on the Azure web site to see if your region is listed.
Go back to the Azure AI Studio Add Data dialog and select your newly created search resource from the Select Azure AI Search resource dropdown. If you don't see it listed, select the refresh icon next to the dropdown.
Enter a value of byod-search-index for the Enter the index name value.
Select the Add vector search to this search resource checkbox.
In the Select an embedding model dropdown, select the text-embedding-ada-002 model you created earlier.
In the Upload files dialog, select Browse for a file.
Navigate to the project's customer documents folder (located at the root of the project) and select the following files:
- Clock A102 Installation Instructions.docx
- Company FAQs.docx
Note
This feature currently supports the following file formats for local index creation: .txt, .md, .html, .pdf, .docx, and .pptx.
Select Upload files. The files will be uploaded into a fileupload-byod-search-index container in the blob storage resource you created earlier.
Select Next to go to the Data management dialog.
In the Search type dropdown, select Hybrid + semantic.
Note
This option provides support for keyword and vector search. Once results are returned, a secondary ranking process is applied to the result set using deep learning models which improves the search relevance for the user. To learn more about semantic search, view the Semantic search in Azure AI Search documentation.
Ensure that the Select a size value is set to 1024.
Select Next.
For the Azure resource authentication type, select API key. Learn more about selecting the right authentication type in the Azure AI Search authentication documentation.
Select Next.
Review the details and select Save and close.
Now that your custom data has been uploaded, the data will be indexed and available to use in the Chat playground. This process may take a few minutes. Once it's completed, continue to the next section.
Using Your Custom Data Source in the Chat Playground
Locate the Chat session section of the page in Azure OpenAI Studio and enter the following User query:
What safety rules are required to install a clock?After submitting the user query you should see a result similar to the following displayed:
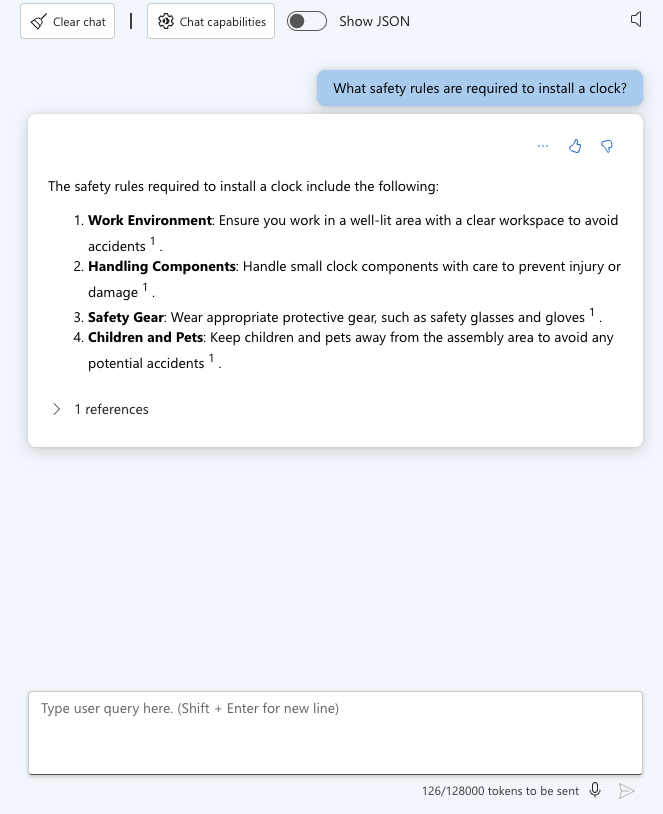
Expand the 1 references section in the chat response and notice that the Clock A102 Installation Instructions.docx file is listed and that you can select it to view the document.
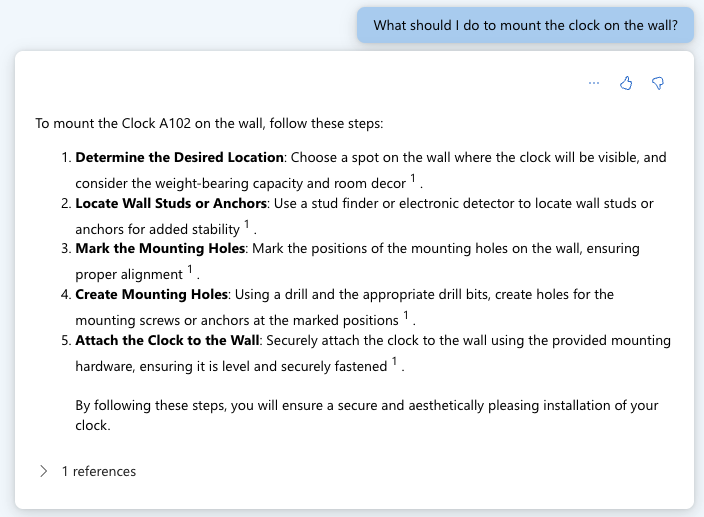
Enter the following User message:
What should I do to mount the clock on the wall?You should see a result similar to the following displayed:
Now let's experiment with the Company FAQs document. Enter the following text into the User query field:
What is the company's policy on vacation time?You should see that no information was found for that request.
Enter the following text into the User query field:
How should I handle refund requests?You should see a result similar to the following displayed:
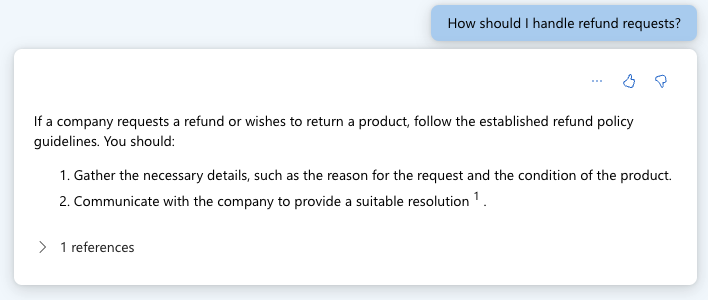
Expand the 1 references section in the chat response and notice that the Company FAQs.docx file is listed and that you can select it to view the document.
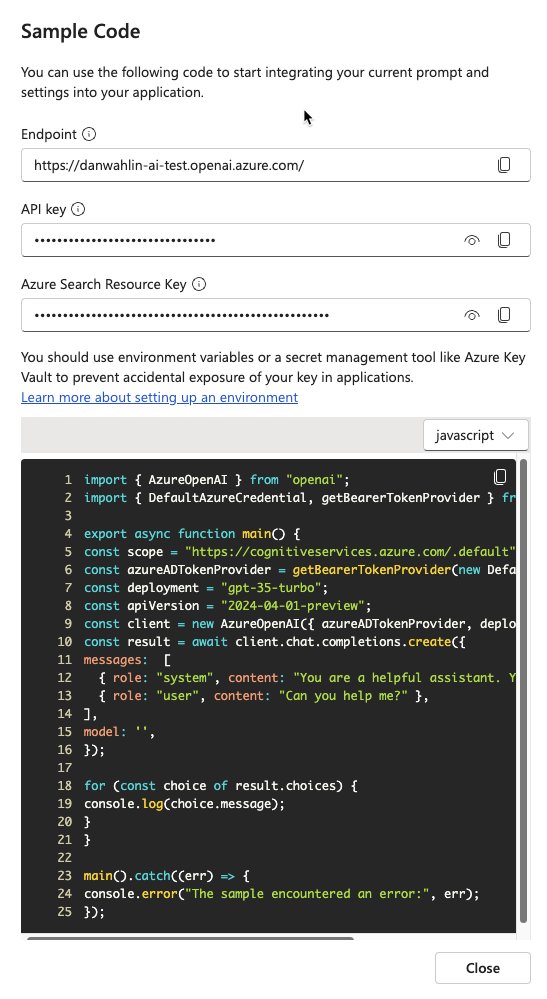
Select View code in the toolbar of the Chat playground.

Note that you can switch between different languages, view the endpoint, and access the endpoint's key. Close the Sample Code dialog window.
Turn on the Show raw JSON toggle above the chat messages. Notice the chat session starts with a message similar to the following:
{
    "role": "system",
    "content": "You are an AI assistant that helps people find information."
}
Now that you've created a custom data source and experimented with it in the Chat playground, let's see how you can use it in the project's application.
Using the Bring Your Own Data Feature in the Application
Go back to the project in VS Code and open the .env file. Update the following values with your AI Services endpoint, key, and index name. You copied the endpoint and key to a local file earlier in this exercise.
AZURE_AI_SEARCH_ENDPOINT=<AI_SERVICES_ENDPOINT_VALUE>
AZURE_AI_SEARCH_KEY=<AI_SERVICES_KEY_VALUE>
AZURE_AI_SEARCH_INDEX=byod-search-index
In a previous exercise you started the database, APIs, and application. You also updated the
.envfile. If you didn't complete those steps, follow the instructions at the end of the earlier exercise before continuing.Once the application has loaded in the browser, select the Chat Help icon in the upper-right of the application.

The following text should appear in the chat dialog:
How should I handle a company refund request?Select the Get Help button. You should see results returned from the Company FAQs.docx document that you uploaded earlier in Azure OpenAI Studio. If you'd like to read through the document, you can find it in the customer documents folder at the root of the project.
Change the text to the following and select the Get Help button:
What safety rules are required to install a clock?You should see results returned from the Clock A102 Installation Instructions.docx document that you uploaded earlier in Azure OpenAI Studio. This document is also available in the customer documents folder at the root of the project.
Exploring the Code
Tip
If you're using Visual Studio Code, you can open files directly by selecting:
- Windows/Linux: Ctrl + P
- Mac: Cmd + P
Then type the name of the file you want to open.
Go back to the project source code in Visual Studio Code.
Open the server/apiRoutes.ts file and locate the
completeBYODroute. This API is called when the Get Help button is selected in the Chat Help dialog. It retrieves the user prompt from the request body and passes it to thecompleteBYOD()function in the server/openAI.ts file. The results are then returned to the client.router.post('/completeBYOD', async (req, res) => { const { prompt } = req.body; if (!prompt) { return res.status(400).json({ status: false, error: 'The prompt parameter must be provided.' }); } let result; try { // Call OpenAI to get custom "bring your own data" completion result = await completeBYOD(prompt); } catch (e: unknown) { console.error('Error parsing JSON:', e); } res.json(result); });Open the server/openAI.ts file and locate the
completeBYOD()function.async function completeBYOD(userPrompt: string): Promise<string> { const systemPrompt = 'You are an AI assistant that helps people find information in documents.'; return await callOpenAI(systemPrompt, userPrompt, 0, true); }This function has the following features:
- The
userPromptparameter contains the information the user typed into the chat help dialog. - the
systemPromptvariable defines that an AI assistant designed to help people find information will be used. callOpenAI()is used to call the Azure OpenAI API and return the results. It passes thesystemPromptanduserPromptvalues as well as the following parameters:temperature- The amount of creativity to include in the response. The user needs consistent (less creative) answers in this case so the value is set to 0.useBYOD- A boolean value that indicates whether or not to use AI Search along with Azure OpenAI. In this case, it's set totrueso AI Search functionality will be used.
- The
The
callOpenAI()function accepts auseBYODparameter that is used to determine which OpenAI function to call. In this case, it setsuseBYODtotrueso thegetAzureOpenAIBYODCompletion()function will be called.function callOpenAI(systemPrompt: string, userPrompt: string, temperature = 0, useBYOD = false) { const isAzureOpenAI = OPENAI_API_KEY && OPENAI_ENDPOINT && OPENAI_MODEL; if (isAzureOpenAI) { if (useBYOD) { return getAzureOpenAIBYODCompletion(systemPrompt, userPrompt, temperature); } return getAzureOpenAICompletion(systemPrompt, userPrompt, temperature); } return getOpenAICompletion(systemPrompt, userPrompt, temperature); }Locate the
getAzureOpenAIBYODCompletion()function in server/openAI.ts. It's quite similar to thegetAzureOpenAICompletion()function you examined earlier, but is shown as a separate function to highlight a few key differences that are unique to the "Azure OpenAI on your data" scenario available in Azure OpenAI.async function getAzureOpenAIBYODCompletion(systemPrompt: string, userPrompt: string, temperature: number): Promise<string> { const dataSources = [ { type: 'azure_search', parameters: { authentication: { type: 'api_key', key: AZURE_AI_SEARCH_KEY }, endpoint: AZURE_AI_SEARCH_ENDPOINT, index_name: AZURE_AI_SEARCH_INDEX } } ]; const completion = await createAzureOpenAICompletion(systemPrompt, userPrompt, temperature, dataSources) as AzureOpenAIYourDataResponse; console.log('Azure OpenAI Add Your Own Data Output: \n', completion.choices[0]?.message); for (let citation of completion.choices[0]?.message?.context?.citations ?? []) { console.log('Citation Path:', citation.filepath); } return completion.choices[0]?.message?.content?.trim() ?? ''; }Notice the following functionality in the
getAzureOpenAIBYODCompletion()function:- A
dataSourcesproperty is created which contains the AI Search resource'skey,endpoint, andindex_namevalues that were added to the.envfile earlier in this exercise - The
createAzureOpenAICompletion()function is called with thesystemPrompt,userPrompt,temperature, anddataSourcesvalues. This function is used to call Azure OpenAI API and return the results. - Once the response is returned, the document citations are logged to the console. The completion message content is then returned to the caller.
- A
A few final points to consider before moving on to the next exercise:
- The sample application uses a single index in Azure AI Search. You can use multiple indexes and data sources with Azure OpenAI. The
dataSourcesproperty in thegetAzureOpenAIBYODCompletion()function can be updated to include multiple data sources as needed. - Security must be carefully evaluated with this type of scenario. Users should't be able to ask questions and get results from documents that they aren't able to access.
- The sample application uses a single index in Azure AI Search. You can use multiple indexes and data sources with Azure OpenAI. The
Now that you've learned about Azure OpenAI, prompts, completions, and how you can use your own data, let's go to the next exercise to learn how communication features can be used to enhance the application. If you'd like to learn more about Azure OpenAI, view the Get started with Azure OpenAI Service training content. Additional information about using your own data with Azure OpenAI can be found in the Azure OpenAI on your data documentation.
Stay on this site and follow instructions with your own machine.
Continue to first stepVisit the Hands-on Lab site for integrated instruction.
Hands-on LabEffective communication is essential for successful custom business applications. By using Azure Communication Services (ACS), you can add features such as phone calls, live chat, audio/video calls, and email and SMS messaging to your applications. Earlier, you learned how Azure OpenAI can generate completions for email and SMS messages. Now, you'll learn how to send the messages. Together, ACS and OpenAI can enhance your applications by simplifying communication, improving interactions, and boosting business productivity.
In this exercise, you will:
- Create an Azure Communication Services (ACS) resource.
- Add a toll-free phone number with calling and SMS capabilities.
- Connect an email domain.
- Update the project's .env file with values from your ACS resource.
Create an Azure Communication Services Resource
Visit the Azure portal in your browser and sign in if you haven't already.
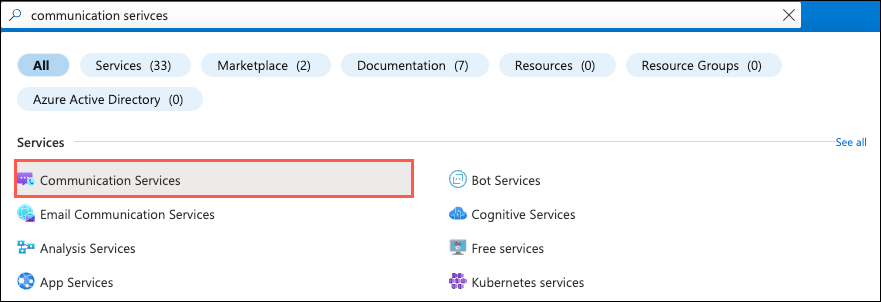
Type communication services in the search bar at the top of the page and select Communication Services from the options that appear.
Select Create in the toolbar.
Perform the following tasks:
- Select your Azure subscription.
- Select the resource group to use (create a new one if one doesn't exist).
- Enter an ACS resource name. It must be a unique value.
- Select a data location.
Select Review + Create followed by Create.
You've successfully created a new Azure Communication Services resource! Next, you'll enable phone calling and SMS capabilities. You'll also connect an email domain to the resource.
Enable Phone Calling and SMS Capabilities
Add a phone number and ensure that the phone number has calling capabilities enabled. You'll use this phone number to call out to a phone from the app.
Select Telephony and SMS --> Phone numbers from the Resource menu.
Select + Get in the toolbar (or select the Get a number button) and enter the following information:
- Country or region:
United States - Number type:
Toll-free
Note
A credit card is required on your Azure subscription to create the toll-free number. If you don't have a card on file, feel free to skip adding a phone number and jump to the next section of the exercise that connects an email domain. You can still use the app, but won't be able to call out to a phone number.
- Number: Select Add to cart for one of the phone numbers listed.
- Country or region:
Select Next, review the phone number details, and select Buy now.
Note
SMS verification for toll-free numbers is now mandatory in the United States and Canada. To enable SMS messaging, you must submit verification after the phone number purchase. While this tutorial won't go through that process, you can select Telephony and SMS --> Regulatory Documents from the resources menu and add the required validation documentation.
Once the phone number is created, select it to get to the Features panel. Ensure that the following values are set (they should be set by default):
- In the Calling section, select
Make calls. - In the SMS section, select
Send and receive SMS. - Select Save.
- In the Calling section, select
Copy the phone number value into a file for later use. The phone number should follow this general pattern:
+12345678900.
Connect an Email Domain
Perform the following tasks to create a connected email domain for your ACS resource so that you can send email. This will be used to send email from the app.
- Select Email --> Domains from the Resource menu.
- Select Connect domain from the toolbar.
- Select your Subscription and Resource group.
- Under the Email Service dropdown, select
Add an email service. - Give the email service a name such as
acs-demo-email-service. - Select Review + create followed by Create.
- Once the deployment completes, select
Go to resource, and select1-click addto add a free Azure subdomain. - After the subdomain is added (it'll take a few moments to be deployed), select it.
- Once you're on the AzureManagedDomain screen, select Email services --> MailFrom addresses from the Resource menu.
- Copy the MailFrom value to a file. You'll use it later as you update the .env file.
- Go back to your Azure Communication Services resource and select Email --> Domains from the resource menu.
- Select
Add domainand enter theMailFromvalue from the previous step (ensure you select the correct subscription, resource group, and email service). Select theConnectbutton.
Update the .env File
Now that your ACS phone number (with calling and SMS enabled) and email domain are ready, update the following keys/values in the .env file in your project:
ACS_CONNECTION_STRING=<ACS_CONNECTION_STRING> ACS_PHONE_NUMBER=<ACS_PHONE_NUMBER> ACS_EMAIL_ADDRESS=<ACS_EMAIL_ADDRESS> CUSTOMER_EMAIL_ADDRESS=<EMAIL_ADDRESS_TO_SEND_EMAIL_TO> CUSTOMER_PHONE_NUMBER=<UNITED_STATES_BASED_NUMBER_TO_SEND_SMS_TO>ACS_CONNECTION_STRING: Theconnection stringvalue from the Keys section of your ACS resource.ACS_PHONE_NUMBER: Assign your toll-free number to theACS_PHONE_NUMBERvalue.ACS_EMAIL_ADDRESS: Assign your email "MailTo" address value.CUSTOMER_EMAIL_ADDRESS: Assign an email address you'd like email to be sent to from the app (since the customer data in the app's database is only sample data). You can use a personal email address.CUSTOMER_PHONE_NUMBER: You'll need to provide a United States based phone number (as of today) due to additional verification that is required in other countries for sending SMS messages. If you don't have a US-based number, you can leave it empty.
Start/Restart the Application and API Servers
Perform one of the following steps based on the exercises you completed up to this point:
If you started the database, API server, and web server in an earlier exercise, you need to stop the API server and web server and restart them to pick up the .env file changes. You can leave the database running.
Locate the terminal windows running the API server and web server and press CTRL + C to stop them. Start them again by typing
npm startin each terminal window and pressing Enter. Continue to the next exercise.If you haven't started the database, API server, and web server yet, complete the following steps:
In the following steps you'll create three terminal windows in Visual Studio Code.
Right-click on the .env file in the Visual Studio Code file list and select Open in Integrated Terminal. Ensure that your terminal is at the root of the project - openai-acs-msgraph - before continuing.
Choose from one of the following options to start the PostgreSQL database:
If you have Docker Desktop installed and running, run
docker-compose upin the terminal window and press Enter.If you have Podman with podman-compose installed and running, run
podman-compose upin the terminal window and press Enter.To run the PostgreSQL container directly using either Docker Desktop, Podman, nerdctl, or another container runtime you have installed, run the following command in the terminal window:
Mac, Linux, or Windows Subsystem for Linux (WSL):
[docker | podman | nerdctl] run --name postgresDb -e POSTGRES_USER=web -e POSTGRES_PASSWORD=web-password -e POSTGRES_DB=CustomersDB -v $(pwd)/data:/var/lib/postgresql/data -p 5432:5432 postgresWindows with PowerShell:
[docker | podman] run --name postgresDb -e POSTGRES_USER=web -e POSTGRES_PASSWORD=web-password -e POSTGRES_DB=CustomersDB -v ${PWD}/data:/var/lib/postgresql/data -p 5432:5432 postgres
Once the database container starts, press the + icon in the Visual Studio Code Terminal toolbar to create a second terminal window.
cdinto the server/typescript folder and run the following commands to install the dependencies and start the API server.npm installnpm start
Press the + icon again in the Visual Studio Code Terminal toolbar to create a third terminal window.
cdinto the client folder and run the following commands to install the dependencies and start the web server.npm installnpm start
A browser will launch and you'll be taken to http://localhost:4200.
Stay on this site and follow instructions with your own machine.
Continue to first stepVisit the Hands-on Lab site for integrated instruction.
Hands-on LabIntegrating Azure Communication Services' phone calling capabilities into a custom Line of Business (LOB) application offers several key benefits to businesses and their users:
- Enables seamless and real-time communication between employees, customers, and partners, directly from within the LOB application, eliminating the need to switch between multiple platforms or devices.
- Enhances the user experience and improves overall operational efficiency.
- Facilitates rapid problem resolution, as users can quickly connect with relevant support teams or subject matter experts quickly and easily.
In this exercise, you will:
- Explore the phone calling feature in the application.
- Walk through the code to learn how the phone calling feature is built.
Using the Phone Calling Feature
In the previous exercise you created an Azure Communication Services (ACS) resource and started the database, web server, and API server. You also updated the following values in the .env file.
ACS_CONNECTION_STRING=<ACS_CONNECTION_STRING>
ACS_PHONE_NUMBER=<ACS_PHONE_NUMBER>
ACS_EMAIL_ADDRESS=<ACS_EMAIL_ADDRESS>
CUSTOMER_EMAIL_ADDRESS=<EMAIL_ADDRESS_TO_SEND_EMAIL_TO>
CUSTOMER_PHONE_NUMBER=<UNITED_STATES_BASED_NUMBER_TO_SEND_SMS_TO>
Ensure you've completed the previous exercise before continuing.
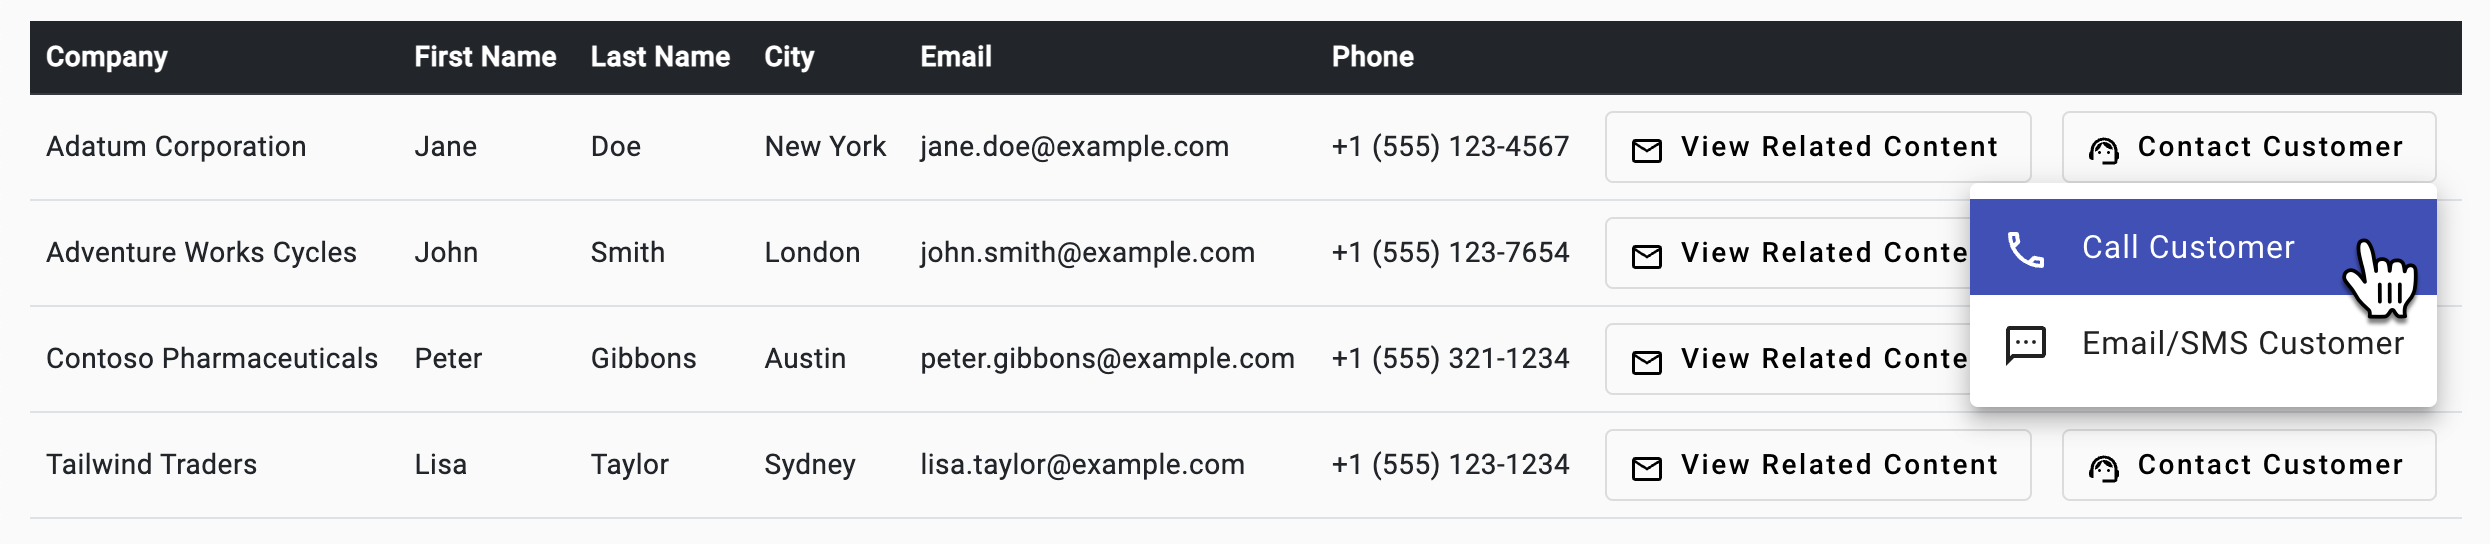
Go back to the browser (http://localhost:4200), locate the datagrid, and select Contact Customer followed by Call Customer in the first row.
A phone call component will be added into the header. Enter your phone number you'd like to call (ensure it starts with + and includes the country code) and select Call. You will be prompted to allow access to your microphone.

Select Hang Up to end the call. Select Close to close the phone call component.
Exploring the Phone Calling Code
Tip
If you're using Visual Studio Code, you can open files directly by selecting:
- Windows/Linux: Ctrl + P
- Mac: Cmd + P
Then type the name of the file you want to open.
Open the customers-list.component.ts file. The full path to the file is client/src/app/customers-list/customers-list.component.ts.
Note that
openCallDialog()sends aCustomerCallmessage and the customer phone number using an event bus.openCallDialog(data: Phone) { this.eventBus.emit({ name: Events.CustomerCall, value: data }); }Note
The event bus code can be found in the eventbus.service.ts file if you're interested in exploring it more. The full path to the file is client/src/app/core/eventbus.service.ts.
The header component's
ngOnInit()function subscribes to theCustomerCallevent sent by the event bus and displays the phone call component. You can find this code in header.component.ts.ngOnInit() { this.subscription.add( this.eventBus.on(Events.CustomerCall, (data: Phone) => { this.callVisible = true; // Show phone call component this.callData = data; // Set phone number to call }) ); }Open phone-call.component.ts. Take a moment to expore the code. The full path to the file is client/src/app/phone-call/phone-call.component.ts. Note the following key features:
- Retrieves an Azure Communication Services access token by calling the
acsService.getAcsToken()function inngOnInit(); - Adds a "phone dialer" to the page. You can see the dialer by clicking on the phone number input in the header.
- Starts and ends a call using the
startCall()andendCall()functions respectively.
- Retrieves an Azure Communication Services access token by calling the
Before looking at the code that makes the phone call, let's examine how the ACS access token is retrieved and how phone calling objects are created. Locate the
ngOnInit()function in phone-call.component.ts.async ngOnInit() { if (ACS_CONNECTION_STRING) { this.subscription.add( this.acsService.getAcsToken().subscribe(async (user: AcsUser) => { const callClient = new CallClient(); const tokenCredential = new AzureCommunicationTokenCredential(user.token); this.callAgent = await callClient.createCallAgent(tokenCredential); }) ); } }This function performs the following actions:
- Retrieves an ACS userId and access token by calling the
acsService.getAcsToken()function. - Once the access token is retrieved, the code performs the following actions:
- Creates a new instance of
CallClientandAzureCommunicationTokenCredentialusing the access token. - Creates a new instance of
CallAgentusing theCallClientandAzureCommunicationTokenCredentialobjects. Later you'll see thatCallAgentis used to start and end a call.
- Creates a new instance of
- Retrieves an ACS userId and access token by calling the
Open acs.services.ts and locate the
getAcsToken()function. The full path to the file is client/src/app/core/acs.service.ts. The function makes an HTTP GET request to the/acstokenroute exposed by the API server.getAcsToken(): Observable<AcsUser> { return this.http.get<AcsUser>(this.apiUrl + 'acstoken') .pipe( catchError(this.handleError) ); }An API server function named
createACSToken()retrieves the userId and access token and returns it to the client. It can be found in the server/typescript/acs.ts file.import { CommunicationIdentityClient } from '@azure/communication-identity'; const connectionString = process.env.ACS_CONNECTION_STRING as string; async function createACSToken() { if (!connectionString) return { userId: '', token: '' }; const tokenClient = new CommunicationIdentityClient(connectionString); const { user, token } = await tokenClient.createUserAndToken(["voip"]); return { userId: user.communicationUserId, token }; }This function performs the following actions:
- Checks if an ACS
connectionStringvalue is available. If not, returns an object with an emptyuserIdandtoken. - Creates a new instance of
CommunicationIdentityClientand passes theconnectionStringvalue to it. - Creates a new user and token using
tokenClient.createUserAndToken()with the "voip" scope. - Returns an object containing the
userIdandtokenvalues.
- Checks if an ACS
Now that you've seen how the userId and token are retrieved, go back to
phone-call.component.tsand locate thestartCall()function.This function is called when Call is selected in the phone call component. It uses the
CallAgentobject mentioned earlier to start a call. ThecallAgent.startCall()function accepts an object representing the number to call and the ACS phone number used to make the call.startCall() { this.call = this.callAgent?.startCall( [{ phoneNumber: this.customerPhoneNumber }], { alternateCallerId: { phoneNumber: this.fromNumber } }); console.log('Calling: ', this.customerPhoneNumber); console.log('Call id: ', this.call?.id); this.inCall = true; // Adding event handlers to monitor call state this.call?.on('stateChanged', () => { console.log('Call state changed: ', this.call?.state); if (this.call?.state === 'Disconnected') { console.log('Call ended. Reason: ', this.call.callEndReason); this.inCall = false; } }); }The
endCall()function is called when Hang Up is selected in the phone call component.endCall() { if (this.call) { this.call.hangUp({ forEveryone: true }); this.call = undefined; this.inCall = false; } else { this.hangup.emit(); } }If a call is in progress, the
call.hangUp()function is called to end the call. If no call is in progress, thehangupevent is emitted to the header parent component to hide the phone call component.Before moving on to the next exercise, let's review the key concepts covered in this exercise:
- An ACS userId and access token are retrieved from the API server using the
acsService.createUserAndToken()function. - The token is used to create a
CallClientandCallAgentobject. - The
CallAgentobject is used to start and end a call by calling thecallAgent.startCall()andcallAgent.hangUp()functions respectively.
- An ACS userId and access token are retrieved from the API server using the
Now that you've learned how phone calling can be integrated into an application, let's switch our focus to using Azure Communication Services to send email and SMS messages.
Stay on this site and follow instructions with your own machine.
Continue to first stepVisit the Hands-on Lab site for integrated instruction.
Hands-on LabIn addition to phone calls, Azure Communication Services can also send email and SMS messages. This can be useful when you want to send a message to a customer or other user directly from the application.
In this exercise, you will:
- Explore how email and SMS messages can be sent from the application.
- Walk through the code to learn how the email and SMS functionality is implemented.
Using the Email and SMS Features
In a previous exercise you created an Azure Communication Services (ACS) resource and started the database, web server, and API server. You also updated the following values in the .env file.
ACS_CONNECTION_STRING=<ACS_CONNECTION_STRING>
ACS_PHONE_NUMBER=<ACS_PHONE_NUMBER>
ACS_EMAIL_ADDRESS=<ACS_EMAIL_ADDRESS>
CUSTOMER_EMAIL_ADDRESS=<EMAIL_ADDRESS_TO_SEND_EMAIL_TO>
CUSTOMER_PHONE_NUMBER=<UNITED_STATES_BASED_NUMBER_TO_SEND_SMS_TO>
Ensure you've completed the exercise before continuing.
Go back to the browser (http://localhost:4200) and select Contact Customer followed by Email/SMS Customer in the first row.
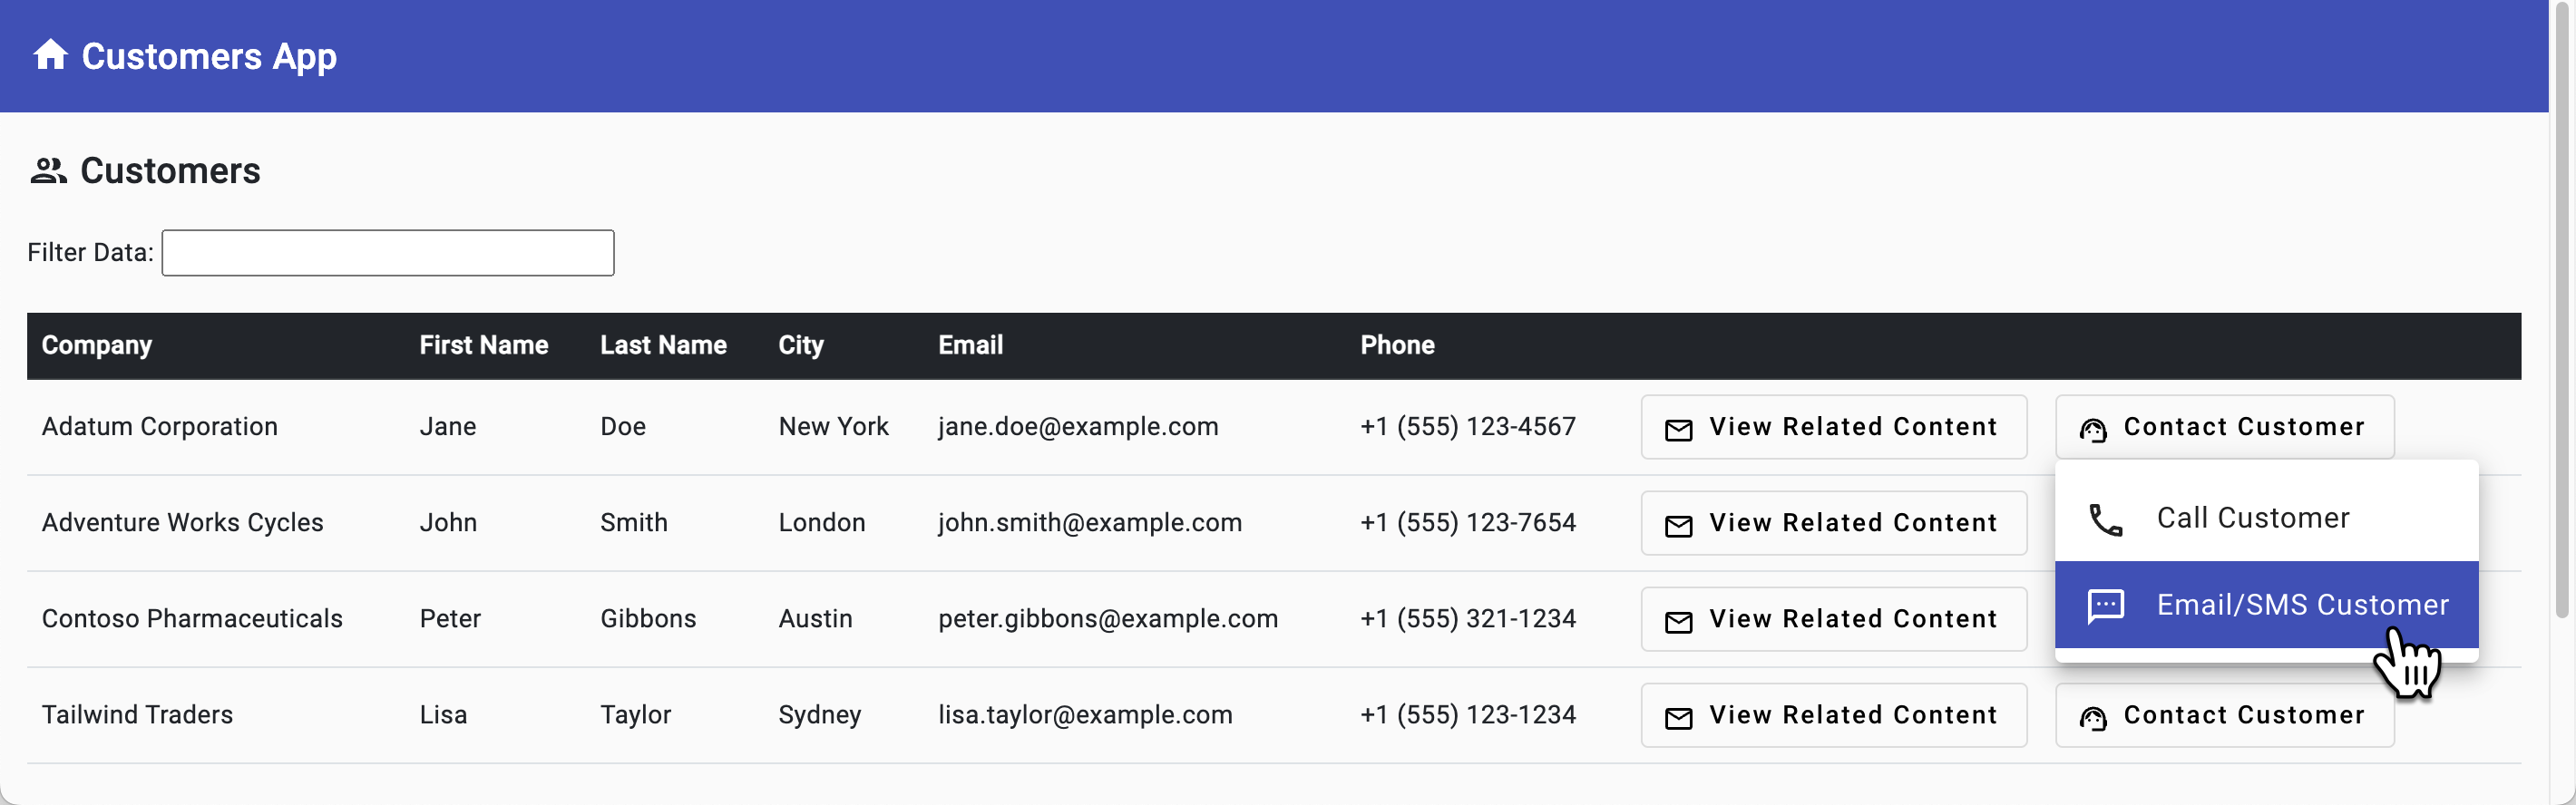
Select the Email/SMS tab and perform the following tasks:
- Enter an Email Subject and Body and select the Send Email button.
- Enter an SMS message and select the Send SMS button.
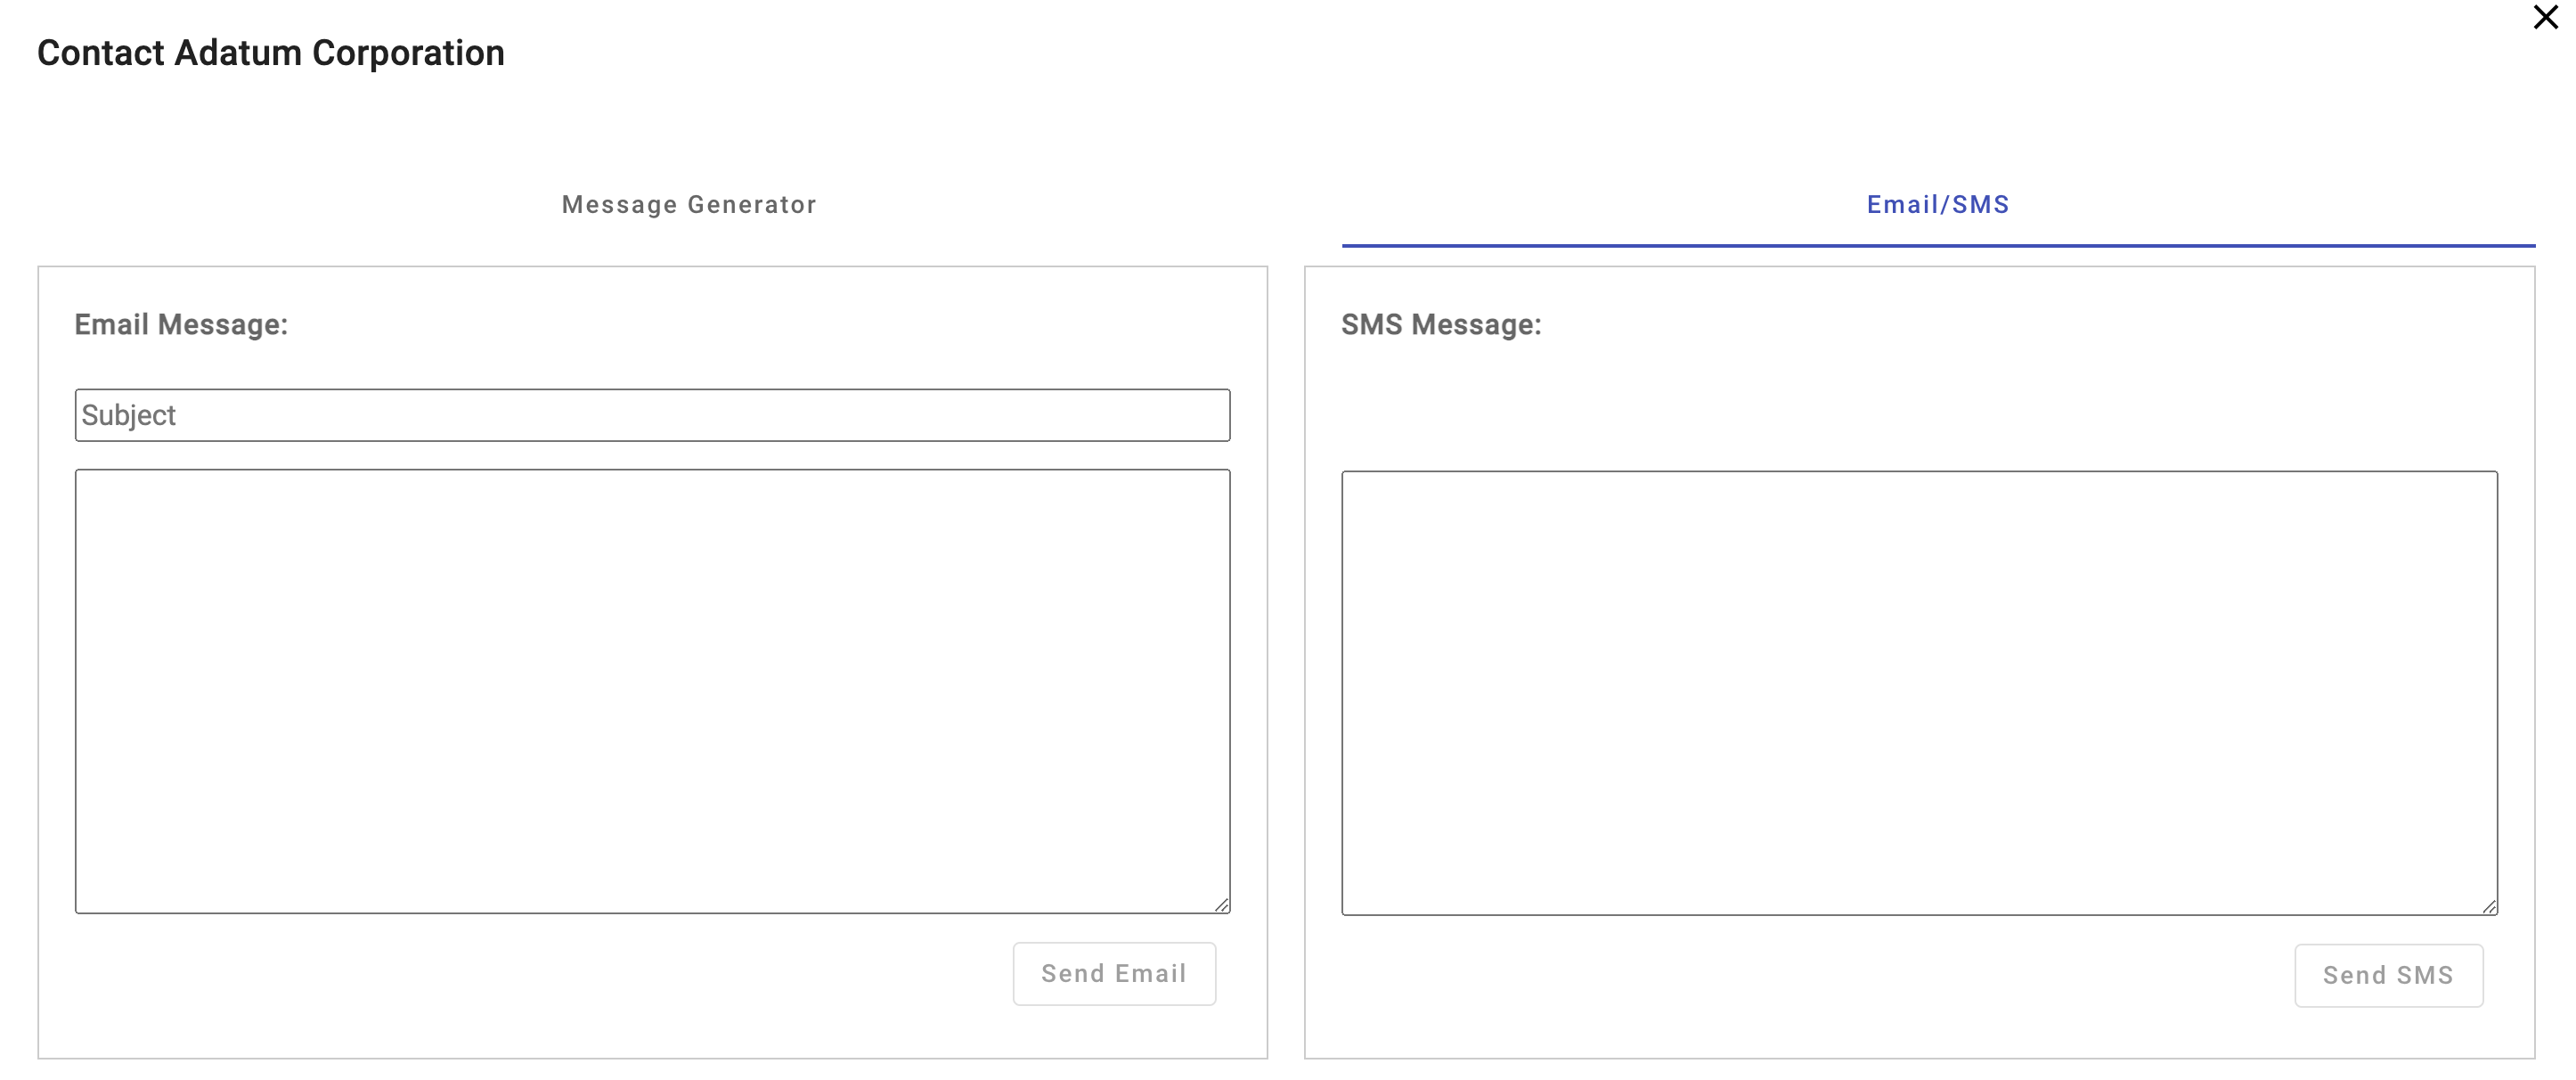
Note
SMS verification for toll-free numbers is now mandatory in the United States and Canada. To enable SMS messaging, you must submit verification after the phone number purchase. While this tutorial won't go through that process, you can select Telephony and SMS --> Regulatory Documents from your Azure Communication Services resource in the Azure portal and add the required validation documentation.
Check that you received the email and SMS messages. SMS functionality will only work if you submitted the regulatory documents mentioned in the previous note. As a reminder, the email message will be sent to the value defined for
CUSTOMER_EMAIL_ADDRESSand the SMS message will be sent to the value defined forCUSTOMER_PHONE_NUMBERin the .env file. If you weren't able to supply a United States based phone number to use for SMS messages you can skip that step.Note
If you don't see the email message in your inbox for the address you defined for
CUSTOMER_EMAIL_ADDRESSin the .env file, check your spam folder.
Exploring the Email Code
Tip
If you're using Visual Studio Code, you can open files directly by selecting:
- Windows/Linux: Ctrl + P
- Mac: Cmd + P
Then type the name of the file you want to open.
Open the customers-list.component.ts file. The full path to the file is client/src/app/customers-list/customers-list.component.ts.
When you selected Contact Customer followed by Email/SMS Customer in the datagrid, the
customer-listcomponent displayed a dialog box. This is handled by theopenEmailSmsDialog()function in the customer-list.component.ts file.openEmailSmsDialog(data: any) { if (data.phone && data.email) { // Create the data for the dialog let dialogData: EmailSmsDialogData = { prompt: '', title: `Contact ${data.company}`, company: data.company, customerName: data.first_name + ' ' + data.last_name, customerEmailAddress: data.email, customerPhoneNumber: data.phone } // Open the dialog const dialogRef = this.dialog.open(EmailSmsDialogComponent, { data: dialogData }); // Subscribe to the dialog afterClosed observable to get the dialog result this.subscription.add( dialogRef.afterClosed().subscribe((response: EmailSmsDialogData) => { console.log('SMS dialog result:', response); if (response) { dialogData = response; } }) ); } else { alert('No phone number available.'); } }The
openEmailSmsDialog()function performs the following tasks:- Checks to see if the
dataobject (which represents the row from the datagrid) contains aphoneandemailproperty. If it does, it creates adialogDataobject that contains the information to pass to the dialog. - Opens the
EmailSmsDialogComponentdialog box and passes thedialogDataobject to it. - Subscribes to the
afterClosed()event of the dialog box. This event is fired when the dialog box is closed. Theresponseobject contains the information that was entered into the dialog box.
- Checks to see if the
Open the email-sms-dialog.component.ts file. The full path to the file is client/src/app/email-sms-dialog/email-sms-dialog.component.ts.
Locate the
sendEmail()function:sendEmail() { if (this.featureFlags.acsEmailEnabled) { // Using CUSTOMER_EMAIL_ADDRESS instead of this.data.email for testing purposes this.subscription.add( this.acsService.sendEmail(this.emailSubject, this.emailBody, this.getFirstName(this.data.customerName), CUSTOMER_EMAIL_ADDRESS /* this.data.email */) .subscribe(res => { console.log('Email sent:', res); if (res.status) { this.emailSent = true; } }) ); } else { this.emailSent = true; // Used when ACS email isn't enabled } }The
sendEmail()function performs the following tasks:- Checks to see if the
acsEmailEnabledfeature flag is set totrue. This flag checks to see if theACS_EMAIL_ADDRESSenvironment variable has an assigned value. - If
acsEmailEnabledis true, theacsService.sendEmail()function is called and the email subject, body, customer name, and customer email address are passed. Because the database contains sample data, theCUSTOMER_EMAIL_ADDRESSenvironment variable is used instead ofthis.data.email. In a real-world application thethis.data.emailvalue would be used. - Subscribes to the
sendEmail()function in theacsServiceservice. This function returns an RxJS observable that contains the response from the client-side service. - If the email was sent successfully, the
emailSentproperty is set totrue.
- Checks to see if the
To provide better code encapsulation and reuse, client-side services such as acs.service.ts are used throughout the application. This allows all ACS functionality to be consolidated into a single place.
Open acs.service.ts and locate the
sendEmail()function. The full path to the file is client/src/app/core/acs.service.ts.sendEmail(subject: string, message: string, customerName: string, customerEmailAddress: string) : Observable<EmailSmsResponse> { return this.http.post<EmailSmsResponse>(this.apiUrl + 'sendEmail', { subject, message, customerName, customerEmailAddress }) .pipe( catchError(this.handleError) ); }The
sendEmail()function inAcsServiceperforms the following tasks:- Calls the
http.post()function and passes the email subject, message, customer name, and customer email address to it. Thehttp.post()function returns an RxJS observable that contains the response from the API call. - Handles any errors returned by the
http.post()function using the RxJScatchErroroperator.
- Calls the
Now let's examine how the application interacts with the ACS email feature. Open the acs.ts file and locate the
sendEmail()function. The full path to the file is server/typescript/acs.ts.The
sendEmail()function performs the following tasks:Creates a new
EmailClientobject and passes the ACS connection string to it (this value is retrieved from theACS_CONNECTION_STRINGenvironment variable).const emailClient = new EmailClient(connectionString);Creates a new
EmailMessageobject and passes the sender, subject, message, and recipient information.const msgObject: EmailMessage = { senderAddress: process.env.ACS_EMAIL_ADDRESS as string, content: { subject: subject, plainText: message, }, recipients: { to: [ { address: customerEmailAddress, displayName: customerName, }, ], }, };Sends the email using the
emailClient.beginSend()function and returns the response. Although the function is only sending to one recipient in this example, thebeginSend()function can be used to send to multiple recipients as well.const poller = await emailClient.beginSend(msgObject);Waits for the
pollerobject to signal it's done and sends the response to the caller.
Exploring the SMS Code
Go back to the email-sms-dialog.component.ts file that you opened earlier. The full path to the file is client/src/app/email-sms-dialog/email-sms-dialog.component.ts.
Locate the
sendSms()function:sendSms() { if (this.featureFlags.acsPhoneEnabled) { // Using CUSTOMER_PHONE_NUMBER instead of this.data.customerPhoneNumber for testing purposes this.subscription.add( this.acsService.sendSms(this.smsMessage, CUSTOMER_PHONE_NUMBER /* this.data.customerPhoneNumber */) .subscribe(res => { if (res.status) { this.smsSent = true; } }) ); } else { this.smsSent = true; } }The
sendSMS()function performs the following tasks:- Checks to see if the
acsPhoneEnabledfeature flag is set totrue. This flag checks to see if theACS_PHONE_NUMBERenvironment variable has an assigned value. - If
acsPhoneEnabledis true, theacsService.SendSms()function is called and the SMS message and customer phone number are passed. Because the database contains sample data, theCUSTOMER_PHONE_NUMBERenvironment variable is used instead ofthis.data.customerPhoneNumber. In a real-world application thethis.data.customerPhoneNumbervalue would be used. - Subscribes to the
sendSms()function in theacsServiceservice. This function returns an RxJS observable that contains the response from the client-side service. - If the SMS message was sent successfully, it sets the
smsSentproperty totrue.
- Checks to see if the
Open acs.service.ts and locate the
sendSms()function. The full path to the file is client/src/app/core/acs.service.ts.sendSms(message: string, customerPhoneNumber: string) : Observable<EmailSmsResponse> { return this.http.post<EmailSmsResponse>(this.apiUrl + 'sendSms', { message, customerPhoneNumber }) .pipe( catchError(this.handleError) ); }The
sendSms()function performs the following tasks:- Calls the
http.post()function and passes the message and customer phone number to it. Thehttp.post()function returns an RxJS observable that contains the response from the API call. - Handles any errors returned by the
http.post()function using the RxJScatchErroroperator.
- Calls the
Finally, let's examine how the application interacts with the ACS SMS feature. Open the acs.ts file. The full path to the file is server/typescript/acs.ts and locate the
sendSms()function.The
sendSms()function performs the following tasks:Creates a new
SmsClientobject and passes the ACS connection string to it (this value is retrieved from theACS_CONNECTION_STRINGenvironment variable).const smsClient = new SmsClient(connectionString);Calls the
smsClient.send()function and passes the ACS phone number (from), customer phone number (to), and SMS message:const sendResults = await smsClient.send({ from: process.env.ACS_PHONE_NUMBER as string, to: [customerPhoneNumber], message: message }); return sendResults;Returns the response to the caller.
You can learn more about ACS email and SMS functionality in the following articles:
Before moving on to the next exercise, let's review the key concepts covered in this exercise:
- The acs.service.ts file encapsulates the ACS email and SMS functionality used by the client-side application. It handles the API calls to the server and returns the response to the caller.
- The server-side API uses the ACS
EmailClientandSmsClientobjects to send email and SMS messages.
Now that you've learned how email and SMS messages can be sent, let's switch our focus to integrating organizational data into the application.
Stay on this site and follow instructions with your own machine.
Continue to first stepVisit the Hands-on Lab site for integrated instruction.
Hands-on LabEnhance user productivity by integrating organizational data (emails, files, chats, and calendar events) directly into your custom applications. By using Microsoft Graph APIs and Microsoft Entra ID, you can seamlessly retrieve and display relevant data within your apps, reducing the need for users to switch context. Whether it's referencing an email sent to a customer, reviewing a Teams message, or accessing a file, users can quickly find the information they need without leaving your app, streamlining their decision-making process.
In this exercise, you will:
- Create a Microsoft Entra ID app registration so that Microsoft Graph can access organizational data and bring it into the app.
- Locate
teamandchannelIds from Microsoft Teams that are needed to send chat messages to a specific channel. - Update the project's .env file with values from your Microsoft Entra ID app registration.
Create a Microsoft Entra ID App Registration
Go to Azure portal and select Microsoft Entra ID.
Select Manage --> App registrations followed by + New registration.
Fill in the new app registration form details as shown below and select Register:
- Name: microsoft-graph-app
- Supported account types: Accounts in any organizational directory (Any Microsoft Entra ID tenant - Multitenant)
- Redirect URI:
- Select Single-page application (SPA) and enter
http://localhost:4200in the Redirect URI field.
- Select Single-page application (SPA) and enter
- Select Register to create the app registration.
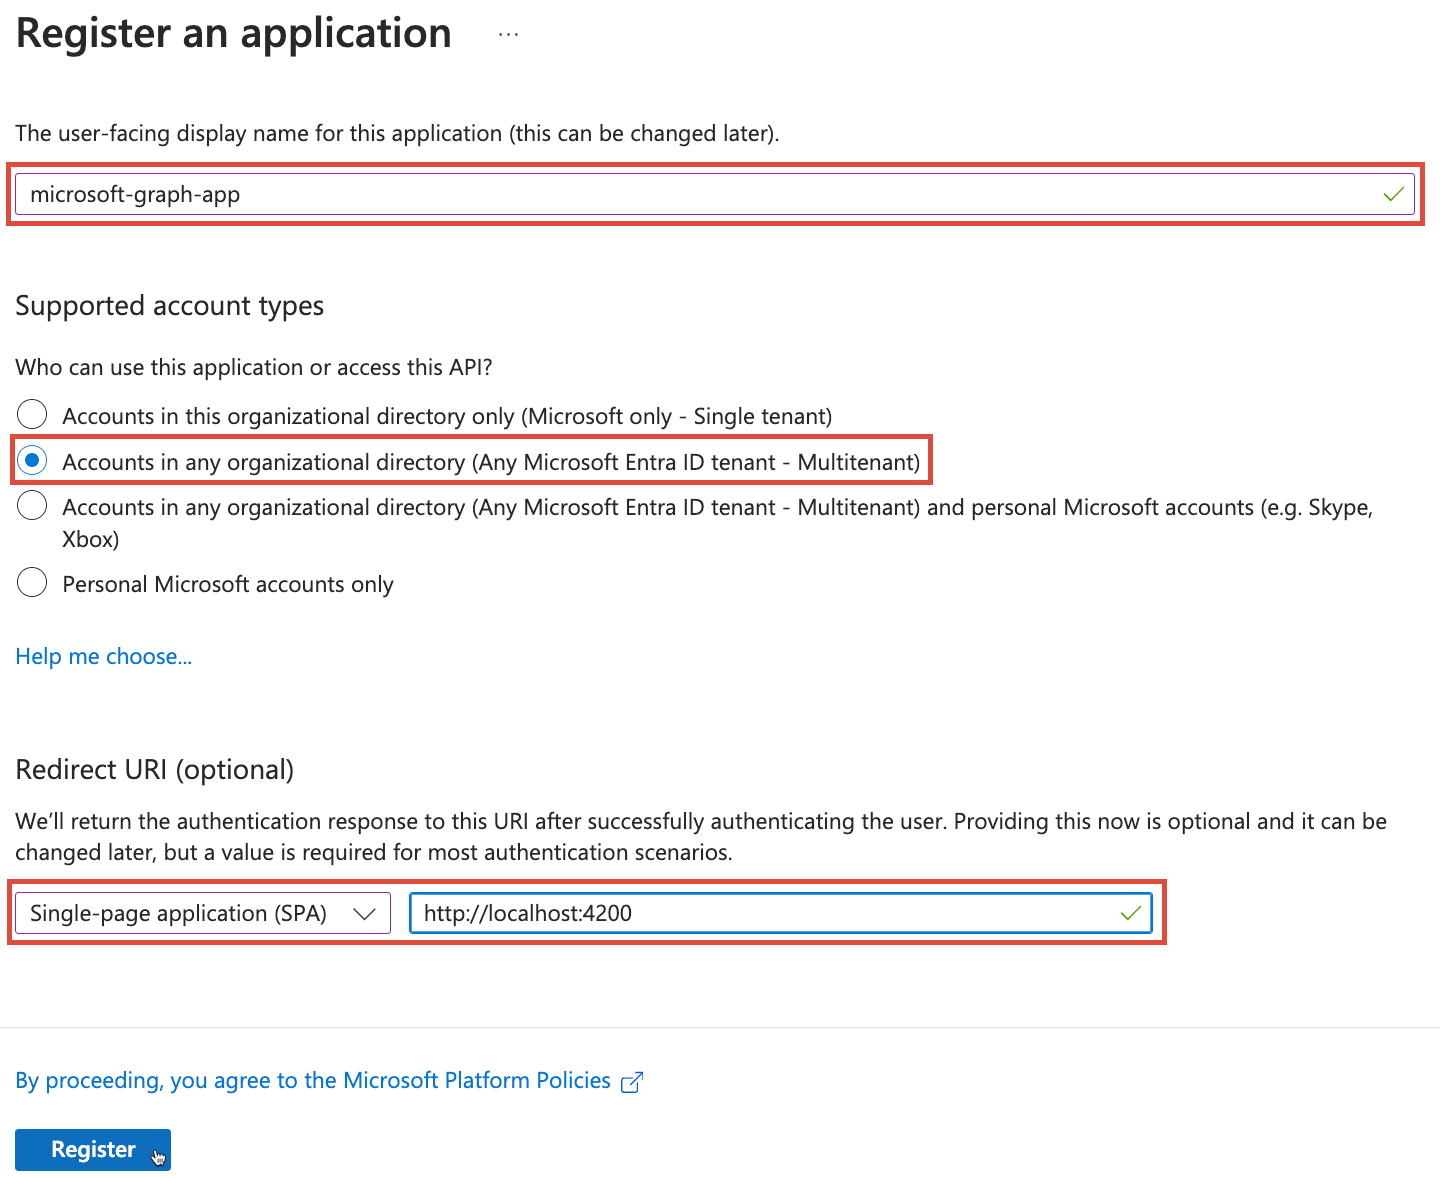
Select Overview in the resource menu and copy the
Application (client) IDvalue to your clipboard.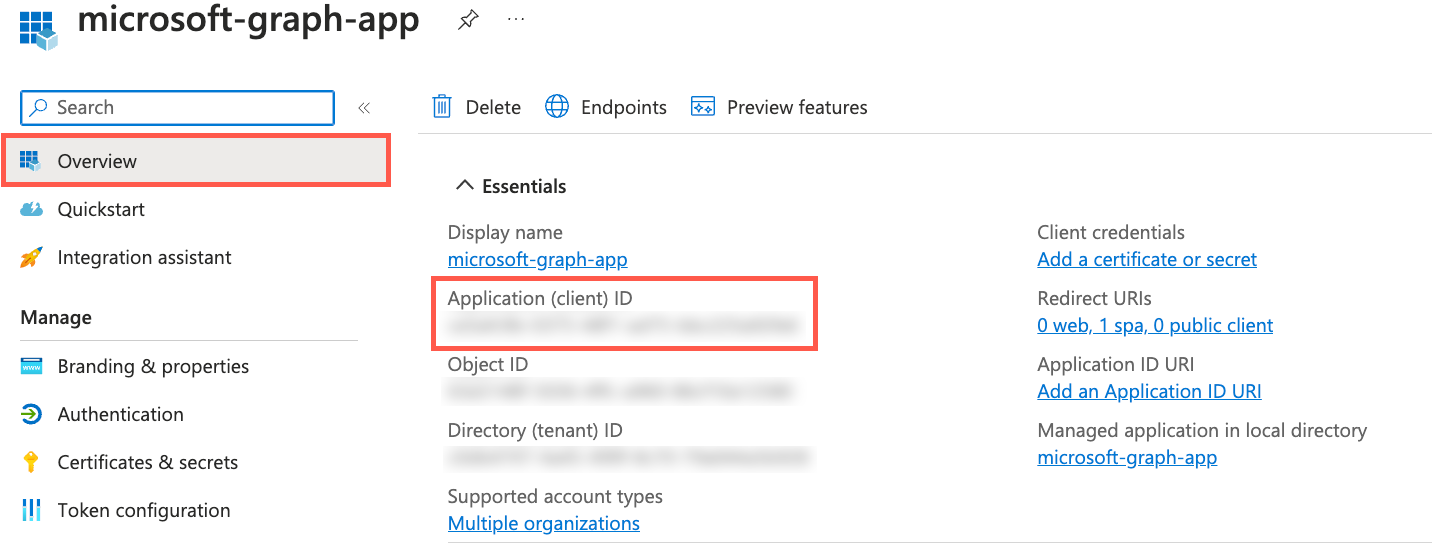
Update the Project's .env File
Open the .env file in your editor and assign the
Application (client) IDvalue toENTRAID_CLIENT_ID.ENTRAID_CLIENT_ID=<APPLICATION_CLIENT_ID_VALUE>If you'd like to enable the ability to send a message from the app into a Teams Channel, sign in to Microsoft Teams using your Microsoft 365 dev tenant account (this is mentioned in the pre-reqs for the tutorial).
Once you're signed in, expand a team, and find a channel that you want to send messages to from the app. For example, you might select the Company team and the General channel (or whatever team/channel you'd like to use).

In the team header, click on the three dots (...) and select Get link to team.
In the link that appears in the popup window, the team ID is the string of letters and numbers after
team/. For example, in the link "https://teams.microsoft.com/l/team/19%3ae9b9.../", the team ID is 19%3ae9b9... up to the following/character.Copy the team ID and assign it to
TEAM_IDin the .env file.In the channel header, click on the three dots (...) and select Get link to channel.
In the link that appears in the popup window, the channel ID is the string of letters and numbers after
channel/. For example, in the link "https://teams.microsoft.com/l/channel/19%3aQK02.../", the channel ID is 19%3aQK02... up to the following/character.Copy the channel ID and assign it to
CHANNEL_IDin the .env file.Save the env file before continuing.
Start/Restart the Application and API Servers
Perform one of the following steps based on the exercises you completed up to this point:
If you started the database, API server, and web server in an earlier exercise, you need to stop the API server and web server and restart them to pick up the .env file changes. You can leave the database running.
Locate the terminal windows running the API server and web server and press CTRL + C to stop them. Start them again by typing
npm startin each terminal window and pressing Enter. Continue to the next exercise.If you haven't started the database, API server, and web server yet, complete the following steps:
In the following steps you'll create three terminal windows in Visual Studio Code.
Right-click on the .env file in the Visual Studio Code file list and select Open in Integrated Terminal. Ensure that your terminal is at the root of the project - openai-acs-msgraph - before continuing.
Choose from one of the following options to start the PostgreSQL database:
If you have Docker Desktop installed and running, run
docker-compose upin the terminal window and press Enter.If you have Podman with podman-compose installed and running, run
podman-compose upin the terminal window and press Enter.To run the PostgreSQL container directly using either Docker Desktop, Podman, nerdctl, or another container runtime you have installed, run the following command in the terminal window:
Mac, Linux, or Windows Subsystem for Linux (WSL):
[docker | podman | nerdctl] run --name postgresDb -e POSTGRES_USER=web -e POSTGRES_PASSWORD=web-password -e POSTGRES_DB=CustomersDB -v $(pwd)/data:/var/lib/postgresql/data -p 5432:5432 postgresWindows with PowerShell:
[docker | podman] run --name postgresDb -e POSTGRES_USER=web -e POSTGRES_PASSWORD=web-password -e POSTGRES_DB=CustomersDB -v ${PWD}/data:/var/lib/postgresql/data -p 5432:5432 postgres
Once the database container starts, press the + icon in the Visual Studio Code Terminal toolbar to create a second terminal window.
cdinto the server/typescript folder and run the following commands to install the dependencies and start the API server.npm installnpm start
Press the + icon again in the Visual Studio Code Terminal toolbar to create a third terminal window.
cdinto the client folder and run the following commands to install the dependencies and start the web server.npm installnpm start
A browser will launch and you'll be taken to http://localhost:4200.
Stay on this site and follow instructions with your own machine.
Continue to first stepVisit the Hands-on Lab site for integrated instruction.
Hands-on LabUsers need to authenticate with Microsoft Entra ID in order for Microsoft Graph to access organizational data. In this exercise, you'll see how the Microsoft Graph Toolkit's mgt-login component can be used to authenticate users and retrieve an access token. The access token can then be used to make calls to Microsoft Graph.
Note
If you're new to Microsoft Graph, you can learn more about it in the Microsoft Graph Fundamentals learning path.
In this exercise, you will:
- Learn how to associate a Microsoft Entra ID app with the Microsoft Graph Toolkit to authenticate users and retrieve organizational data.
- Learn about the importance of scopes.
- Learn how the Microsoft Graph Toolkit's mgt-login component can be used to authenticate users and retrieve an access token.
Using the Sign In Feature
In the previous exercise, you created an app registration in Microsoft Entra ID and started the application server and API server. You also updated the following values in the
.envfile (TEAM_IDandCHANNEL_IDare optional):ENTRAID_CLIENT_ID=<APPLICATION_CLIENT_ID_VALUE> TEAM_ID=<TEAMS_TEAM_ID> CHANNEL_ID=<TEAMS_CHANNEL_ID>Ensure you've completed the previous exercise before continuing.
Go back to the browser (http://localhost:4200), select Sign In in the header, and sign in using an admin user account from your Microsoft 365 Developer tenant.
Tip
Sign in with your Microsoft 365 developer tenant admin account. You can view other users in your developer tenant by going to the Microsoft 365 admin center.
If you're signing in to the application for the first time, you'll be prompted to consent to the permissions requested by the application. You'll learn more about these permissions (also called "scopes") in the next section as you explore the code. Select Accept to continue.
Once you're signed in, you should see the name of the user displayed in the header.

Exploring the Sign In Code
Now that you've signed in, let's look at the code used to sign in the user and retrieve an access token and user profile. You'll learn about the mgt-login web component that's part of the Microsoft Graph Toolkit.
Tip
If you're using Visual Studio Code, you can open files directly by selecting:
- Windows/Linux: Ctrl + P
- Mac: Cmd + P
Then type the name of the file you want to open.
Open client/package.json and notice that the
@microsoft/mgtand@microsoft/mgt-componentspackages are included in the dependencies. The@microsoft/mgtpackage contains MSAL (Microsoft Authentication Library) provider features and web components such as mgt-login and others that can be used to sign in users and retrieve and display organizational data.Open client/src/main.ts and notice the following imports from the
@microsoft/mgt-componentspackage. The imported symbols are used to register the Microsoft Graph Toolkit components that are used in the application.import { registerMgtLoginComponent, registerMgtSearchResultsComponent, registerMgtPersonComponent, } from '@microsoft/mgt-components';Scroll to the bottom of the file and note the following code:
registerMgtLoginComponent();
registerMgtSearchResultsComponent();
registerMgtPersonComponent();
This code registers the
mgt-login,mgt-search-results, andmgt-personweb components and enables them for use in the application.To use the mgt-login component to sign in users, the Microsoft Entra ID app's client Id (stored in the .env file as
ENTRAID_CLIENT_ID) needs to be referenced and used.Open graph.service.ts and locate the
init()function. The full path to the file is client/src/app/core/graph.service.ts. You'll see the following import and code:import { Msal2Provider, Providers, ProviderState } from '@microsoft/mgt'; init() { if (!this.featureFlags.microsoft365Enabled) return; if (!Providers.globalProvider) { console.log('Initializing Microsoft Graph global provider...'); Providers.globalProvider = new Msal2Provider({ clientId: ENTRAID_CLIENT_ID, scopes: ['User.Read', 'Presence.Read', 'Chat.ReadWrite', 'Calendars.Read', 'ChannelMessage.Read.All', 'ChannelMessage.Send', 'Files.Read.All', 'Mail.Read'] }); } else { console.log('Global provider already initialized'); } }This code creates a new
Msal2Providerobject, passing the Microsoft Entra ID client Id from your app registration and thescopesfor which the app will request access. Thescopesare used to request access to Microsoft Graph resources that the app will access. After theMsal2Providerobject is created, it's assigned to theProviders.globalProviderobject, which is used by Microsoft Graph Toolkit components to retrieve data from Microsoft Graph.Open header.component.html in your editor and locate the mgt-login component. The full path to the file is client/src/app/header/header.component.html.
@if (this.featureFlags.microsoft365Enabled) {
    <mgt-login class="mgt-dark" (loginCompleted)="loginCompleted()"></mgt-login>
}
The mgt-login component enables user sign in and provides access to a token that is used with Microsoft Graph. Upon successful sign in, the
loginCompletedevent is triggered, which calls theloginCompleted()function. Although mgt-login is used within an Angular component in this example, it is compatible with any web application.Display of the mgt-login component depends on the
featureFlags.microsoft365Enabledvalue being set totrue. This custom flag checks for the presence of theENTRAID_CLIENT_IDenvironment variable to confirm that the application is properly configured and able to authenticate against Microsoft Entra ID. The flag is added to accommodate cases where users choose to complete only the AI or Communication exercises within the tutorial, rather than following the entire sequence of exercises.Open header.component.ts and locate the
loginCompletedfunction. This function is called when theloginCompletedevent is emitted and handles retrieving the signed in user's profile usingProviders.globalProvider.async loginCompleted() { const me = await Providers.globalProvider.graph.client.api('me').get(); this.userLoggedIn.emit(me); }In this example, a call is being made to the Microsoft Graph
meAPI to retrieve the user's profile (merepresents the current signed in user). Thethis.userLoggedIn.emit(me)code statement emits an event from the component to pass the profile data to the parent component. The parent component is app.component.ts file in this case, which is the root component for the application.To learn more about the mgt-login component, visit the Microsoft Graph Toolkit documentation.
Now that you've logged into the application, let's look at how organizational data can be retrieved.
Stay on this site and follow instructions with your own machine.
Continue to first stepVisit the Hands-on Lab site for integrated instruction.
Hands-on LabIn today's digital environment, users work with a wide array of organizational data, including emails, chats, files, calendar events, and more. This can lead to frequent context shifts—switching between tasks or applications—which can disrupt focus and reduce productivity. For example, a user working on a project might need to switch from their current application to Outlook to find crucial details in an email or switch to OneDrive for Business to find a related file. This back-and-forth action disrupts focus and wastes time that could be better spent on the task at hand.
To enhance efficiency, you can integrate organizational data directly into the applications users use everyday. By bringing in organizational data to your applications, users can access and manage information more seamlessly, minimizing context shifts and improving productivity. Additionally, this integration provides valuable insights and context, enabling users to make informed decisions and work more effectively.
In this exercise, you will:
- Learn how the mgt-search-results web component in the Microsoft Graph Toolkit can be used to search for files.
- Learn how to call Microsoft Graph directly to retrieve files from OneDrive for Business and chat messages from Microsoft Teams.
- Understand how to send chat messages to Microsoft Teams channels using Microsoft Graph.
Using the Organizational Data Feature
In a previous exercise you created an app registration in Microsoft Entra ID and started the application server and API server. You also updated the following values in the
.envfile.ENTRAID_CLIENT_ID=<APPLICATION_CLIENT_ID_VALUE> TEAM_ID=<TEAMS_TEAM_ID> CHANNEL_ID=<TEAMS_CHANNEL_ID>Ensure you've completed the previous exercise before continuing.
Go back to the browser (http://localhost:4200). If you haven't already signed in, select Sign In in the header, and sign in with a user from your Microsoft 365 Developer tenant.
Note
In addition to authenticating the user, the mgt-login web component also retrieves an access token that can be used by Microsoft Graph to access files, chats, emails, calendar events, and other organizational data. The access token contains the scopes (permissions) such as
Chat.ReadWrite,Files.Read.All, and others that you saw earlier:Providers.globalProvider = new Msal2Provider({ clientId: ENTRAID_CLIENT_ID, // retrieved from .env file scopes: ['User.Read', 'Presence.Read', 'Chat.ReadWrite', 'Calendars.Read', 'ChannelMessage.Read.All', 'ChannelMessage.Send', 'Files.Read.All', 'Mail.Read'] });Select View Related Content for the Adatum Corporation row in the datagrid. This will cause organizational data such as files, chats, emails, and calendar events to be retrieved using Microsoft Graph. Once the data loads, it'll be displayed below the datagrid in a tabbed interface. It's important to mention that you may not see any data at this point since you haven't added any files, chats, emails, or calendar events for the user in your Microsoft 365 developer tenant yet. Let's fix that in the next step.
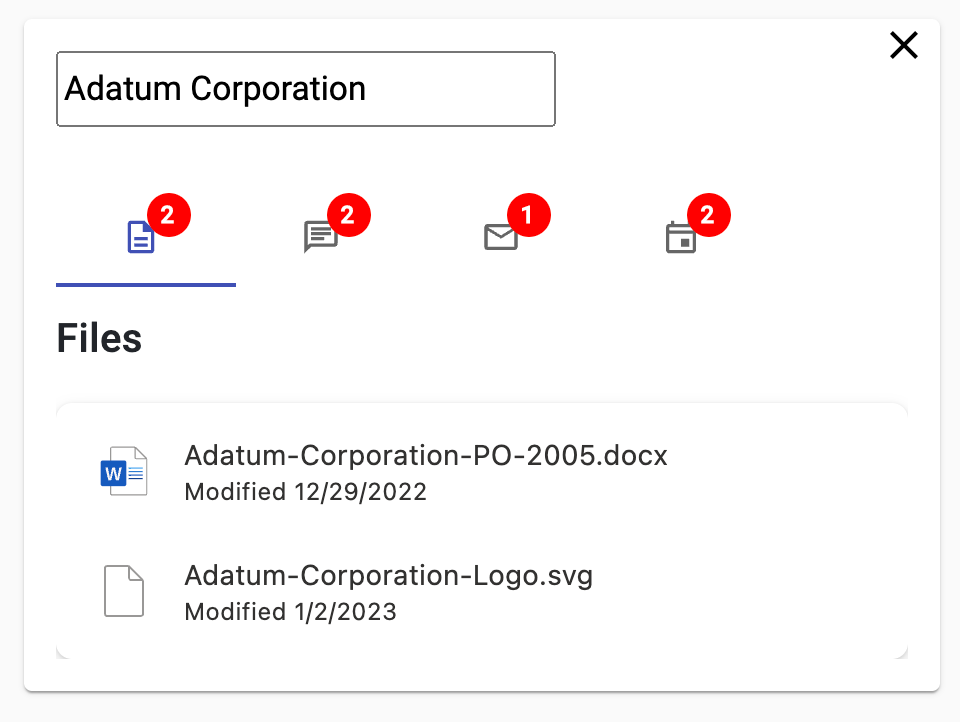
Your Microsoft 365 tenant may not have any related organizational data for Adatum Corporation at this stage. To add some sample data, perform at least one of the following actions:
Add files by visiting https://onedrive.com and signing in using your Microsoft 365 Developer tenant credentials.
- Select My files in the left navigation.
- Select + Add new and then Folder upload from the menu.
- Select the openai-acs-msgraph/customer documents folder from the project you cloned.
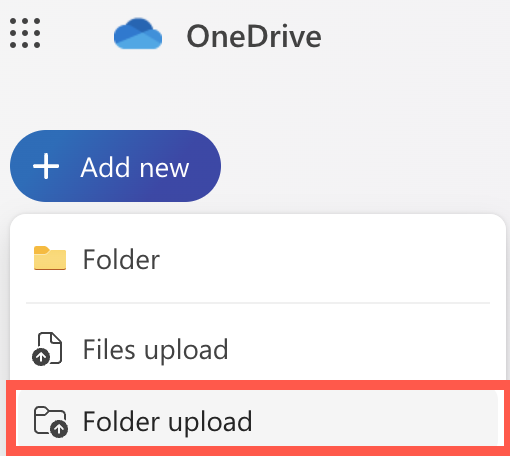
Add chat messages and calendar events by visiting https://teams.microsoft.com and signing in using your Microsoft 365 Developer tenant credentials.
Select Teams in the left navigation.
Select a team and channel.
Select Start a post.
Enter New order placed for Adatum Corporation for the subject and any additional text you'd like to add in the message body. Select the Post button.
Feel free to add additional chat messages that mention other companies used in the application such as Adventure Works Cycles, Contoso Pharmaceuticals, and Tailwind Traders.
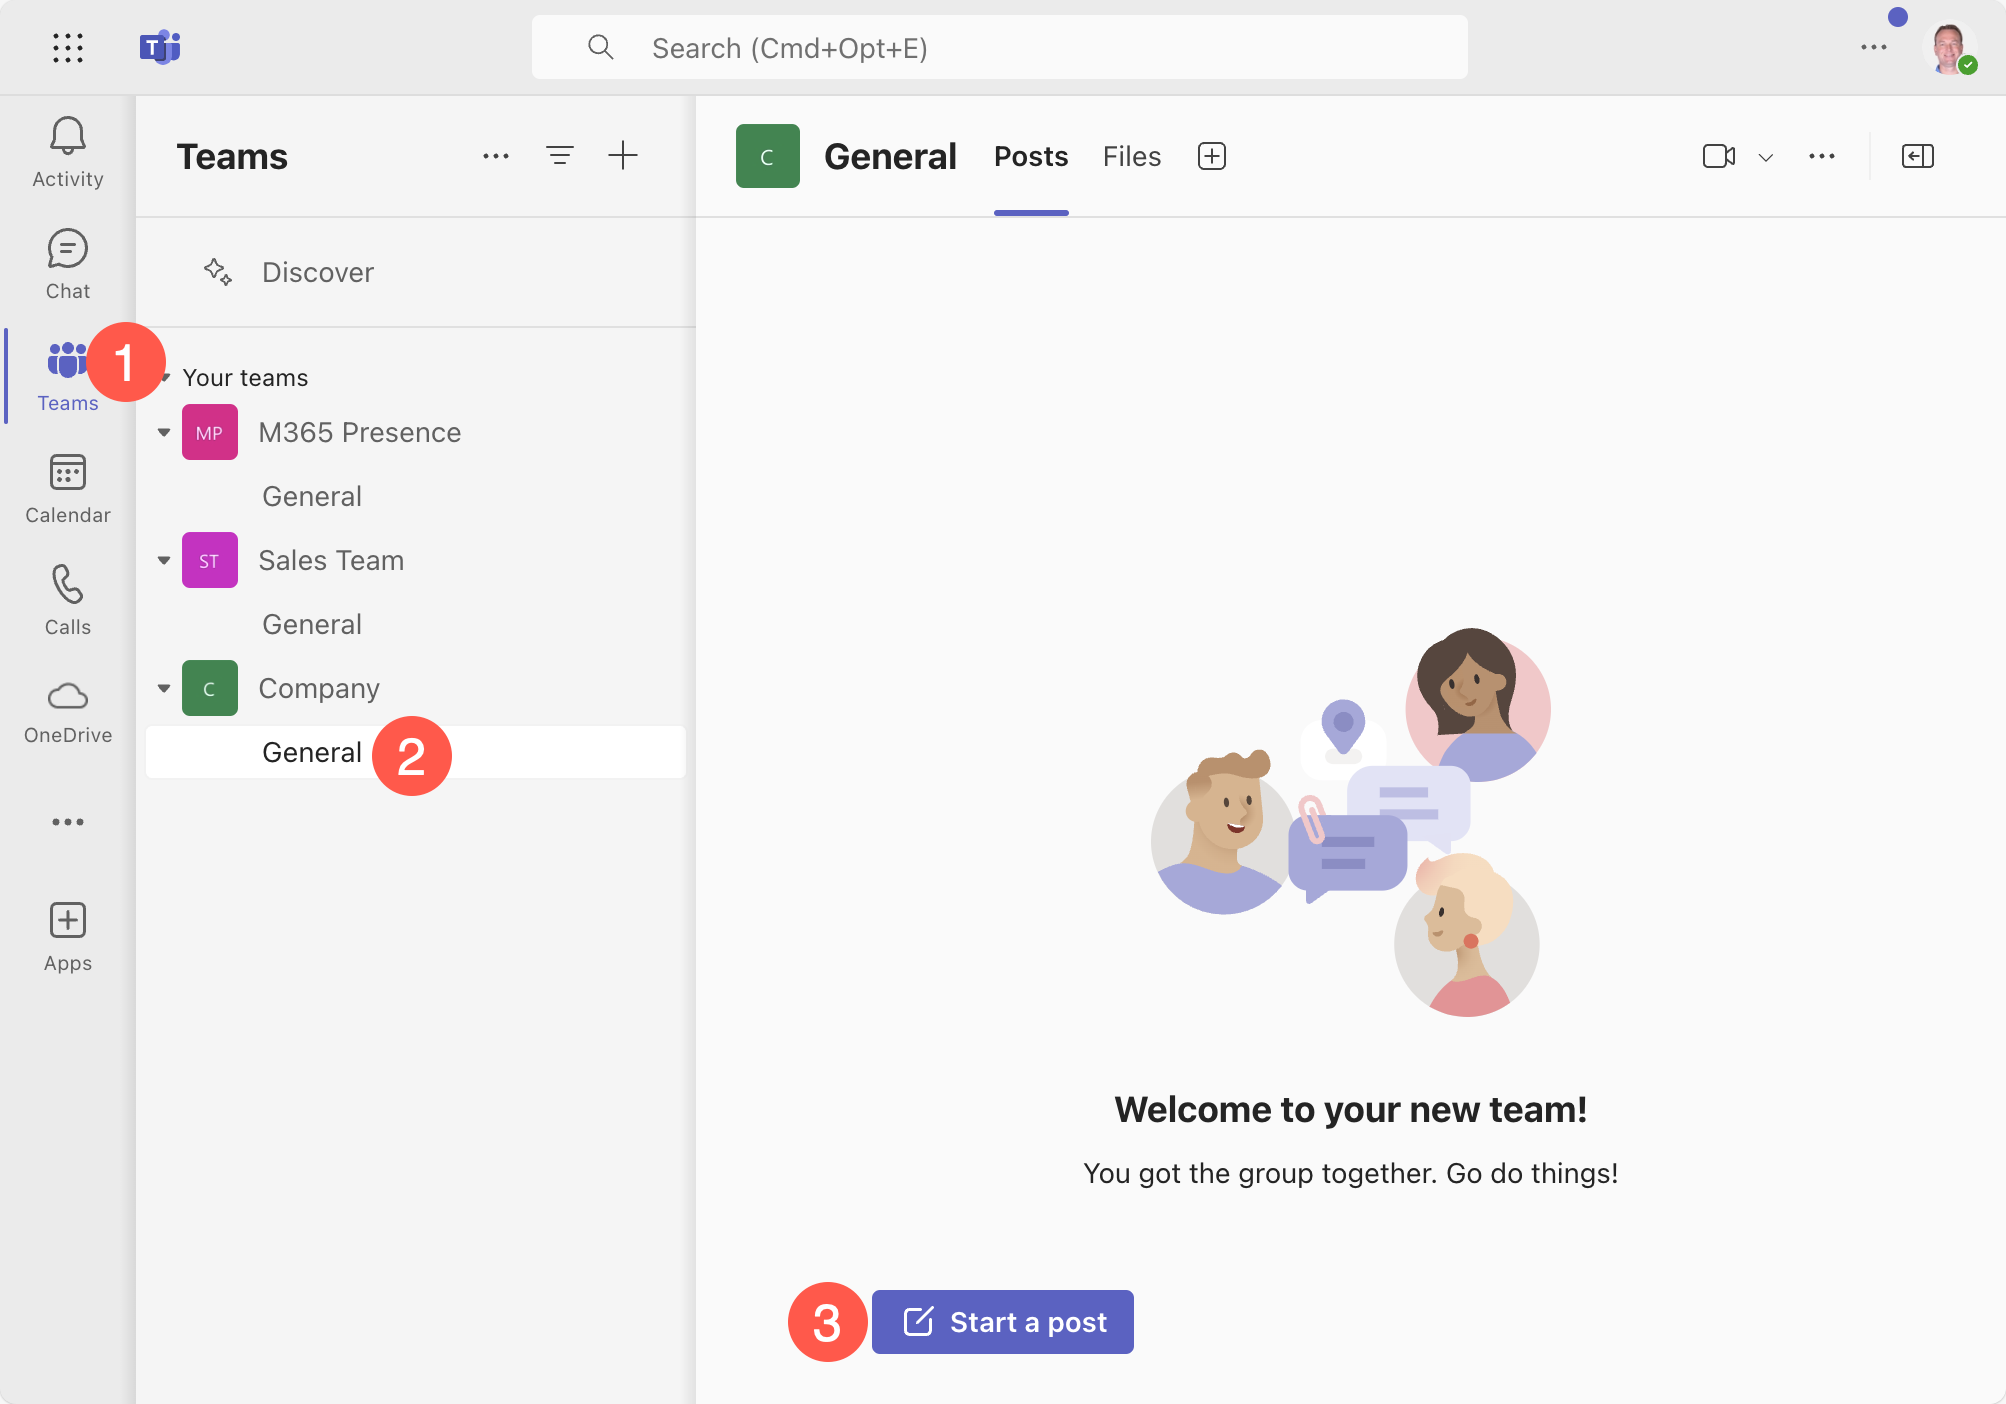
Select Calendar in the left navigation.
Select New meeting.
Enter "Meet with Adatum Corporation about project schedule" for the title and body.
Select Save.
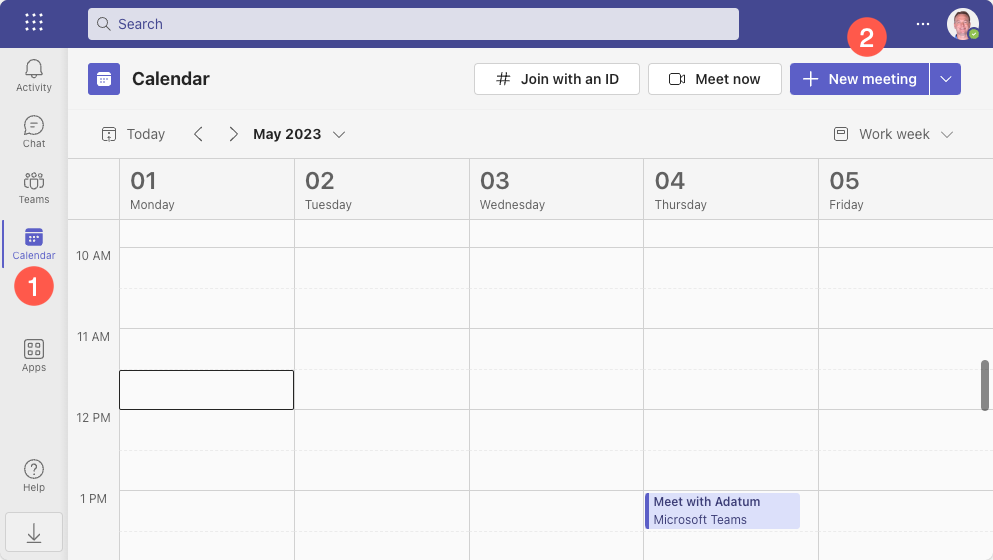
Add emails by visiting https://outlook.com and signing in using your Microsoft 365 Developer tenant credentials.
Select New mail.
Enter your personal email address in the To field.
Enter New order placed for Adatum Corporation for the subject and anything you'd like for the body.
Select Send.
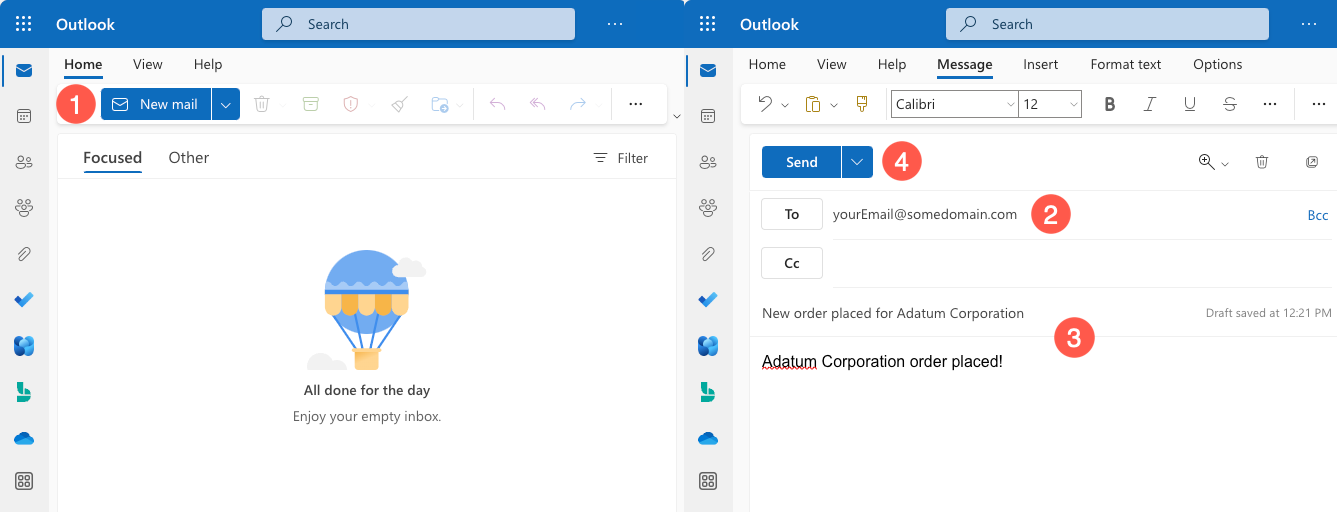
Go back to the application in the browser and refresh the page. Select View Related Content again for the Adatum Corporation row. You should now see data displayed in the tabs depending upon which tasks you performed in the previous step.
Let's explore the code that enables the organizational data feature in the application. To retrieve the data, the client-side portion of the application uses the access token retrieved by the mgt-login component you looked at earlier to make calls to Microsoft Graph APIs.
Exploring Files Search Code
Tip
If you're using Visual Studio Code, you can open files directly by selecting:
- Windows/Linux: Ctrl + P
- Mac: Cmd + P
Then type the name of the file you want to open.
Let's start by looking at how file data is retrieved from OneDrive for Business. Open files.component.html and take a moment to look through the code. The full path to the file is client/src/app/files/files.component.html.
Locate the mgt-search-results component and note the following attributes:
<mgt-search-results
    class="search-results"
    entity-types="driveItem"
    [queryString]="searchText"
    (dataChange)="dataChange($any($event))"
/>
The mgt-search-results component is part of the Microsoft Graph Toolkit and as the name implies, it's used to display search results from Microsoft Graph. The component uses the following features in this example:
The
classattribute is used to specify that thesearch-resultsCSS class should be applied to the component.The
entity-typesattribute is used to specify the type of data to search for. In this case, the value isdriveItemwhich is used to search for files in OneDrive for Business.The
queryStringattribute is used to specify the search term. In this case, the value is bound to thesearchTextproperty which is passed to the files component when the user selects View Related Content for a row in the datagrid. The square brackets aroundqueryStringindicate that the property is bound to thesearchTextvalue.The
dataChangeevent fires when the search results change. In this case, a customer function nameddataChange()is called in the files component and the event data is passed to the function. The parenthesis arounddataChangeindicate that the event is bound to thedataChange()function.Since no custom template is supplied, the default template built into
mgt-search-resultsis used to display the search results.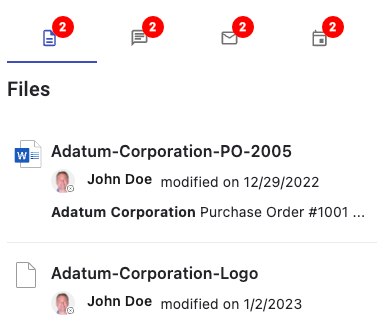
An alternative to using components such as mgt-search-results, is to call Microsoft Graph APIs directly using code. To see how that works, open the graph.service.ts file and locate the
searchFiles()function. The full path to the file is client/src/app/core/graph.service.ts.You'll notice that a
queryparameter is passed to the function. This is the search term that's passed as the user selects View Related Content for a row in the datagrid. If no search term is passed, an empty array is returned.async searchFiles(query: string) { const files: DriveItem[] = []; if (!query) return files; ... }A filter is then created that defines the type of search to perform. In this case the code is searching for files in OneDrive for Business so
driveItemis used just as you saw earlier with themgt-search-resultscomponent. This is the same as passingdriveItemtoentity-typesin the mgt-search-results component that you saw earlier. Thequeryparameter is then added to thequeryStringfilter along withContentType:Document.const filter = { "requests": [ { "entityTypes": [ "driveItem" ], "query": { "queryString": `${query} AND ContentType:Document` } } ] };A call is then made to the
/search/queryMicrosoft Graph API using theProviders.globalProvider.graph.client.api()function. Thefilterobject is passed to thepost()function which sends the data to the API.const searchResults = await Providers.globalProvider.graph.client.api('/search/query').post(filter);The search results are then iterated through to locate
hits. Eachhitcontains information about a document that was found. A property namedresourcecontains the document metadata and is added to thefilesarray.if (searchResults.value.length !== 0) { for (const hitContainer of searchResults.value[0].hitsContainers) { if (hitContainer.hits) { for (const hit of hitContainer.hits) { files.push(hit.resource); } } } }The
filesarray is then returned to the caller.return files;
Looking through this code you can see that the mgt-search-results web component you explored earlier does a lot of work for you and significantly reduces the amount of code you have to write! However, there may be scenarios where you want to call Microsoft Graph directly to have more control over the data that's sent to the API or how the results are processed.
Open the files.component.ts file and locate the
search()function. The full path to the file is client/src/app/files/files.component.ts.Although the body of this function is commented out due to the mgt-search-results component being used, the function could be used to make the call to Microsoft Graph when the user selects View Related Content for a row in the datagrid. The
search()function callssearchFiles()in graph.service.ts and passes thequeryparameter to it (the name of the company in this example). The results of the search are then assigned to thedataproperty of the component.override async search(query: string) { this.data = await this.graphService.searchFiles(query); }The files component can then use the
dataproperty to display the search results. You could handle this using custom HTML bindings or by using another Microsoft Graph Toolkit control namedmgt-file-list. Here's an example of binding thedataproperty to one of the component's properties namedfilesand handling theitemClickevent as the user interacts with a file.<mgt-file-list (itemClick)="itemClick($any($event))" [files]="data"></mgt-file-list>Whether you choose to use the mgt-search-results component shown earlier or write custom code to call Microsoft Graph will depend on your specific scenario. In this example, the mgt-search-results component is used to simplify the code and reduce the amount of work you have to do.
Exploring Teams Chat Messages Search Code
Go back to graph.service.ts and locate the
searchChatMessages()function. You'll see that it's similar to thesearchFiles()function you looked at previously.- It posts filter data to Microsoft Graph's
/search/queryAPI and converts the results into an array of objects that have information about theteamId,channelId, andmessageIdthat match the search term. - To retrieve the Teams channel messages, a second call is made to the
/teams/${chat.teamId}/channels/${chat.channelId}/messages/${chat.messageId}API and theteamId,channelId, andmessageIdare passed. This returns the full message details. - Additional filtering tasks are performed and the resulting messages are returned from
searchChatMessages()to the caller.
- It posts filter data to Microsoft Graph's
Open the chats.component.ts file and locate the
search()function. The full path to the file is client/src/app/chats/chats.component.ts. Thesearch()function callssearchChatMessages()in graph.service.ts and passes thequeryparameter to it.override async search(query: string) { this.data = await this.graphService.searchChatMessages(query); }The results of the search are assigned to the
dataproperty of the component and data binding is used to iterate through the results array and render the data. This example uses an Angular Material card component to display the search results.@if (this.data.length) { <div> @for (chatMessage of this.data;track chatMessage.id) { <mat-card> <mat-card-header> <mat-card-title [innerHTML]="chatMessage.summary"></mat-card-title> <!-- <mat-card-subtitle [innerHTML]="chatMessage.body"></mat-card-subtitle> --> </mat-card-header> <mat-card-actions> <a mat-stroked-button color="basic" [href]="chatMessage.webUrl" target="_blank">View Message</a> </mat-card-actions> </mat-card> } </div> }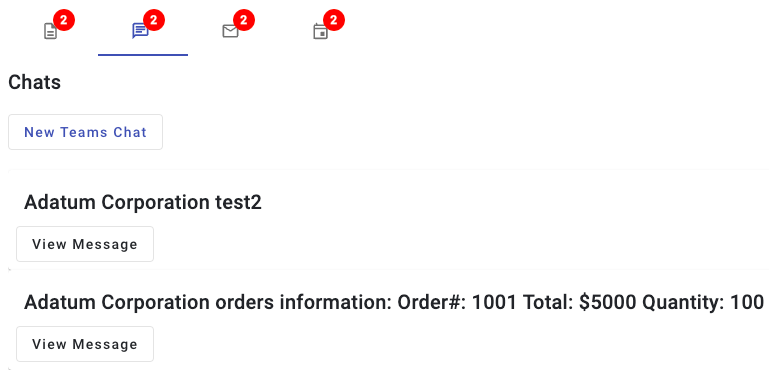
Sending a Message to a Microsoft Teams Channel
In addition to searching for Microsoft Teams chat messages, the application also allows a user to send messages to a Microsoft Teams channel. This can be done by calling the
/teams/${teamId}/channels/${channelId}/messagesendpoint of Microsoft Graph.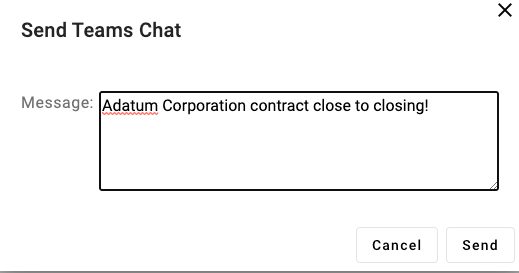
In the following code you'll see that a URL is created that includes the
teamIdandchannelIdvalues. Environment variable values are used for the team ID and channel ID in this example but those values could be dynamically retrieved as well using Microsoft Graph. Thebodyconstant contains the message to send. A POST request is then made and the results are returned to the caller.async sendTeamsChat(message: string): Promise<TeamsDialogData> { if (!message) new Error('No message to send.'); if (!TEAM_ID || !CHANNEL_ID) new Error('Team ID or Channel ID not set in environment variables. Please set TEAM_ID and CHANNEL_ID in the .env file.'); const url = `https://graph.microsoft.com/v1.0/teams/${TEAM_ID}/channels/${CHANNEL_ID}/messages`; const body = { "body": { "contentType": "html", "content": message } }; const response = await Providers.globalProvider.graph.client.api(url).post(body); return { id: response.id, teamId: response.channelIdentity.teamId, channelId: response.channelIdentity.channelId, message: response.body.content, webUrl: response.webUrl, title: 'Send Teams Chat' }; }Leveraging this type of functionality in Microsoft Graph provides a great way to enhance user productivbity by allowing users to interact with Microsoft Teams directly from the application they're already using.
Stay on this site and follow instructions with your own machine.
Continue to first stepVisit the Hands-on Lab site for integrated instruction.
Hands-on LabIn the previous exercise you learned how to retrieve files from OneDrive for Business and chats from Microsoft Teams using Microsoft Graph and the mgt-search-results component from Microsoft Graph Toolkit. You also learned how to send messages to Microsoft Teams channels. In this exercise, you'll learn how to retrieve email messages and calendar events from Microsoft Graph and integrate them into the application.
In this exercise, you will:
- Learn how the mgt-search-results web component in the Microsoft Graph Toolkit can be used to search for emails and calendar events.
- Learn how to customize the mgt-search-results component to render search results in a custom way.
- Learn how to call Microsoft Graph directly to retrieve emails and calendar events.
Exploring Email Messages Search Code
Tip
If you're using Visual Studio Code, you can open files directly by selecting:
- Windows/Linux: Ctrl + P
- Mac: Cmd + P
Then type the name of the file you want to open.
In a previous exercise you created an app registration in Microsoft Entra ID and started the application server and API server. You also updated the following values in the
.envfile.ENTRAID_CLIENT_ID=<APPLICATION_CLIENT_ID_VALUE> TEAM_ID=<TEAMS_TEAM_ID> CHANNEL_ID=<TEAMS_CHANNEL_ID>Ensure you've completed the previous exercise before continuing.
Open emails.component.html and take a moment to look through the code. The full path to the file is client/src/app/emails/emails.component.html.
Locate the mgt-search-results component:
<mgt-search-results
  class="search-results"
  entity-types="message"
  [queryString]="searchText"
  (dataChange)="dataChange($any($event))">
  <template data-type="result-message"></template>
</mgt-search-results>
This example of the mgt-search-results component is configured the same way as the one you looked at previously. The only difference is that the
entity-typesattribute is set tomessagewhich is used to search for email messages and an empty template is supplied.- The
classattribute is used to specify that thesearch-resultsCSS class should be applied to the component. - The
entity-typesattribute is used to specify the type of data to search for. In this case, the value ismessage. - The
queryStringattribute is used to specify the search term. - The
dataChangeevent fires when the search results change. The emails component'sdataChange()function is called, the results are passed to it, and a property nameddatais updated in the component. - An empty template is defined for the component. This type of template is normally used to define how the search results will be rendered. However, in this scenario we're telling the component not to render any message data. Instead, we'll render the data ourselves using standard data binding (Angular is used in this case, but you can use any library/framework you want).
- The
Look below the mgt-search-results component in emails.component.html to find the data bindings used to render the email messages. This example iterates through the
dataproperty and writes out the email subject, body preview, and a link to view the full email message.@if (this.data.length) { <div> @for (email of this.data;track $index) { <mat-card> <mat-card-header> <mat-card-title>{{email.resource.subject}}</mat-card-title> <mat-card-subtitle [innerHTML]="email.resource.bodyPreview"></mat-card-subtitle> </mat-card-header> <mat-card-actions> <a mat-stroked-button color="basic" [href]="email.resource.webLink" target="_blank">View Email Message</a> </mat-card-actions> </mat-card> } </div> }
In addition to using the mgt-search-results component to retrieve messages, Microsoft Graph provides several APIs that can be used to search emails as well. The
/search/queryAPI that you saw earlier could certainly be used, but a more straightforward option is themessagesAPI.To see how to call this API, go back to graph.service.ts and locate the
searchEmailMessages()function. It creates a URL that can be used to call themessagesendpoint of Microsoft Graph and assigns thequeryvalue to the$searchparameter. The code then makes a GET request and returns the results to the caller. The$searchoperator searches for thequeryvalue in the subject, body, and sender fields automatically.async searchEmailMessages(query:string) { if (!query) return []; // The $search operator will search the subject, body, and sender fields automatically const url = `https://graph.microsoft.com/v1.0/me/messages?$search="${query}"&$select=subject,bodyPreview,from,toRecipients,receivedDateTime,webLink`; const response = await Providers.globalProvider.graph.client.api(url).get(); return response.value; }The emails component located in emails.component.ts calls
searchEmailMessages()and displays the results in the UI.override async search(query: string) { this.data = await this.graphService.searchEmailMessages(query); }
Exploring Calendar Events Search Code
Searching for calendar events can also be accomplished using the mgt-search-results component. It can handle rendering the results for you, but you can also define your own template which you'll see later in this exercise.
Open calendar-events.component.html and take a moment to look through the code. The full path to the file is client/src/app/calendar-events/calendar-events.component.html. You'll see that it's very similar to the files and emails components you looked at previously.
<mgt-search-results
    class="search-results"
    entity-types="event"
    [queryString]="searchText"
    (dataChange)="dataChange($any($event))">
    <template data-type="result-event"></template>
</mgt-search-results>
This example of the mgt-search-results component is configured the same way as the ones you looked at previously. The only difference is that the
entity-typesattribute is set toeventwhich is used to search for calendar events and an empty template is supplied.- The
classattribute is used to specify that thesearch-resultsCSS class should be applied to the component. - The
entity-typesattribute is used to specify the type of data to search for. In this case, the value isevent. - The
queryStringattribute is used to specify the search term. - The
dataChangeevent fires when the search results change. The calendar event component'sdataChange()function is called, the results are passed to it, and a property nameddatais updated in the component. - An empty template is defined for the component. In this scenario we're telling the component not to render any data. Instead, we'll render the data ourselves using standard data binding.
- The
Immediately below the
mgt-search-resultscomponent in calendar-events.component.html you'll find the data bindings used to render the calendar events. This example iterates through thedataproperty and writes out the start date, time, and subject of the event. Custom functions included in the component such asdayFromDateTime()andtimeRangeFromEvent()are called to format data properly. The HTML bindings also include a link to view the calendar event in Outlook and the location of the event if one is specified.@if (this.data.length) { <div> @for (event of this.data;track $index) { <div class="root"> <div class="time-container"> <div class="date">{{ dayFromDateTime(event.resource.start.dateTime)}}</div> <div class="time">{{ timeRangeFromEvent(event.resource) }}</div> </div> <div class="separator"> <div class="vertical-line top"></div> <div class="circle"> @if (!this.event.resource.bodyPreview?.includes('Join Microsoft Teams Meeting')) { <div class="inner-circle"></div> } </div> <div class="vertical-line bottom"></div> </div> <div class="details"> <div class="subject">{{ event.resource.subject }}</div> @if (this.event.resource.location?.displayName) { <div class="location"> at <a href="https://bing.com/maps/default.aspx?where1={{event.resource.location.displayName}}" target="_blank" rel="noopener"><b>{{ event.resource.location.displayName }}</b></a> </div> } @if (this.event.resource.attendees?.length) { <div class="attendees"> @for (attendee of this.event.resource.attendees;track attendee.emailAddress.name) { <span class="attendee"> <mgt-person person-query="{{attendee.emailAddress.name}}"></mgt-person> </span> } </div> } @if (this.event.resource.bodyPreview?.includes('Join Microsoft Teams Meeting')) { <div class="online-meeting"> <img class="online-meeting-icon" src="https://img.icons8.com/color/48/000000/microsoft-teams.png" title="Online Meeting" /> <a class="online-meeting-link" href="{{ event.resource.onlineMeetingUrl }}"> Join Teams Meeting </a> </div> } </div> </div> } </div> }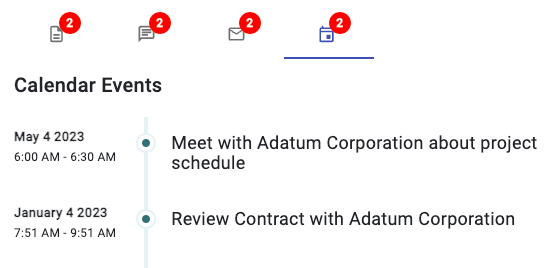
In addition to searching for calendar events using the
search/queryAPI, Microsoft Graph also provides aneventsAPI that can be used to search calendar events as well. Locate thesearchCalendarEvents()function in graph.service.ts.The
searchCalendarEvents()function creates start and end date/time values that are used to define the time period to search. It then creates a URL that can be used to call theeventsendpoint of Microsoft Graph and includes thequeryparameter and start and end date/time variables. A GET request is then made and the results are returned to the caller.async searchCalendarEvents(query:string) { if (!query) return []; const startDateTime = new Date(); const endDateTime = new Date(startDateTime.getTime() + (7 * 24 * 60 * 60 * 1000)); const url = `/me/events?startdatetime=${startDateTime.toISOString()}&enddatetime=${endDateTime.toISOString()}&$filter=contains(subject,'${query}')&orderby=start/dateTime`; const response = await Providers.globalProvider.graph.client.api(url).get(); return response.value; }Here's a breakdown of the URL that's created:
- The
/me/eventsportion of the URL is used to specify that the events of the signed in user should be retrieved. - The
startdatetimeandenddatetimeparameters are used to define the time period to search. In this case, the search will return events that start within the next 7 days. - The
$filterquery parameter is used to filter the results by thequeryvalue (the company name selected from the datagrid in this case). Thecontains()function is used to look for thequeryvalue in thesubjectproperty of the calendar event. - The
$orderbyquery paramter is used to order the results by thestart/dateTimeproperty.
- The
Once the
urlis created, a GET request is made to the Microsoft Graph API using the value ofurland the results are returned to the caller.As with the previous components, the calendar-events component (calendar-events.component.ts file) calls
search()and displays the results.override async search(query: string) { this.data = await this.graphService.searchCalendarEvents(query); }Note
You can make Microsoft Graph calls from a custom API or server-side application as well. View the following tutorial to see an example of calling a Microsoft Graph API from an Azure Function.
You've now seen example of using Microsoft Graph to retrieve files, chats, email messages, and calendar events. The same concepts can be applied to other Microsoft Graph APIs as well. For example, you could use the Microsoft Graph users API to search for users in your organization. You could also use the Microsoft Graph groups API to search for groups in your organization. You can view the full list of Microsoft Graph APIs in the documentation.
Stay on this site and follow instructions with your own machine.
Continue to first stepVisit the Hands-on Lab site for integrated instruction.
Hands-on LabYou completed this tutorial
Congratulations! In this tutorial you learned how:
- Azure OpenAI can be used to enhance user productivity.
- Azure Communication Services can be used to integrate communication features.
- Microsoft Graph APIs and components can be used to retrieve and display organizational data.
By using these technologies, you can create effective solutions that increase user productivity by minimizing context shifts and providing necessary decision-making information.
Clean Up Azure Resources
Cleanup your Azure resources to avoid more charges to your account. Go to the Azure portal and delete the following resources:
- Azure AI Search resource
- Azure Storage resource
- Azure OpenAI resource (ensure that you delete your models first and then the Azure OpenAI resource)
- Azure Communication Services resource
Next Steps
Documentation
- Azure OpenAI Documentation
- Azure OpenAI on your data
- Azure Communication Services Documentation
- Microsoft Graph Documentation
- Microsoft Graph Toolkit Documentation
- Microsoft Teams Developer Documentation
Training Content
- Apply prompt engineering with Azure OpenAI Service
- Get started with Azure OpenAI Service
- Introduction to Azure Communication Services
- Microsoft Graph Fundamentals
- Video Course: Microsoft Graph Fundamentals for Beginners
- Explore Microsoft Graph scenarios for JavaScript development
- Explore Microsoft Graph scenarios for ASP.NET Core development
- Get started with Microsoft Graph Toolkit
- Build and deploy apps for Microsoft Teams using Teams Toolkit for Visual Studio Code
Stay on this site and follow instructions with your own machine.
Continue to first stepVisit the Hands-on Lab site for integrated instruction.
Hands-on LabHave an issue with this section? If so, please give us some feedback so we can improve this section.