Build your first Word task pane add-in with Visual Studio
In this article, you'll walk through the process of building a Word task pane add-in.
Prerequisites
Visual Studio 2019 or later with the Office/SharePoint development workload installed.
Note
If you've previously installed Visual Studio, use the Visual Studio Installer to ensure that the Office/SharePoint development workload is installed.
Office connected to a Microsoft 365 subscription (including Office on the web).
Create the add-in project
In Visual Studio, choose Create a new project.
Using the search box, enter add-in. Choose Word Web Add-in, then select Next.
Name your project and select Create.
Visual Studio creates a solution and its two projects appear in Solution Explorer. The Home.html file opens in Visual Studio.
Explore the Visual Studio solution
When you've completed the wizard, Visual Studio creates a solution that contains two projects.
| Project | Description |
|---|---|
| Add-in project | Contains only an XML-formatted add-in only manifest file, which contains all the settings that describe your add-in. These settings help the Office application determine when your add-in should be activated and where the add-in should appear. Visual Studio generates the contents of this file for you so that you can run the project and use your add-in immediately. Change these settings any time by modifying the XML file. |
| Web application project | Contains the content pages of your add-in, including all the files and file references that you need to develop Office-aware HTML and JavaScript pages. While you develop your add-in, Visual Studio hosts the web application on your local IIS server. When you're ready to publish the add-in, you'll need to deploy this web application project to a web server. |
Update the code
Home.html specifies the HTML that will be rendered in the add-in's task pane. In Home.html, replace the
<body>element with the following markup and save the file.<body> <div id="content-header"> <div class="padding"> <h1>Welcome</h1> </div> </div> <div id="content-main"> <div class="padding"> <p>Choose the buttons below to add boilerplate text to the document by using the Word JavaScript API.</p> <br /> <h3>Try it out</h3> <button id="emerson">Add quote from Ralph Waldo Emerson</button> <br /><br /> <button id="checkhov">Add quote from Anton Chekhov</button> <br /><br /> <button id="proverb">Add Chinese proverb</button> </div> </div> <br /> <div id="supportedVersion"/> </body>Open the file Home.js in the root of the web application project. This file specifies the script for the add-in. Replace the entire contents with the following code and save the file.
'use strict';

(function () {

    Office.onReady(function() {
        // Office is ready.
        $(document).ready(function () {
            // The document is ready.
            // Use this to check whether the API is supported in the Word client.
            if (Office.context.requirements.isSetSupported('WordApi', '1.1')) {
                // Do something that is only available via the new APIs.
                $('#emerson').on("click", insertEmersonQuoteAtSelection);
                $('#checkhov').on("click", insertChekhovQuoteAtTheBeginning);
                $('#proverb').on("click", insertChineseProverbAtTheEnd);
                $('#supportedVersion').html('This code is using Word 2016 or later.');
            } else {
                // Lets you know that this code will not work with your version of Word.
                $('#supportedVersion').html('This code requires Word 2016 or later.');
            }
        });
    });

    async function insertEmersonQuoteAtSelection() {
        await Word.run(async (context) => {

            // Create a proxy object for the document.
            const thisDocument = context.document;

            // Queue a command to get the current selection.
            // Create a proxy range object for the selection.
            const range = thisDocument.getSelection();

            // Queue a command to replace the selected text.
            range.insertText('"Hitch your wagon to a star." - Ralph Waldo Emerson\n', Word.InsertLocation.replace);

            // Synchronize the document state by executing the queued commands,
            // and return a promise to indicate task completion.
            await context.sync();
            console.log('Added a quote from Ralph Waldo Emerson.');
        })
        .catch(function (error) {
            console.log('Error: ' + JSON.stringify(error));
            if (error instanceof OfficeExtension.Error) {
                console.log('Debug info: ' + JSON.stringify(error.debugInfo));
            }
        });
    }

    async function insertChekhovQuoteAtTheBeginning() {
        await Word.run(async (context) => {

            // Create a proxy object for the document body.
            const body = context.document.body;

            // Queue a command to insert text at the start of the document body.
            body.insertText('"Knowledge is of no value unless you put it into practice." - Anton Chekhov\n', Word.InsertLocation.start);

            // Synchronize the document state by executing the queued commands,
            // and return a promise to indicate task completion.
            await context.sync();
            console.log('Added a quote from Anton Chekhov.');
        })
        .catch(function (error) {
            console.log('Error: ' + JSON.stringify(error));
            if (error instanceof OfficeExtension.Error) {
                console.log('Debug info: ' + JSON.stringify(error.debugInfo));
            }
        });
    }

    async function insertChineseProverbAtTheEnd() {
        await Word.run(async (context) => {

            // Create a proxy object for the document body.
            const body = context.document.body;

            // Queue a command to insert text at the end of the document body.
            body.insertText('"To know the road ahead, ask those coming back." - Chinese proverb\n', Word.InsertLocation.end);

            // Synchronize the document state by executing the queued commands,
            // and return a promise to indicate task completion.
            await context.sync();
            console.log('Added a quote from a Chinese proverb.');
        })
        .catch(function (error) {
            console.log('Error: ' + JSON.stringify(error));
            if (error instanceof OfficeExtension.Error) {
                console.log('Debug info: ' + JSON.stringify(error.debugInfo));
            }
        });
    }
})();
Open the file Home.css in the root of the web application project. This file specifies the custom styles for the add-in. Replace the entire contents with the following code and save the file.
#content-header {
    background: #2a8dd4;
    color: #fff;
    position: absolute;
    top: 0;
    left: 0;
    width: 100%;
    height: 80px;
    overflow: hidden;
}

#content-main {
    background: #fff;
    position: fixed;
    top: 80px;
    left: 0;
    right: 0;
    bottom: 0;
    overflow: auto;
}

.padding {
    padding: 15px;
}
Update the manifest
Open the add-in only manifest file in the add-in project. This file defines the add-in's settings and capabilities.
The
ProviderNameelement has a placeholder value. Replace it with your name.The
DefaultValueattribute of theDisplayNameelement has a placeholder. Replace it with My Office Add-in.The
DefaultValueattribute of theDescriptionelement has a placeholder. Replace it with A task pane add-in for Word.Save the file.
...
<ProviderName>John Doe</ProviderName>
<DefaultLocale>en-US</DefaultLocale>
<!-- The display name of your add-in. Used on the Store and various places of the Office UI such as the add-in's dialog. -->
<DisplayName DefaultValue="My Office Add-in" />
<Description DefaultValue="A task pane add-in for Word."/>
...
Try it out
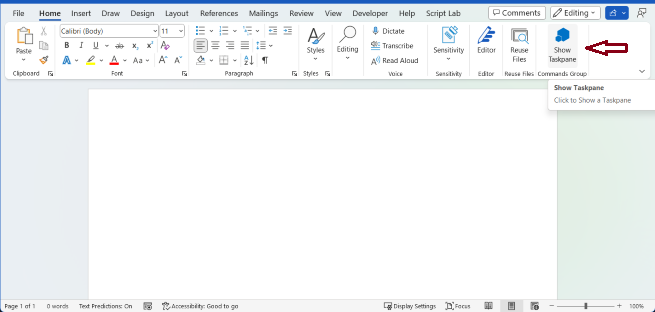
Using Visual Studio, test the newly created Word add-in by pressing F5 or choosing Debug > Start Debugging to launch Word with the Show Taskpane add-in button displayed on the ribbon. The add-in will be hosted locally on IIS.
In Word, if the add-in task pane isn't already open, choose the Home tab, and then choose the Show Taskpane button on the ribbon to open the add-in task pane. (If you're using a volume-licensed perpetual version of Office 2016 or older, then custom buttons aren't supported. Instead, the task pane will open immediately.)
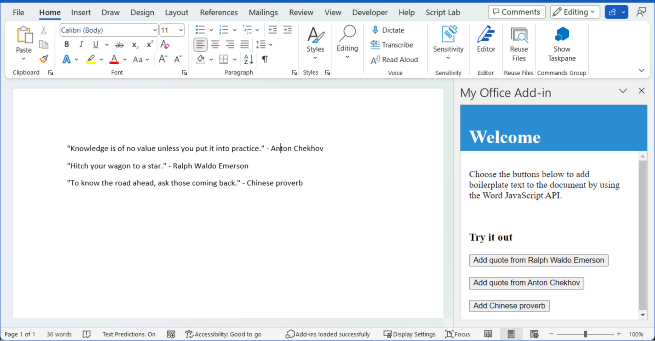
In the task pane, choose any of the buttons to add boilerplate text to the document.
Note
To see the console.log output, you'll need a separate set of developer tools for a JavaScript console. To learn more about F12 tools and the Microsoft Edge DevTools, visit Debug add-ins using developer tools for Internet Explorer, Debug add-ins using developer tools for Edge Legacy, or Debug add-ins using developer tools in Microsoft Edge (Chromium-based).
Next steps
Congratulations, you've successfully created a Word task pane add-in! Next, to learn more about developing Office Add-ins with Visual Studio, continue to the following article.
Troubleshooting
Ensure your environment is ready for Office development by following the instructions in Set up your development environment.
Some of the sample code uses ES6 JavaScript. This isn't compatible with older versions of Office that use the Trident (Internet Explorer 11) browser engine. For information on how to support those platforms in your add-in, see Support older Microsoft webviews and Office versions. If you don't already have a Microsoft 365 subscription to use for development, you might qualify for a Microsoft 365 E5 developer subscription through the Microsoft 365 Developer Program; for details, see the FAQ. Alternatively, you can sign up for a 1-month free trial or purchase a Microsoft 365 plan.
- If your add-in shows an error (for example, "This add-in could not be started. Close this dialog to ignore the problem or click "Restart" to try again.") when you press F5 or choose Debug > Start Debugging in Visual Studio, see Debug Office Add-ins in Visual Studio for other debugging options.
Code samples
- Word "Hello world" add-in: Learn how to build a simple Office Add-in with only a manifest, HTML web page, and a logo.
See also
Office Add-ins