Create your first adaptive card
Adaptive cards within Power Automate may either share blocks of information or collect data via a form for a given data source.
In either case, you'll need to sketch out which datasets you'll share, and/or what data the form will need to collect.
Tip
Use simple blocks of data rather than complex table arrays.
Prerequisites
Microsoft Teams with the Workflows app installed.
Add an action
In this procedure, you’ll add an action that will use the data from previous actions in the flow to post information to a Microsoft Teams channel.
Sign in to Power Automate.
Select My flows in the top navigation bar.
Select New flow > Instant cloud flow.
Name your flow.
Select Manually trigger a flow as the trigger.
Select Create.
In the designer, select New Step.
Search for Microsoft Teams, and then select Post an adaptive card to a Teams channel and wait for a response as the action.
Select the Team and the Channel to which you'd like to post the card.
Paste this JSON into the Message box.
{
    "$schema": "http://adaptivecards.io/schemas/adaptive-card.json",
    "type": "AdaptiveCard",
    "version": "1.0",
    "body": [
        {
            "type": "TextBlock",
            "text": "Poll Request",
            "id": "Title",
            "spacing": "Medium",
            "horizontalAlignment": "Center",
            "size": "ExtraLarge",
            "weight": "Bolder",
            "color": "Accent"
        },
        {
            "type": "TextBlock",
            "text": "Header Tagline Text",
            "id": "acHeaderTagLine",
            "separator": true
        },
        {
            "type": "TextBlock",
            "text": "Poll Header",
            "weight": "Bolder",
            "size": "ExtraLarge",
            "spacing": "None",
            "id": "acHeader"
        },
        {
            "type": "TextBlock",
            "text": "Lorem ipsum dolor sit amet, consectetur adipiscing elit. Integer vestibulum lorem eget neque sollicitudin, quis malesuada felis ultrices. ",
            "id": "acInstructions",
            "wrap": true
        },
        {
            "type": "TextBlock",
            "text": "Poll Question",
            "id": "acPollQuestion"
        },
        {
            "type": "Input.ChoiceSet",
            "placeholder": "Select from these choices",
            "choices": [
                {
                    "title": "Choice 1",
                    "value": "Choice 1"
                },
                {
                    "title": "Choice 2",
                    "value": "Choice 2"
                },
                {
                    "title": "Choice 3",
                    "value": "Choice 3"
                }
            ],
            "id": "acPollChoices",
            "style": "expanded"
        }
    ],
    "actions": [
        {
            "type": "Action.Submit",
            "title": "Submit",
            "id": "btnSubmit"
        }
    ]
}
Make the following replacements in the JSON.
Important
Do not remove any quotation marks when you do the replacements. You can revise the car choices to suit your needs:
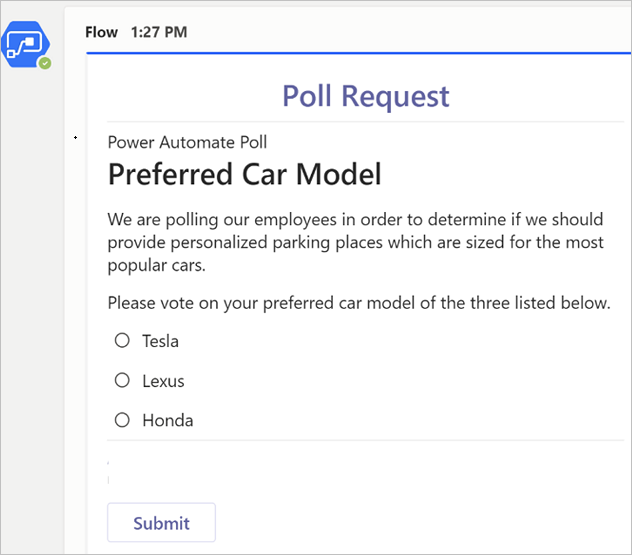
Text to change New text Header Tagline Text Power Automate Poll Poll Header Preferred Car Model Poll Question Please vote on your preferred car model from the choices listed here. Replace the latin text with a reason, or business context, related to why you are conducting the poll. We are polling our employees in order to determine if we should provide personalized parking places that are sized for the most popular cars. Choice 1 (replace in both places) Tesla Choice 2 (replace in both places) Lexus Choice 3 (replace in both places) Honda Select New Step, and then search for and select one of the Send an email actions to which you have access.
Provide the email recipient as the person who selected the instant button (use the Email tag from the dynamic content from the trigger).
Configure the Body of the email as follows. Replace the words in curly parentheses "{}" with dynamic tokens:
Your poll response was {acPollChoices} (acPollChoices is dynamic content from the wait for a response action). It was submitted by {User Name} (User Name is dynamic content from the trigger)
Test your adaptive card
To test your work, run the flow you created earlier and confirm the following:
The flow run has no errors, and waits for the response, showing the wait indicator for the Adaptive Card action on the run screen.
The Teams channel has the new adaptive card posted.
When you respond to the card by selecting a car model, and then selecting the Submit button on the bottom section of the adaptive card:
No errors should occur on the adaptive card.
The flow run completes successfully.
Card replacement is relevant after submission if you have configured the Update message area at the bottom of the wait for a response actions (shown next with the corresponding replacement card). Otherwise, all submissions will simply reset the form.

The email notification contains the body that shows who submitted the response and which car was selected.
Congratulations! you’ve just made your first interactive adaptive card!

Troubleshooting tips for adaptive cards
The most common problems that you will encounter when creating adaptive cards are:
Flow run errors are often caused by one of the following factors:
- The Workflows app isn't installed in Microsoft Teams – Install the Workflows app in Microsoft Teams.
In this case the error may resemble this screenshot:

Improperly formatted JSON – This is not usually as complex as one might expect. These are most often just situations where:
There are curly quotes, or missing quotes, around values within the JSON. Always check the JSON to ensure all text values are enclosed within double quotes, and that numbers are enclosed in quotation marks. All quotation marks should be straight and not curly.
You can validate the format of your JSON by pasting the JSON into the Card Payload Editor.
Missing Image URLs – All image values within Adaptive Cards must refer to a valid URL. Full image content is not directly supported in an Adaptive Card. Test your image links by pasting the URL into the browser to see if an image is displayed.
Adaptive Cards may not look like what’s expected due to styling and schema constraints:
Check that placeholder values, text styles, and any markup language align with Adaptive Card schema requirements (review Adaptive Card schema best practices here)
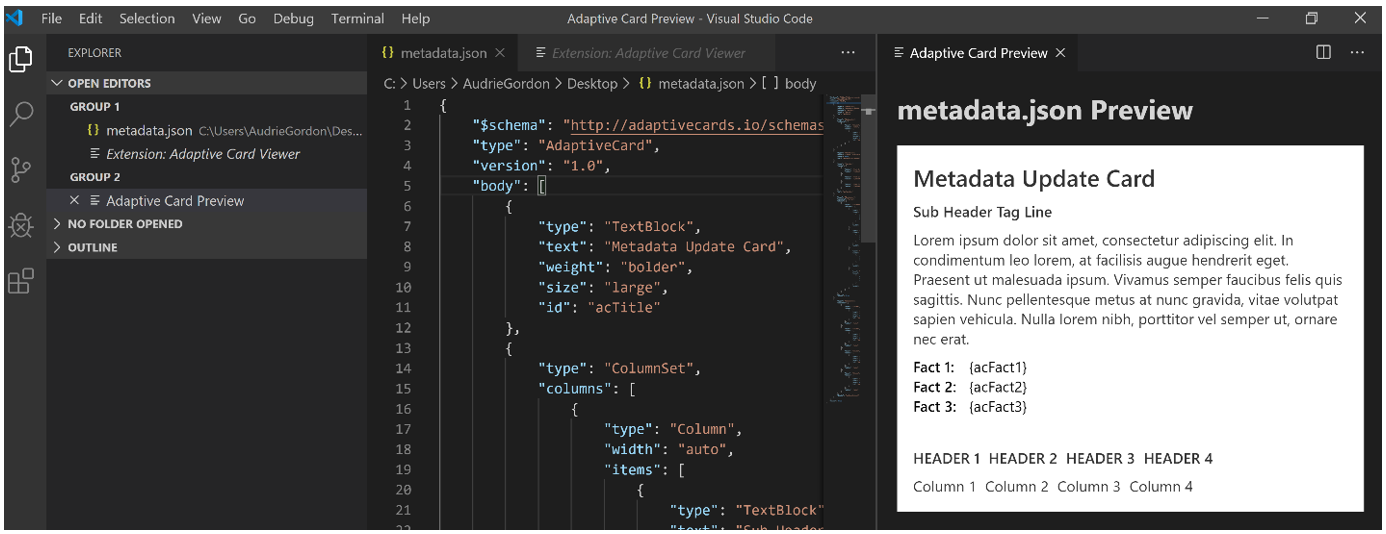
Leverage the Visual Studio Code Adaptive Card validator. To install it from the Visual Studio Code application, open the Extensions Marketplace, and search for Adaptive Card Viewer.

Truncated screenshot of the Adaptive Card Viewer extension installed in Visual Studio Code (shortcut: Ctrl+V+A once enabled).
Errors following Adaptive Card submission are often due to:
Using an action, which does not include ‘wait for response’ in the name

Attempting to submit the card more than once. Each Adaptive Card can be submitted only once, after which all further submissions will be ignored.