Create a CyberArk® credential (preview)
[This article is prerelease documentation and is subject to change.]
This feature allows users to create a Power Automate credential that retrieves CCP CyberArk® secrets from vault during runtime.
Important
- This is a preview feature.
- Preview features aren’t meant for production use and may have restricted functionality. These features are available before an official release so that customers can get early access and provide feedback.
Availability
Currently, this feature isn't available for US Government Clouds.
Prerequisites
Set up your CyberArk® Central Credential Provider (CCP)
If your CyberArk® Central Credential Provider (CCP) isn't set up, complete the following actions:
- Install the Central Credential Provider (CCP). Learn more at https://docs.cyberark.com/credential-providers/latest/en/Content/CCP/CCP-Installation.htm.
- Ensure that your machines can communicate with the CyberArk® server.
- Allow https connections to contact the CCP AIMWebService.
Create an application with client certification authentication from PVWA
A signed certificate enables the application authentication with a certificate serial number.
To add a signed certificate:
Sign-in to CyberArk®’s Password Vault Web Access (PVWA).
From the left navigation, select the Applications tab and then select Add Application.
Provide the information in the Application window (at least a name) and select Add.
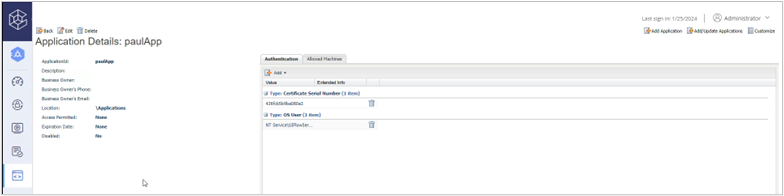
In the details of the application, select Add on the Authentication tab.
Select Certificate serial number and enter the value. Learn more in Application authentication methods.
Set up a CyberArk® safe that contains their user accounts
(Optional) If you don’t have a safe yet, you can create a Safe from PVWA:
From the left navigation, select Policies and then select Safes.
Select Create Safe.
Enter a safe name and select PasswordManager.
Enter Safe members and Access then select Create Safe.
From PVWA, you can then add your machine accounts.
Note
You can also create accounts from PrivateArk client.
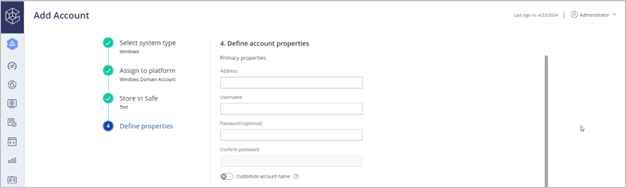
From the left navigation, select Accounts > Add Account.
Select Windows as system type.
Select the safe you created to store your robotic process automation (RPA) machine accounts.
Provide information about your account and select Add.
Define application and credential provider as safe member
Add the Credential Provider user as a Safe Member with the following authorizations: • List accounts • Retrieve accounts • View Safe Members

Add the application as a Safe Member with the following authorizations: • Retrieve accounts
Add a CyberArk® application to machine / group
If you want to run a desktop flow on a machine or a group using CyberArk® credentials, you need to add your CyberArk® application information in the Power Automate portal.
- Sign-in to Power Automate.
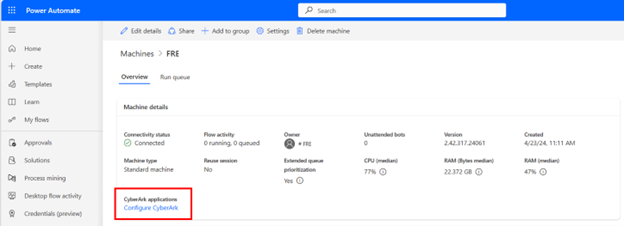
- From the left navigation, select Machines and select the machine or the group.
- In the Machine details, select Configure CyberArk®.
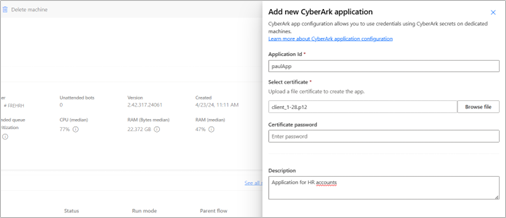
- Select New application.
- Enter the app ID of the application you created from CyberArk® PVWA.
- Select the certificate, which stores the private and the public key of the certificate.
- The allowed formats are .pfx or .p12 files.
- The private key should be marked as exportable.
Enter the certificate file password that is used to open the certificate file.
Note
The password is not stored. The certificate is opened and encrypted with the public key of the machine group so it is only readable from the registered machines.
Enter a description (optional) and then select Save.
Create a CyberArk® credential
Now that you complete all the prerequisites steps, you can create your CyberArk® credentials.
- From the left navigation, select Credentials.
- Select New credential.
- In the wizard, define a credential name and a small description and then select Next.
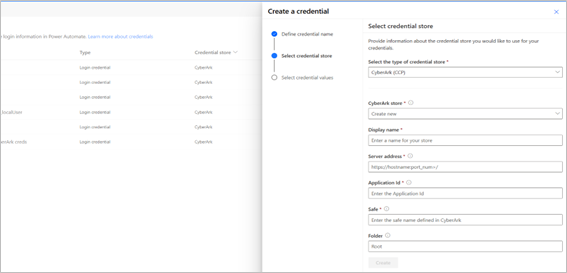
- In the second step
- Select CyberArk® CCP as the type of credential store.
- If you already defined a CyberArk® store, you can select it from the dropdown. Otherwise, select Create new.
- Display name: Provide a name for your CyberArk store.
- Server address: The server address is the Central Credential Provider URL. For example,
https://svc.skytap.com:8992. - Application Id: To find the Application ID, open CyberArk® PVWA (Password Vault Web Access) on a web browser and navigate to the Applications tab.
- Safe: Populate the name of the safe displayed in CyberArk® PVWA.
- Folder (optional): Populate the folder name where your credentials are stored. By default, credentials are stored in the "Root" folder.
- In the last step of the wizard, you need to provide the information about the user account:
- Username: Select a username from your text environment variables or create a new one by selecting new.
- Object name: The object name corresponds to the CyberArk® object name store in the CyberArk® safe. This value is also called account name in PVWA.
Use the credential in Desktop flow connection
Your credential is now created. You can use it in a desktop flow connection to run desktop flows from cloud flows.
Feedback
Coming soon: Throughout 2024 we will be phasing out GitHub Issues as the feedback mechanism for content and replacing it with a new feedback system. For more information see: https://aka.ms/ContentUserFeedback.
Submit and view feedback for