Enable Azure Storage
Azure Storage integration for Power Pages enables you to take advantage of the greater file storage capability of Azure, using the same interface and providing the same user experience as for default file attachments. This feature is supported for web files, basic forms, and multistep forms.
Enable Azure Blob Storage for basic or multistep forms with attachments
Create a storage account with Resource manager as the deployment model. For more information, see Create an Azure storage account.
After the storage account is running, add role based permissions to the app in Azure:
- Sign in to the Azure portal, where the storage account was created.
- Go to Resource groups and select the resource group that contains the storage account.
- Select Access Control (IAM) > Add > Add role assignment.
- Select the Reader role and then select Next.
- Select User, group, or service principal, and then select Select members.
- On the right side, select the portal application by searching your site name and then select the Select button. The application name is in the format
Portals-<site name>with<site name>being the name of your Power Pages site. - Select Review + assign > Review + assign.
- Go to the storage account and select Access Control (IAM) > Add > Add role assignment.
- Select the Storage Blob Data Contributor role and then select Next.
- Select User, group, or service principal and then select Select members.
- On the right side, select the portal application by searching your site name and then select the Select button.
- Select Review + assign > Review + assign.
Power Pages requires certain global settings that tell the application how to locate your storage account.
Azure storage integration only works with notes configured in basic form metadata. Azure Blob as storage isn't used if you use Portal Comments that can be set up using Timeline. Although portal comments also provide capability for files to be uploaded as attachments, these files are only stored in Microsoft Dataverse.
Note
- Before using this feature, you must enable attachments for the table in Microsoft Dataverse first. Learn more in Create a table.
- The maximum per file upload size is 10 GB.
Specify the storage container
If you don't already have an Azure Blob container in your storage account, you must add one by using your Azure portal.
To specify the storage container for a form:
- Open Power Pages design studio and go to the Pages workspace.
- Select a page that contains the form that uses Azure storage for attachments.
- Select the form and then select Edit form.
- Select Attachments.
- For Attachment storage, select Azure Blob Storage.
- Enter values for the Azure storage account name and the Azure container name.
Enable Azure Blob Storage for web files
To enable Azure Blob Storage for web files, follow these steps to add a CORS rule and add site settings.
Add CORS rule
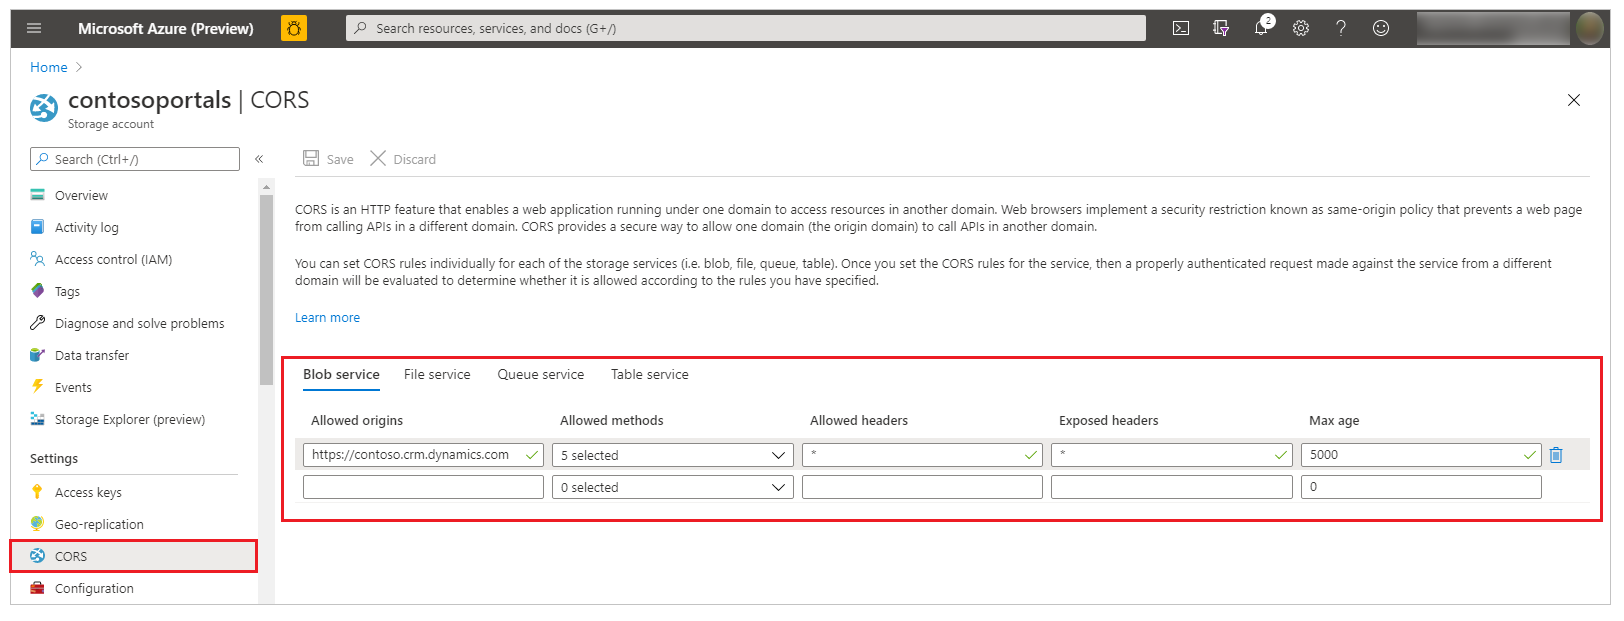
You must add cross-origin resource sharing (CORS) rule on your Azure Storage account as follows, otherwise you see the regular attachment icon rather than the cloud icon:
- Allowed origins: Specify your domain. For example,
https://contoso.crm.dynamics.com
Make sure the allowed origin doesn't have a trailing/. For example,https://contoso.crm.dynamics.com/is incorrect. - Allowed verbs: GET, PUT, DELETE, HEAD, POST
- Allowed headers: Specify the request headers that the origin domain might specify on the CORS request. For example, x-ms-meta-data*, x-ms-meta-target*, or * to allow all.
- Exposed headers: Specify the response headers that might be sent in the response to the CORS request and exposed by the browser to the request issuer. For example, x-ms-meta-*, or * to allow all.
- Maximum age (seconds): Specify the maximum amount time that a browser should cache the preflight OPTIONS request. For example, 200.
CORS rule example:
More information: CORS support for the Azure Storage Services.
Add site settings
Add the following site settings from Portals > Site Settings. Learn more in Manage portal site settings.
| Name | Value |
|---|---|
| WebFiles/CloudStorageAccount | Provide the same connection string as provided for the FileStorage/CloudStorageAccount setting. |
| WebFiles/StorageLocation | AzureBlobStorage |
Enable Azure Blob Storage for timeline control
To enable Azure Blob Storage for the timeline control:
In the Portal Management app, within the Website section go to Settings > New, and add a new setting named FileStorage/CloudStorageContainerName, using the name of your container as the value.
Create another setting named FileStorage/CloudStorageAccount with the value of your connection string.
To locate the value for FileStorage/CloudStorageAccount, get the connection string from the Azure portal:
- Sign in to the Azure portal.
- Go to your storage account.
- Select Access Keys.
- In the resulting panel, locate the field labeled Connection String. Select the Copy icon next to the field for which you need to copy the value, and then paste that value into your new setting.
Configure notes as attachments using Portals Management app
To view and add attachments stored in Azure on basic and multistep forms on your site, you need to Set up notes as attachments for basic and multistep forms.
You can then add attachments to records on web pages. Attachments uploaded via the site are stored in Azure.
To view and access the attachments in a model-driven app (including Dynamics 365 apps), you need to add a web resource to enable uploading attachments to Azure Storage.