Manage Dataverse auditing
The Dataverse auditing feature is designed to meet the external and internal auditing, compliance, security, and governance policies that are common to many enterprises. Dataverse auditing logs changes that are made to customer records in an environment with a Dataverse database. Dataverse auditing also logs user access through an app or through the SDK in an environment.
Dataverse auditing is supported on all custom and most customizable tables and columns. Audit logs are stored in Dataverse and consume log storage capacity. Audit logs can be viewed in the Audit History tab for a single record and in the Audit Summary view for all audited operations in a single environment. Audit logs can also be retrieved using the web API or the SDK for .NET. Audit logs are created when there are changes to the record on a table where auditing is turned on. Audit logs for updates are created when a new value is different from the old value of a column.
Note
The use of entity-related terminology depends on the protocol or class library used. See Terminology use depending on protocol or technology.
Audit logs may show up with a delay in the Audit History tab of a record and in the Audit Summary view. This is because audit logs are stored in the Dataverse log storage and no longer in the database storage.
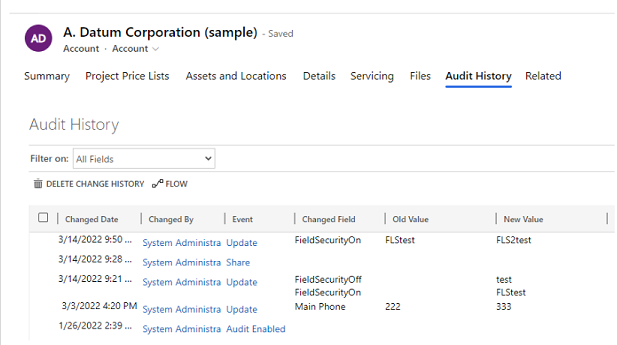
Audit History for a single record
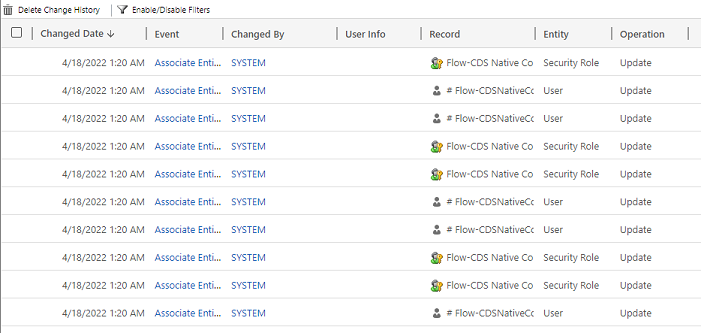
Audit Summary view (all audit logs)
Audit logs help administrators and other privileged users to answer questions like:
- Who created or updated a record and when?
- Which fields in a record were updated?
- What was the previous field value before the update?
- Who was accessing the system and when?
- Who deleted a record?
The following operations can be audited:
- Audit changes at the entity, attribute, and organization level. For example, enabling audit for an environment or a table.
- Create, update, and delete operations on records.
- Changes to the sharing privileges of a record.
- The N:N association or disassociation of records.
- Changes to security roles.
- Deletion of audit logs.
- For changes made to entity fields that can be localized, such as the Product entity name or description fields, the locale ID (LCID) appears in the audit record.
Auditing is not supported on table or column definition changes or during authentication. Furthermore, auditing does not support retrieve operations or export operations. Dataverse and model-driven apps activity logging can be turned on, in addition to Dataverse auditing, to log data retrieve operations and export operations.
The following list enumerates the non-customizable tables that cannot be audited. This list was obtained by testing for a CanModifyAuditSettings column value of false on each table's definition:
- ActivityPointer
- Annotation
- BulkOperation
- Calendar
- CalendarRule
- CustomerOpportunityRole
- Discount
- DiscountType
- IncidentResolution
- KbArticle
- KbArticleComment
- KbArticleTemplate
- Notification
- OpportunityClose
- OrderClose
- ProductPriceLevel
- QuoteClose
- RecurrenceRule
- Resource
- ResourceGroup
- ResourceGroupExpansion
- ResourceSpec
- SalesLiteratureItem
- SalesProcessInstance
- Service
- Subject
- Template
- UoM
- UoMSchedule
- Workflow
- WorkflowLog
Configure auditing for an environment
There are three levels where auditing can be configured: an environment, table, and column. Auditing must be turned on at the environment-level first. To log data changes in a table, auditing must be turned on for the table, and for the column.
To turn on user access auditing (log access) or activity logging (Read logs), auditing must be turned on at the environment-level. The option to turn on activity logging is only visible when the minimum Office licensing requirements are met.
Note
User access or activity logging is sent to Purview for production environments only.
You must have System Administrator or System Customizer role or equivalent permissions to turn on or off auditing.
Auditing can be configured manually through the Power Platform admin center and the Power Apps portal. Auditing can also be configured programmatically. Learn more at Auditing overview.
Turn on auditing through Security page (Preview)
[This section is prerelease documentation and is subject to change.]
You must be assigned to the Power Platform or Dynamics 365 admin role to turn on or off auditing through the Security page.
To meet your external and internal auditing, compliance, security, and governance policies that are common to many enterprises, auditing for the following tables are turned on automatically when you turn on auditing through the Security page. You can audit other tables, where applicable, but please note that there are some core tables that audit is turned on by default.
Important
- This is a preview feature.
- Preview features aren't meant for production use and might have restricted functionality. These features are subject to supplemental terms of use, and are available before an official release so that customers can get early access and provide feedback.
| Category | Table |
|---|---|
| Common entities | systemuser |
| Common entities | role |
| Common entities | report |
| Common entities | goalrollupquery |
| Common entities | metric |
| Common entities | goal |
| Common entities | bulkoperation |
| Common entities | list |
| Common entities | salesliterature |
| Common entities | product |
| Common entities | lead |
| Common entities | contact |
| Common entities | account |
| Common entities | activitypointer |
| Sales | opportunitysalesprocess |
| Sales | leadtoopportunitysalesprocess |
| Sales | invoice |
| Sales | salesorder |
| Sales | quote |
| Sales | competitor |
| Sales | opportunity |
| Marketing | campaign |
| CustomerService | translationprocess |
| CustomerService | expiredprocess |
| CustomerService | newprocess |
| CustomerService | phonetocaseprocess |
| CustomerService | service |
| CustomerService | contract |
| CustomerService | kbarticle |
| CustomerService | knowledgearticle |
| CustomerService | queueitem |
| CustomerService | incident |
| CustomerService | socialprofile |
| Security | solution |
| Security | entity |
| Security | team |
| Security | position |
| Security | organization |
| Security | fieldsecurityprofile |
| Security | businessunit |
- Go to the Power Platform admin center.
- From the left-side menu, select Security.
- Select the Auditing tile.
- Select the environment that you want to turn on auditing.
- Select the Turn on auditing switch.
- Review the list of Dataverse data and Dynamics 365 apps entities.
- Review and update the Event log retention by selecting the dropdown.
- Select the period that meets your data retention policy.
- The selected period is effective from the current date and overrides the existing retention policy. To apply the new retention policy for new logs only, select to switch the Existing logs to On.
Note
It is recommended that you apply the new retention policy to all logs. If you turned on the Existing logs switch, older logs continue to be retained using the prior retention policy. For example, by default, the initial logs are kept Forever and they aren't deleted with the new retention policy.
Start/stop auditing for an environment and set retention policy
This task requires the System Administrator or System Customizer role or equivalent permissions.
Important
The audit retention period is not available for Dynamics 365 Customer Engagement (on-premises) or for environments encrypted with a customer's own encryption key.
It is recommended that you use the Security page auditing option to set the retention policy. This provides the flexibility to apply the retention policy to existing logs.
Sign in to the Power Platform admin center using administrator credentials.
Go to Environments > [select an environment] > Settings > expand Audit and logs > Audit settings.
Setting Description Start Auditing Start or stop auditing. Log access Log whenever the system is accessed, generally by signing in. Read logs Logs will be sent to the Microsoft Purview compliance portal. You can set a retention period for how long audit logs are kept in an environment. Under Retain these logs for, choose the period of time you wish to retain the logs.
Setting Description Set the retention policy for these logs Default: Forever Set a custom retention policy Maximum: 24,855 days. Visible if you select "Custom" in the above setting.
Note
When the audit retention period is set to Forever, logs aren't deleted. When the audit retention period is set to any other value, logs are deleted continuously starting at the time an audit record exceeds the time defined in the retention policy.
For example, assume the retention policy is set to 30 days. Audit records that were created 30 days, and one second ago, start to be deleted in the background.
Each audit log is stamped with the currently active retention period. Changing the retention period here does not change the retention period for already existing records. The new retention period is applied to all new records created after the retention policy was changed. For example, assume the retention period is changed from 30 days to 90 days. Audit records that were created prior to the change are deleted in the background after 30 days. Audit records that were created after the change are deleted in the background after 90 days.
- Select Save.
Learn more in the Configure organization settings.
Turn on auditing for a specific app in a web app
This task requires the System Administrator or System Customizer role or equivalent permissions.
This feature allows you to quickly turn on auditing for multiple tables (entities) simultaneously. The grouping of tables corresponds to a Dynamics 365 application, for example Sales tables correspond to the Sales Hub app.
In the web app, go to Settings (
 ) > Advanced Settings.
Select Settings > Administration.
Select System Settings, and then select the Auditing tab.
Select the table (entities) you want to track. To start or stop auditing on specific tables, select or clear the following check boxes:
- Common Entities. Tracks common entities like Account, Contact, Goal, Product, and User.
- Sales Entities. Tracks sales-related entities like Competitor, Opportunity, Invoice, Order, and Quote.
- Marketing Entities. Tracks Campaign entity activity.
- Customer Service Entities. Tracks Case, Contract, Queue, and Service entity activity.
Select OK.
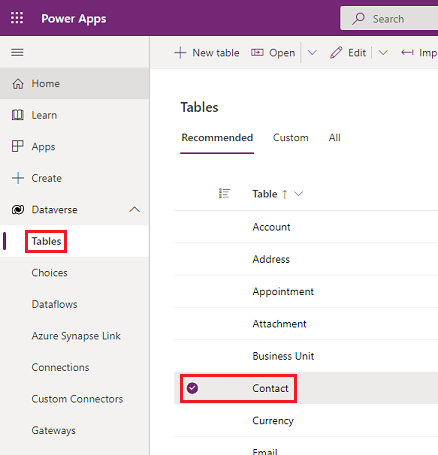
Configure auditing for one or more tables and columns in Power Apps
This task requires the System Administrator or System Customizer role or equivalent permissions.
Sign in to Power Apps using your System Administrator or System Customizer credentials.
Select the environment for which you want to configure auditing.
Note
We recommend that you manage the audit configuration as part of a solution. This allows you to easily find your customizations, apply your own solution published prefix, and export your solution for distribution to other environments. To learn more about solutions, see Use a solution to customize. When using a solution, add all tables you want to configure for auditing to your solution, then perform steps 3-8 before saving and publishing your solution.
Select Dataverse > Tables.
Select a table.
On the command bar, select Edit.
On the command bar, select Edit table properties.
Expand Advanced options.
Select the Audit changes to its data checkbox.
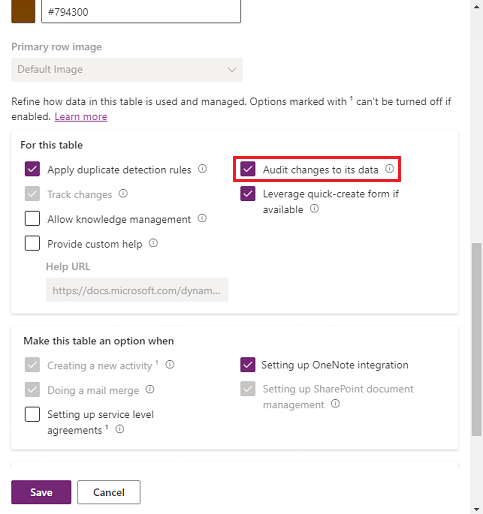
Select Save.
On the command bar, select <- Back.
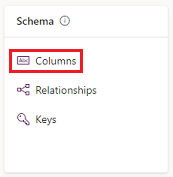
Under Schema, select Columns.
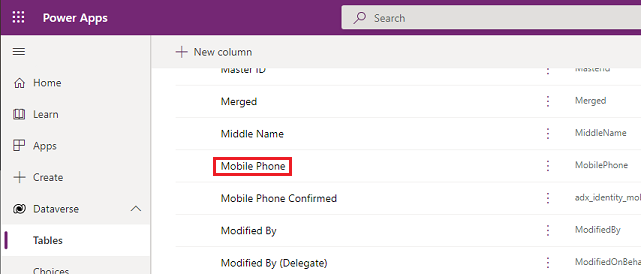
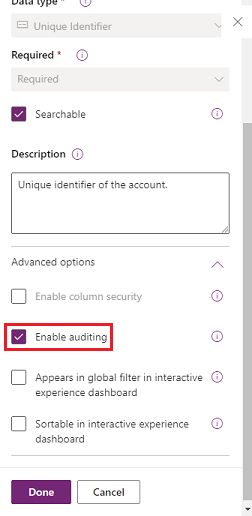
Select a column you want to turn on for auditing, and then expand Advanced options.
Select the Enable auditing checkbox.
Select Save.
Repeat steps 3 – 10 for all tables and columns you want to edit.
Turn on or off auditing for entities and fields
System administrators or customizers can change the default audit settings for entities and for specific fields for an entity.
Turn on or off auditing for an entity
Browse to the Power Platform admin center and sign in using administrator credentials.
Go to Environments > [select an environment] > Settings > expand Audit and logs > Entity and Field Audit Settings.
Under Components, expand Entities.
Select the entity for which you want to turn on auditing.
To start auditing, on the General tab, in the Data Services section, select the Auditing check box to turn on auditing, or clear the Auditing check box to turn it off.
By default, when you start or stop auditing for an entity, you also start or stop auditing for all the fields of this entity.
If you have turned on the Read Logs in the environment's audit settings, you'll need to turn on the Single record auditing. Log a record when opened and Multiple record auditing. Log all records displayed on an opened page auditing settings to see the read audit logs from this table. Learn more at Activity logging.
Select Save.
Publish the customization. To publish for a single entity, choose the entity, such as Account, and then select Publish on the toolbar.
Turn on or off auditing for specific fields on an entity
Under the entity for which you want to turn on auditing with specific fields, select Fields.
To turn on or off auditing for a single field, open the field and in the Auditing section, select Enable or Disable.
To turn on or off auditing for more than one field, select the fields you want, and then on the toolbar select Edit. In the Edit Multiple Fields dialog box, in the Auditing area, select Enabled or Disabled.
Select Save.
Publish the customization. To publish for a single entity, choose the entity, such as Account, and then select Publish on the Actions toolbar.
More information: Dataverse developer guide: Configure auditing > Configure tables and columns
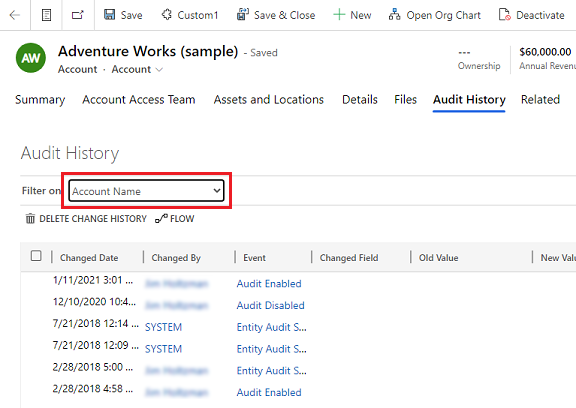
Use the Audit History in a model-driven app
Audit History is a valuable resource for users to understand the update history of a single record. It answers questions such as "When was this record created and by whom?", "Who changed a particular field and what was the previous value?", "Who shared the record with another user?".
Users must have the View Audit History privilege to see the Audit History of a record.
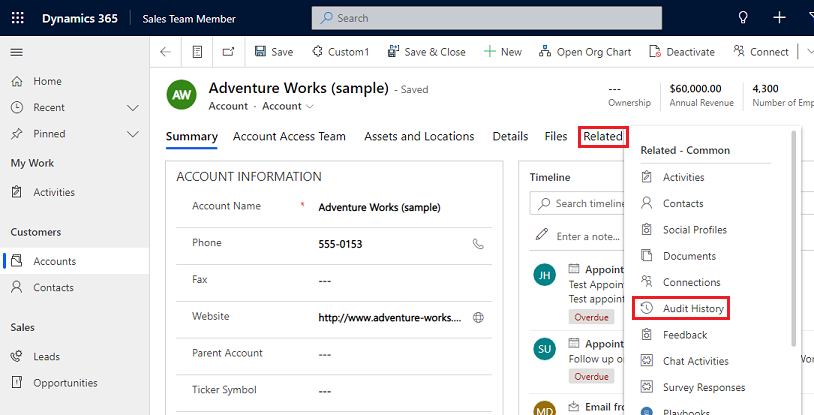
Select a record in a model-driven application.
Select the Related tab and select Audit History.
Choose a field in Filter on to filter results by a field you want to see the change history.
Use the Audit Summary view
The Audit Summary view is a comprehensive list of all audit logs in an environment. By filtering on various columns, users of the Audit Summary view can understand what happened in the environment over time. It helps to answer questions such as "What actions did a user perform and when", "Who deleted a particular record?", or "Who changed a user's role?".
Users must have the View Audit Summary privilege to see the Audit Summary view.
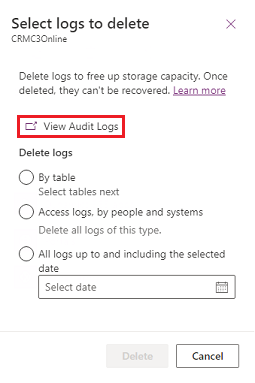
Sign in to the Power Platform admin center, and then select an environment.
In the Auditing card, select Delete Logs.
Select View Audit Logs.
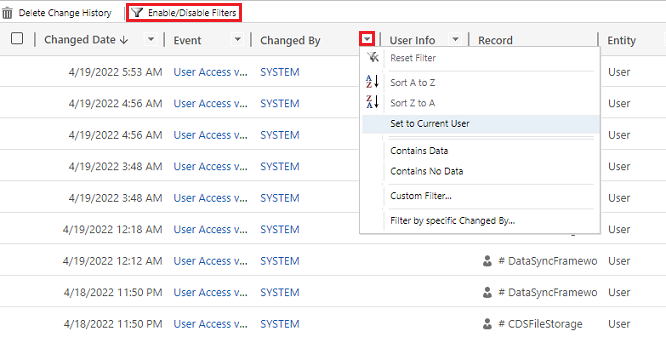
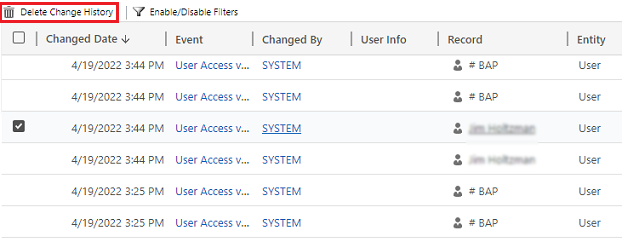
Use the Enable/Disable Filters option to narrow down the list of audit records needed to answer your question. You can apply several filters at once.
Note
Sorting is only possible on the Changed Date column.
Exporting of Audit logs is currently not supported. Use the Web API or SDK for .NET to retrieve audit data from your environment. See Retrieve and delete the history of audited data changes.
Large attribute values, such as Email.description or Annotation, are limited (capped) at 5KB or ~5,000 characters. A capped attribute value can be recognized by three dots at the end of the text, for example, "lorem ipsum, lorem ip…".
More information: Dataverse developer guide: Retrieve the history of audited data changes
Delete the change history for a record
Dataverse auditing supports the deletion of a single record's entire audit history. This is useful when responding to a customer's request to delete their data.
Users must have the Delete Audit Record Change History privilege to perform this action.
The deletion of a record's audit history can be done in a model-driven application's Audit History and in the environment's Audit Summary view.
Delete the change history for a record in the Audit History tab of a record
Select a record in a model-driven application.
Select the Related tab, and then select Audit History.
In Filter on, choose All fields, and then select Delete Change History to delete all logs pertaining to the selected record.
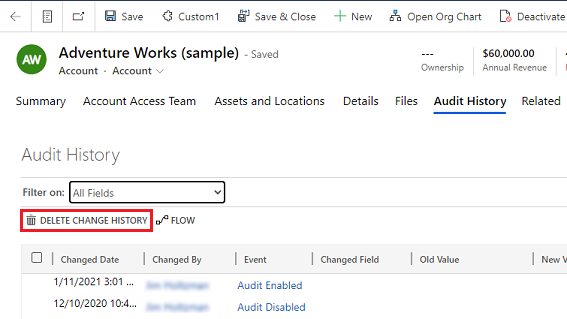
Select Delete to confirm.
Delete the change history for a record in the Audit Summary view
Sign in to the Power Platform admin center, and then select an environment.
In the Auditing card, select Delete logs.
Select View Audit Logs.
Select a row in the audit history, and then select Delete Change History to delete all logs pertaining to the selected record.
Select Delete to confirm.
Reduce log storage: Delete audit logs – legacy process
When you turn on Dataverse auditing, your apps create audit logs to store changes to the records and user access. You can delete audit logs when they are no longer needed to free up log capacity space.
Warning
When you delete audit logs, you can no longer view the audit history for the period covered by that audit log.
In the upper-right corner of an app, select Settings (
) > Advanced Settings > Settings > Auditing.Select Audit Log Management, and then select View Audit Logs.
Select the oldest audit log, then select Delete Logs.
Select OK to confirm.
Note
You can only delete the oldest audit log in the system. To delete more than one audit log repeat deleting the oldest available audit log until you have deleted enough logs.
Reduce log storage: Delete audit logs – new process
When you turn on Dataverse auditing, your apps create audit logs to store changes to the records and user access. You can delete audit logs when they are no longer needed to free up log capacity space.
Warning
When you delete audit logs, you can no longer view the audit history for the tables, user access, period covered by that audit log.
Sign in to the Power Platform admin center, and then select an environment.
Under Auditing, select Delete logs.
Choose how to select logs to delete.
Delete logs Description System job name Logs by table Select one or more tables for which you want to delete audit logs. By default, all tables in the environment will be shown, whether they contain audit data or not. Delete logs for [number of] tables. Access logs by people and systems Delete all access logs. This will delete all logs for all users and systems. Delete access logs. All logs up to and including the selected date Delete logs including the date selected. Delete all logs before and including [timestamp]. 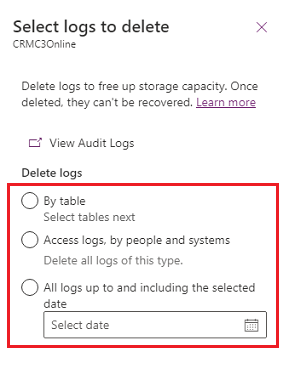
Select Delete, and then confirm.
Note
Audit logs will be deleted in an asynchronous background system job. The duration of the deletion depends on the amount of audit records to be deleted. The current rate is approximately 100 million records per day, or approximately 4 million records per hour.
To monitor the status of audit delete jobs, see the next section.
Monitoring system jobs
Several features use system jobs to perform tasks automatically, including workflows, import, and duplicate detection, running independently or in the background. You can monitor them to ensure that they run smoothly or have completed successfully.
In the Power Platform admin center, select an environment.
For Unified Interface, in the upper-right corner, select Settings (
) > Advanced Settings > Settings.Select Settings > Audit and logs > System Jobs to see a grid view of system jobs.
If there is a problem with a system job, you can cancel, postpone, pause, or resume it. Select a job and then select the Actions menu.
Canceling system jobs
You cannot resume a canceled system job.
Postponing completion of system jobs
Postponing an active system job stops any current and subsequent actions. You can specify a later time when you want the system job to restart.
Pausing system jobs
You can resume a paused system job.
Resuming paused system jobs
Resuming restarts a system job that was paused.
Tip
- If a system job fails, you can view the details about what steps failed and what the problems may have been. First, open the system job record. To display details about system job failures, move your pointer over the warning symbols.
- To view system job failures in a format that you can print or copy and paste, select the Print button.
Note
You cannot make changes to the status of a system job that has been completed or canceled.
Monitor the status of audit delete jobs
In the Power Platform admin center, select an environment.
For Unified Interface, in the upper-right corner, select Settings (
) > Advanced Settings > Settings.Select Settings > Data management > Bulk deletion.
Select the system job name to open details about your delete job.
Access audit data using Azure Synapse Link for Dataverse
You can use Azure Synapse link for Dataverse to link the audit table and create reports using Power BI to meet your external and internal auditing, compliance, and governance needs. More information: Access audit data using Azure Synapse Link for Dataverse and Power BI