Collect audit logs using a custom connector (deprecated)
Important
Using the dedicated Center of Excellence - Audit Log solution and the Office 365 Management custom connector to collect audit log events are deprecated. The solution and custom connector will be removed from the CoE Starter Kit in August 2023. We have a new flow that collects audit log events, which is part of the Center of Excellence - Core Components solution. This new flow uses an HTTP connector. Learn more: Collect audit logs using an HTTP action
The Audit Log Sync flow connects to the Microsoft 365 audit log to gather telemetry data (unique users, launches) for apps. The flow uses a custom connector to connect to the Audit Log. In the following instructions, you set up the custom connector and configure the flow.
The Center of Excellence (CoE) Starter Kit works without this flow, but the usage information (app launches, unique users) in the Power BI dashboard is then blank.
Prerequisites
Complete the Before setting up the CoE Starter Kit and Set up inventory components articles before continuing with the setup in this article.
Sign in with the correct identity.
(Optional) Set up the Audit Log solution only if you chose cloud flows as the mechanism for inventory and telemetry.
Watch a walk-through on how to set up the audit log connector.
Before you use the audit log connector
Microsoft 365 audit log search must be turned on for the audit log connector to work. For more information, see Turn auditing on or off
The user identity running the flow must have permission to the audit logs. Minimum permissions are described in Before you search the audit log.
Your tenant must have a subscription that supports unified audit logging. For more information, see Microsoft 365 guidance for security & compliance.
A Global Admin is required to configure the Microsoft Entra app registration.
The Office 365 Management APIs use Microsoft Entra ID to provide authentication services that you can use to grant rights for your application to access them.
Create a Microsoft Entra app registration for the Office 365 Management API
Using these steps, you set up a Microsoft Entra app registration that is used in a custom connector and Power Automate flow to connect to the audit log. More information: Get started with Office 365 Management APIs
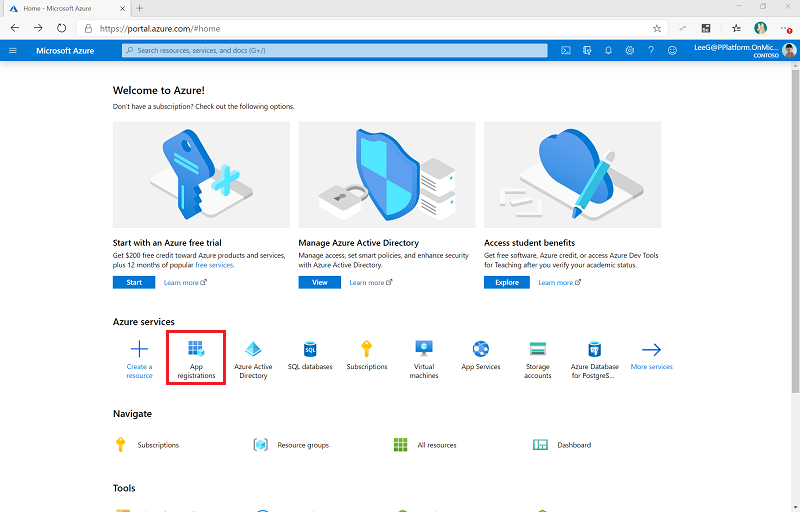
Sign in to the Azure portal.
Go to Microsoft Entra ID > App registrations.
Select + New Registration.
Enter a name (for example, Microsoft 365 Management), don't change any other setting, and then select Register.
Select API permissions > + Add a permission.
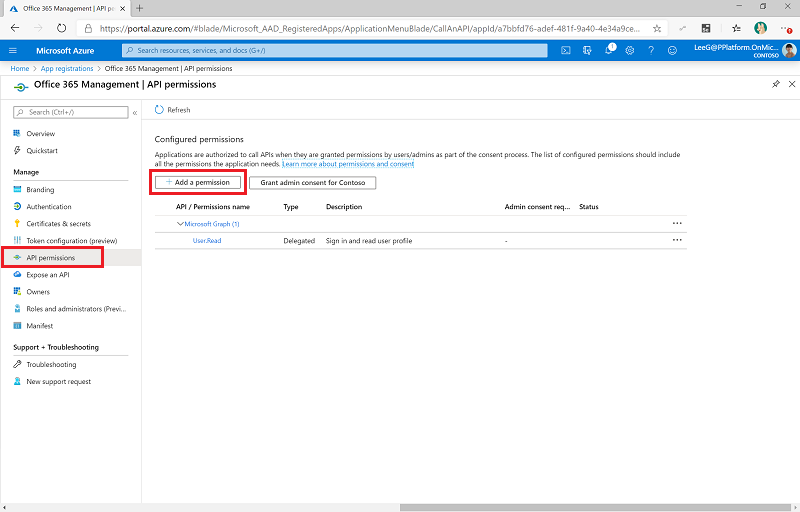
Select Office 365 Management API, and configure permissions as follows:
Select Delegated permissions, and then select ActivityFeed.Read.
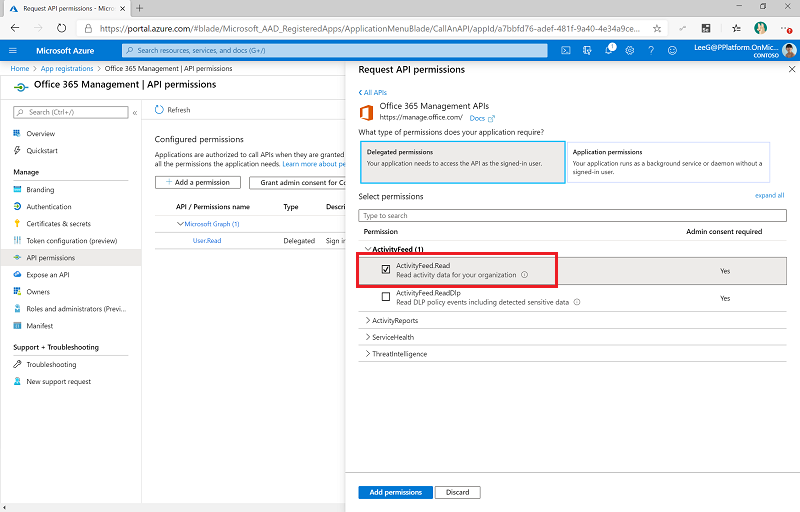
Select Add permissions.
Select Grant Admin Consent for (your organization). Prerequisites: Grant tenant-wide admin consent to an application
The API permissions now reflect delegated ActivityFeed.Read with a status of Granted for (your organization).
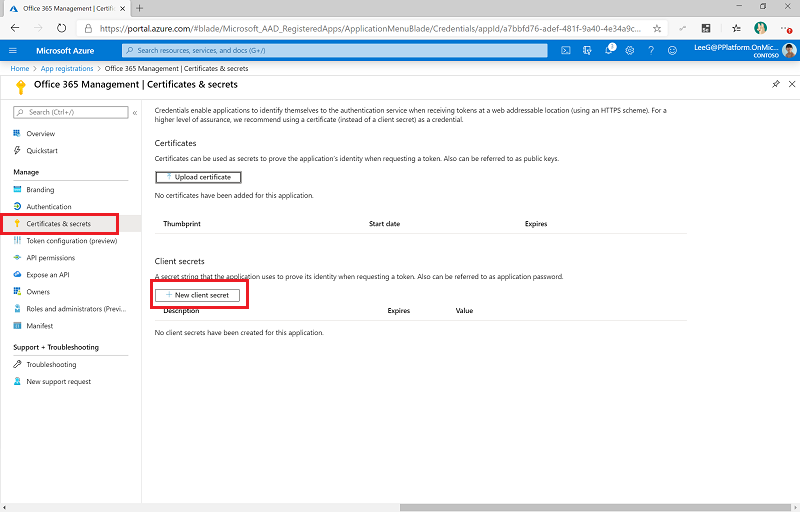
Select Certificates and secrets.
Select + New client secret.
Add a description and expiration (in line with your organization's policies), and then select Add.
Copy and paste the Secret to a text document in Notepad for the time being.
Select Overview, and copy and paste the application (client) ID and directory (tenant) ID values to the same text document; be sure to make a note of which GUID is for which value. You'll need these values in the next step as you configure the custom connector.


Leave the Azure portal open, because you'll need to make some configuration updates after you set up the custom connector.
Set up the custom connector
Now you configure and set up a custom connector that uses the Office 365 Management APIs.
Go to Power Apps > Dataverse > Custom Connectors. The Office 365 Management API custom connector is listed here. The connector is imported with the core components solution.
Select Edit.
If your tenant is a commercial tenant, leave the General page as is.
Important
- If your tenant is a GCC tenant, change the host to
manage-gcc.office.com. - If your tenant is a GCC High tenant, change the host to
manage.office365.us. - If your tenant is a DoD tenant, change the host to
manage.protection.apps.mil.
For more information, see Activity API operations.
- If your tenant is a GCC tenant, change the host to
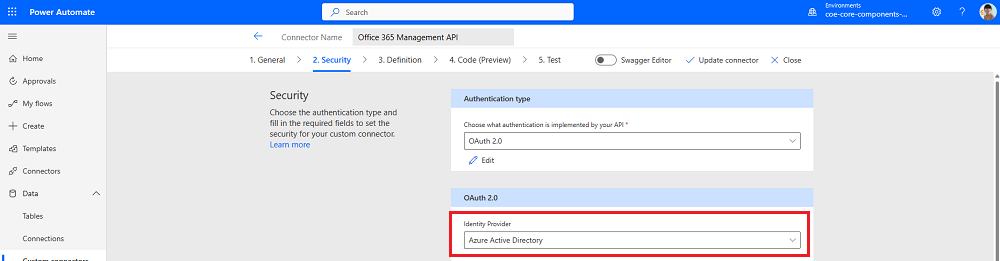
Select Security.
Select Edit at the bottom of the OAuth 2.0 area to edit the authentication parameters.

Change the Identity Provider to Microsoft Entra ID.
Paste the application (client) ID you copied from the app registration into Client Id.
Paste the client secret you copied from the app registration into Client secret.
Don't change the Tenant ID.
Leave the Login URL as is for commercial and GCC tenants, but for a GCC High or DoD tenant change the URL to
https://login.microsoftonline.us/.Set the Resource URL:
Tenant type URL Commercial https://manage.office.comGCC https://manage-gcc.office.comGCC High https://manage.office365.usDoD https://manage.protection.apps.milSelect Update Connector.
Copy the Redirect URL into a text document, such as Notepad.


Note
If you have a data loss prevention (DLP) policy configured for your CoE Starter Kit environment, add this connector to the business data-only group of this policy.
Update Microsoft Entra app registration with the redirect URL
Go to the Azure portal and your app registrations.
Under Overview, select Add a Redirect URI.
Select + Add a platform > Web.
Enter the URL you copied from the Redirect URL section of the custom connector.
Select Configure.
Start a subscription and audit log content
Go back to the custom connector to set up a connection to the custom connector and start a subscription to the audit log content, as described in the following steps.
Important
You must complete these steps for subsequent steps to work. If you don't create a new connection and test the connector here, setting up the flow and child flow in later steps fails.
On the Custom Connector page, select Test.
Select + New connection, and then sign in with your account.
Under Operations, select StartSubscription.
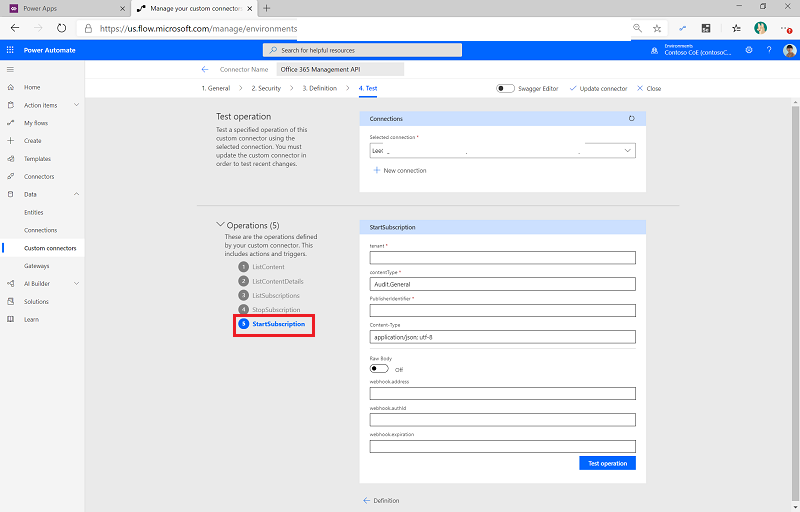
Paste the directory (tenant) ID—copied earlier from the App Registration overview page in Microsoft Entra ID—into the Tenant field.
Paste the directory (tenant) ID into PublisherIdentifier.
Select Test Operation.

You should see a (200) status returned, which means the query was successful.

Important
If you have previously enabled the subscription, you see a (400) The subscription is already enabled message. This means the subscription is successfully enabled already. Ignore this error and continue with the setup.
If you don't see the above message or a (200) response, the request likely failed. There might be an error with your setup that's keeping the flow from working. Common issues to check are:
- The identity provider on the Security tab should be set to Microsoft Entra ID.
- Audit logs should be enabled and you have permission to view them. Check your access by searching the Microsoft Compliance Manager.
- If you don't have permissions, see Before you search the audit log.
- If you enabled the audit logs recently, try seaching again in a few minutes to give the audit log time to activate.
- The tenant ID from your Microsoft Entra app registration should be correct.
- Your resource URL should have no added spaces or characters at the end.
- Review the steps in your Microsoft Entra app registration for correctness.
- The security settings of the custom connector, as described in step 6 of the custom connector setup, should be updated correctly.
If you are still seeing failures, your connection might be in a bad state. For more information, see Step-by-step instructions to repair Audit Log connection.
Set up the Power Automate flow
A Power Automate flow uses the custom connector, queries the audit log daily, and writes the Power Apps launch events to a Microsoft Dataverse table. This table is then used in the Power BI dashboard to report on sessions and unique users of an app.
Download the solution in Set up core components.
Go to make.powerapps.com.
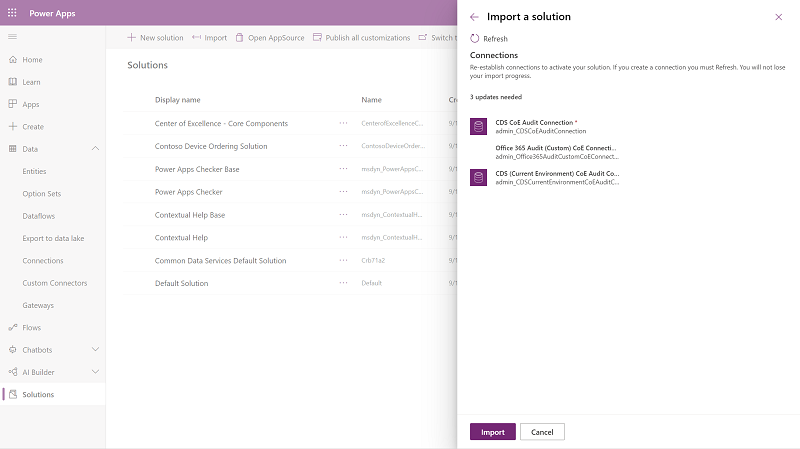
Import the Center of Excellence audit logs solution using the
CenterofExcellenceAuditLogs_*x_x_x_xxx*_managed.zipfile.Establish connections then activate your solution. If you create a new connection, you must select Refresh. You don't lose your import progress.
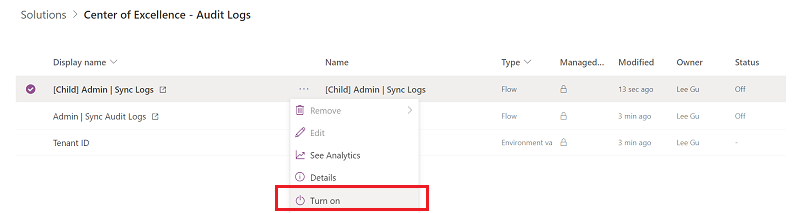
Open the Center of Excellence – Audit Log solution.
Remove the unmanaged layer from the [Child] Admin | Sync Logs.
Select the [Child] Admin | Sync Logs.
Edit the Run only users settings.
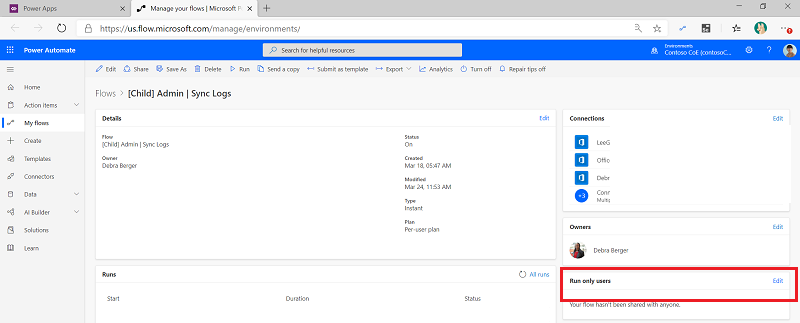
For the Office 365 Management API custom connector, change the value to Use this connection (userPrincipalName@company.com). If there's no connection for any of the connectors, go to Dataverse > Connections, and create one for the connector.
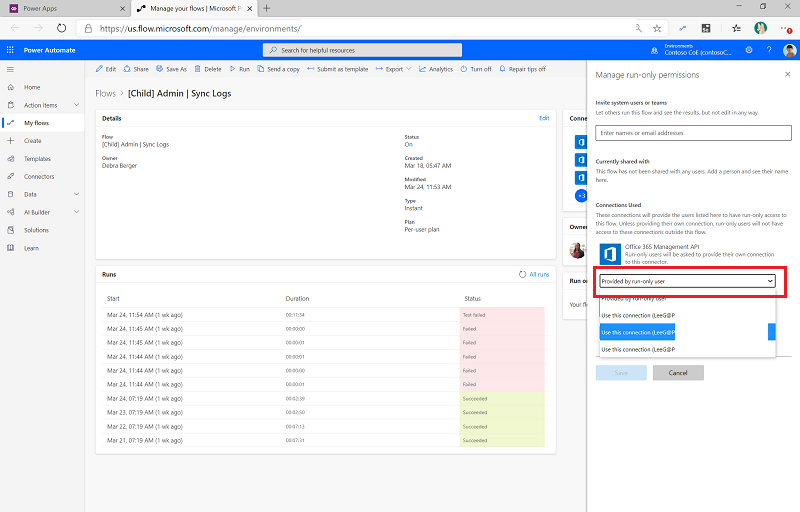
For the Microsoft Dataverse connector, leave the run-only permission value blank and confirm that the connection reference for the CoE Audit Logs - Dataverse connection is configured correctly. If the connection is showing an error, update the connection reference for the CoE Audit Logs - Dataverse connection reference.

Select Save, and then close the Flow details tab.
(Optional) Edit the
TimeInterval-UnitandTimeInterval-Intervalenvironment variables to gather smaller chunks of time. The default value is to chunk1day into1hour segments. You receive an alert from this solution if the Audit Log fails to collect all data with your configured time interval.Name Description StartTime-Interval Must be a whole number to represent the start time for how far back to fetch. Default value: 1(for one day back)StartTime-Unit Determines units for how far back in time to go to fetch data. Must be a value from accepted as an input parameter to Add to Time. Example legal values: Minute,Hour,Day. Default value isDay.TimeInterval-Unit Determines units for chunking the time since start. Must be a value from accepted as an input parameter to Add to Time. Example legal values: Minute,Hour,Day. Default value isHour.TimeInterval-Interval Must be a whole number to represent the number of chunks of type unit. Default value is 1(for 1-hour chunks).TimeSegment-CountLimit Must be a whole number to represent the limit on the number of chunks that can be created. Default value is 60.[!ITIP] These default values work in a medium-sized tenant. You might have to adjust the values multiple times for this to work for your tenant size.


For more information on updating environment variables, see Update Environment Variables.
Back in the solution, turn on both the [Child] Admin | Sync Logs flow and the Admin | Sync Audit Logs flow.

Example configurations for environment variables
Here are example configurations for these values:
| StartTime-Interval | StartTime-Unit | TimeInterval-Interval | TimeInterval-Unit | TimeSegment-CountLimit | Expectation |
|---|---|---|---|---|---|
| 1 | day | 1 | hour | 60 | Create 24 child flows, which is within the limit of 60. Each child flow pulls back 1 hour of logs from the past 24 hours. |
| 2 | day | 1 | hour | 60 | Create 48 child flows, which is within the limit of 60. Each child flow pulls back 1 hour of logs from the past 48 hours. |
| 1 | day | 5 | minute | 300 | Creates 288 child flows, which is within the limit of 300. Each child flow pulls back 5 minutes of logs from the past 24 hours. |
| 1 | day | 15 | minute | 100 | Create 96 child flows, which is within the limit of 100. Each child flow pulls back 15 minutes of logs from the past 24 hours. |
How to get older data
Once configured, this solution collects app launches, though isn't set up to collect historic app launches. Depending on your Microsoft 365 license, historic data is available for up to one year using the audit log within Microsoft Purview.
You can load historic data into the CoE Starter Kit tables manually. For more information, see How to import old Audit Logs.
I found a bug with the CoE Starter Kit. Where should I go?
To file a bug against the solution, go to aka.ms/coe-starter-kit-issues.
Feedback
Coming soon: Throughout 2024 we will be phasing out GitHub Issues as the feedback mechanism for content and replacing it with a new feedback system. For more information see: https://aka.ms/ContentUserFeedback.
Submit and view feedback for