Windows Installation
This guide describes the steps for installing Xamarin.Android for Visual Studio on Windows, and it explains how to configure Xamarin.Android for building your first Xamarin.Android application.
Overview
In this guide, you will learn the following:
How to configure custom locations for the Java Development Kit, Android SDK, and Android NDK.
How to launch the Android SDK Manager to download and install additional Android SDK components.
How to prepare an Android device or emulator for debugging and testing.
How to create your first Xamarin.Android app project.
By the end of this guide, you will have a working Xamarin.Android installation integrated into Visual Studio, and you will be ready to start building your first Xamarin.Android application.
Installation
For detailed information on installing Xamarin for use with Visual Studio on Windows, see the Windows Install guide.
Configuration
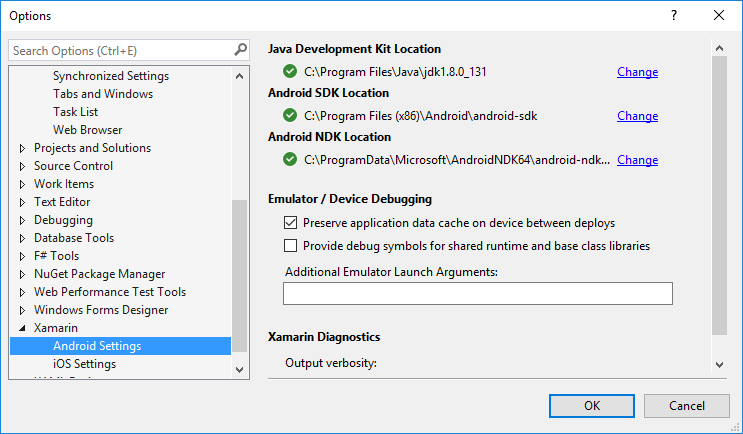
Xamarin.Android uses the Java Development Kit (JDK) and the Android SDK to build apps. During installation, the Visual Studio installer places these tools in their default locations and configures the development environment with the appropriate path configuration. You can view and change these locations by clicking Tools > Options > Xamarin > Android Settings:

For most users these default locations will work without further changes. However, you may wish to configure Visual Studio with custom locations for these tools (for example, if you have installed the Java JDK, Android SDK, or NDK in a different location). Click Change next to a path that you want to change, then navigate to the new location.
Xamarin.Android uses JDK 11, which is required for API 31 and greater, JDK 8, which is required if you are developing for API level 24 to 30 (JDK 8 also supports API levels earlier than 24).
Important
Xamarin.Android does not support JDK 9.
Android SDK Manager
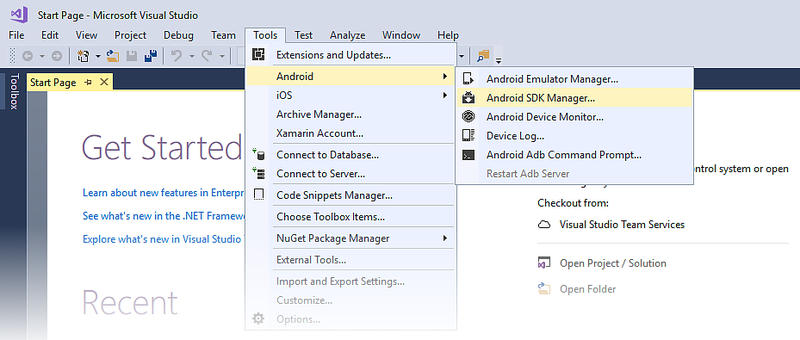
Android uses multiple Android API level settings to determine your app's compatibility across the various versions of Android (for more information about Android API levels, see Understanding Android API Levels). Depending on what Android API level(s) you want to target, you may need to download and install additional Android SDK components. In addition, you may need to install optional tools and emulator images provided in the Android SDK. To do this, use the Android SDK Manager. You can launch the Android SDK Manager by clicking Tools > Android > Android SDK Manager:
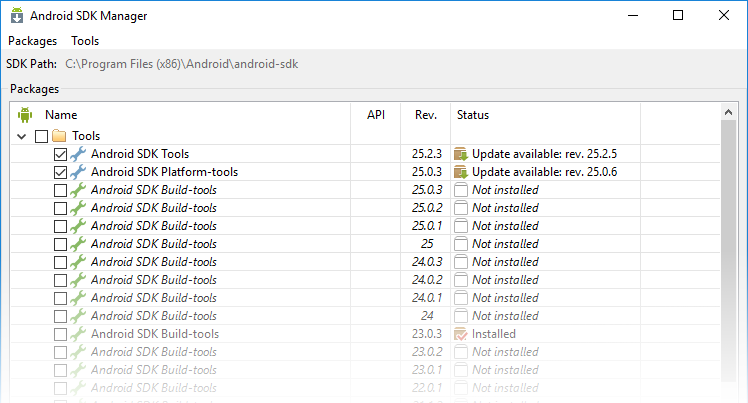
By default, Visual Studio installs the Google Android SDK Manager:

You can use the Google Android SDK Manager to install versions of the Android SDK Tools package up to version 25.2.3. However, if you need to use a later version of the Android SDK Tools package, you must install the Xamarin Android SDK Manager plugin for Visual Studio (available from the Visual Studio Marketplace). This is necessary because Google's standalone SDK Manager was deprecated in version 25.2.3 of the Android SDK Tools package.
For more information about using the Xamarin Android SDK Manager, see Android SDK Setup.
Windows 11 Subsystem for Android (Preview)
Windows 11 now includes a subsystem for running Android applications. This provides a new way to quickly debug your Android applications directly from Visual Studio without the need for another device or emulator. For complete instructions and requirements to enable this feature, follow the Windows 11 guidance.
Once connected with adb, your machine will show up in the run/debug menu alongside any emulators or devices you have configured.
Known limitations and issues:
- Google Play Services are not supported.
- Remaining on a breakpoint while debugging will eventually timeout and crash your app.
Android Emulator
The Android Emulator can be helpful tool to develop and test a Xamarin.Android app. For example, a physical device such as a tablet may not be readily available during development, or a developer may want to run some integration tests on their computer before committing code.
Emulating an Android device on a computer involves the following components:
- Google Android Emulator – This is an emulator based on QEMU that creates a virtualized device running on the developer's workstation.
- An Emulator Image – An emulator image is a template or a specification of the hardware and operating system that is meant to be virtualized. For example, one emulator image would identify the hardware requirements for a Nexus 5X running Android 7.0 with Google Play Services installed. Another emulator image might specific a 10" table running Android 6.0.
- Android Virtual Device (AVD) – An Android Virtual Device is an emulated Android device created from an emulator image. When running and testing Android apps, Xamarin.Android will start the Android Emulator, starting a specific AVD, install the APK, and then run the app.
A significant improvement in performance when developing on x86 based computers can be achieved by using special emulator images that are optimized for x86 architecture and one of two virtualization technologies:
- Microsoft's Hyper-V – Available on computers running the Windows 10 April 2018 Update or later.
- Intel's Hardware Accelerated Execution Manager (HAXM) – Available on x86 computers running OS X, macOS, or older versions of Windows.
For more information about the Android Emulator, Hyper-V, and HAXM, please see Hardware Acceleration for Emulator Performance guide.
Note
On versions of Windows prior to Windows 10 April 2018 Update, HAXM is not compatible with Hyper-V. In this scenario it is necessary to either disable Hyper-V or to use the slower emulator images that do not have the x86 optimizations.
Android Device
If you have a physical Android device to use for testing, this is a good time to set it up for development use. See Set Up Device for Development to configure your Android device for development, then connect it to your computer for running and debugging Xamarin.Android applications.
Create an Application
Now that you have installed Xamarin.Android, you can launch Visual Studio create a new project. Click File > New > Project to begin creating your app:

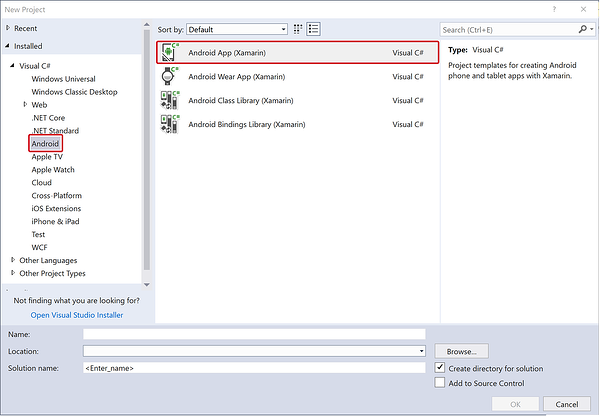
In the New Project dialog, select Android under Templates and click Android App in the right pane. Enter a name for your app (in the screenshot below, the app is called MyApp), then click OK:
That's it! Now you are ready to use Xamarin.Android to create Android applications!
Summary
In this article, you learned how to set up and install the Xamarin.Android platform on Windows, how to (optionally) configure Visual Studio with custom Java JDK and Android SDK installation locations, how to launch the SDK Manager to install additional Android SDK components, how to setup an Android device or emulator, and how to start building your first application.
The next step is to have a look at the Hello, Android tutorials to learn how to create a working Xamarin.Android app.

