Hello, iOS – Deep dive
The Quickstart walkthrough, introduced building and running a basic Xamarin.iOS application. Now it’s time to develop a deeper understanding of how iOS applications work so you can build more sophisticated programs. This guide reviews the steps that in the Hello, iOS walkthrough to enable understanding of the fundamental concepts of iOS application development.
This guide helps you develop the skills and knowledge required to build a single-screen iOS application. After working through it, you should have an understanding of the different parts of a Xamarin.iOS application and how they fit together.
Introduction to Visual Studio for Mac
Visual Studio for Mac is a free, open-source IDE that combines features from Visual Studio and Xcode. It features a fully integrated visual designer, a text editor complete with refactoring tools, an assembly browser, source code integration, and more. This guide introduces some basic Visual Studio for Mac features, but if you're new to Visual Studio for Mac, check out the Visual Studio for Mac documentation.
Visual Studio for Mac follows the Visual Studio practice of organizing code into solutions and projects. A solution is a container that can hold one or more projects. A project can be an application (such as iOS or Android), a supporting library, a test application, and more. In the Phoneword app, a new iPhone project was added using the Single View Application template. The initial solution looked like this:

Introduction to Visual Studio
Visual Studio is a powerful IDE from Microsoft. It features a fully integrated visual designer, a text editor complete with refactoring tools, an assembly browser, source code integration, and more. This guide introduces some basic Visual Studio features with Xamarin Tools for Visual Studio.
Visual Studio organizes code into solutions and projects. A solution is a container that can hold one or more projects. A project can be an application (such as iOS or Android), a supporting library, a test application, and more. In the Phoneword app, a new iPhone project was added using the Single View Application template. The initial solution looked like this:
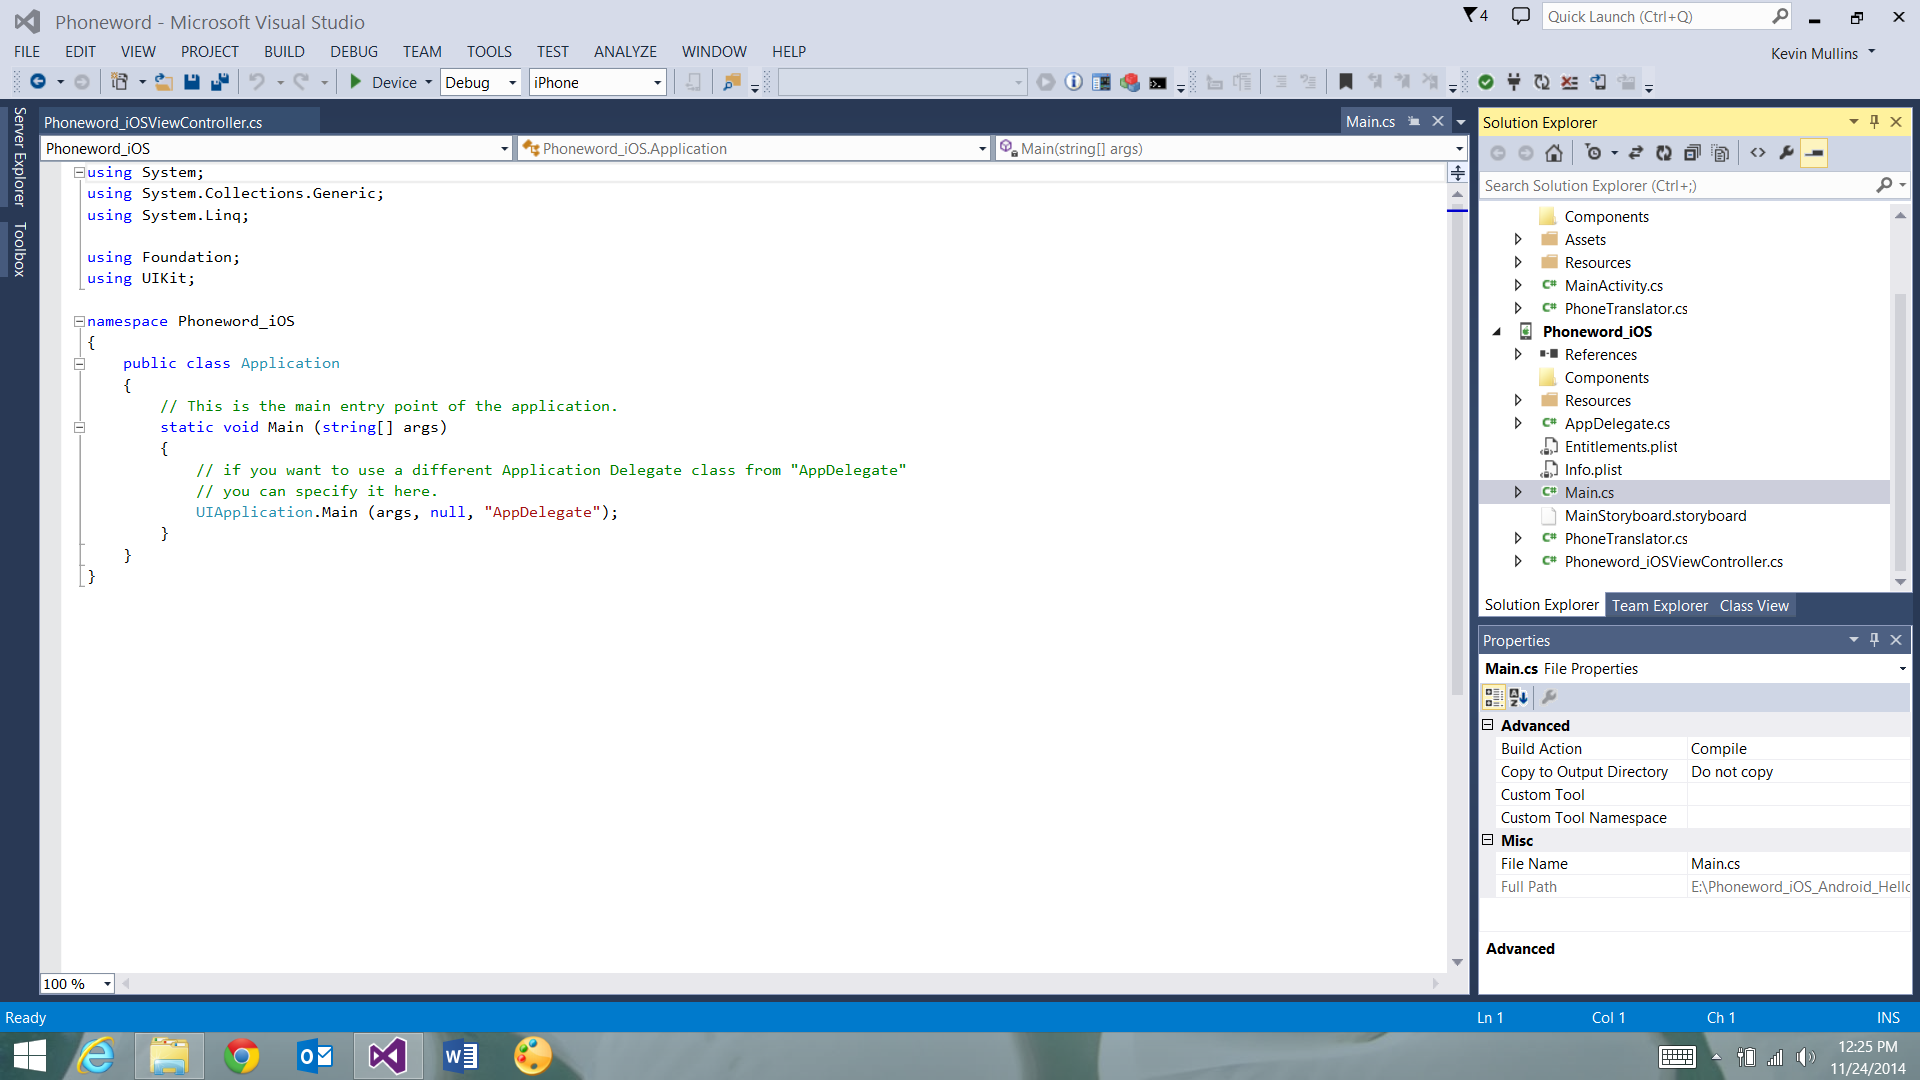
Anatomy of a Xamarin.iOS application
On the left is the solution Pad, which contains the directory structure and all the files associated with the solution:

On the right is the solution Pane, which contains the directory structure and all the files associated with the solution:
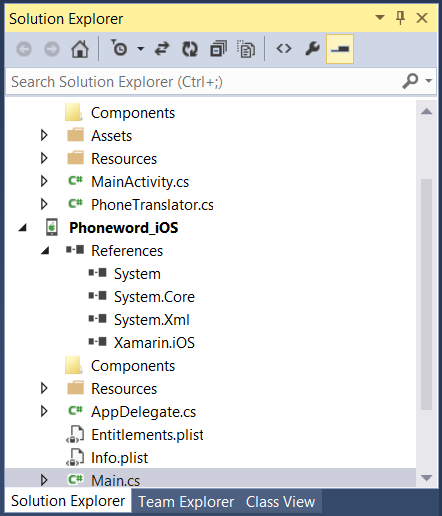
In the Hello, iOS walkthrough, you created a solution called Phoneword and placed an iOS project - Phoneword_iOS - inside it. The items inside the project include:
- References - Contains the assemblies required to build and run the application. Expand the directory to see references to .NET assemblies such as System, System.Core, and System.Xml, as well as a reference to the Xamarin.iOS assembly.
- Packages - The packages directory contains ready-made NuGet packages.
- Resources - The resources folder stores other media.
- Main.cs – This contains the main entry point of the application. To start the application, the name of the main application class, the
AppDelegate, is passed in . - AppDelegate.cs – This file contains the main application class and is responsible for creating the Window, building the user interface, and listening to events from the operating system.
- Main.storyboard - The Storyboard contains the visual design of the application’s user interface. Storyboard files open in a graphical editor called the iOS Designer.
- ViewController.cs – The view controller powers the screen (View) that a user sees and touches. The view controller is responsible for handling interactions between the user and the View.
- ViewController.designer.cs – The
designer.csis an auto-generated file that serves as the glue between controls in the View and their code representations in the view controller. Because this is an internal plumbing file, the IDE will overwrite any manual changes and most of the time this file can be ignored. - Info.plist – The Info.plist is where application properties such as the application name, icons, launch images, and more are set. This is a powerful file and a thorough introduction to it is available in the Working with Property Lists guide.
- Entitlements.plist - The entitlements property list lets us specify application capabilities (also called App Store Technologies) such as iCloud, PassKit, and more. More information on the Entitlements.plist can be found in the Working with Property Lists guide. For a general introduction to entitlements, refer to the Device Provisioning guide.
Architecture and app fundamentals
Before an iOS application can load a user interface, two things need to be in place. First, the application needs to define an entry point – the first code that runs when the application’s process is loaded into memory. Second, it needs to define a class to handle application-wide events and interact with the operating system.
This section studies the relationships illustrated in the following diagram:
Main method
The main entry point of an iOS application is the Application class. The Application class is defined in the Main.cs file and contains a static Main method. It creates a new Xamarin.iOS application instance and passes the name of the Application Delegate class that will handle OS events. The template code for the static Main method appears below:
using System;
using UIKit;

namespace Phoneword_iOS
{
    public class Application
    {
        static void Main (string[] args)
        {
            UIApplication.Main (args, null, "AppDelegate");
        }
    }
}
Application delegate
In iOS, the Application Delegate class handles system events; this class lives inside AppDelegate.cs. The AppDelegate class manages the application Window. The Window is a single instance of the UIWindow class that serves as a container for the user interface. By default, an application gets only one Window onto which to load its content, and the Window is attached to a Screen (single UIScreen instance) that provides the bounding rectangle matching the dimensions of the physical device screen.
The AppDelegate is also responsible for subscribing to system updates about important application events such as when the app finishes launching or when memory is low.
The template code for the AppDelegate is presented below:
using System;
using Foundation;
using UIKit;

namespace Phoneword_iOS
{

    [Register ("AppDelegate")]
    public partial class AppDelegate : UIApplicationDelegate
    {
        public override UIWindow Window {
            get;
            set;
        }

        ...
    }
}
Once the application has defined its Window, it can begin loading the user interface. The next section explores UI creation.
User interface
The user interface of an iOS app is like a storefront - the application typically gets one Window, but it can fill the Window up with as many objects at it needs, and the objects and arrangements can be changed depending on what the app wants to display. The objects in this scenario - the things that the user sees - are called Views. To build a single screen in an application, Views are stacked on top of each other in a Content View Hierarchy, and the hierarchy is managed by a single view controller. Applications with multiple screens have multiple Content View Hierarchies, each with its own view controller, and the application places Views in the Window to create a different Content View Hierarchy based on the screen that the user is on.
For more details about building a user interface using Storyboards, see the Designing with Storyboards section of Xcode Overview in Apple’s iOS Developer Library.
The diagram below illustrates the relationships between the Window, Views, Subviews, and view controller that bring the user interface to the device screen:
In the next section discusses how to work with Views in code and learn to program for user interaction using view controllers and the View lifecycle.
View controllers and the view lifecycle
Every Content View Hierarchy has a corresponding view controller to power user interaction. The role of the view controller is to manage the Views in the Content View Hierarchy. The view controller is not part of the Content View Hierarchy, and it's not an element in the interface. Rather, it provides the code that powers the user's interactions with the objects on the screen.
View controllers and storyboards
The view controller is represented in a Storyboard as a bar at the bottom of the Scene. Selecting the view controller brings up its properties in the Properties Pad:

A custom view controller class for the Content View Hierarchy represented by this Scene can be set by editing the Class property in the Identity section of the Properties Pad. For example, our Phoneword application sets the ViewController as the view controller for our first screen, as illustrated by the screenshot below:
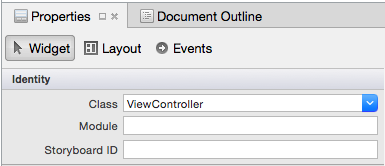
The view controller is represented in a Storyboard as a bar at the bottom of the Scene. Selecting the view controller brings up its properties in the Properties Pane:
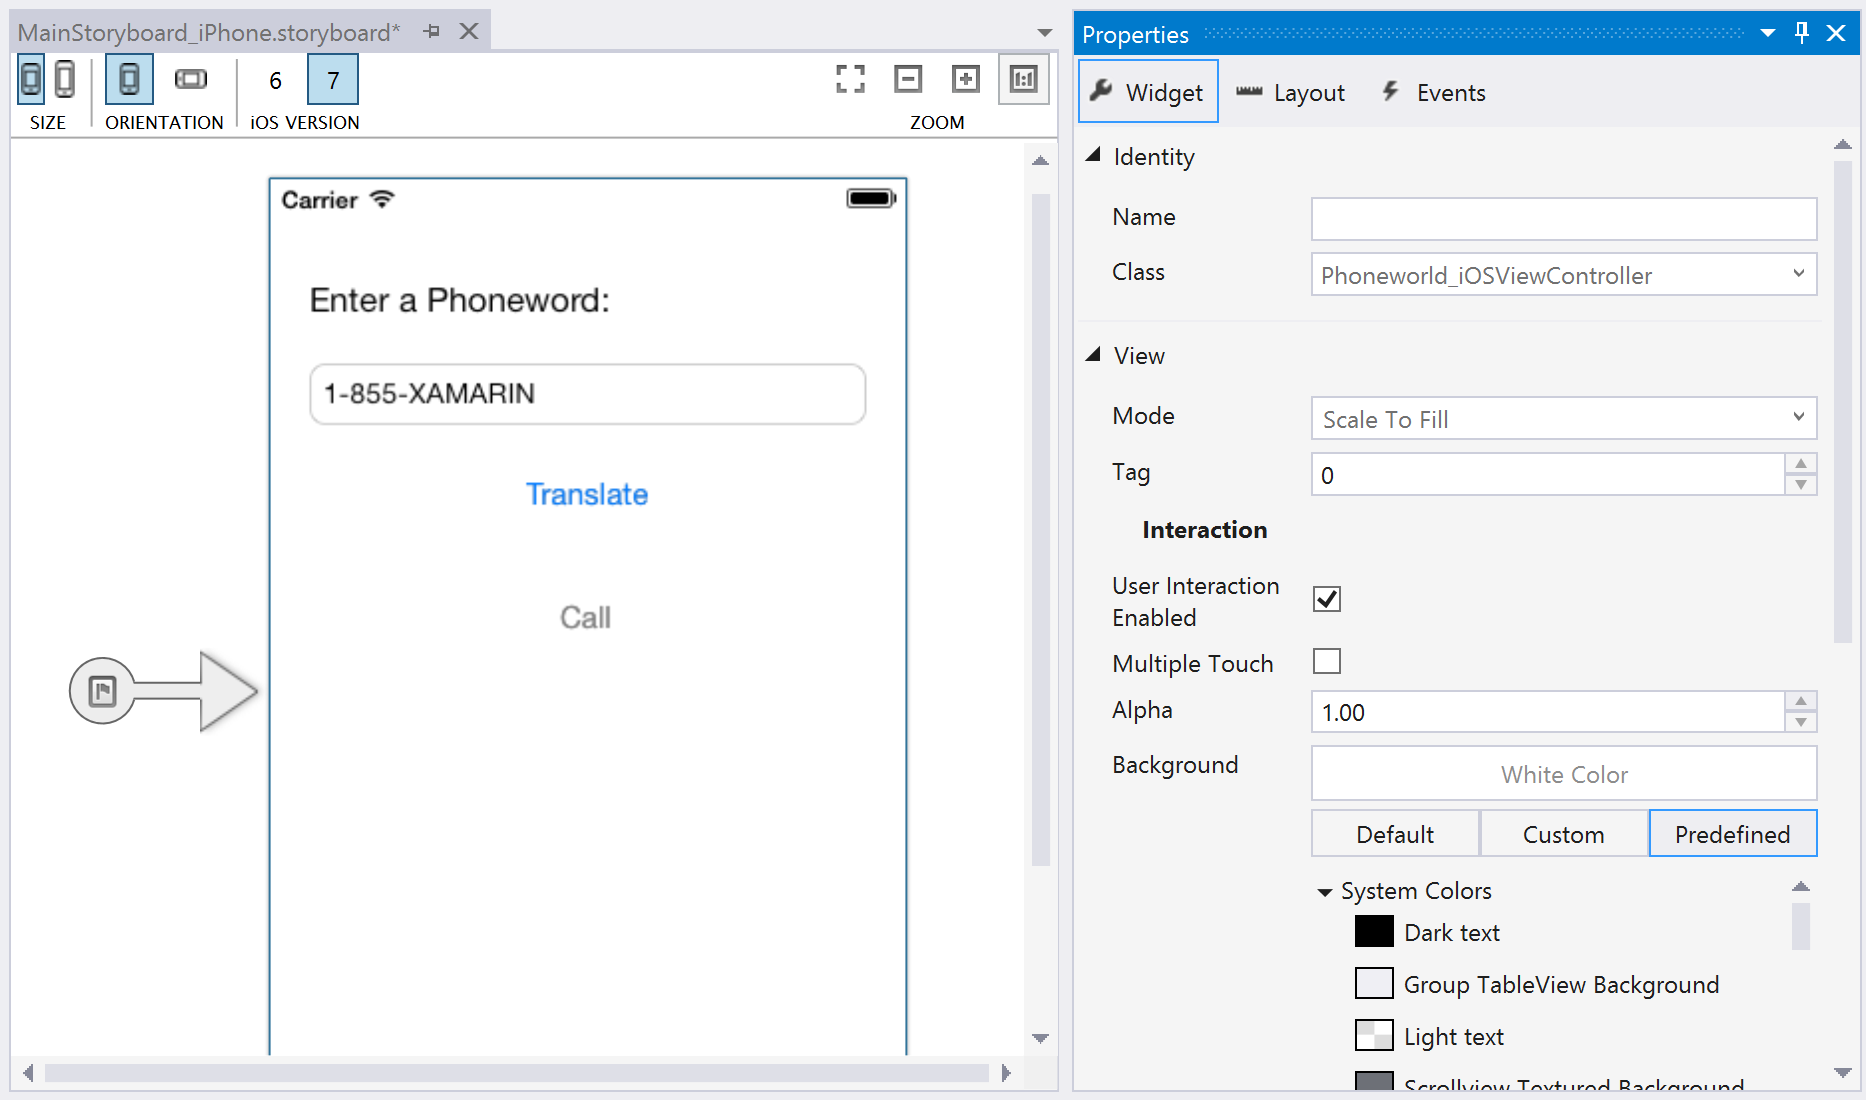
A custom view controller class for the Content View Hierarchy represented by this Scene can be set by editing the Class property in the Identity section of the Properties Pane. For example, our Phoneword application sets the ViewController as the view controller for our first screen, as illustrated by the screenshot below:
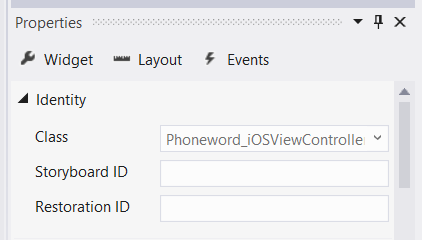
This links the Storyboard representation of the view controller to the ViewController C# class. Open the ViewController.cs file and notice view controller is a subclass of UIViewController, as illustrated by the code below:
public partial class ViewController : UIViewController
{
    public ViewController (IntPtr handle) : base (handle)
    {

    }
}
The ViewController now drives the interactions of the content view hierarchy associated with this view controller in the storyboard. Next you’ll learn about the view controller's role in managing the Views by introducing a process called the view lifecycle.
Note
For visual-only screens that don’t require user interaction, the Class property can be left blank in the Properties Pad. This sets the view controller's backing class as the default implementation of a UIViewController, which is appropriate if you don’t plan on adding custom code.
View lifecycle
The view controller is in charge of loading and unloading content view hierarchies from the window. When something of importance happens to a view in the content view hierarchy, the operating system notifies the view controller through events in the view lifecycle. By overriding methods in the view lifecycle, you can interact with the objects on the screen and create a dynamic, responsive user interface.
These are the basic lifecycle methods and their function:
- ViewDidLoad - Called once the first time the view controller loads its Content View Hierarchy into memory. This is a good place to do initial setup because it is when Subviews first become available in code.
- ViewWillAppear - Called every time a view controller's View is about to be added to a Content View Hierarchy and appear on the screen.
- ViewWillDisappear - Called every time a view controller's View is about to be removed from a Content View Hierarchy and disappear from the screen. This lifecycle event is used for cleanup and saving state.
- ViewDidAppear and ViewDidDisappear - Called when a View gets added or removed from the Content View Hierarchy, respectively.
When custom code is added to any stage of the lifecycle, that lifecycle method’s base implementation must be overridden. This is achieved by tapping into the existing lifecycle method, which has some code already attached to it, and extending it with additional code. The base implementation is called from inside the method to make sure the original code runs before the new code. An example of this is demonstrated in the next section.
For more information on working with view controllers, refer to Apple's view controller Programming Guide for iOS and the UIViewController reference.
Responding to user interaction
The most important role of the view controller is responding to user interaction, such as button presses, navigation, and more. The simplest way to handle user interaction is to wire up a control to listen to user input and attach an event handler to respond to the input. For example, a button could be wired up to respond to a touch event, as demonstrated in the Phoneword app.
Let's explore how this works.
In the Phoneword_iOS project, a button was added called TranslateButton to the Content View Hierarchy:
When a referencing outlet is created using Xcode Interface Builder, Xcode Sync automatically maps it to a control in the ViewController.designer.cs, making the TranslateButton available inside the ViewController class. Controls first become available in the ViewDidLoad stage of the View lifecycle, so this lifecycle method is used to respond to the user's touch:
public override void ViewDidLoad ()
{
    base.ViewDidLoad ();

    // wire up TranslateButton here
}
The Phoneword app uses a touch event called TouchUpInside to listen to the user's touch. TouchUpInside listens for a touch up event (finger lifting off the screen) that follows a touch down (finger touching the screen) inside the bounds of the control. The opposite of TouchUpInside is the TouchDown event, which fires when the user presses down on a control. The TouchDown event captures a lot of noise and gives the user no option to cancel the touch by sliding their finger off the control. TouchUpInside is the most common way to respond to a Button touch and creates the experience the user expects when pressing a button. More information on this is available in Apple’s iOS Human Interface Guidelines.
The app handled the TouchUpInside event with a lambda, but a delegate or a named event handler could have also been used. The final Button code resembled the following:
public override void ViewDidLoad ()
{
    base.ViewDidLoad ();
    string translatedNumber = "";

    TranslateButton.TouchUpInside += (object sender, EventArgs e) => {
      translatedNumber = Core.PhonewordTranslator.ToNumber(PhoneNumberText.Text);
      PhoneNumberText.ResignFirstResponder ();

      if (translatedNumber == "") {
        CallButton.SetTitle ("Call", UIControlState.Normal);
        CallButton.Enabled = false;
      } else {
        CallButton.SetTitle ("Call " + translatedNumber, UIControlState.Normal);
        CallButton.Enabled = true;
      }
  };
}
Additional concepts introduced in Phoneword
The Phoneword application introduced several concepts not covered in this guide. These concepts include:
Change Button Text – The Phoneword app demonstrated how to change the text of a Button by calling
SetTitleon the Button and passing in the new text and the Button’s Control State. For example, the following code changes the CallButton’s text to “Call”:CallButton.SetTitle ("Call", UIControlState.Normal);Enable and Disable Buttons – Buttons can be in an
EnabledorDisabledstate. A disabled Button won’t respond to user input. For example, the following code disables theCallButton:CallButton.Enabled = false;For more information on buttons, refer to the Buttons guide.
Dismiss the Keyboard – When the user taps the Text Field, iOS displays the keyboard to let the user enter input. Unfortunately, there is no built-in functionality to dismiss the keyboard. The following code is added to the
TranslateButtonto dismiss the keyboard when the user presses theTranslateButton:PhoneNumberText.ResignFirstResponder ();For another example of dismissing the keyboard, refer to the Dismiss the Keyboard recipe.
Place Phone Call with URL – In the Phoneword app, an Apple URL scheme is used to launch the system phone app. The custom URL scheme consists of a “tel:” prefix and the translated phone number, as illustrated by the code below:
var url = new NSUrl ("tel:" + translatedNumber);
if (!UIApplication.SharedApplication.OpenUrl (url))
{
    // show alert Controller
}
Show an Alert – When a user tries to place a phone call on a device that doesn’t support calls – for example the simulator or an iPod Touch – an alert dialog is displayed to let the user know the phone call can’t be placed. The code below creates and populates an alert controller:
if (!UIApplication.SharedApplication.OpenUrl (url)) {
                var alert = UIAlertController.Create ("Not supported", "Scheme 'tel:' is not supported on this device", UIAlertControllerStyle.Alert);
                alert.AddAction (UIAlertAction.Create ("Ok", UIAlertActionStyle.Default, null));
                PresentViewController (alert, true, null);
            }
For more information on iOS alert views, refer to the Alert Controller recipe.
Testing, deployment, and finishing touches
Both Visual Studio for Mac and Visual Studio provide many options for testing and deploying an application. This section covers debugging options, demonstrates testing applications on device, and introduces tools for creating custom app icons and launch images.
Debugging tools
Sometimes issues in application code are difficult to diagnose. To help diagnose complex code issues, you could Set a Breakpoint, Step Through Code, or Output Information to the Log Window.
Deploy to a device
The iOS Simulator is a quick way to test an application. The Simulator has a number of useful optimizations for testing, including mock location, simulating movement, and more. However, users will not consume the final app in a Simulator. All applications should be tested on real devices early and often.
A device takes time to provision and requires an Apple Developer Account. The Device Provisioning guide gives thorough instructions on getting a device ready for development.
Note
At present, due to a requirement from Apple, it is necessary to have a development certificate or signing identity to build your code for a physical device or the simulator. Follow the steps in the Device Provisioning guide to set this up.
Once the device is provisioned, you can deploy to it by plugging it in, changing the target in the build toolbar to the iOS Device, and pressing Start ( Play) as illustrated by the following screenshot:


The app will deploy to the iOS device:
Generate custom icons and launch images
Not everyone has a designer available to create the custom icons and launch images an app needs to stand out. Here are several alternate approaches to generating custom app artwork:
- Pixelmator – A versatile image editing app for Mac that costs about $30.
- Fiverr – Choose from a variety of designers to create an icon set for you, starting at $5. Can be hit or miss but a good resource if you need icons designed on the fly
- Visual Studio – You can use this to create a simple icon set for your app directly in the IDE.
- Fiverr – Choose from a variety of designers to create an icon set for you, starting at $5. Can be hit or miss but a good resource if you need icons designed on the fly
For more information about icon and launch image sizes and requirements, refer to the Working with Images guide.
Summary
Congratulations! You now have a solid understanding of the components of a Xamarin.iOS application as well as the tools used to create them. In the next tutorial in the Getting Started series, you’ll extend our application to handle multiple screens. Along the way you’ll implement a Navigation Controller, learn about Storyboard Segues, and introduce the Model, View, Controller (MVC) pattern as you extend your application to handle multiple screens.


