Tutorial: Create and deploy a SQL project
Applies to: ![]() SQL Server
SQL Server ![]() Azure SQL Database
Azure SQL Database ![]() Azure SQL Managed Instance
Azure SQL Managed Instance
The development cycle of a SQL database project enables database development to be integrated into a continuous integration and continuous deployment (CI/CD) workflows familiar as a development best practice. While deployment of a SQL database project can be done manually, it's recommended to use a deployment pipeline to automate the deployment process such that ongoing deployments are run based on your continued local development without additional effort.
This article steps through creating a new SQL project, adding objects to the project, and setting up a continuous deployment pipeline for building and deploying the project with GitHub actions. The tutorial is a superset of the contents of the SQL projects getting started article. While the tutorial implements the deployment pipeline in GitHub actions, the same concepts apply to Azure DevOps, GitLab, and other automation environments.
In this tutorial, you:
- Create a new SQL project
- Add objects to the project
- Build the project locally
- Check the project into source control
- Add a project build step to a continuous deployment pipeline
- Add a
.dacpacdeployment step to a continuous deployment pipeline
If you've already completed the steps in the SQL projects getting started article, you can skip to step 4. At this end of this tutorial, your SQL project will be automatically building and deploying changes to a target database.
Prerequisites
# install SqlPackage CLI
dotnet tool install -g Microsoft.SqlPackage

# install Microsoft.Build.Sql.Templates
dotnet new install Microsoft.Build.Sql.Templates
Make sure you have the following items to complete the pipeline setup in GitHub:
A GitHub account where you can create a repository. Create one for free.
GitHub actions is enabled on your repository.
Note
To complete the deployment of a SQL database project, you need access to an Azure SQL or SQL Server instance. You can develop locally for free with SQL Server developer edition on Windows or in containers.
Step 1: Create a new project
We start our project by creating a new SQL database project before manually adding objects to it. There are other ways to create a project that enable immediately populating the project with objects from an existing database, such as using the schema comparison tools.
Select File, New, then Project.
In the New Project dialog box, use the term SQL Server in the search box. The top result should be SQL Server Database Project.

Select Next to proceed to the next step. Provide a project name, which doesn't need to match a database name. Verify and modify the project location as needed.
Select Create to create the project. The empty project is opened and visible in the Solution Explorer for editing.
Select File, New, then Project.
In the New Project dialog box, use the term SQL Server in the search box. The top result should be SQL Server Database Project, SDK-style (preview).

Select Next to proceed to the next step. Provide a project name, which doesn't need to match a database name. Verify and modify the project location as needed.
Select Create to create the project. The empty project is opened and visible in the Solution Explorer for editing.
In the Database Projects view of VS Code or Azure Data Studio, select the New Project button.
The first prompt determines which project template to use, primarily based on whether the target platform is SQL Server or Azure SQL. If prompted to select a specific version of SQL, choose the version that matches the target database but if the target database version is unknown, choose the latest version as the value can be modified later.
Enter a project name in the text input that appears, which doesn't need to match a database name.
In the "Select a Folder" dialog that appears, select a directory for the project's folder, .sqlproj file, and other contents to reside in.
When prompted whether to create an SDK-style project (preview), select Yes.
Once completed, the empty project is opened and visible in the Database Projects view for editing.
With the .NET templates for Microsoft.Build.Sql projects installed, you can create a new SQL database project from the command line. The -n option specifies the name of the project, and the -tp option specifies the project target platform.
Use the -h option to see all available options.
# install Microsoft.Build.Sql.Templates
dotnet new sqlproject -n MyDatabaseProject
Step 2: Add objects to the project
In Solution Explorer, right-click the project node and select Add, then Table. The Add New Item dialog appears, where you can specify the table name. Select Add to create the table in the SQL project.
The table is opened in the Visual Studio table designer with the template table definition, where you can add columns, indexes, and other table properties. Save the file when you're done making the initial edits.
More database objects can be added through the Add New Item dialog, such as views, stored procedures, and functions. Access the dialog by right-clicking the project node in Solution Explorer and selecting Add, then the desired object type. Files in the project can be organized into folders through the New Folder option under Add.
In Solution Explorer, right-click the project node and select Add, then New Item. The Add New Item dialog appears, select Show All Templates and then Table. Specify the table name as the file name and select Add to create the table in the SQL project.
The table is opened in the Visual Studio query editor with the template table definition, where you can add columns, indexes, and other table properties. Save the file when you're done making the initial edits.
More database objects can be added through the Add New Item dialog, such as views, stored procedures, and functions. Access the dialog by right-clicking the project node in Solution Explorer and selecting Add, then the desired object type after Show All Templates. Files in the project can be organized into folders through the New Folder option under Add.
In the Database Projects view of VS Code or Azure Data Studio, right-click the project node and select Add Table. In the dialog that appears, specify the table name.
The table is opened in the text editor with the template table definition, where you can add columns, indexes, and other table properties. Save the file when you're done making the initial edits.
More database objects can be added through the context menu on the project node, such as views, stored procedures, and functions. Access the dialog by right-clicking the project node in Database Projects view of VS Code or Azure Data Studio, then the desired object type. Files in the project can be organized into folders through the New Folder option under Add.
Files can be added to the project by creating them in the project directory or nested folders. The file extension should be .sql and organization by object type or schema and object type is recommended.
The base template for a table can be used as a starting point for creating a new table object in the project:
CREATE TABLE [dbo].[Table1]
(
  [Id] INT NOT NULL PRIMARY KEY
)
Step 3: Build the project
The build process validates the relationships between objects and the syntax against the target platform specified in the project file. The artifact output from the build process is a .dacpac file, which can be used to deploy the project to a target database and contains the compiled model of the database schema.
In Solution Explorer, right-click the project node and select Build.
The output window automatically opens to display the build process. If there are errors or warnings, they're displayed in the output window. On a successful build, the build artifact (.dacpac file) is created its location is included in the build output (default is bin\Debug\projectname.dacpac).
In the Database Projects view of VS Code or Azure Data Studio, right-click the project node and select Build.
The output window automatically opens to display the build process. If there are errors or warnings, they're displayed in the output window. On a successful build, the build artifact (.dacpac file) is created its location is included in the build output (default is bin/Debug/projectname.dacpac).
SQL database projects can be built from the command line using the dotnet build command.
dotnet build

# optionally specify the project file
dotnet build MyDatabaseProject.sqlproj
The build output includes any errors or warnings and the specific files and line numbers where they occur. On a successful build, the build artifact (.dacpac file) is created its location is included in the build output (default is bin/Debug/projectname.dacpac).
Step 4: Check the project into source control
We will initialize our project as a Git repository and commit the project files to source control. This step is necessary to enable the project to be shared with others and to be used in a continuous deployment pipeline.
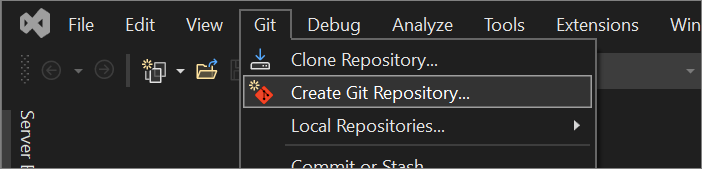
From the Git menu in Visual Studio, select Create Git Repository.
In the Create a Git repository dialog, under the Push to a new remote section, choose GitHub.
In the Create a new GitHub repository section of the Create a Git repository dialog, enter the name of the repo you want to create. (If you haven't yet signed in to your GitHub account, you can do so from this screen, too.)
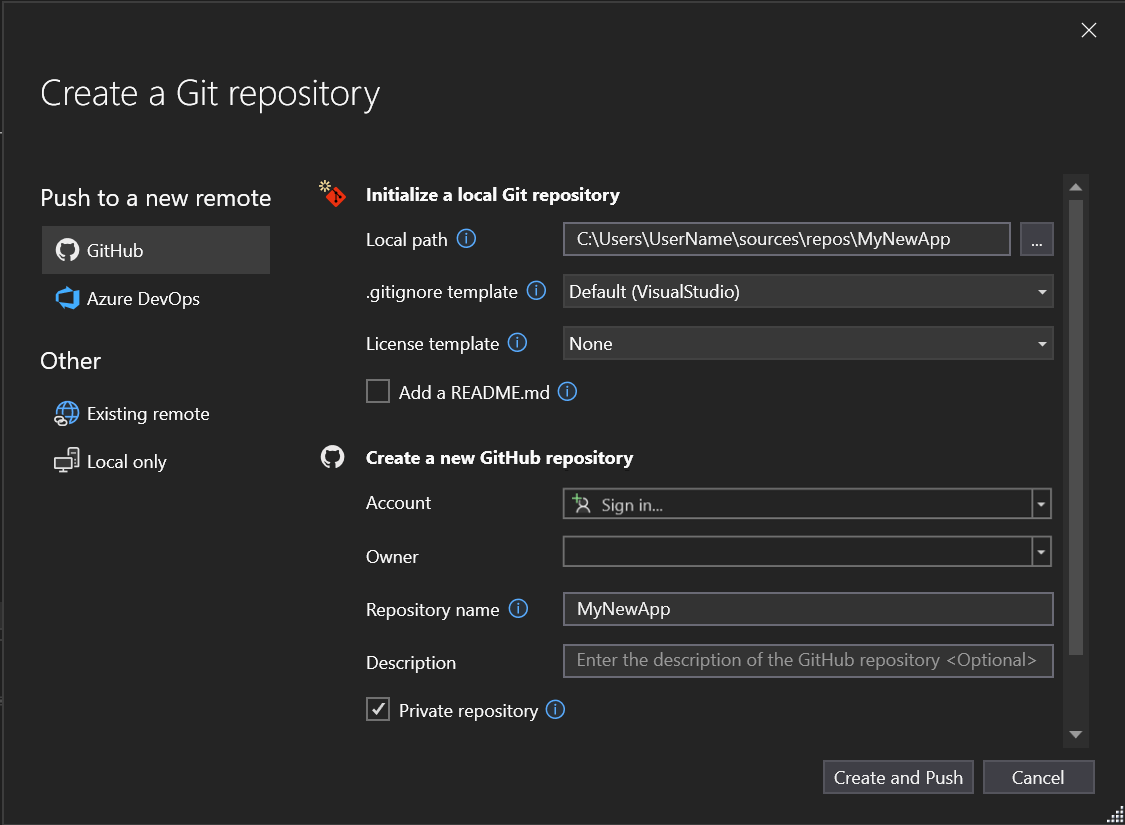
Under Initialize a local Git Repository, you should use the .gitignore template option to specify any intentionally untracked files that you want Git to ignore. To learn more about .gitignore, see Ignoring files. And to learn more about licensing, see Licensing a repository.
After you sign in and enter your repo info, select the Create and Push button to create your repo and add your app.

In Solution Explorer, right-click the project node and select Publish....
The publish dialog opens, where you establish the target database connection. If you don't have an existing SQL instance for deployment, LocalDB ((localdb)\MSSQLLocalDB) is installed with Visual Studio and can be used for testing and development.
Specify a database name and select Publish to deploy the project to the target database or Generate Script to generate a script to review before executing.
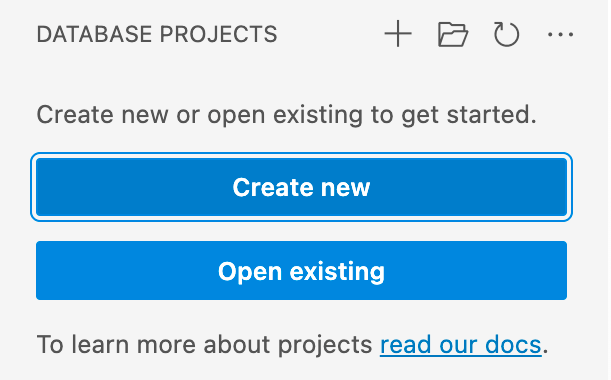
You can initialize and local repository and publish it directly to GitHub from VS Code or Azure Data Studio. This action creates a new repository on your GitHub account and pushes your local code changes to the remote repository in a single step.
Use the Publish to GitHub button in the Source Control view in VS Code or Azure Data Studio. You're then prompted to specify a name and description for the repository, and as well as whether to make it public or private.

Alternatively, you can initialize a local repository and push it to GitHub following the steps provided when you create an empty repository on GitHub.
Initialize a new Git repository in the project directory and commit the project files to source control.
git init
git add .
git commit -m "Initial commit"
Create a new repository on GitHub and push the local repository to the remote repository.
git remote add origin <repository-url>
git push -u origin main
Step 5: Add a project build step to a continuous deployment pipeline
SQL projects are backed by a .NET library and as a result the projects are built with the dotnet build command. This command is a staple of even the most basic continuous integration and continuous deployment (CI/CD) pipelines. The build step can be added to a continuous deployment pipeline we create in GitHub actions.
In the root of the repository, create a new directory named
.github/workflows. This directory will contain the workflow file that defines the continuous deployment pipeline.In the
.github/workflowsdirectory, create a new file namedsqlproj-sample.yml.Add the following content to the
sqlproj-sample.ymlfile, editing the project name to match the name and path of your project:name: sqlproj-sample on: push: branches: [ "main" ] jobs: build: runs-on: ubuntu-latest steps: - uses: actions/checkout@v4 - name: Setup .NET uses: actions/setup-dotnet@v4 with: dotnet-version: 8.0.x - name: Build run: dotnet build MyDatabaseProject.sqlprojCommit the workflow file to the repository and push the changes to the remote repository.
On GitHub.com, navigate to the main page of the repository. Under your repository name, click Actions. In the left sidebar, select the workflow you just created. A recent run of the workflow should appear in the list of workflow runs from when you pushed the workflow file to the repository.
More information on the fundamentals of creating your first GitHub actions workflow is available in the GitHub Actions quickstart.
Step 6: Add a .dacpac deployment step to a continuous deployment pipeline
The compiled model of a database schema in a .dacpac file can be deployed to a target database using the SqlPackage command-line tool or other deployment tools. The deployment process determines the necessary steps to update the target database to match the schema defined in the .dacpac, creating or altering objects as needed based on the objects already existing in the database. For example, to deploy a .dacpac file to a target database based on a connection string:
sqlpackage /Action:Publish /SourceFile:bin/Debug/MyDatabaseProject.dacpac /TargetConnectionString:{yourconnectionstring}

The deployment process is idempotent, meaning it can be run multiple times without causing issues. The pipeline we're creating will build and deploy our SQL project every time a change is checked into the main branch of our repository. Instead of executing the SqlPackage command directly in our deployment pipeline, we can use a deployment task that abstracts the command and provides additional features such as logging, error handling, and task configuration. The deployment task GitHub sql-action can be added to a continuous deployment pipeline in GitHub actions.
Note
Running a deployment from an automation environment requires configuring the database and environment such that the deployment can reach the database and authenticate. In Azure SQL Database or SQL Server in a VM, this might require setting up a firewall rule to allow the automation environment to connect to the database as well as providing a connection string with the necessary credentials. Guidance is provided in the GitHub sql-action documentation.
Open the
sqlproj-sample.ymlfile in the.github/workflowsdirectory.Add the following step to the
sqlproj-sample.ymlfile after the build step:- name: Deploy uses: azure/sql-action@v2 with: connection-string: ${{ secrets.SQL_CONNECTION_STRING }} action: 'publish' path: 'bin/Debug/MyDatabaseProject.dacpac'Before committing the changes, add a secret to the repository that contains the connection string to the target database. In the repository on GitHub.com, navigate to Settings, then Secrets. Select New repository secret and add a secret named
SQL_CONNECTION_STRINGwith the value of the connection string to the target database.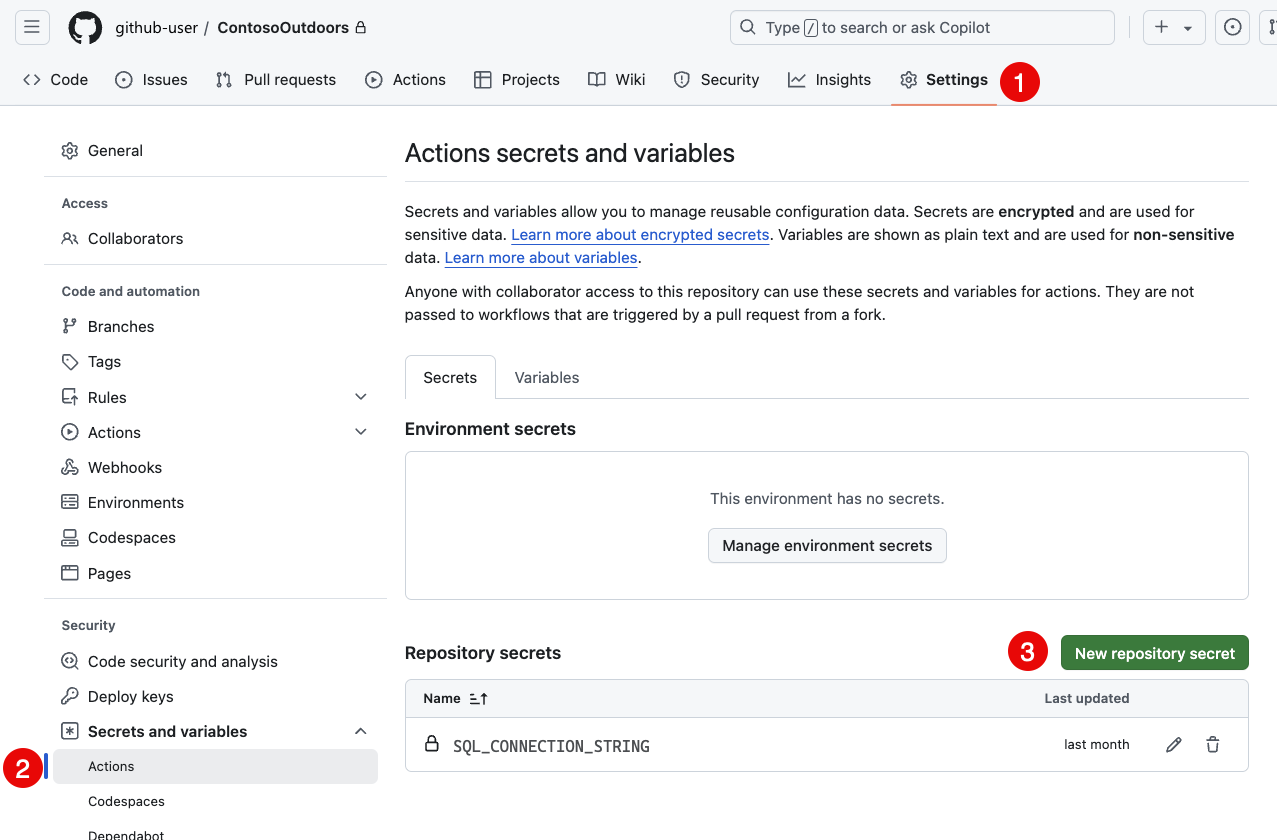
Commit the changes from
sqlproj-sample.ymlto the repository and push the changes to the remote repository.Navigate back to the workflow history on GitHub.com and select the most recent run of the workflow. The deployment step should be visible in the list of steps for the workflow run and the workflow returns a success code.
Verify the deployment by connecting to the target database and checking that the objects in the project are present in the database.

GitHub deployments can be further secured by establishing an environment relationship in a workflow and requiring approval before a deployment is run. More information on environment protection and protecting secrets is available in the GitHub Actions documentation.