Secure your Azure environment
Now that you understand how to control your environments and secure your deployment pipelines, you can consider disabling human access to your controlled environments. In this unit, you learn how to structure your users' permissions to Azure environments. Including, how to allow access in emergency situations, and how to audit any changes that happen in your Azure estate.
Block human access
By blocking human access to your controlled environments, you ensure that accidental or malicious changes can't bypass your team's review and automated deployment processes. If you don't block human access, somebody could inadvertently circumvent the controls that you've spent so much time planning and implementing throughout your repository and pipelines.
Without blocking controls, it's also easy for somebody to accidentally break something. For example, suppose a user has two copies of the Azure portal open. One is for a test environment, and the other is for the production environment. When the user is switching back and forth between browser tabs, it's easy for them to accidentally make changes to a production environment that were meant for a test environment.
To block human access, you can use Azure role-based access control (RBAC). In RBAC, you create role assignments to define:
- Which users, groups, or service principals can access a defined set of Azure resources (the scope).
- What those users, groups, or service principals can do when they access the resources (the role).
Azure RBAC provides many built-in role types, including:
- Reader, which has read-only access to the environment.
- Contributor, which can modify resources.
- Owner, which can modify resources and grant access to others.
It's important to grant access at an appropriate scope. If your organization follows the recommended practice of using dedicated Azure subscriptions for each environment, consider using Azure management groups to simplify the scope of your role assignments. If your organization uses a single Azure subscription for all of your environments, avoid granting humans access to the entire subscription, because all of the resources, including your controlled environments, would inherit that permission.
Tip
Role assignments are Azure Resource Manager (ARM) resources. This means that you can configure your Azure RBAC role assignments in code, such as by using Bicep.
When you plan your role assignments, you need to decide what makes sense for your organization. For example, suppose your organization creates separate subscriptions for each of your environments. You might choose to grant your administrators and developers Reader access to your controlled environments. With that role, they can access the production environment within the Azure portal to review the configuration of your resources, view metrics and logs, and investigate problems or bugs without making any changes to the environment.
Here's how you might configure your role assignments for your toy company's environments, for both your Azure administrators and the developers who write your code and scripts:
| Environment name | Control level | Administrator permission | Developer permission |
|---|---|---|---|
| Development | Controlled | Reader | Reader |
| Test | Controlled | Reader | Reader |
| Staging | Controlled | Reader | Reader |
| Production | Controlled | Reader | Reader |
| Demo | Uncontrolled | Owner | Contributor |
| Performance testing | Uncontrolled | Owner | None |
| Penetration testing | Uncontrolled | Owner | None |
| PR reviews | Uncontrolled | Owner | Owner |
| Development sandboxes | Uncontrolled | Owner | Owner |
When you plan your role assignments, ensure that you test them thoroughly. Sometimes, management operations might require permissions that aren't obvious. Give your team members the opportunity to test all of their day-to-day work with the permissions that you plan to use. Review any problems that they experience.
Audit your role assignments regularly. Ensure that you haven't accidentally granted access to the wrong people or granted access that's too wide.
Data plane access
There are two types of operations in Azure:
- Control plane operations to manage the resources in your subscription.
- Data plane operations to access features that a resource exposes.
For example, you'd use a control plane operation to create a storage account. You'd use a data plane operation to connect to the storage account and access the data that it contains.
When you block direct user access to your Azure resources, also consider how this restriction applies to data plane operations. For example, your deployment process might store the key for a storage account in a place that an administrator can access. That administrator could potentially use the key to circumvent your controls and access the storage account's data plane directly.
An increasing number of Azure resources support configuring their data plane access control by using Microsoft Entra ID. This support reduces the likelihood that you leak keys or grant data plane access inadvertently. It's a good practice to use Microsoft Entra ID for data plane access wherever you can.
Emergency access
Sometimes, emergencies happen and somebody needs to quickly get access to a production environment to investigate or resolve a problem. It's important to plan and rehearse how you want to respond to these emergency situations well before they occur. You don't want to have to scramble to respond in the middle of an outage.
One approach to consider is a break-glass account, which is a special user account that has higher levels of permissions than users normally have. It's named a break-glass account because it requires something unusual to gain access to its credential, similar to breaking the glass on a fire-alarm panel. You can provide a secure way for your operators to get access to the credentials for the break-glass account. These operators can then sign in as the account to perform emergency changes.
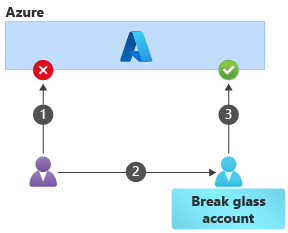
The sequence of steps for using a break-glass account is:
- The user tries to perform an emergency change by using their normal account, but the operation is blocked because the normal user account doesn't have sufficient permission.
- The user accesses the credentials for the break-glass account and signs in as that user.
- The user (acting as the break-glass account) is allowed to perform the operation.
The use of break-glass accounts requires a high level of discipline. Their use should be reserved for true emergency situations. Carefully manage and protect their credentials, because the account is highly privileged. It's a good practice to change the credentials for break-glass accounts frequently, to minimize the chance that they've been exposed or compromised.
Break-glass accounts are often shared within a team, so it's hard to trace who has used them and what those users did. An alternative approach to break-glass accounts is to adopt the Microsoft Entra Privileged Identity Management (PIM) feature. It allows a user's own account to be temporarily granted a higher level of permission.
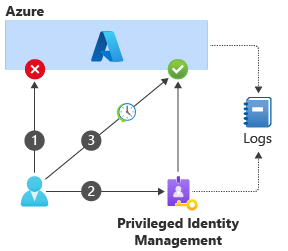
The sequence of steps for using PIM is:
The user tries to perform an emergency change by using their normal account, but the operation is blocked because the normal user account doesn't have sufficient permissions.
The user contacts PIM and requests a temporary elevation of permissions.
PIM might perform further validation of the user's identity or ask for approval from somebody, depending on how it's configured for the organization.
If the request is authorized, PIM updates the user's permissions temporarily.
The user is allowed to perform the operation.
After the defined time period has elapsed, PIM revokes the elevated permissions that it granted to the user.
Both PIM and Azure write comprehensive audit logs to help you understand who has requested elevated permissions and why. The logs also track what they did in your environment when the permissions were granted.
Note
PIM requires a premium license for Microsoft Entra ID.
After the emergency ends
After an emergency ends, it's important to have a process to return to normal operations. You should Follow this process before too much time has elapsed, or you risk forgetting important information or leaving configurations in a nonsecure state.
Carefully review the Azure and PIM audit logs to understand the changes that were performed in your controlled environments, and especially your production environment.
Important
Somebody who uses PIM or a break-glass account might have the opportunity to grant their regular user account broader access than it should have. They might also use the temporary permissions to gain access to data-plane keys that they can continue to use after their permissions are revoked.
Carefully audit all use of your break-glass accounts or PIM. Revoke or rotate any keys that might've been exposed during the emergency.
Soon after the emergency, resynchronize your infrastructure-as-code assets with any changes that were made during the emergency. For example, suppose that as part of resolving an urgent issue, an administrator manually increased the SKU of an Azure App Service plan. Update your deployment templates to include the new SKU in the resource configuration. Otherwise, during the next regular deployment from your pipeline, the SKU might be reset to the previous value and cause another outage.
Audit changes to your Azure environment
It's also a good practice to configure auditing and logging across your entire Azure environment, and to monitor for specific events or threats.
Consider using a security information and event management (SIEM) tool, like Microsoft Sentinel. You can use this tool to collect and analyze logs from your Azure estate, and even from Azure DevOps, GitHub, and other systems. You can use Sentinel to monitor for unexpected or unauthorized changes to your Azure resources. You can also import your pipeline's audit logs and trigger alerts when events happen, like when an administrator changes a branch protection policy in your repository.