Exercise - Deploy AKS Edge Essentials single machine K3S cluster
In this exercise, we deploy AKS Edge Essentials in a single machine K3S cluster with a Linux and Windows node. We use the Azure Cloud Shell to create an Azure virtual machine (VM) with Windows 11 Enterprise and run a PowerShell script for easy deployment of AKS Edge Essentials.
Create an Azure VM with Windows 11 Enterprise
Let's create the Azure VM with Windows 11 Enterprise using Azure Cloud Shell.
Start by activating the Azure sandbox.
Execute the following command in the Azure Cloud Shell to set the variables for creating the Azure VM:
resourcegroup="<rgn>[resource group name]</rgn>"
vmname="myVM"
username="azureuser"
let "randomIdentifier=$RANDOM*$RANDOM"
adminpassword="Admin-$randomIdentifier-Password!"

echo Admin Password: $adminpassword
Note
Take a note of the
Admin Password. You will need it later.Create the Azure VM with Windows 11 Enterprise using the az vm create command:
az vm create \
    --resource-group $resourcegroup \
    --name $vmname \
    --image MicrosoftVisualStudio:windowsplustools:base-win11-gen2:latest \
    --public-ip-sku Standard \
    --admin-username $username \
    --admin-password $adminpassword \
    --size Standard_D2s_v5 \
    --security-type TrustedLaunch
It takes a few minutes to create the VM and supporting resources. The following example output shows the VM create operation was successful.
{
    "fqdns": "",
    "id": "/subscriptions/00000000-0000-0000-0000-000000000000/resourceGroups/learn-rg-0000/providers/Microsoft.Compute/virtualMachines/myVM",
    "location": "westus3",
    "macAddress": "00-00-00-00-00-00",
    "powerState": "VM running",
    "privateIpAddress": "10.0.0.4",
    "publicIpAddress": "00.000.000.000",
    "resourceGroup": "learn-rg-0000",
    "zones": ""
}
Download AKS Edge Essentials
Let's download the K3s installer and Windows node files to Azure file share and then mount it in the VM so we can access it using the drive with letter Z.
Take a note of the storage account name, key and the Azure file share name. You need it later:
storageAccountName=$(az storage account list --resource-group $resourcegroup --query '[0].name' -o tsv)
storageAccountKey=$(az storage account keys list --resource-group $resourcegroup --account-name $storageAccountName --query '[0].value' -o tsv)
storageAccountFile=$(az storage share list --account-name $storageAccountName --account-key $storageAccountKey --query '[0].name' -o tsv)

echo Storage Account Name: $storageAccountName
echo Storage Account Key: $storageAccountKey
echo Storage Account File: $storageAccountFile
Download K3s installer, Windows node files and certificates to the Azure file share:
curl -L -o ~/clouddrive/MicrosoftRootCertificateAuthority2011.cer "https://download.microsoft.com/download/2/4/8/248D8A62-FCCD-475C-85E7-6ED59520FC0F/MicrosoftRootCertificateAuthority2011.cer" && echo "Downloaded MicrosoftRootCertificateAuthority2011.cer"
curl -L -o ~/clouddrive/MicCodSigPCA2011.crt "https://www.microsoft.com/pkiops/certs/MicCodSigPCA2011_2011-07-08.crt" && echo "Downloaded MicCodSigPCA2011.crt"
curl -L -o ~/clouddrive/AksEdge-Learn.msi "https://aka.ms/aks-edge/k3s-msi" && echo "Downloaded AksEdge-Learn.msi"
curl -L -o ~/clouddrive/AksEdgeWindows-Learn.zip "https://aka.ms/aks-edge/windows-node-zip" && echo "Downloaded AksEdgeWindows-Learn.zip"
Create the RDP file to connect to the VM:
publicIp=$(az vm show -d -g $resourcegroup -n $vmname --query publicIps -o tsv)
echo full address:s:$publicIp > ./myvm.rdp
echo username:s:$username >> ./myvm.rdp
Download the RDP file to your local machine:
download myvm.rdpOpen the RDP file and connect to the VM using azureuser as the user, and the
Admin Passwordyou took a note earlier, as the password.Tip
When logging in for the first time to the Windows 11 Enterprise Azure VM, you can accept all options by clicking Next and Accept.
Note
The following commands are executed in the PowerShell command line of the VM.
Open the PowerShell command line by clicking on the Start menu and typing PowerShell.
Run the following PowerShell commands to mount the Azure file share in the VM with the letter Z. Replace the values of
[YOUR_STORAGE_ACCOUNT_NAME],[YOUR_STORAGE_ACCOUNT_KEY]and[YOUR_STORAGE_ACCOUNT_FILE]with the values you took a note earlier:$storageAccountName = "[YOUR_STORAGE_ACCOUNT_NAME]" $storageAccountKey = "[YOUR_STORAGE_ACCOUNT_KEY]" $storageAccountFile = "[YOUR_STORAGE_ACCOUNT_FILE]" # Save the password so the drive will persist on reboot cmd.exe /C "cmdkey /add:`"$storageAccountName.file.core.windows.net`" /user:`"localhost\$storageAccountName`" /pass:`"$storageAccountKey`"" # Mount the drive with the letter Z New-PSDrive -Name Z -PSProvider FileSystem -Root "\\$storageAccountName.file.core.windows.net\$storageAccountFile" -Persist
Deploy AKS Edge Essentials
Now that the VM is created and the install files downloaded, let's run the AksEdgeQuickStart-v2.ps1 PowerShell script for easy deployment of AKS Edge Essentials.
Note
The following commands are executed in the PowerShell command line of the VM.
Open the PowerShell command line by clicking on the Start menu and typing PowerShell. Then run the following command to change the working directory to
C:\aksedgeLearn:if (!(Test-Path -Path "C:\aksedgeLearn")) { New-Item -ItemType Directory -Path "C:\aksedgeLearn" | Out-Null } Push-Location "C:\aksedgeLearn"Install Windows certificates:
certutil.exe -addstore -f "AuthRoot" "Z:\\MicrosoftRootCertificateAuthority2011.cer"
certutil.exe -addstore -f "CA" "Z:\\MicCodSigPCA2011.crt"
Set the parameters to create a single machine K3S cluster with a Linux and Windows node. The
aideuser-config.jsonandaksedge-config.jsonfiles are used to run theAksEdgeQuickStart-v2.ps1PowerShell script:$aideuserConfig = @" { "SchemaVersion": "1.1", "Version": "1.0", "AksEdgeProduct": "AKS Edge Essentials - K3s", "AksEdgeProductUrl": "Z:\\AksEdge-Learn.msi", "Azure": { "SubscriptionName": "", "SubscriptionId": "", "TenantId": "", "ResourceGroupName": "", "ServicePrincipalName": "", "Location": "", "CustomLocationOID":"", "Auth":{ "ServicePrincipalId":"", "Password":"" } }, "AksEdgeConfigFile": "aksedge-config.json" } "@ echo $aideuserConfig | Out-File -FilePath "aideuser-config.json" $aksedgeConfig = @" { "SchemaVersion": "1.9", "Version": "1.0", "DeploymentType": "SingleMachineCluster", "Init": { "ServiceIPRangeSize": 10 }, "Network": { "NetworkPlugin": "flannel", "InternetDisabled": false }, "User": { "AcceptEula": true, "AcceptOptionalTelemetry": true }, "Machines": [ { "LinuxNode": { "CpuCount": 2, "MemoryInMB": 2048, "DataSizeInGB": 20 }, "WindowsNode": { "CpuCount": 2, "MemoryInMB": 2048 } } ] } "@ echo $aksedgeConfig | Out-File -FilePath "aksedge-config.json"Download and run the
AksEdgeQuickStart-v2.ps1PowerShell script:$url = "https://raw.githubusercontent.com/Azure/AKS-Edge/main/tools/scripts/AksEdgeQuickStart/AksEdgeQuickStart-v2.ps1" Invoke-WebRequest -Uri $url -OutFile .\AksEdgeQuickStart-v2.ps1 Unblock-File .\AksEdgeQuickStart-v2.ps1 Set-ExecutionPolicy -ExecutionPolicy Bypass -Scope Process -Force .\AksEdgeQuickStart-v2.ps1 -AideUserConfigFilePath .\aideuser-config.json -AksEdgeConfigFilePath .\aksedge-config.jsonNote
The installation process takes around 30 minutes to complete.
This script automates the following steps:
- In the VM working folder
C:\aksedgeLearn, the script downloads the GitHub archive of Azure/AKS-Edge and unzips to a folder AKS-Edge-main. - Invokes the
Start-AideWorkflowfunction that performs the following tasks:- Unzips Windows install files.
- Installs the AKS Edge Essentials MSI.
- Installs required host OS features (
Install-AksEdgeHostFeatures). - Deploys a single machine K3S cluster with a Linux and Windows node.
The following example with the last lines of the output, shows the download and installation of AKS Edge Essentials K3s distribution was successful. You can also access the log file at
C:\aksedgeLearn\aksedgedlog-yymmdd-hhmm.txt... [01/04/2024 15:29:34] Waiting for Windows node IP address... [01/04/2024 15:29:34] Testing Windows node control channel... [01/04/2024 15:29:37] ...successfully connected to the Windows node [01/04/2024 15:31:39] Waiting for Windows node to transition to ready state (796 seconds remaining) - Waiting for Kubernetes node (myvm-wedge) to reach condition Ready, time remaining = 796 seconds - Kubernetes node (myvm-wedge) reached condition Ready [01/04/2024 15:31:57] AksEdge - copying Kubeconfig into the host. [01/04/2024 15:32:02] AksEdge - new deployment successfully created. * AksEdge VM deployment successfull. Deployment Successful. Step 4: Connect to Arc >> skipping step 4 Duration: 0 hrs 23 mins 13 seconds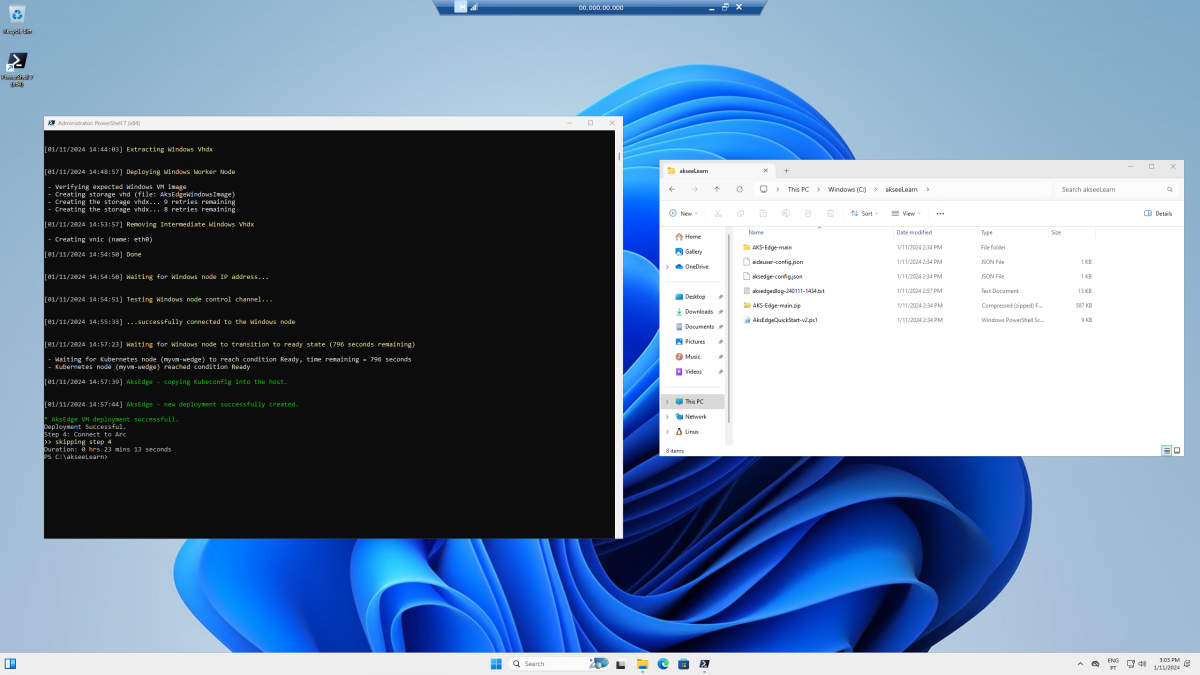
- In the VM working folder

Tip
Since the installation process takes around 30 minutes to complete, you can continue to the next learning unit, we will get back to this later.