Create table constraints and indexes with Azure Data Studio
It's time to finish the tables for the online card-reference application. With the knowledge from the previous units, the data model should utilize table relationships, primary keys, and indexes. You also need to ensure data integrity with constraints.
In this exercise, you'll create table relationships, primary keys, identity columns, and indexes for the online card-reference application.
The cards table
Recall the rules for the cards table:
- Only one row for each card in the cards table
- A card can have multiple language translations of the original text and card name
- The cards attributes are:
- Card ID
- Name (no more than 100 characters)
- Color (no more than 10 characters)
- Power (no card can have a power greater than 20)
- Type (no more than 10 characters)
- Text (Text area is 500 characters large)
- Status
- Art
- A card can only be one of the following colors: black, blue, green, red, white, orange
- A card can only be one of the following types: hero, monster, spell, weapon
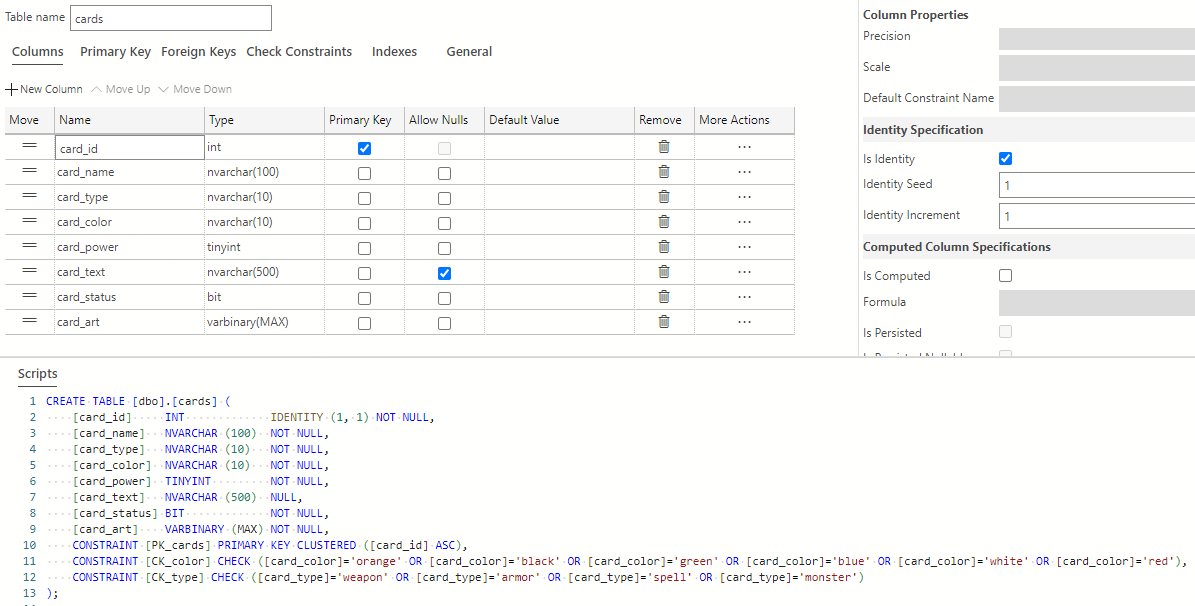
You need to create a primary key on the card_id column and implement the constraint rules on card_color and card_type. Another rule you need to define is which columns can contain null values and which ones are required.
You can update your table with what you know from the previous units and scenario rules:
Cards
| Column name | Data type | Null? | Default values | Notes |
|---|---|---|---|---|
| card_id | int | no | IDENTITY and Primary Key | |
| card_name | nvarchar(100) | no | ||
| card_type | nvarchar(10) | no | weapon, armor, spell, monster | |
| card_color | nvarchar(10) | no | orange, black, green, blue, white, red | |
| card_power | tinyint | no | It can use tinyint here because power won't be greater than 20 | |
| card_text | nvarchar(500) | yes | ||
| card_status | bit | no | 1 | |
| card_art | varbinary(max) | no |
Update the cards table in Azure Data Studio
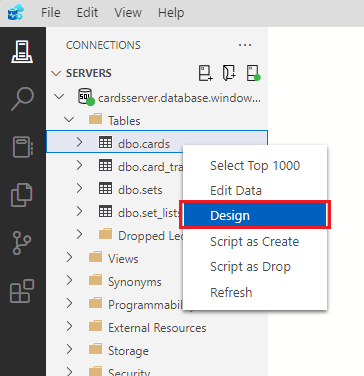
With Azure Data Studio open from the previous exercise, find the dbo.cards table in the connections navigator in the tables folder. Right-click the cards table and select Design.
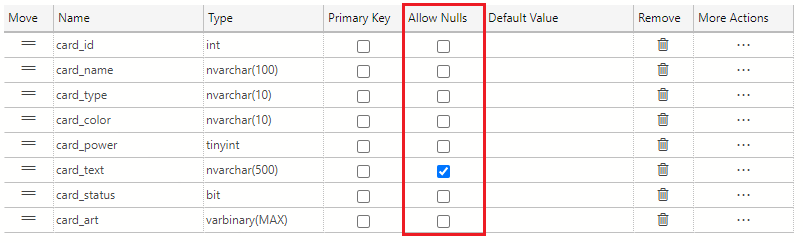
The first task is to dictate which columns allow null values and which don't. A card must have all the relevant information on it such as name, type, color, power, status, and some art. The only column that you don't need to have text in is the card_text column. Using the checkboxes in the Allow Nulls column in the table designer, uncheck all the checkboxes except for the one in the card_text row.
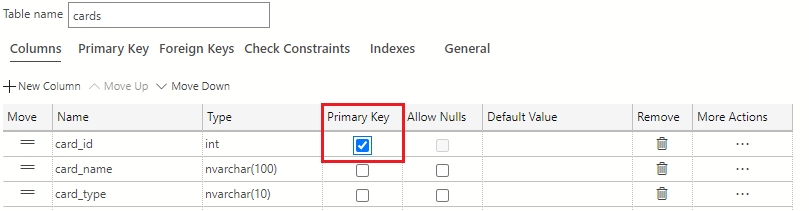
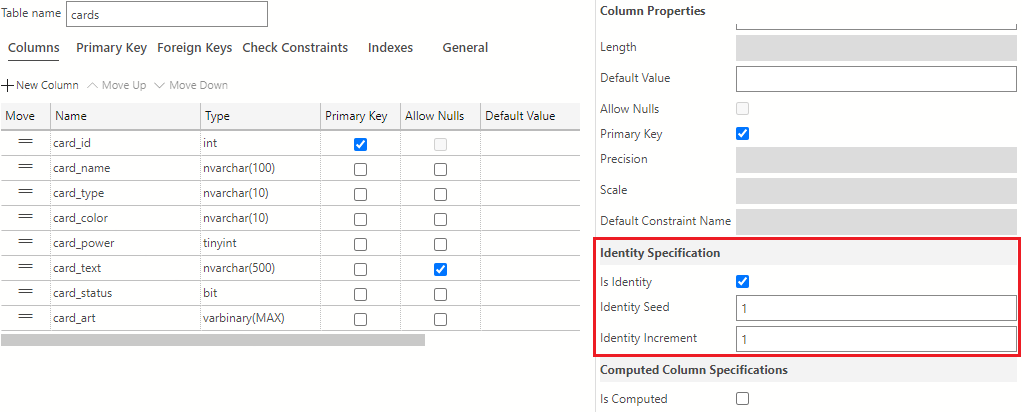
card_id is the primary key identifier of the cards table. In the Primary Key column of the table designer, select the checkbox to make card_id the primary key for the table.
Note
Remember, by defining a primary key, you've automatically added a clustered rowstore index to this table.
In addition to making the card_id column the primary key, you also want to set this column as an identity column. To make card_id an identity column, navigate to the Column Properties area and scroll down to find the Identity Specification section. Here, check the Is Identity box. The values in the Identity Seed and Identity Increment field should be set to 1.
Next, you need to add default values to the card_type restricting this column to either weapon, armor, spell, or monster. To add default values to this column, select the Check Constraints tab in the table designer
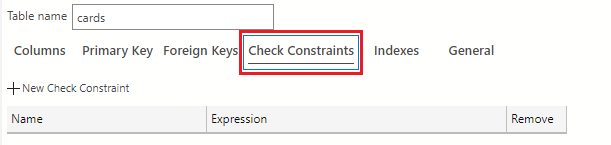
Next, select the + New Check Constraint button to add these constraints to the column.
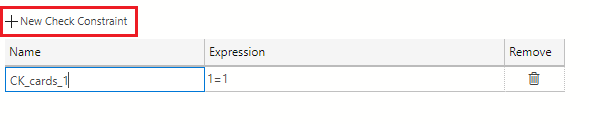
Set the following values in the Check Constraints Properties area. In the Name field, change the name of the constraint from the provided default to CK_type. Navigate to the Expression field and type the expression as shown in the following text:
[card_type] = 'weapon' OR [card_type] = 'armor' OR [card_type] = 'spell' OR [card_type] = 'monster'
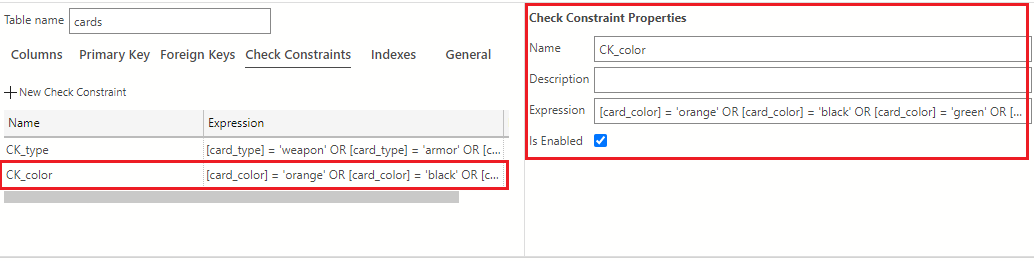
Just as you did with card_type, you need to add default values to the card_color column. A card color can only be the following values: orange, black, green, blue, white, or red. While still on the Check Constraints tab in the table designer, select the + New Check Constraint button to add a new constraint to the column.

In the Name field, change the name of the constraint from the provided default to CK_color. Navigate to the Expression field and type the expression as shown in the following text:
[card_color] = 'orange' OR [card_color] = 'black' OR [card_color] = 'green' OR [card_color] = 'blue' OR [card_color] = 'white' OR [card_color] = 'red'The check constraints view should look like the following image after adding the card_color constraint:
The cards table is now complete and should look like the following:
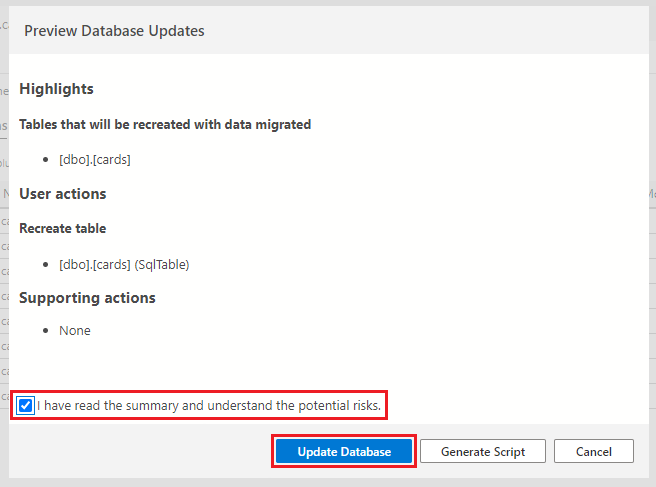
Select the Publish Changes button on the top-left of the table designer window to save these table changes to the database.
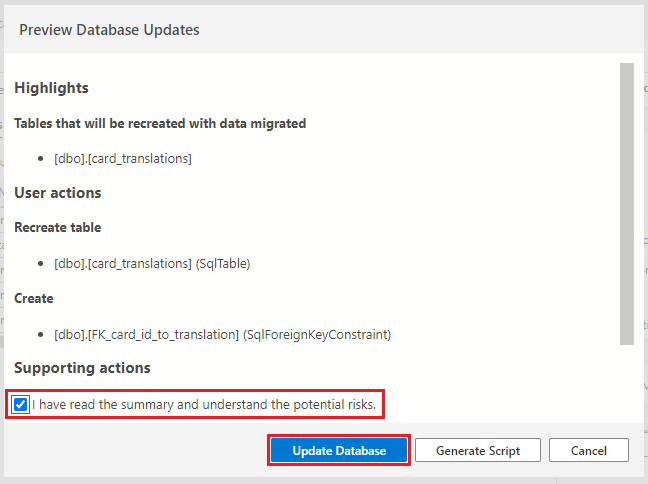
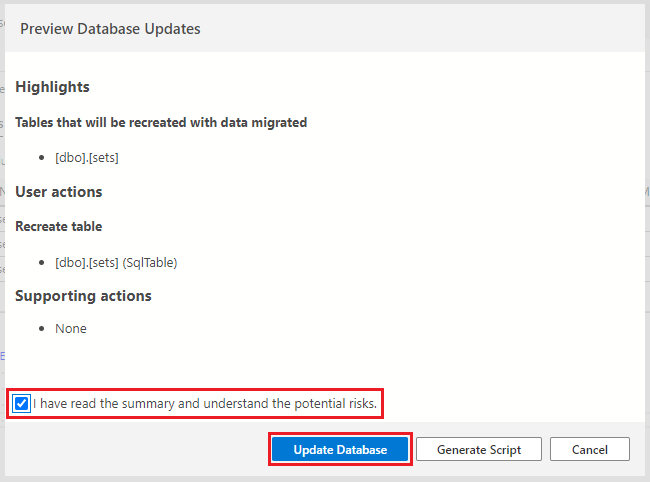
If prompted to review the changes, first, select the checkbox confirming the changes, then select the Update Database button.
The translations table
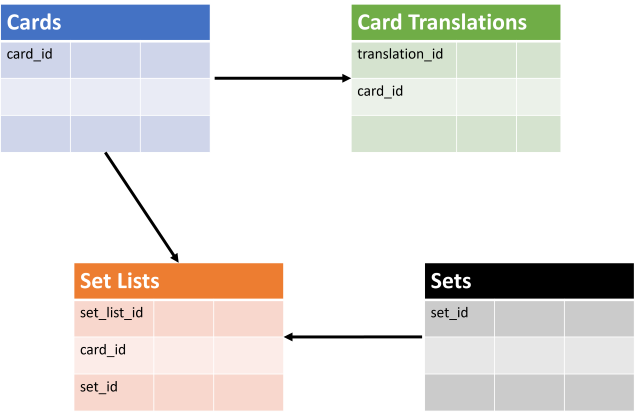
The translations table will be the first table to use a foreign key that will refer back to the cards table by the card_id. This relationship won't only create a reference back to the card_id column in the cards table, but will prevent rows being entered into this table without that referenced card_id existing. Again, it will also have an identity column (translation_id) that will serve as the primary key, a reoccurring situation you'll see in every table created in the card application scenario.
With the identity column and foreign key in mind, here's what you'll add to your translations table:
Card_translations
| Column name | Data type | Null? | Default values | Notes |
|---|---|---|---|---|
| translation_id | int | no | IDENTITY and Primary Key | |
| card_id | int | no | Foreign key back to the Cards table | |
| translation_card_language | nvarchar(50) | no | ||
| translation_card_name | nvarchar(500) | no | The translated card name | |
| translation_card_text | nvarchar(2000) | yes | The translated card text |
Update the translations table in Azure Data Studio
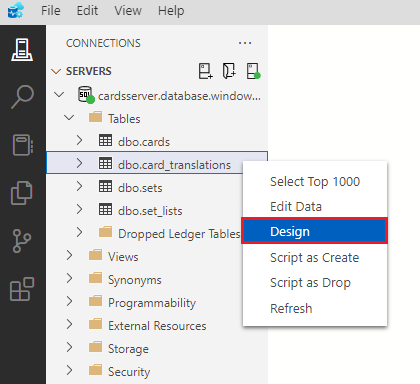
Find the dbo.card_translations table in the connections navigator in the tables folder. Right-click the table and select Design.
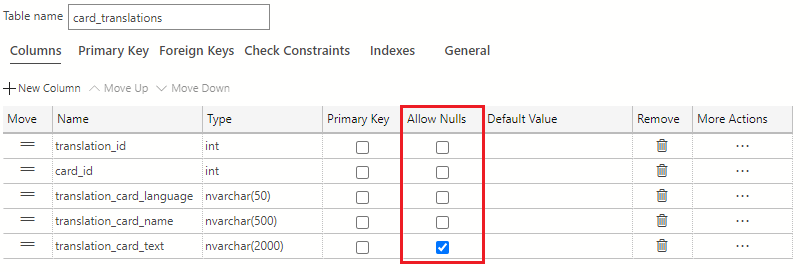
First, decide which columns allow null values and which don't. A row in this table must have an ID, a reference to the card_id from the cards table, a translation language and a translated card name. As with the cards table, translation_card_text can be null. In the Allow Nulls column in the table designer, uncheck all the checkboxes except for the one in the translation_card_text row.
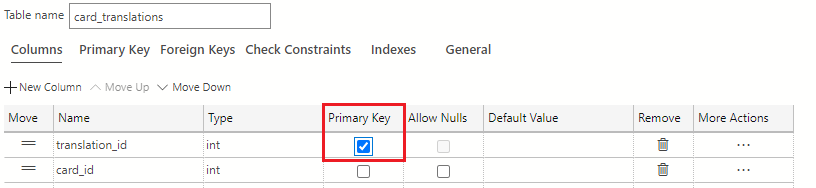
The translation_id column is the primary key identifier of this table. In the Primary Key column of the table designer, select the checkbox to make translation_id the primary key for the table.
Note
Remember, by defining a primary key, you've automatically added a clustered rowstore index to this table.
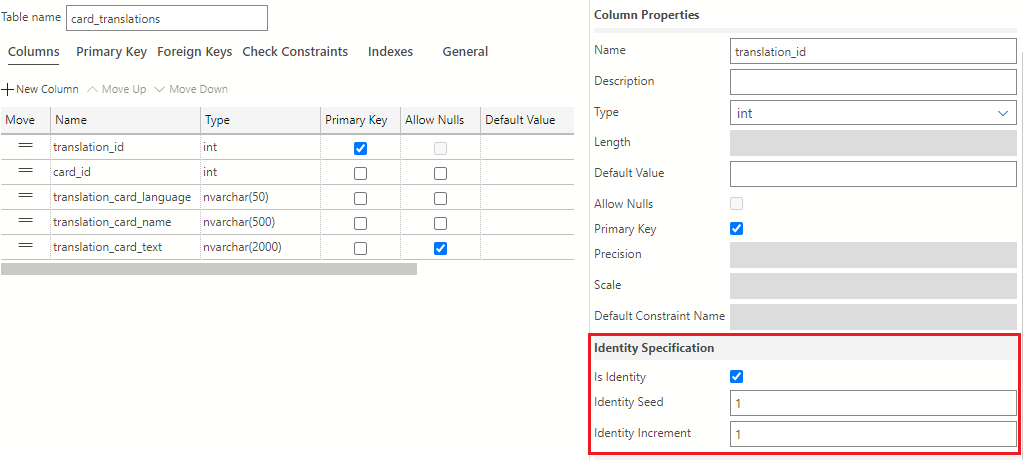
In addition to making the translation_id column the primary key, you also want to set this column as an identity column. To set translation_id as an identity column, navigate to the Column Properties area and scroll down to find the Identity Specification section. Here, check the Is Identity box. The values in the Identity Seed and Identity Increment field should be set to 1.
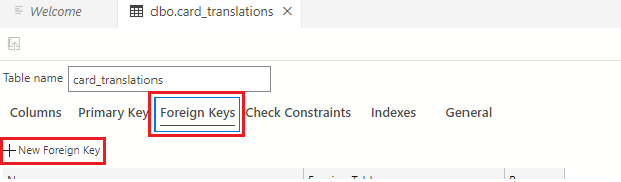
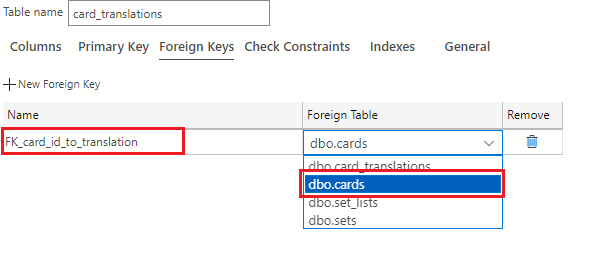
Once the columns are created, you need to create the foreign key. Select the Foreign Keys tab in the table designer, then select the + New Foreign Key button.
In the Foreign Key Name field, enter FK_card_id_to_translation and use the Foreign Table drop-down to select dbo.cards (the cards table).
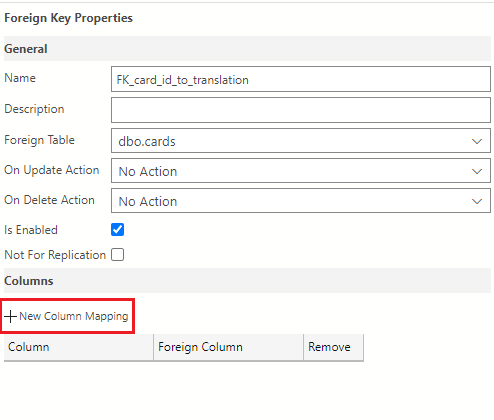
In the Foreign Key Properties pane on the right of the table designer, select the + New Column Mapping button.
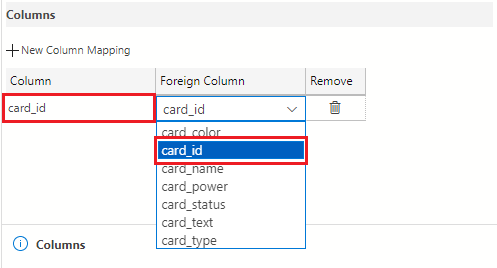
Select card_id using the drop-down for both the Column and Foreign Column fields.
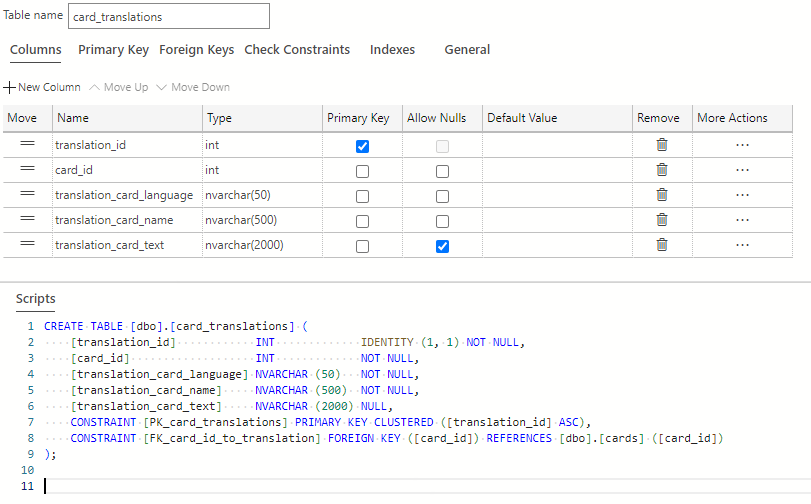
The card_translations table is now complete and should look like the following:
Select the Publish Changes button on the top-left of the table designer window to save these table changes to the database.

If prompted to review the changes, first, select the checkbox confirming the changes, then select the Update Database button.
The sets table
The update on the sets table is minor; you'll just add a primary key that's also the identity column. You'll use the set_id column for this update. You'll also need to set all columns to not accept null values.
Sets
| Column name | Data type | Null? | Default values | Notes |
|---|---|---|---|---|
| set_id | int | no | IDENTITY and Primary Key | |
| set_name | nvarchar(50) | no | ||
| set_date | date | no | It doesn't need to store time (hours/minutes/seconds) so DATE will work here |
Update the sets table in Azure Data Studio
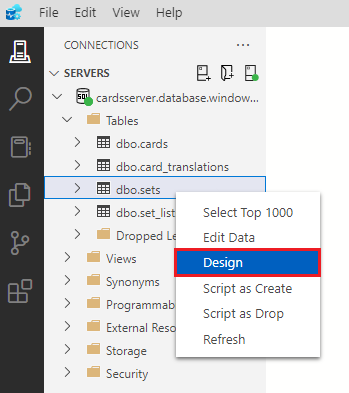
Find the dbo.sets table in the connections navigator in the tables folder. Right-click the table and select Design.
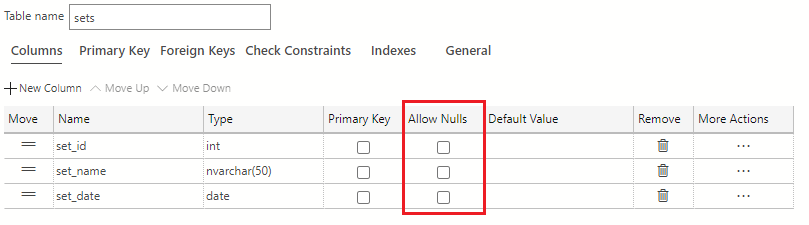
Uncheck all the checkboxes in the Allow Nulls column in the table designer.
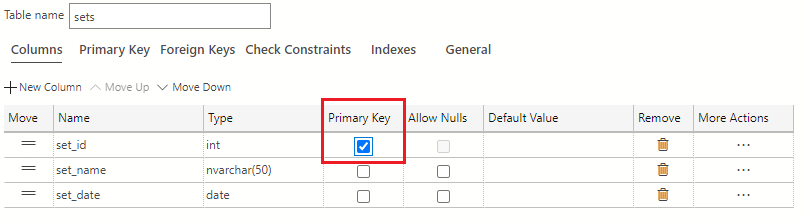
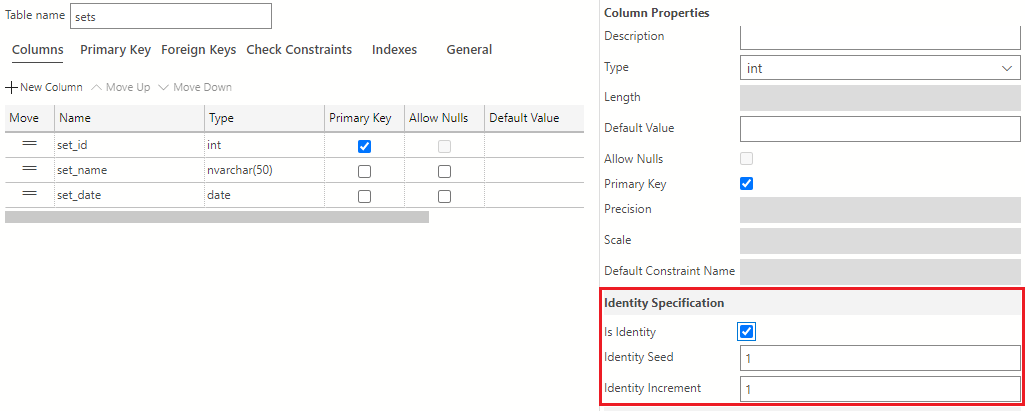
The set_id column is the primary key identifier of this table. In the Primary Key column of the table designer, select the checkbox to make set_id the primary key for the table.
Note
Remember, by defining a primary key, you've automatically added a clustered rowstore index to this table.
In addition to making the set_id column the primary key, you also want to set this column as an identity column. To make the set_id column an identity column, navigate to the Column Properties area and scroll down to find the Identity Specification section. Here, check the Is Identity box. The values in the Identity Seed and Identity Increment field should be set to 1.
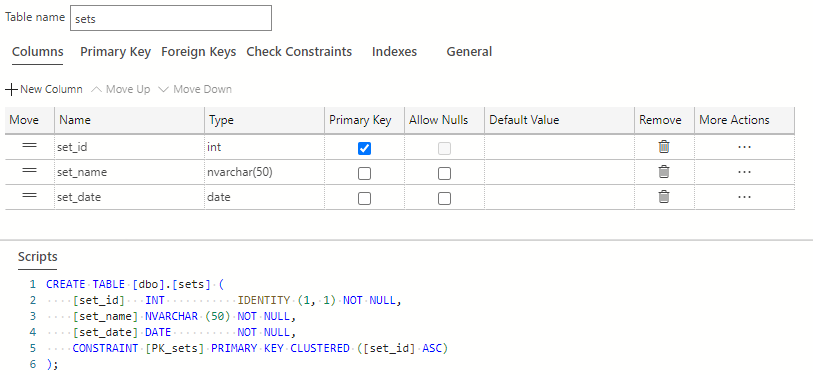
The sets table is now complete and should look like the following:
Select the Publish Changes button on the top-left of the table designer window to save these table changes to the database.
If prompted to review the changes, first, select the checkbox confirming the changes, then select the Update Database button.
The set_lists table
You also need an identity column/primary key on the set_list_id column. Next, you need to create the two pointers back to the cards and sets table, which will be the foreign keys; card_id and set_id with matching data types to those tables. This set_lists table will be important when a user wants all the information about cards in a particular set. Additionally, these foreign-key relationships will prevent having tables with duplicate rows or attempting to lump set_id into a single column on the cards table, which would result in parsing and performance issues.
The set_lists table will look like the following with the modifications:
Set_lists
| Column name | Data type | Null? | Default values | Notes |
|---|---|---|---|---|
| set_list_id | int | no | IDENTITY and Primary Key | |
| card_id | int | no | Foreign key back to the Cards table | |
| set_id | int | no | Foreign key back to the Sets table |
Update the set_lists table in Azure Data Studio
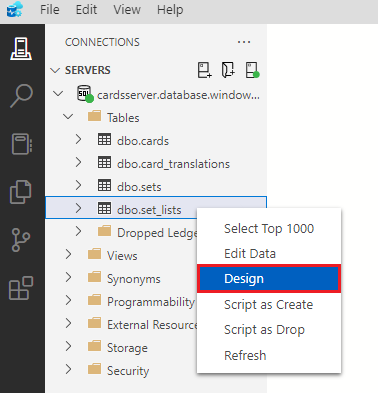
Find the dbo.set_lists table in the connections navigator in the tables folder. Right-click the cards table and select Design.
Uncheck all the checkboxes in the Allow Nulls column in the table designer.
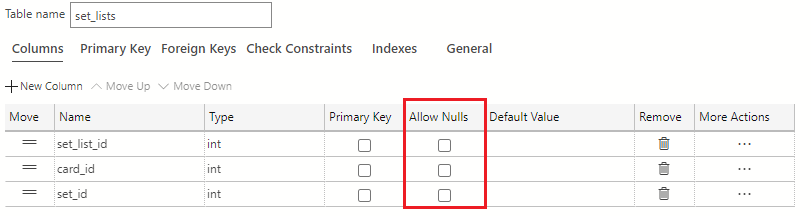
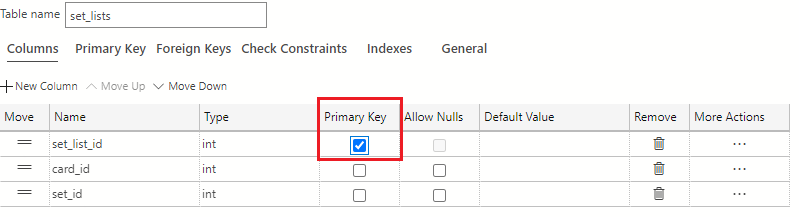
The set_list_id column is the primary key identifier of this table. In the Primary Key column of the table designer, select the checkbox to make the set_list_id column the primary key for the table.
Note
Remember, by defining a primary key, you've automatically added a clustered rowstore index to this table.
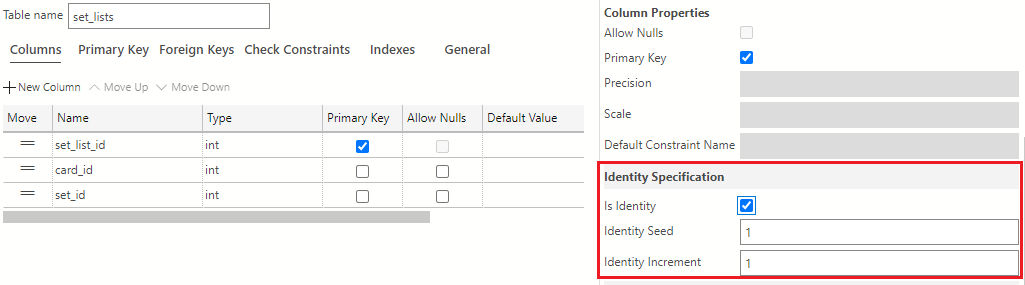
In addition to making the set_list_id column the primary key, you also want to set this column as an identity column. To make the set_list_id column into an identity column, navigate to the Column Properties area and scroll down to find the Identity Specification section. Here, select the Is Identity checkbox. The values in the Identity Seed and Identity Increment field should be set to 1.
Next, you need to create the foreign keys. Select the Foreign Keys tab in the table designer, then select the + New Foreign Key button.

For the first key, in the Foreign Key Name field, enter FK_card_id_to_card and use the Foreign Table drop-down to select dbo.cards.

In the Foreign Key Properties pane on the right of the table designer, select the + New Column Mapping button.
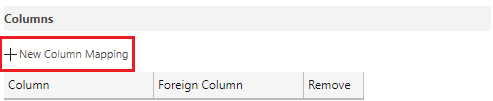
Select card_id using the drop-down for both the Column and Foreign Column fields.
Select the + New Foreign Key button again.
In the Foreign Key Name field, enter FK_set_id_to_set and use the Foreign Table drop-down to select dbo.sets.
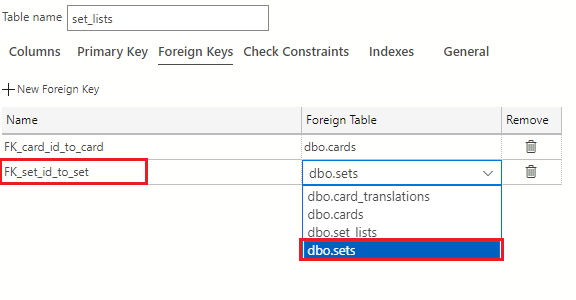
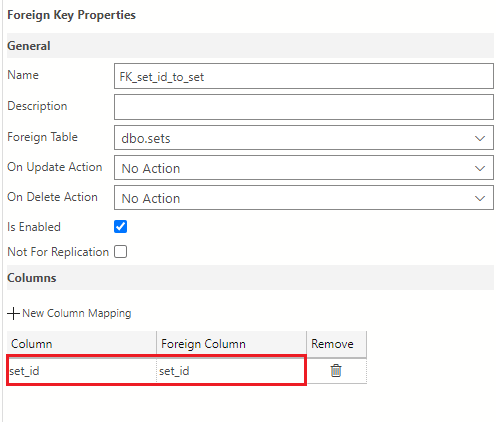
In the Foreign Key Properties pane on the right of the table designer, select the + New Column Mapping button.
Select set_id using the drop-down for both the Column and Foreign Column fields.
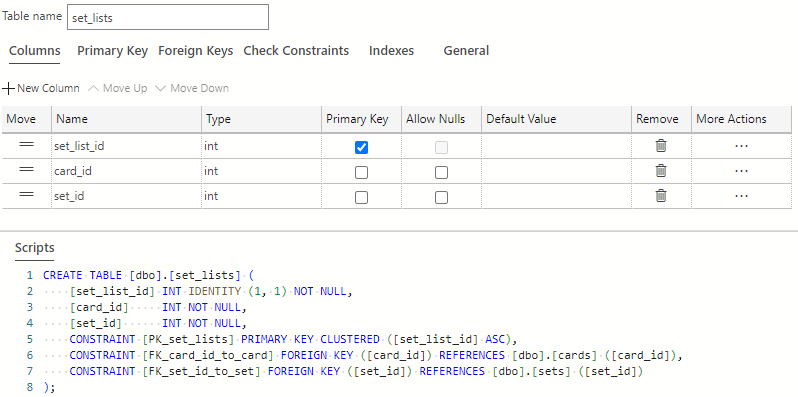
The set_lists table is now complete. It should look like the following image:
Select the Publish Changes button on the top left of the table designer window to save these table changes to the database.
If prompted to review the changes, first, select the checkbox confirming the changes, then select the Update Database button.
