Manage records
The two ways that you can work with and view the details of records in the mobile application are:
On the home page - When you tap a record, the record details display partially on the bottom half of the screen. This form provides the basic details, including related notes and reminders.
On the Meeting page - Displays the meeting's regarded record.
Create records
To create records, tap the New icon on the navigation bar on the bottom of the screen. A menu displays the different types of records that you can create.
The following image shows the menu that displays the different records that you can create.
Edit records from the home page
To edit records in the Dynamics 365 Sales mobile app, while you're on the home page, tap the record that you want to edit to display the record details. When the record is open, tap the Edit icon (pencil) in the upper-right corner of the screen. You can also open the record in the Sales Hub app.
Edit records from a meeting
When you're working with a meeting record, you can edit the related record by tapping the Edit (pencil) icon. The edit form opens, where you can make some basic edits to the record. For example, in the following screenshot, the left image shows the Meeting screen, and the right image shows the Edit screen. Selecting Open Opportunity on the Edit screen would open the opportunity record in Sales Hub.
Manage contacts
Field sellers can work with contacts directly in the Dynamics 365 Sales mobile app. You can perform the following actions on a contact:
View contact details - Allows you to view specific details about the contact. You can access contact details from the home screen for recently viewed contacts or access this information from a meeting. For more information, see View details.
Edit contact details - Allows you to edit a contact record that you're working with. You can modify the information directly from the Dynamics 365 Sales mobile app or from the Sales Hub app. For more information, see Edit contact details.
Create a new contact - Allows you to create a new contact record from the application. For more information, see Create contact.
The following image shows that tapping a contact from the home screen opens the contact record, where you can tap the Edit (pencil) icon to make changes.
Manage notes
Frequently, as you meet with customers, you capture important notes about them. You can refer to these notes as needed. While working in the Sales mobile app, you can view the notes that are associated with a record in the Notes section of the record details.
You can perform the following actions in the Notes section:
Open a list of notes by tapping Notes.
View an image that's associated with a note by tapping the image name.
Open or edit a note by tapping the note.
Take more actions, such as change the connected record or delete a note, by tapping the ellipsis (...).
Create a note by tapping Add a note.
For more information about working with notes, select the following links:
View activities of a record or contact
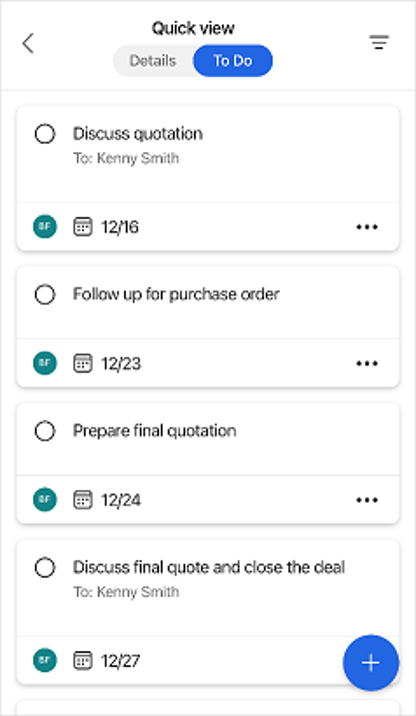
The Sales mobile app lets you work with task and phone call activities that are related to a record or contact. These activities are presented in the To Do tab. When you open a record or contact, you can select the To Do tab in the upper part of the form to display all activities for the record. The displayed activities are sorted based on their due dates.
Anatomy of an activity
Each activity displays as a card in the list, which helps make identifying and working with the specific activity easier.
The preceding image provides a breakdown of the anatomy of an activity in the mobile application (as described in the corresponding numbers):
Select the option button to mark the activity as complete.
Name of the activity.
Owner of the activity.
Due date for the activity.
More actions for the activity.
Add an activity from a record
While you're working with the To Do list for a record or contact, you can add new activities by tapping the New button in the lower-right corner of the form. Then, tap if you want to Add a task or Add a phone call.
Add an activity from the home page
While on the home page, you can add an activity by selecting the New button in the lower part of the screen and then tapping Phone Call or Task. When you create a new activity this way, you need to set the Regarding field to define which record that the activity is associated with.
Filter activities
As you're working with the To Do list, you can filter the list of activities to view only one type of activity at a time. In the upper-right corner of the form, tap the Filter button and then choose whether you want to filter Tasks or Phone calls. The filter is based on the record type that you select.
Mark an activity as complete
After you call someone or complete a task, you can mark the activity as complete by tapping the Option button on the activity card. Alternatively, tap the ellipsis (...) on the activity card and then tap Complete. In addition to being able to mark the task as complete, you can select Cancel, Delete, or Edit from the menu.
For more information, see View activities of a record or contact.


