Protect your cloud workloads
Microsoft Defender for Cloud provides proactive and comprehensive protection for your workloads in the cloud, including:
- Virtual machines and servers.
- Containers.
- Data and storage.
- Internet of Things (IoT) infrastructure.
- Azure Key Vault.
In your organization, many instances of these workloads could be running at any given time, and they're used for different business processes. You need to provide robust and intelligent protection to all your workloads.
Here, you'll learn how you can use Microsoft Defender for Cloud capabilities to protect these different workloads.
Protect virtual machines and servers
Microsoft Defender for Cloud protects your virtual machines and servers through several measures, including Microsoft Defender for Endpoint for Servers, just-in-time access, adaptive application controls, and vulnerability assessments.
Use Microsoft Defender for Endpoint
Microsoft Defender for Cloud is designed to work with other Azure services to continuously protect and monitor your servers. Microsoft Defender for Cloud can extend how it protects your cloud workloads by integrating with Microsoft Defender for Endpoint for Servers. Both services will work together to provide intelligent endpoint detection and response capabilities. Microsoft Defender for Endpoint detects threats, and triggers alerts. You can then see these alerts from Microsoft Defender for Cloud. From there, you can jump to the Microsoft Defender portal, and carry out detailed investigations to understand the scope of an attack.
You'll need to complete some steps. For example, you can do the following higher-level steps to use Microsoft Defender for Endpoint integration with Microsoft Defender for Cloud, to protect your Windows servers:
- Onboard your Windows servers to the Microsoft Defender for Endpoint.
- Make sure your Windows servers are onboarded to Microsoft Defender for Cloud Standard.
- The Microsoft Defender for Endpoint sensor is then automatically enabled for Windows servers that are onboarded to Microsoft Defender for Cloud. Both services then begin to cooperate.
Note
Use the links in the Learn more section at the bottom of this unit for a detailed rundown of how to perform these steps.
Also, automated onboarding is only available for Windows Server 2008 R2 SP1, Windows Server 2012 R2, and Windows Server 2016.
Use just-in-time (JIT) to protect virtual machine access
Attackers frequently look for accessible machines through open management ports such as Secure Shell (SSH) or Remote Desktop Protocol (RDP). This means that all of the virtual machines in your environment could be targets for an attacker. If a virtual machine becomes compromised, it can be used to attack other resources in your environment.
You want to prevent this from ever happening by closing as many ports as you can at all times. The problem is that, because your users also use these ports, you can't practically always keep them closed. Here's where just-in-time (JIT) can help you. JIT enables you to lock ports for inbound traffic on your virtual machines, but allow them to be opened temporarily when necessary.
You select the ports on the virtual machine you want to block for inbound traffic. Microsoft Defender for Cloud creates "deny all inbound traffic" rules in the Azure Firewall rules and network security (NSG) rules for the ports you specified. When a user wants to access a virtual machine, Microsoft Defender for Cloud checks whether they have the correct permissions, and then updates the NSGs and Azure Firewall (if there is one). This action allows inbound traffic for that user's IP address (or range), but only for a specified duration. After this duration, Microsoft Defender for Cloud restores the NSGs and Azure Firewall to how they were before access was granted to the user.
Here's how to enable JIT to protect your virtual machines:
In Microsoft Defender for Cloud, select Just-in-time VM access on the left pane, under Advanced cloud defense.
The Just-in-time VM access pane opens. You'll see your virtual machines have been grouped into several tabs. Select Not configured, to configure just-in-time access for a virtual machine.
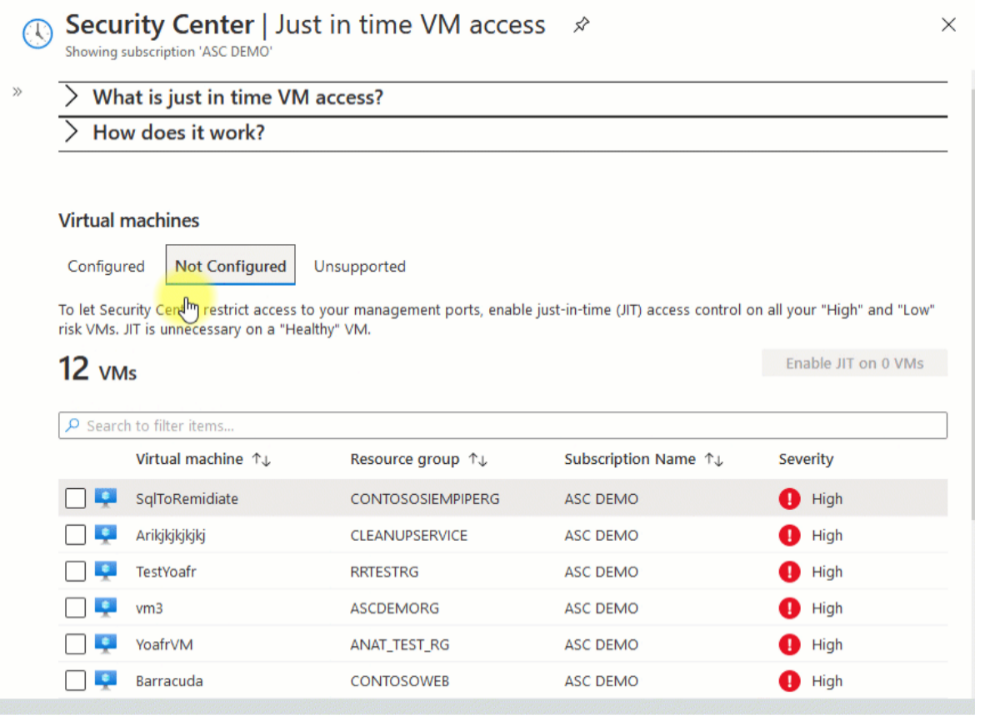
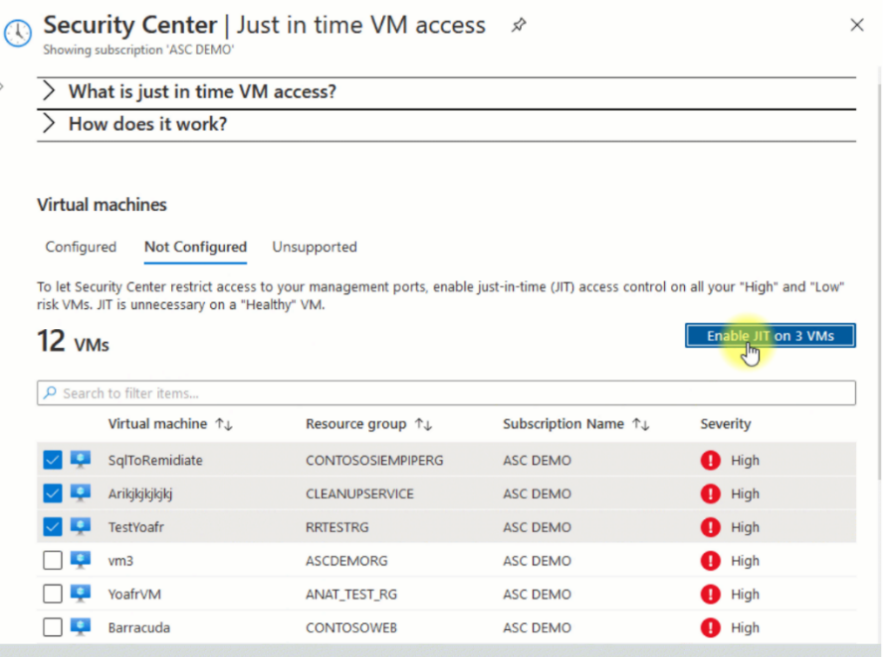
Select the virtual machines you want to configure for JIT, and then select Enable JIT on VMs.
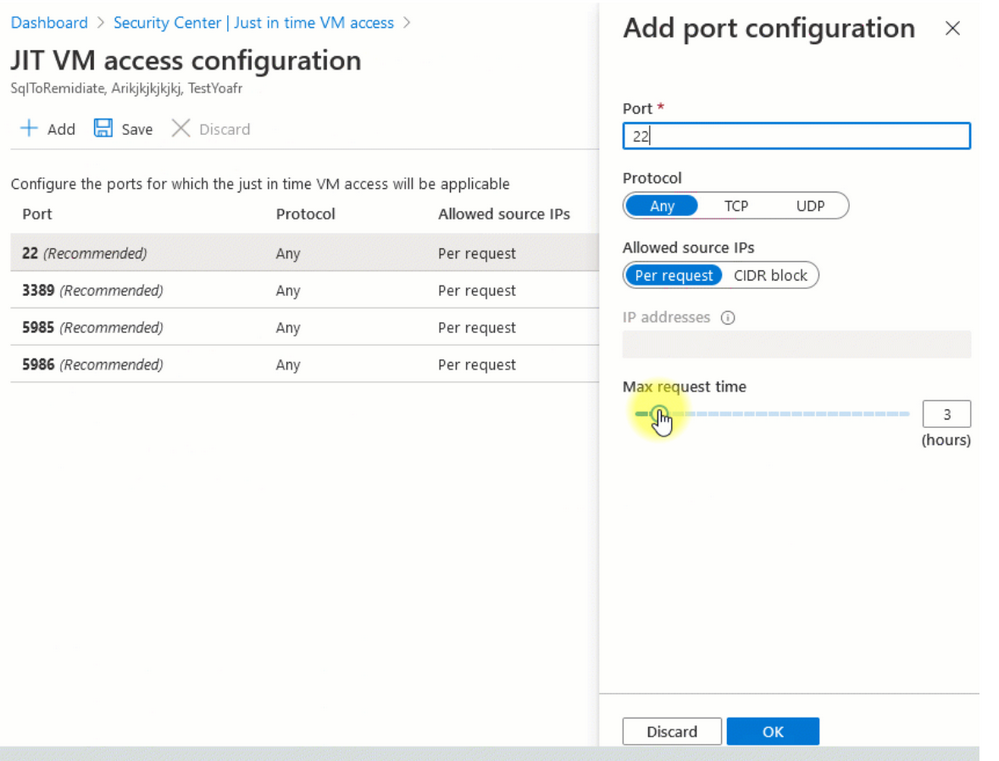
You'll see a list of ports that Microsoft Defender for Cloud recommends protecting. These include 22 for SSH and 3389 for RDP. You select any of these ports if you want to make changes to their configuration. The Add port configuration pane opens up for you to make changes. When you're done, select OK at the bottom.
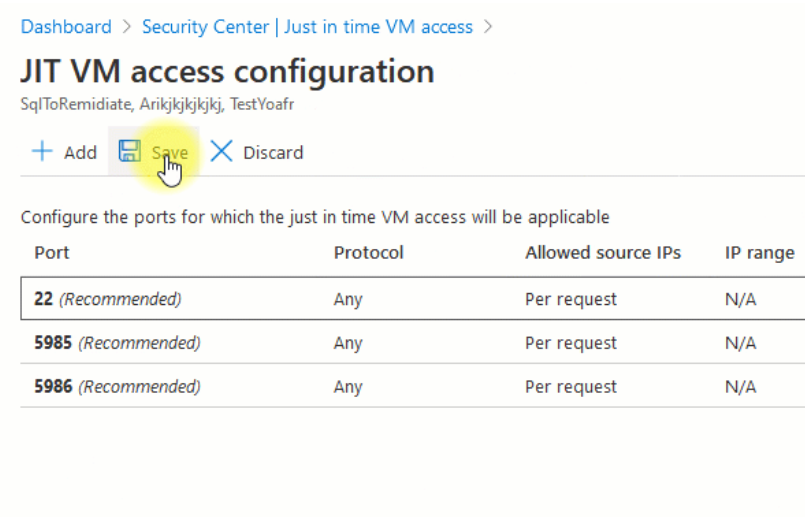
Finally, select Save.
Adaptive application controls
Adaptive application controls are a sophisticated way for you to only allow specific applications to run your machines. Your organization probably has a group of machines that usually run the same processes on a day-to-day basis. Microsoft Defender for Cloud uses machine learning to analyze the kind of applications that run on your machines and create an allowed list of known and safe apps that can be further customized. Through adaptive application controls, you can get security alerts if an application other than the "allowed" ones you've defined ever runs on any machine.
Here's how you can take advantage of adaptive application controls.
If Microsoft Defender for Cloud identifies machines in your environment that usually run a similar set of applications, you'll find the following recommendations in your Microsoft Defender for Cloud recommendations pane: Adaptive application controls for defining safe applications should be enabled on your machines. You can find the recommendations pane by selecting Recommendations under Resource security hygiene on the left pane of Microsoft Defender for Cloud.
When you see the recommendation, you can select Adaptive application controls on the left pane of Microsoft Defender for Cloud. This opens the adaptive application controls pane.
Select the Recommended tab. You'll see groups of machines for which Microsoft Defender for Cloud recommends you apply application controls to define a list of known-safe applications.
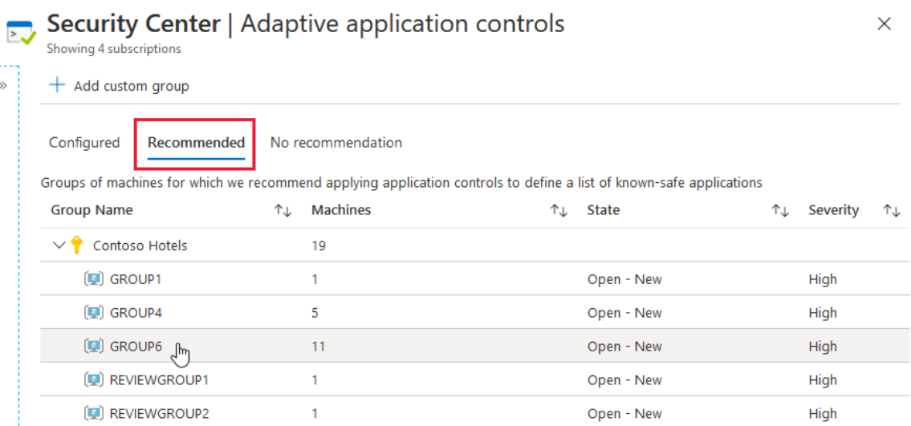
Select any group.
To configure the new rule, you'll need to review the different sections of the Configure application control rules pane. These will be unique to this specific group of machines.
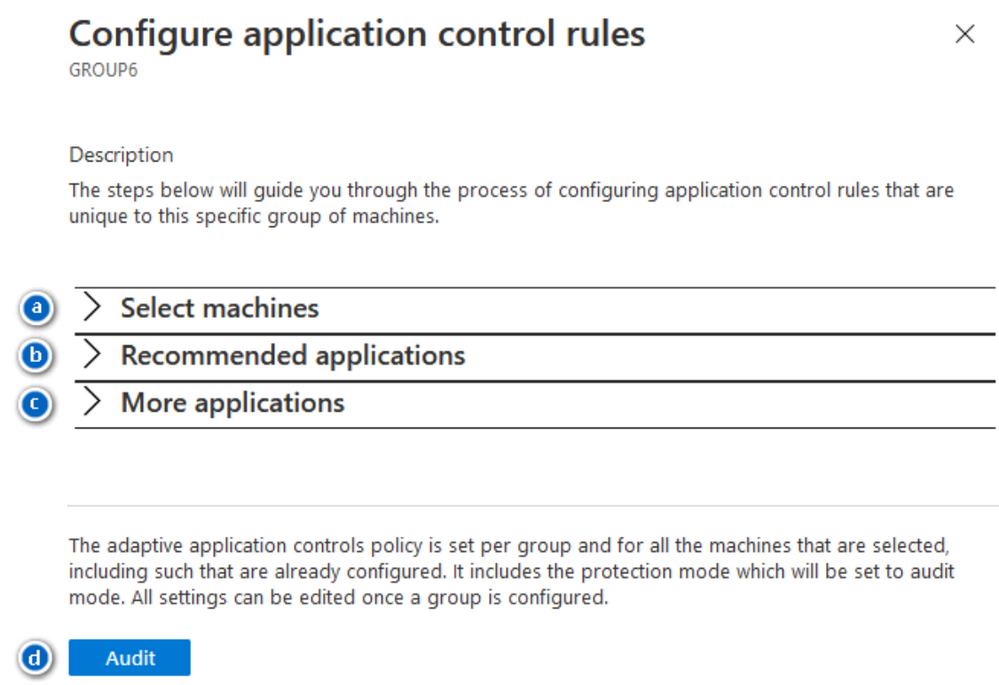
Select machines: You can clear any machines you want to exclude.
Recommended applications: You can review the list of applications that are common to this group of machines and are recommended to be allowed to run on them.
More applications: You can also review a list of applications that either run less often on these machines, or are known for being exploitable. When you see a warning icon, it means this specific application can be used by an attacker to bypass the allowlist. Be careful when you review this list.
When you're done, select Audit at the bottom.
Vulnerability assessment
Vulnerabilities in your machines can have a serious impact on your environment. Your machines could become vulnerable for different reasons. For example, some applications installed on your virtual machines could have vulnerabilities that might lead to an attacker breaching your virtual machine, and subsequently accessing your wider environment. Microsoft Defender for Cloud provides vulnerability scanning to protect your machines and the wider environment.
Microsoft Defender for Cloud tries to find out whether there's a vulnerability assessment solution installed on your machines. If a machine doesn't have one installed, Microsoft Defender for Cloud gives the following recommendation for that machine: A vulnerability assessment solution should be enabled on your virtual machines.
Here's how you deploy vulnerability scanning to your virtual machines:
Go to the Recommendations pane in Microsoft Defender for Cloud.
Select the A vulnerability assessment solution should be enabled on your virtual machines recommendation:
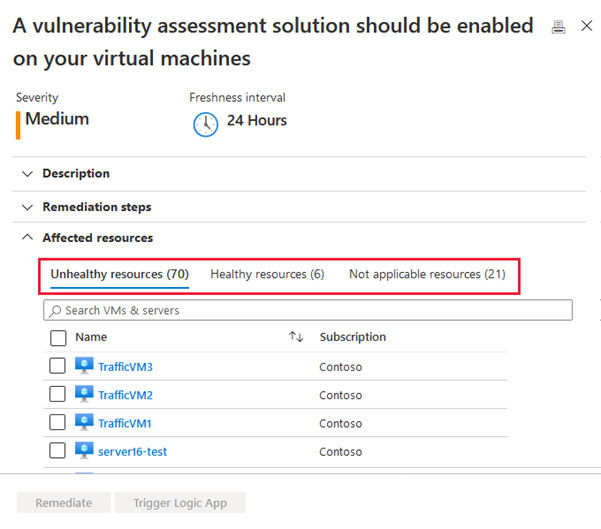
Select the Unhealthy resources tab then select the virtual machines where you want the scanner to be deployed.
Select Remediate at the bottom of the list.
You can choose between different options. Select Recommended: Deploy Defender for Cloud integrated vulnerability scanner powered by Qualys (included in standard pricing tier).
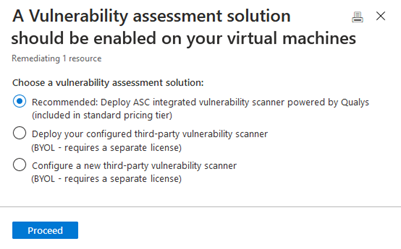
The scanner will then be installed on the machines within a few minutes. After installation, scanning will begin automatically and take place at four-hour intervals.
You can view findings for your vulnerability assessments by doing the following:
In the Recommendations pane, select the Vulnerabilities in your virtual machines should be remediated recommendation.
You'll see findings for all of your virtual machines in your selected subscription, ordered by severity.
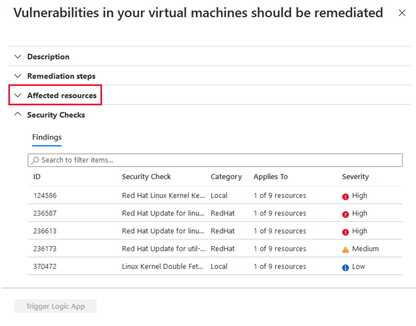
Look for a specific virtual machine by selecting the Affected resources tab. You can then select the virtual machine to view which vulnerabilities have been identified for it.
If you want to learn more about a certain vulnerability, you select it. A details pane will appear on the right. You can then remediate it by following the steps in the details pane.

Container protection
When it comes to containers, Microsoft Defender for Cloud provides protection for the following resource types:
| Resource type | Details |
|---|---|
| Container hosts | Azure Defender for Cloud will scan your Docker configuration and inform you of misconfigurations through a list of failed rules that were assessed. |
| Azure Kubernetes Service (AKS) clusters | Through the Microsoft Defender for Cloud's AKS bundle, you can gain better insight into the security state of your nodes, cloud traffic, and more. |
| Azure Container Registry (ACR registries | Through the Microsoft Defender for Cloud's ACR bundle, you'll gain deeper information about vulnerabilities of images in your ACR registries. |
Note
Use the links in the Learn more section of this to find out more about the AKS and ACR bundles.
Microsoft Defender for Cloud provides protection for your containers and their apps through several measures, including:
- Vulnerability management: Scanning is done on your container images.
- Environment hardening: Your Docker configuration and Kubernetes clusters are monitored continuously.
- Run-time protection: Real-time threat detection for your containerized environments.
Vulnerability management
To use vulnerability management, you'll need to make sure you're on the Microsoft Defender for Cloud standard tier. You can then enable the Container Registries bundle. You do this by going to the Pricing & settings pane, and then enabling Container registries:

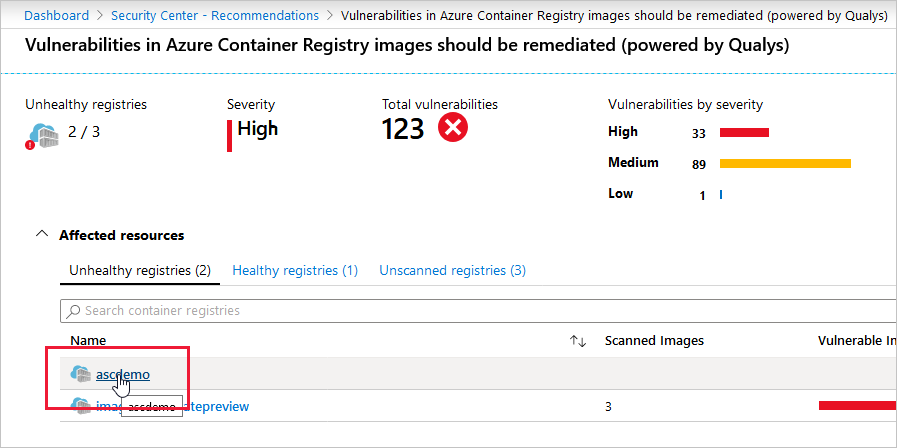
When an image is pushed to your registry, Microsoft Defender for Cloud will scan it using a Qualys scanner. If issues are identified, you'll receive recommendations through the Microsoft Defender for Cloud's Recommendations pane. Select a recommendation to implement it:

You'll see details about the recommendation, including a list of registries with vulnerable images, under the Affected resources section. You select a specific registry to view affected repositories:
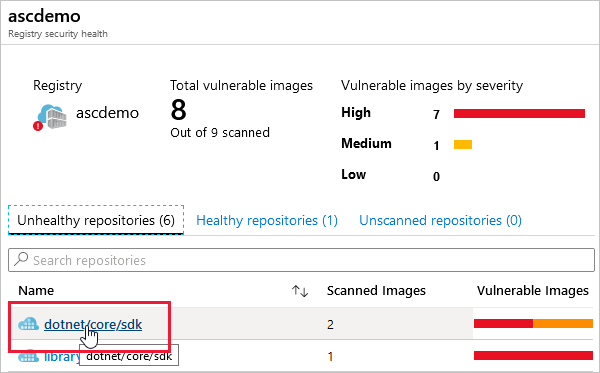
Under the Unhealthy repositories tab, you select a repository, to see its vulnerable images:
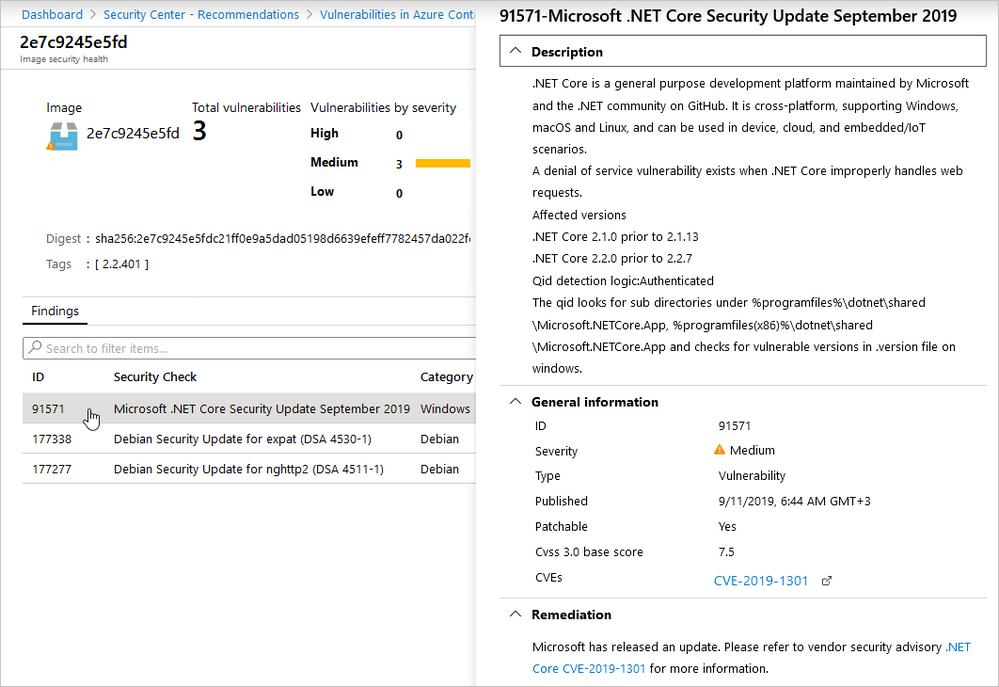
Then you select an image to see its vulnerabilities:
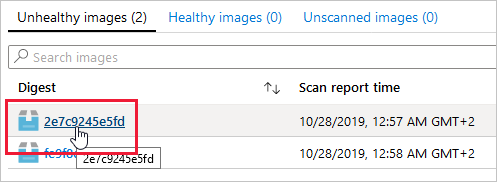
You'll see the list of findings. When you select any finding, a pane appears on the right that you can use to investigate further, and begin to remediate it.
After you've remediated the issue, you'll need to:
- Push the updated image, which will trigger another scan.
- Check the Recommendations pane again to make sure the Vulnerabilities in Azure Container Registry images should be remediated (powered by Qualys) recommendation is no longer there.
- Delete the old vulnerable image from your registry.
Continuous monitoring
Microsoft Defender for Cloud continuously monitors your Docker configurations and Azure Kubernetes clusters. For example, it will identify unmanaged containers hosted on Linux virtual machines that run Docker containers. Microsoft Defender for Cloud will assess the configurations of your containers continuously, and compare them against the Center for Internet Security (CIS) Docker Benchmark.
Microsoft Defender for Cloud will then tell you if there are any containers that don't meet a particular control. After it gives you recommendations, you can implement them as follows:
Select Compute & Apps in the left pane of Microsoft Defender for Cloud, under Resource security hygiene.
Select the Containers tab. You'll see a list of container host machines.
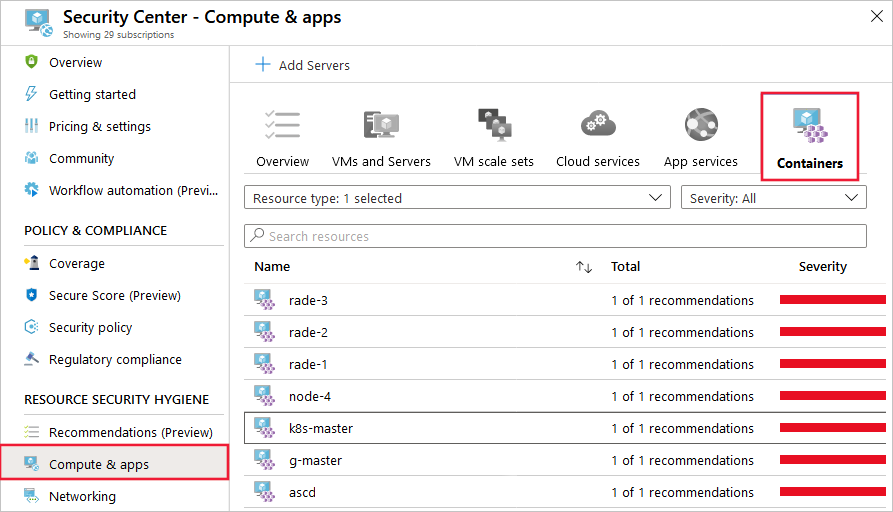
Select any machine to investigate further.
The Container host information pane opens. In the Recommendation list section, you select a recommendation you want to implement.
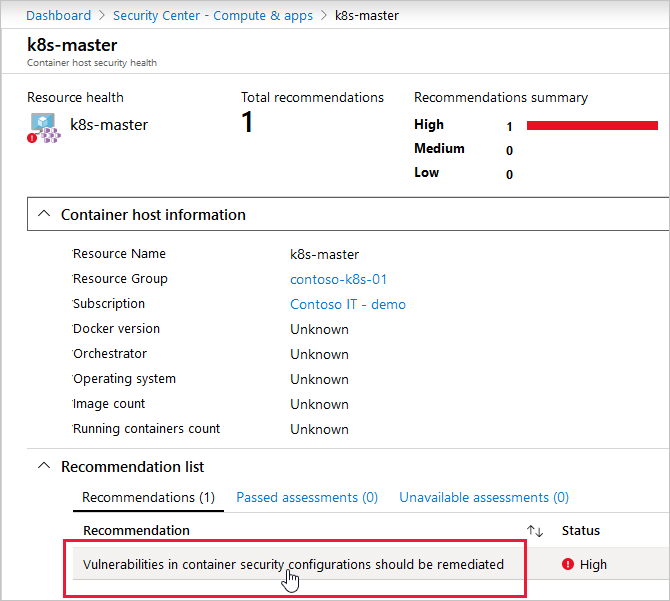
A new pane appears. Use it to review further details about the recommendation, and possible remediation steps to take to resolve the issue.
Run-time protection
You can also use real-time threat protection for containerized environments, and Microsoft Defender for Cloud will also generate alerts for security issues.
Threat protection is provided at two levels that are configured differently:
- Host level: A Log Analytics agent can be installed to monitor your Linux hosts, and triggers alerts for suspicious activities coming from a node or the container that runs on it. For example, it will monitor for activities like connections with known suspicious IP addresses, or access to API servers, and alert you.
- AKS cluster level: When you enable the Kubernetes option from the Pricing & settings pane, Kubernetes audit logs are analyzed through agentless monitoring. Microsoft Defender for Cloud then monitors AKS-managed services using logs fetched by AKS. It will monitor for events like the creation of sensitive mounts or any high privileged roles.
Alerts will show up in Microsoft Defender for Cloud when a suspicious event occurs. These alerts help you to remediate security issues on time, and improve the protection of your containers.
Data and storage protection
Microsoft Defender for Cloud helps you protect your data and storage. Microsoft Defender for Cloud will detect threats to your data and storage resources, alert you, and suggest remediation steps to deal with those threats. With Microsoft Defender for Cloud, you don't have to be an expert, and you don't need to learn multiple security monitoring systems to keep your data and storage secure. Microsoft Defender for Cloud helps you protect different data and storage resources and services including:
- Azure Storage
- Azure Cosmos DB
- Azure Key Vault
- SQL Database
Microsoft Defender for Cloud provides specific protections for each resource or service. For example:
Azure Key Vault support
Through advanced threat protection, Azure Key Vault detects suspicious attempts to exploit or access your Azure Key Vault accounts. When suspicious activities are detected by Microsoft Defender for Cloud, you'll receive alerts.

Microsoft Defender for Cloud will also send an email to the subscription administrator, which includes information about activity that occurred, and how to remediate it.
Here's how you configure advanced threat protection for your Azure Key Vaults:
Go to the Pricing & settings pane in Microsoft Defender for Cloud, then select your subscription.
Make sure you're on the standard tier.
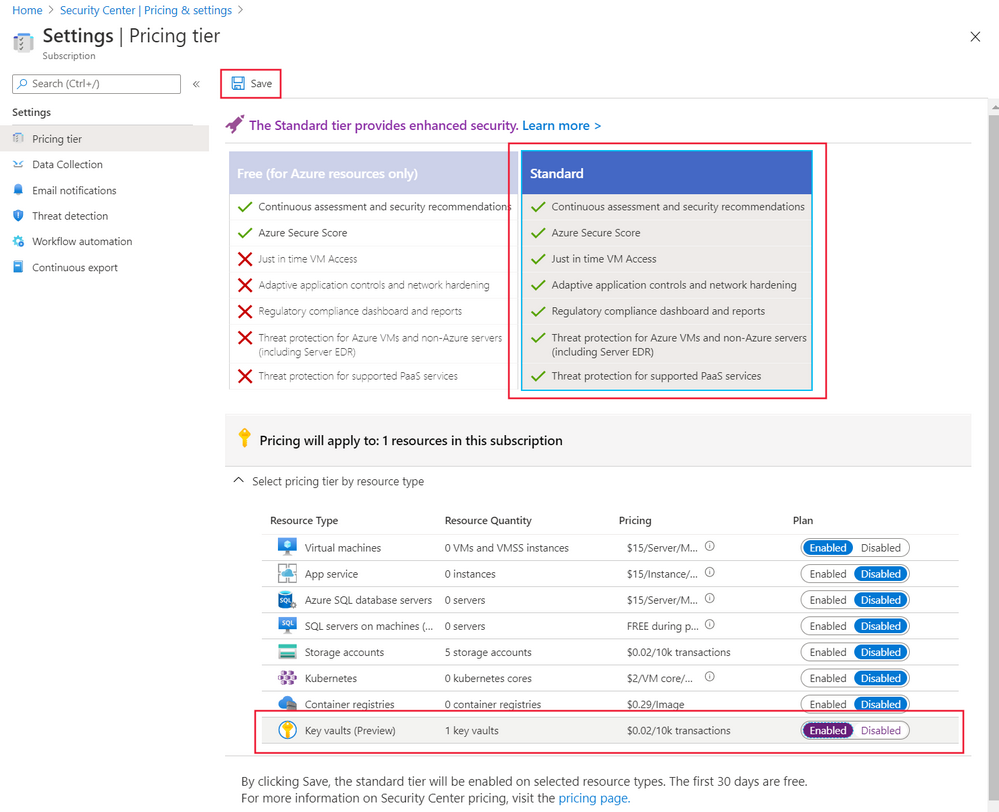
Set Key Vaults (preview) to enabled.
Select Save at the top.
Microsoft Defender for Identity for Azure Storage
Through advanced threat protection, Microsoft Defender for Cloud provides protection for different types of Azure Storage resources, including:
- Blob containers
- File shares
- Data lakes
For example, Microsoft Defender for Cloud will monitor for activities across your Azure Storage accounts and alert you based on the type of event that has occurred. You'll receive alerts for:
- Suspicious activity: For example, someone might have accessed one of your storage accounts from an IP address that's known to be an active exit node of Tor.
- Anomalous behavior: Normally, your storage accounts are accessed from the United States, but now access might have been attempted from another country/region, on a different continent. So Microsoft Defender for Cloud decides to alert you.
Microsoft Defender for Cloud also uses malware reputation screening, where hash reputation analysis is used to find out whether an uploaded file could be harmful. This means your uploaded files aren't opened or scanned. Instead, the storage logs are scrutinized and hashes of uploaded files are compared with hashes of known viruses, spyware, trojans, and ransomware. If Microsoft Defender for Cloud suspects a file contains malware, it will raise an alert.
You can select an alert to get more information, along with details about how you can remediate it.

Microsoft Defender for Cloud can also send an email to the storage owner to approve or delete the file. You can set up workflow automation for this, by configuring an automated workflow that deletes suspicious files whenever the Potential malware uploaded to a storage account alert is triggered.
Here's how you configure advanced threat protection for Azure Storage:
Go to the Pricing & settings pane in Microsoft Defender for Cloud, and select your subscription.
Make sure you're on the standard tier of Microsoft Defender for Cloud.
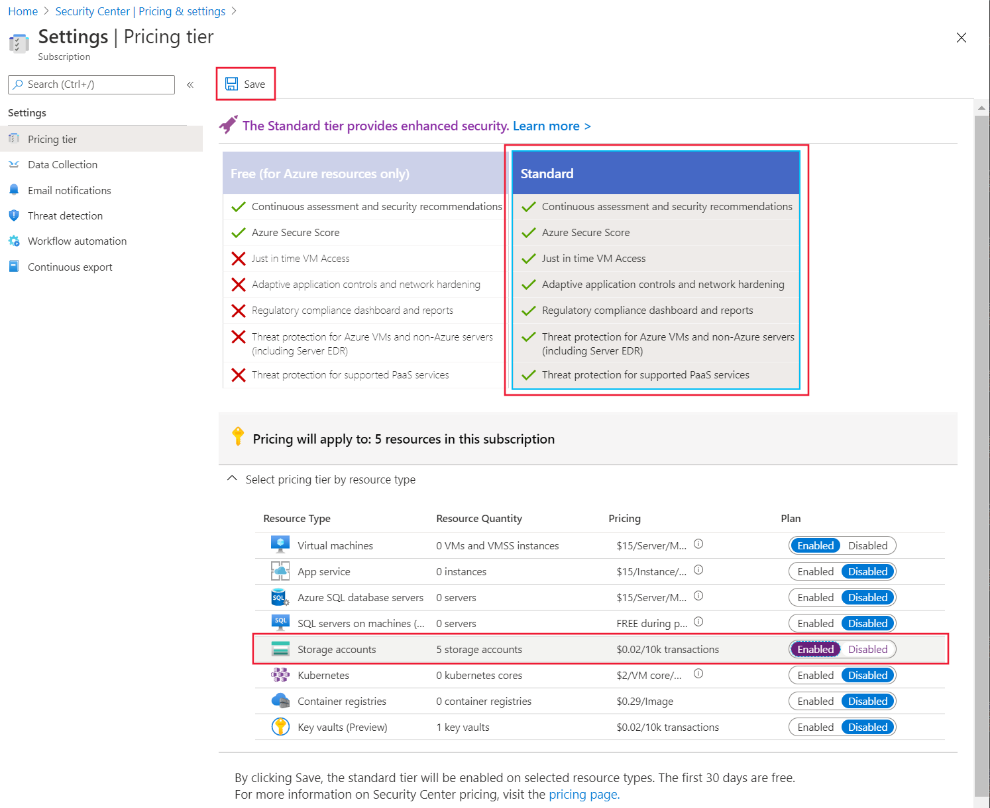
Set Storage accounts to enabled.
Select Save.
IoT protection
Every new addition to your IoT infrastructure has the potential to become another attack surface. To secure your IoT infrastructure, you'll need to provide protection at every level. Microsoft Defender for Cloud helps you provide end-to-end protection for your IoT infrastructure. Through Microsoft Defender for IoT, you can mitigate security threats and implement security best practices and analysis across your IoT devices, hubs, and related compute and data assets and resources. You can also get a unified view and control of the security of your workloads in the cloud or on-premises, and use intelligent threat detection to respond promptly and effectively to threats.
When you want to enable Microsoft Defender for IoT, two different deployment options are available. Choose one of the following deployment options, based on what best meets your needs:
- Built-in deployment: Use this option to quickly integrate Microsoft Defender for IoT into your IoT Hub. You'll get security analysis of your IoT Hub configuration, your hub and device communication patterns, along with device identity and management, and monitoring.
- Enhanced deployment: Use this option for enhanced security capabilities. These capabilities include comprehensive security posture management, and full threat detection across your devices, such as monitoring logins, remote connections, active applications, and more. This deployment option requires the installation of IoT security device agents on your devices to collect and analyze security events.
You'll need to make sure the following components are in place to enable Microsoft Defender for IoT:
- IoT Hub standard tier
- You'll also need an Azure role that has the Owner role over it
- Microsoft Defender for Cloud
- Log Analytics Workspace (one is created for you automatically when enabling Microsoft Defender for IoT)
Note
If you want to use enhanced deployment, you need to also check the supported platforms for agents. You should also make sure that your IoT Hub is in one of the supported regions. You can find details about supported platforms and regions in the Learn more section of this unit.
Enable Microsoft Defender for IoT
How you enable Microsoft Defender for IoT depends on the deployment option you've chosen. For example, to enable it using built-in deployment, you do the following:
- Go to your IoT Hub in the Azure portal.
- On the left pane, select Overview, under Security.
- Select Secure your IoT solution .
- Fill in the onboarding form that appears.
After you've enabled Microsoft Defender for IoT, it will automatically begin to identify other Azure resources and services that are part of your IoT infrastructure, and are connected to your IoT Hub through automatic relationship detection. You can also select which resources, resource groups, or subscriptions to add. Microsoft Defender for IoT provides security alerts and recommendations for them too.
For example, you can select Azure resources to add by doing the following steps:
- Go to your IoT Hub in the Azure portal.
- In the left pane, select Resources under Security.
- Select Edit, then pick the resource groups that you want to add.
- Select Add.
Microsoft Defender for IoT will then begin to monitor the resources you've added.
Investigate and remediate security alerts and recommendations
After you've set up Microsoft Defender for IoT, it will begin to provide security alerts and recommendations to help protect your IoT infrastructure. You can now view and investigate security alerts, using the following steps:
Go to Microsoft Defender for Cloud in the Azure portal.
Select IoT Hubs & resources, under Resource security hygiene.
You'll see security recommendations for your IoT Hubs. Select a recommendation to investigate it further.
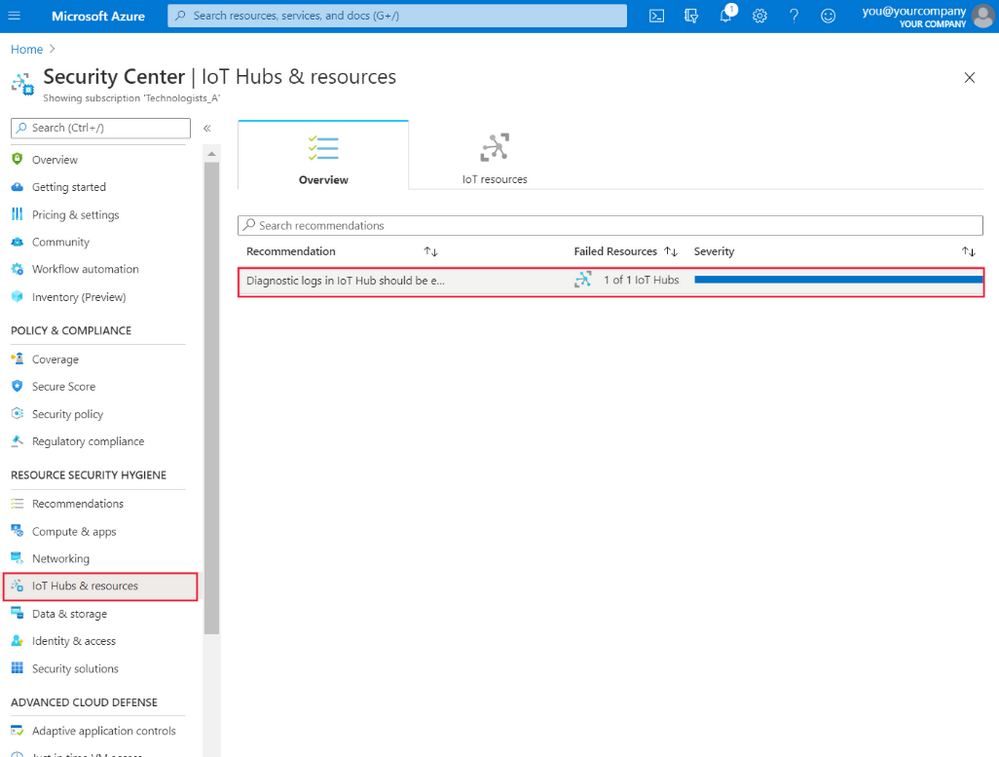
In the pane that appears, you'll see more information about the security recommendations, which of your IoT Hubs are affected, and details about remediation steps you can take to address the issue.
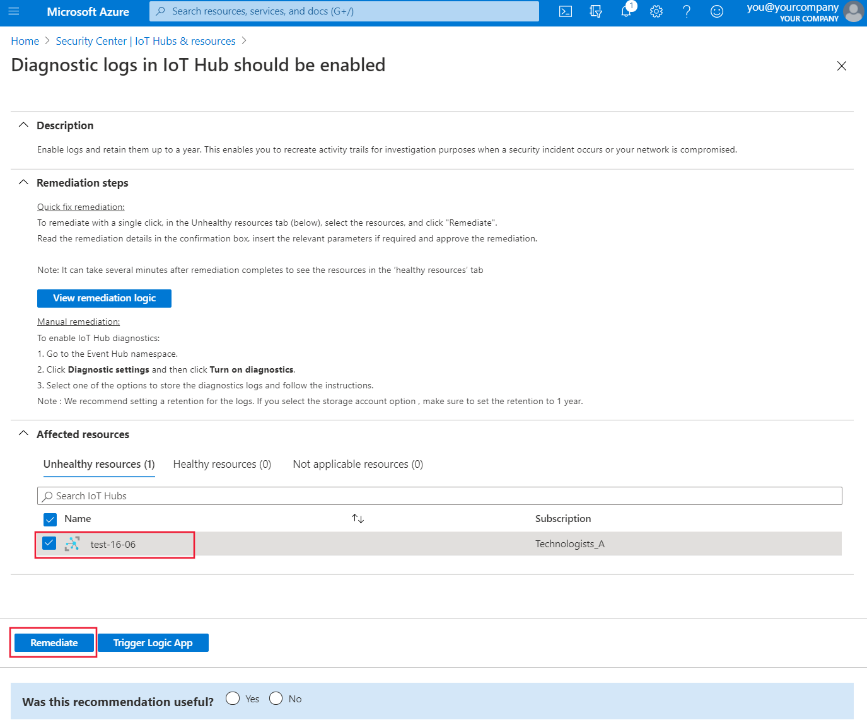
To remediate, select an IoT Hub and then select Remediate, or select Trigger Logic App to trigger an automated workflow.


Learn more
- Onboard Windows servers to Microsoft Defender for Endpoint.
- Onboarding to Microsoft Defender for Cloud Standard for enhanced security.
- Microsoft Defender for Cloud's ACR bundle
- Microsoft Defender for Cloud's AKS bundle
- Microsoft Defender for IoT Supported platforms
- Microsoft Defender for IoT supported regions