Exercise - Initialize a Git repository
You've decided that your workflow could benefit from a version control system, and you're going to try Git. In this exercise, you'll get everything ready so that you can start to work with Git.
During the process, you'll:
- Install and configure Git.
- Create and initialize a Git repository.
- Add a Bicep file to the repository folder and see how the repository's status changes.
Note
Visual Studio Code is a powerful editor, and it has many different ways of achieving the same thing. Almost every action has keyboard shortcuts. There are often several ways to perform common actions by using the user interface too. This module will guide you to perform the actions by using one approach. Feel free to use a different approach if you want.
Install Git
Install Git. Choose the correct version based on your operating system.
If you already have Visual Studio Code open, restart it so that it detects your Git installation.
Configure Git
You need to run a few commands to configure Git so that it associates your name and email address with your activity. This identification helps when you use Git to collaborate with others. If you've already configured Git, you can skip these steps and move to the next section.
Open Visual Studio Code.
Open a Visual Studio Code terminal window by selecting Terminal > New Terminal. The window usually opens at the bottom of the screen.
Verify that Git is installed by entering the following command:
git --versionIf you see an error, make sure you've installed Git, restart Visual Studio Code, and try again.
Set your name by using the following command. Replace
USER_NAMEwith the username that you want to use. Use your first name and last name so that your team members know it's you.git config --global user.name "USER_NAME"Set your email address by using the following command. Replace
USER_EMAIL_ADDRESSwith your email address.git config --global user.email "USER_EMAIL_ADDRESS"Run the following command to check that your changes worked:
git config --listConfirm that the output includes two lines that are similar to the following example. Your name and email address will be different from what's shown in the example.
user.name=User Name
user.email=user-name@contoso.com
Create and initialize a Git repository
In the Visual Studio Code terminal, create a new folder named toy-website:
mkdir toy-website
cd toy-website
By using the Visual Studio Code terminal, run the following command to reopen Visual Studio Code with the toy-website folder loaded:
code --reuse-window .Visual Studio Code reloads. If you're prompted to trust the folder, select Yes, I trust the authors.
In the Visual Studio Code terminal, run the following command to initialize a new Git repository in the toy-website folder that you created:
git initGit displays a message confirming that it initialized an empty Git repository.
Add a Bicep file
Create a subfolder named deploy. You can create the folder using Explorer in Visual Studio Code, or you can use the following command in the Visual Studio Code terminal:
mkdir deployIn the deploy folder, create a new file called main.bicep.
Open and save the empty file so that Visual Studio Code loads the Bicep tooling.
You can either select File > Save As or select the keyboard shortcut Ctrl+S for Windows (⌘+S for macOS). Be sure to remember where you save the file. For example, you might want to create a scripts folder to save it in.
Copy the following code into main.bicep.
@description('The Azure region into which the resources should be deployed.')
param location string = resourceGroup().location

@description('The type of environment. This must be nonprod or prod.')
@allowed([
  'nonprod'
  'prod'
])
param environmentType string
This Bicep file contains two parameters but doesn't define any resources yet.
Save the file.
Note
Even though you've saved the file into your repository's folder, Git isn't tracking it yet. You'll learn how Git keeps track of files in the next unit.
Inspect the repository status by using the CLI
Git monitors the repository folder for changes. You can query Git to see the list of files that have been modified. This feature is useful to see what you've done and to verify you haven't accidentally added files or made changes that you didn't mean to include. You can use both the Git CLI and Visual Studio Code to view the status of your repository.
By using the Visual Studio Code terminal, run the following command:
git statusLook at the results. They're similar to the following example:
On branch main

No commits yet

Untracked files:
  (use "git add <file>..." to include in what will be committed)
        deploy/

nothing added to commit but untracked files present (use "git add" to track)
This text tells you four pieces of information:
- You're currently on the main branch. You'll learn about branches shortly.
- There have been no commits to this repository. You'll learn about commits in the next unit.
- There are untracked files in the deploy folder.
- You haven't told Git to add any files to be tracked by the repository yet.
Look at the first line of the output from the preceding step. If it shows a branch name that's different from main, run the following command to rename your branch to main:
git branch -M mainThis command ensures you can follow along with the remaining exercises in this module.
Inspect the repository status by using Visual Studio Code
Visual Studio Code shows the same information that the git status command provides, but it integrates the information into the Visual Studio Code interface.
In Visual Studio Code, select View > Source Control, or select Ctrl+Shift+G on the keyboard.
Source Control opens.
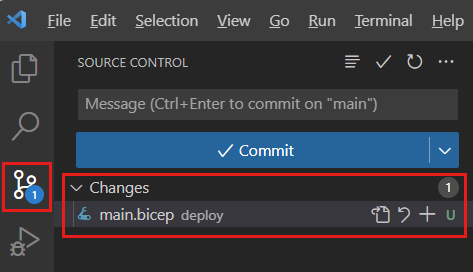
Visual Studio Code shows that the main.bicep file in the deploy folder has changed. Additionally, the Source Control icon has a badge that shows the number 1, which indicates one untracked file.
The status bar appears at the bottom of Visual Studio Code. It provides useful information and functionality. Toward the left side, the status bar shows the word main:
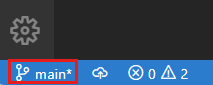
This word indicates that you're currently on the main branch. You'll learn about branches shortly.
The status reported by Git and Visual Studio Code is the same because the Git CLI and Visual Studio Code use the same Git engine. You can mix and match the tools that you use to work with your repositories. You can use different tools based on what suits you best.