Explore feature branch workflow
The core idea behind the Feature Branch Workflow is that all feature development should take place in a dedicated branch instead of the main branch.
The encapsulation makes it easy for multiple developers to work on a particular feature without disturbing the main codebase. It also means the main branch will never contain broken code, a huge advantage for continuous integration environments.
Encapsulating feature development also makes it possible to use pull requests, which are a way to start discussions around a branch. They allow other developers to sign out on a feature before it integrates into the official project. Or, if you get stuck in the middle of a feature, you can open a pull request asking for suggestions from your colleagues.
Pull requests make it incredibly easy for your team to comment on each other's work. Also, feature branches can (and should) be pushed to the central repository. It allows sharing a feature with other developers without touching any official code.
Since the main is the only "special" branch, storing several feature branches on the central repository doesn't pose any problems. It's also a convenient way to back up everybody's local commits.
Release Branch Workflow
In addition to the Feature Branch Workflow, another commonly used strategy in Git branching workflows is the Release Branch Strategy. This strategy involves the creation of dedicated branches specifically for preparing releases. The release branch is typically created from a stable feature branch, ensuring that it contains only thoroughly tested and validated code. Once created, the release branch undergoes additional testing, bug fixes, and stabilization efforts to prepare the codebase for deployment. The release branch allows for the isolation of release-related activities from ongoing feature development, providing a controlled environment for finalizing and polishing the upcoming release. After all necessary adjustments and verifications have been made on the release branch, it is then merged into the main branch or deployed directly to production, depending on the team's release process. The Release Branch Strategy helps teams manage the complexities of coordinating release activities while maintaining a stable main branch for ongoing development.
Trunk-based development workflow
The trunk-based development Workflow assumes a central repository, and the main represents the official project history. Instead of committing directly to their local main branch, developers create a new branch whenever they start working on a new feature. Feature branches should have descriptive names, like new-banner-images or bug-91. The idea is to give each branch a clear, highly focused purpose.
Git makes no technical distinction between the main and feature branches, so developers can edit, stage, and commit changes to a feature branch.
Create a branch
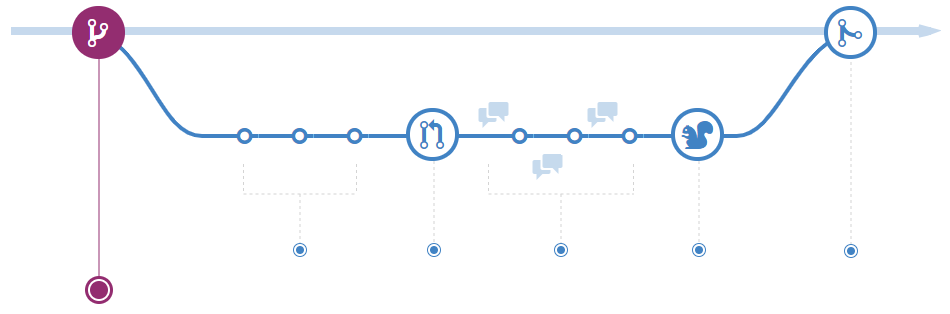
When you're working on a project, you will have many different features or ideas in progress at any given time – some of which are ready to go and others that aren't. Branching exists to help you manage this workflow. When you create a branch in your project, you create an environment where you can try out new ideas.
In addition to creating branches for new features or fixes, teams following a release branch workflow also create dedicated branches specifically for preparing releases. These release branches are typically derived from stable feature branches to ensure they contain thoroughly tested and validated code. Once created, the release branch undergoes additional testing, bug fixes, and stabilization efforts to prepare the codebase for deployment.
Add commits
Once your branch has been created, it's time to make changes. Whenever you add, edit, or delete a file, you make a commit and add them to your branch.
Adding commits keeps track of your progress as you work on a feature branch.
Commits also create a transparent history of your work that others can follow to understand your actions and why.
Each commit has an associated commit message explaining why a particular change was made.
Furthermore, each commit is considered a separate unit of change. It lets you roll back changes if a bug is found or you decide to head in a different direction.
Commit messages are essential, especially since Git tracks your changes and displays them as commits once pushed to the server.
By writing clear commit messages, you can make it easier for others to follow along and provide feedback.
Open a pull request
The Pull Requests start a discussion about your commits. Because they're tightly integrated with the underlying Git repository, anyone can see exactly what changes would be merged if they accept your request.
You can open a Pull Request at any point during the development process when:
- You've little or no code but want to share screenshots or general ideas.
- You're stuck and need help or advice.
- You're ready for someone to review your work.
Using the @mention system in your Pull Request message, you can ask for feedback from specific people or teams, whether they're down the hall or 10 time zones away.
Pull Requests help contribute to projects and for managing changes to shared repositories.
If you're using a Fork & Pull Model, Pull Requests provide a way to notify project maintainers about the changes you'd like them to consider.
If you're using a Shared Repository Model, Pull Requests help start code review and conversation about proposed changes before they're merged into the main branch.
Discuss and review your code
Once a Pull Request has been opened, the person or team reviewing your changes may have questions or comments.
Perhaps the coding style doesn't match project guidelines, the change is missing unit tests, everything looks excellent, and the props are in order.
Pull Requests are designed to encourage and capture this type of conversation.
You can also continue to push to your branch, considering discussion and feedback about your commits.
Suppose someone comments that you forgot to do something, or if there's a bug in the code, you can fix it in your branch and push up the change.
Git will show your new commits and any feedback you may receive in the unified Pull Request view.
Pull Request comments are written in Markdown, so you can embed images and emojis, use pre-formatted text blocks, and other lightweight formatting.
Deploy
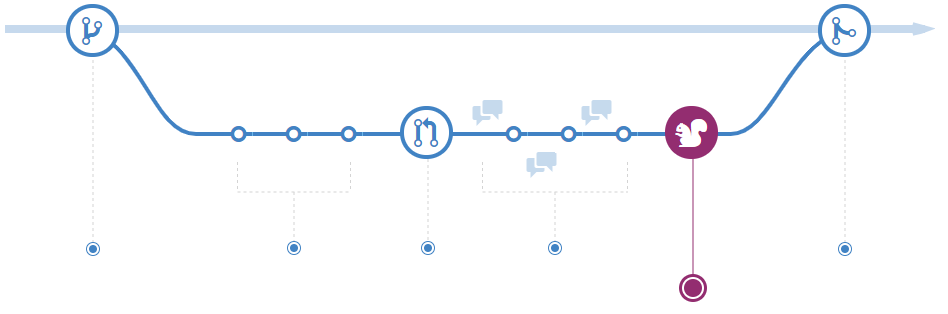
With Git, you can deploy from a branch for final testing in an environment before merging to the main.
Once your pull request has been reviewed and the branch passes your tests, you can deploy your changes to verify them. You can roll it back if your branch causes issues by deploying the existing main.
Merge
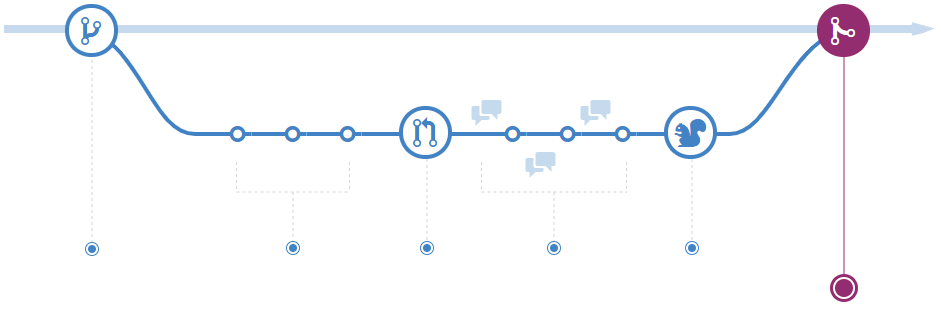
Once your changes have been verified, it's time to merge your code into the main branch.
Once merged, Pull Requests preserve a record of the historical changes to your code. Because they're searchable, they let anyone go back in time to understand why and how a decision was made.
You can associate issues with code by incorporating specific keywords into your Pull Request text. When your Pull Request is merged, the related issues can also close.
This workflow helps organize and track branches focused on business domain feature sets.
Other Git workflows, like the Git Forking Workflow and the Gitflow Workflow, are repo-focused and can use the Git Feature Branch Workflow to manage their branching models.