Search for content in a case
After a Microsoft Purview eDiscovery (Standard) case is created and people of interest in the case are placed on hold, an organization can create and run one or more searches for content relevant to the case. Searches associated with an eDiscovery (Standard) case aren't listed on the Content search page in the Microsoft Purview compliance portal. Instead, these searches are listed on the Searches page of the eDiscovery (Standard) case the searches are associated with. As a result, searches associated with a case can only be accessed by case members.
To create an eDiscovery (Standard) search:
On the Microsoft Purview compliance portal, select eDiscovery in the navigation pane to expand the group. Under the eDiscovery group, select Standard.
On the eDiscovery (Standard) page, select eDiscovery in the navigation pane to expand the group. Under the eDiscovery group, select Standard.
On the eDiscovery (Standard) page, select +Create a case on the menu bar.
On the eDiscovery (Standard) page, select the case that you want to create an associated search, and then select Open case.
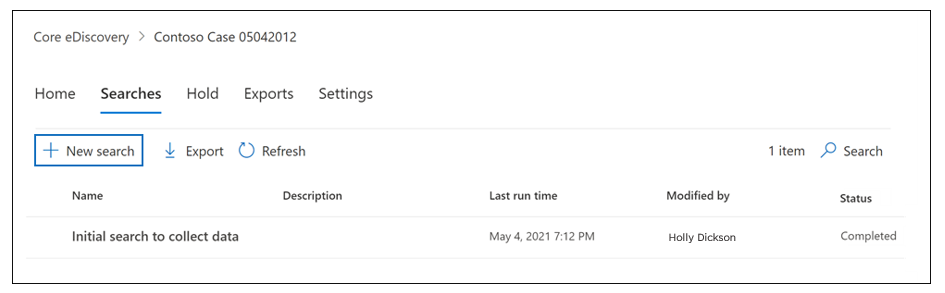
On the detail page for the case, select the Searches tab, and then select +New search.
In the New search pane that appears, enter a Name for the search (required) and optionally enter a description. The name of the search must be unique in your organization.
On the Locations page, choose the content locations that you want to search. You can search mailboxes, sites, and public folders.
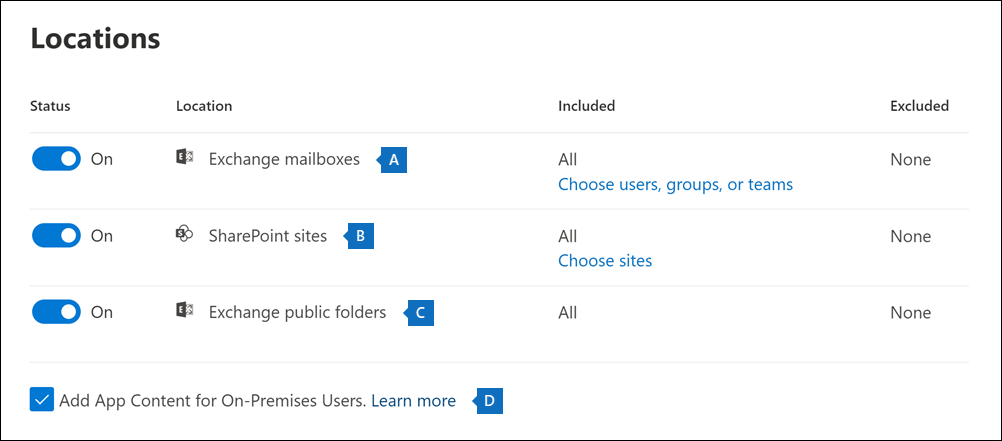
Exchange mailboxes. Set the toggle to On and then select Choose users, groups, or teams to specify the mailboxes to place on hold. Use the search box to find user mailboxes and distribution groups (to place a hold on the mailboxes of group members) to place on hold. You can also search the mailbox associated with a Microsoft Team (for channel messages), Microsoft 365 Group, and Yammer Group. For more information about the application data stored in mailboxes, see Content stored in mailboxes for eDiscovery.
When you select Choose users, groups, or teams to specify mailboxes to search, the mailbox picker that's displayed is empty. This condition is by design to enhance performance. To add recipients to this list, select Choose users, groups, or teams, type a name (a minimum of three characters) in the search box, select the check box next to the desired name, and then select Choose.
You can also add inactive mailboxes, Microsoft Teams, Yammer Groups, Microsoft 365 Groups, and distribution groups to the list of mailboxes to search. Dynamic distribution groups aren't supported. If you add Microsoft Teams, Yammer Groups, or Microsoft 365 Groups, the group or team mailbox is searched; the mailboxes of the group members aren't searched.
SharePoint sites. Set the toggle to On and then select Choose sites to specify SharePoint sites and OneDrive accounts to place on hold. Type the URL for each site that you want to place on hold. You can also add the URL for the SharePoint site for a Microsoft Team, Microsoft 365 Group, or Yammer Group.
Exchange public folders. Set the toggle to On to put all public folders in your Exchange Online organization on hold. You can't choose specific public folders to put on hold. Leave the toggle switch Off if you don't want to put a hold on public folders.
Add App Content for On-Premises Users. Keep this check box selected to search for Teams content for on-premises users. For example, if you search all Exchange mailboxes in the organization and this check box is selected, the cloud-based storage used to store Teams chat data for on-premises users will be included in the scope of the search. For more information, see Search for Teams chat data for on-premises users.
On the Define your search conditions page, type a keyword query and add conditions to the search query if necessary.
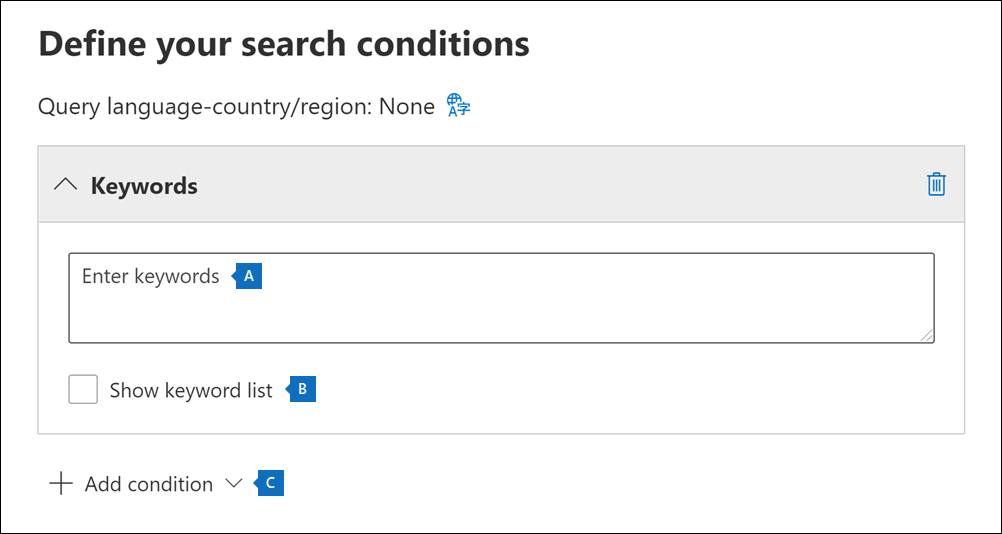
Enter keywords. Specify keywords, message properties such as sent and received dates, or document properties such as file names or the date that a document was last changed. You can use more complex queries that use a Boolean operator, such as AND, OR, NOT, and NEAR. If you leave the keyword box empty, all content located in the specified content locations is included in the search results. For more information, see Keyword queries and search conditions for eDiscovery.
Show keyword list. Alternatively, you can select the Show keyword list option and type a keyword in each row. If you do so, the keywords on each row are connected by a logical operator (c:s) that's similar in functionality to the OR operator in the search query that's created.
An advantage to using the keyword list is that it displays statistics showing how many items match each keyword. This information can help you quickly identify which keywords are the most (and least) effective. You can also use a keyword phrase (surrounded by parentheses) in a row. For more information about the keyword list and search statistics, see Get keyword statistics for searches.
Note
To help reduce issues caused by large keyword lists, you're limited to a maximum of 20 rows in the keyword list.
Add condition. You can add search conditions to narrow a search and return a more refined set of results. Each condition adds a clause to the search query that's created and run when you start the search. A condition is logically connected to the keyword query (specified in the keyword box) by a logical operator (c:c) that's similar in functionality to the AND operator. As a result, items must satisfy both the keyword query and one or more conditions to be included in the results. This example is how conditions help to narrow your results. For a list and description of conditions that you can use in a search query, see Search conditions.
On the Review the search settings page, review the settings that you configured for this search. If any settings must be changed, select the appropriate Edit option. Once all settings are correct, select Submit to start the search.
After the search is completed, you can preview the search results. If necessary, select Refresh on the Searches tab to display the search you created.