Exercise - Add multiple environments to your workflow
Now you're ready to update your workflow to deploy to both your test and production environments. In this unit, you'll update your workflow to use called workflows so that you can reuse the jobs across the environments.
During the process, you'll:
- Add a reusable workflow for the lint job.
- Add a reusable workflow that defines the jobs required to deploy to any environment.
- Update your workflow to use the called workflows.
- Run your workflow and view the results.
Add a reusable workflow for the lint job
The lint job happens only once during the workflow run, regardless of how many environments the workflow deploys to. So, you don't really need to use a called workflow for the lint job. But to keep your main workflow definition file simple and easy to read, you decide to define the lint job in a separate workflow file.
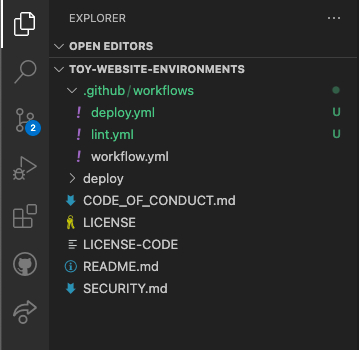
In Visual Studio Code, create a new file in the .github/workflows folder named lint.yml.

Paste the following workflow definition into the file:
name: lint

on:
  workflow_call:

jobs:
  lint:
    name: Lint code
    runs-on: ubuntu-latest
    steps:
    - uses: actions/checkout@v3

    - name: Lint code
      run: |
        az bicep build --file deploy/main.bicep
The lint job is the same as the lint job already in the workflow, but now it's in a separate workflow file.
Save your changes and close the file.
Add a reusable workflow for deployment
Create a reusable workflow that defines all of the jobs required to deploy each of your environments. You'll use inputs and secrets to specify the settings that might differ between environments.
Create a new file in the .github/workflows folder named deploy.yml.
This file represents all of the deployment activities that run for each of your environments.
Paste the following workflow name, trigger, inputs, and secrets into the file:
name: deploy

on:
  workflow_call:
    inputs:
      environmentType:
        required: true
        type: string
      resourceGroupName:
        required: true
        type: string
    secrets:
      AZURE_CLIENT_ID:
        required: true
      AZURE_TENANT_ID:
        required: true
      AZURE_SUBSCRIPTION_ID:
        required: true
Note
When you start to work with your YAML file in Visual Studio Code, you might see some red squiggly lines telling you there's a problem. This is because the Visual Studio Code extension for YAML files sometimes incorrectly guesses the file's schema.
You can ignore the problems that the extension reports. Or if you prefer, you can add the following code to the top of the file to suppress the extension's guessing:
# yaml-language-server: $schema=./deploy.ymlBelow the secrets, paste the definition of the validation job:
jobs:
  validate:
     runs-on: ubuntu-latest
     steps:
     - uses: actions/checkout@v3
     - uses: azure/login@v1
       name: Sign in to Azure
       with:
        client-id: ${{ secrets.AZURE_CLIENT_ID }}
        tenant-id: ${{ secrets.AZURE_TENANT_ID }}
        subscription-id: ${{ secrets.AZURE_SUBSCRIPTION_ID }}
     - if: inputs.environmentType != 'Production'
       uses: azure/arm-deploy@v1
       name: Run preflight validation
       with:
         deploymentName: ${{ github.run_number }}
         resourceGroupName: ${{ inputs.resourceGroupName }}
         template: ./deploy/main.bicep
         parameters: >
           environmentType=${{ inputs.environmentType }}
         deploymentMode: Validate
     - if: inputs.environmentType == 'Production'
       uses: azure/arm-deploy@v1
       name: Run what-if
       with:
         failOnStdErr: false
         resourceGroupName: ${{ inputs.resourceGroupName }}
         template: ./deploy/main.bicep
         parameters: >
           environmentType=${{ inputs.environmentType }}
         additionalArguments: --what-if
Notice that a condition is applied to the jobs. The preflight validation runs only for non-production environments. The what-if operation runs only for the production environment. In the previous module in the learning path, you used separate jobs for these operations, but here you combine them to simplify the workflow.
Tip
YAML files are sensitive to indentation. Whether you type or paste this code, make sure your indentation is correct. Later in this exercise, you'll see the complete YAML workflow definition so that you can verify that your file matches.
Below the validation job, paste the definition of the deploy job:
deploy:
  needs: validate
  environment: ${{ inputs.environmentType }}
  runs-on: ubuntu-latest
  outputs:
    appServiceAppHostName: ${{ steps.deploy.outputs.appServiceAppHostName }}
  steps:
  - uses: actions/checkout@v3
  - uses: azure/login@v1
    name: Sign in to Azure
    with:
      client-id: ${{ secrets.AZURE_CLIENT_ID }}
      tenant-id: ${{ secrets.AZURE_TENANT_ID }}
      subscription-id: ${{ secrets.AZURE_SUBSCRIPTION_ID }}
  - uses: azure/arm-deploy@v1
    id: deploy
    name: Deploy Bicep file
    with:
      failOnStdErr: false
      deploymentName: ${{ github.run_number }}
      resourceGroupName: ${{ inputs.resourceGroupName }}
      template: ./deploy/main.bicep
      parameters: >
        environmentType=${{ inputs.environmentType }}
Below the deploy job, paste the definition of the smoke test job:
smoke-test:
  runs-on: ubuntu-latest
  needs: deploy
  steps:
  - uses: actions/checkout@v3
  - run: |
      $container = New-PesterContainer `
        -Path 'deploy/Website.Tests.ps1' `
        -Data @{ HostName = '${{needs.deploy.outputs.appServiceAppHostName}}' }
      Invoke-Pester `
        -Container $container `
        -CI
    name: Run smoke tests
    shell: pwsh
Verify that your deploy.yml file now looks like the following example:
name: deploy

on:
  workflow_call:
    inputs:
      environmentType:
        required: true
        type: string
      resourceGroupName:
        required: true
        type: string
    secrets:
      AZURE_CLIENT_ID:
        required: true
      AZURE_TENANT_ID:
        required: true
      AZURE_SUBSCRIPTION_ID:
        required: true

jobs:
  validate:
     runs-on: ubuntu-latest
     steps:
     - uses: actions/checkout@v3
     - uses: azure/login@v1
       name: Sign in to Azure
       with:
        client-id: ${{ secrets.AZURE_CLIENT_ID }}
        tenant-id: ${{ secrets.AZURE_TENANT_ID }}
        subscription-id: ${{ secrets.AZURE_SUBSCRIPTION_ID }}
     - if: inputs.environmentType != 'Production'
       uses: azure/arm-deploy@v1
       name: Run preflight validation
       with:
         deploymentName: ${{ github.run_number }}
         resourceGroupName: ${{ inputs.resourceGroupName }}
         template: ./deploy/main.bicep
         parameters: >
           environmentType=${{ inputs.environmentType }}
         deploymentMode: Validate
     - if: inputs.environmentType == 'Production'
       uses: azure/arm-deploy@v1
       name: Run what-if
       with:
         failOnStdErr: false
         resourceGroupName: ${{ inputs.resourceGroupName }}
         template: ./deploy/main.bicep
         parameters: >
           environmentType=${{ inputs.environmentType }}
         additionalArguments: --what-if

  deploy:
    needs: validate
    environment: ${{ inputs.environmentType }}
    runs-on: ubuntu-latest
    outputs:
      appServiceAppHostName: ${{ steps.deploy.outputs.appServiceAppHostName }}
    steps:
    - uses: actions/checkout@v3
    - uses: azure/login@v1
      name: Sign in to Azure
      with:
        client-id: ${{ secrets.AZURE_CLIENT_ID }}
        tenant-id: ${{ secrets.AZURE_TENANT_ID }}
        subscription-id: ${{ secrets.AZURE_SUBSCRIPTION_ID }}
    - uses: azure/arm-deploy@v1
      id: deploy
      name: Deploy Bicep file
      with:
        failOnStdErr: false
        deploymentName: ${{ github.run_number }}
        resourceGroupName: ${{ inputs.resourceGroupName }}
        template: ./deploy/main.bicep
        parameters: >
          environmentType=${{ inputs.environmentType }}

  smoke-test:
    runs-on: ubuntu-latest
    needs: deploy
    steps:
    - uses: actions/checkout@v3
    - run: |
        $container = New-PesterContainer `
          -Path 'deploy/Website.Tests.ps1' `
          -Data @{ HostName = '${{needs.deploy.outputs.appServiceAppHostName}}' }
        Invoke-Pester `
          -Container $container `
          -CI
      name: Run smoke tests
      shell: pwsh
Save your changes to the file.
Update the workflow definition to use the templates
Open the workflow.yml file in the .github/workflows folder.
Remove the contents of the
env:section, including the two environment variables. You'll replace these with environment-specific variables soon.Remove the contents of the
lint:job definition and replace it with the following code to use the lint.yml file you created earlier:# Lint the Bicep file. lint: uses: ./.github/workflows/lint.ymlDelete everything in the file below the lint job that you updated.
At the bottom of the file, add the following code to deploy to the test environment:
# Deploy to the test environment.
deploy-test:
  uses: ./.github/workflows/deploy.yml
  needs: lint
  with:
    environmentType: Test
    resourceGroupName: ToyWebsiteTest
  secrets:
    AZURE_CLIENT_ID: ${{ secrets.AZURE_CLIENT_ID_TEST }}
    AZURE_TENANT_ID: ${{ secrets.AZURE_TENANT_ID }}
    AZURE_SUBSCRIPTION_ID: ${{ secrets.AZURE_SUBSCRIPTION_ID }}
Below the code you just added, add the following code to deploy to the production environment:
# Deploy to the production environment.
deploy-production:
  uses: ./.github/workflows/deploy.yml
  needs: deploy-test
  with:
    environmentType: Production
    resourceGroupName: ToyWebsiteProduction
  secrets:
    AZURE_CLIENT_ID: ${{ secrets.AZURE_CLIENT_ID_PRODUCTION }}
    AZURE_TENANT_ID: ${{ secrets.AZURE_TENANT_ID }}
    AZURE_SUBSCRIPTION_ID: ${{ secrets.AZURE_SUBSCRIPTION_ID }}
Your updated workflow runs the lint job once. Then it uses the deploy.yml called workflow twice: once per environment. This keeps the workflow definition clear and easy to understand. The comments in the YAML file identify each job's target environment.
Verify that your workflow.yml file looks like the following example:
name: deploy-toy-website-environments
concurrency: toy-company

on:
  push:
    branches:
      - main
  workflow_dispatch:

permissions:
  id-token: write
  contents: read

jobs:

  # Lint the Bicep file.
  lint:
    uses: ./.github/workflows/lint.yml

  # Deploy to the test environment.
  deploy-test:
    uses: ./.github/workflows/deploy.yml
    needs: lint
    with:
      environmentType: Test
      resourceGroupName: ToyWebsiteTest
    secrets:
      AZURE_CLIENT_ID: ${{ secrets.AZURE_CLIENT_ID_TEST }}
      AZURE_TENANT_ID: ${{ secrets.AZURE_TENANT_ID }}
      AZURE_SUBSCRIPTION_ID: ${{ secrets.AZURE_SUBSCRIPTION_ID }}

  # Deploy to the production environment.
  deploy-production:
    uses: ./.github/workflows/deploy.yml
    needs: deploy-test
    with:
      environmentType: Production
      resourceGroupName: ToyWebsiteProduction
    secrets:
      AZURE_CLIENT_ID: ${{ secrets.AZURE_CLIENT_ID_PRODUCTION }}
      AZURE_TENANT_ID: ${{ secrets.AZURE_TENANT_ID }}
      AZURE_SUBSCRIPTION_ID: ${{ secrets.AZURE_SUBSCRIPTION_ID }}
Save your changes.
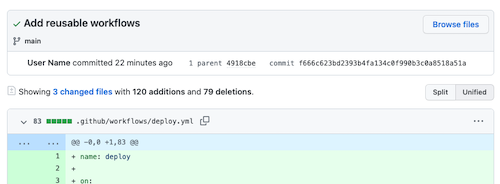
Commit and push your changes to your Git repository by running the following commands in the Visual Studio Code terminal:
git add .
git commit -m "Add reusable workflows"
git push
Since this is the first time you push to the repository, you might be prompted to sign in.
On Windows, type 1 to authenticate using a web browser, and select Enter.
On macOS, select Authorize.
A browser window appears. You might need to sign in to GitHub again. Select Authorize.
View the workflow run
In your browser, go to Actions.
The first run of your workflow, labeled Initial commit, is shown as a failure. GitHub automatically ran the workflow when you created the repository. It failed because the secrets weren't ready at that time. You can ignore this failure.
Select the deploy-toy-website-environments workflow.
Select the most recent run of your workflow.
Notice that the workflow run now shows all the jobs that you defined in the YAML files.
Some warnings are listed in the Annotations panel. All of these warnings are because of the way Bicep writes informational messages to the workflow log. You can ignore these warnings.
Wait for the workflow to pause before the deploy-production / deploy job. It might take a few minutes for the workflow to reach this point.
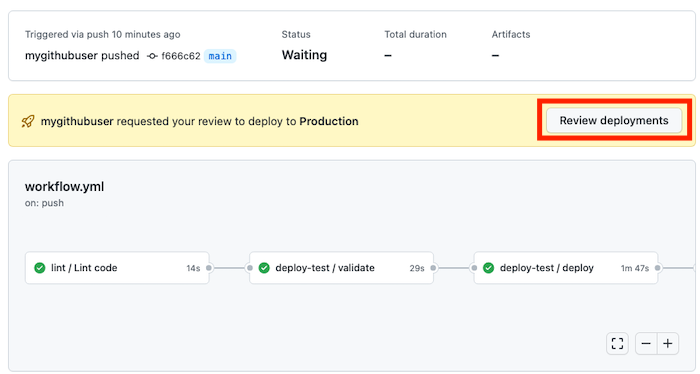
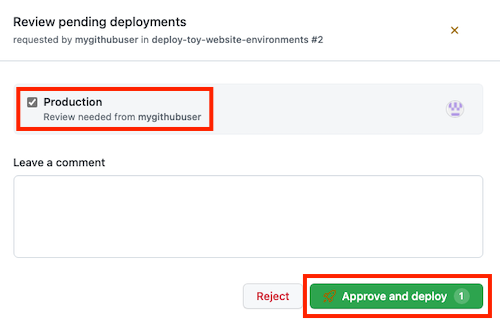
Approve the deployment to the production environment by selecting the Review deployments button.
Select the Production environment, then select the Approve and deploy button.
Wait for the workflow to finish running. The workflow completes successfully.
Select Code.
Select the Production deployment.
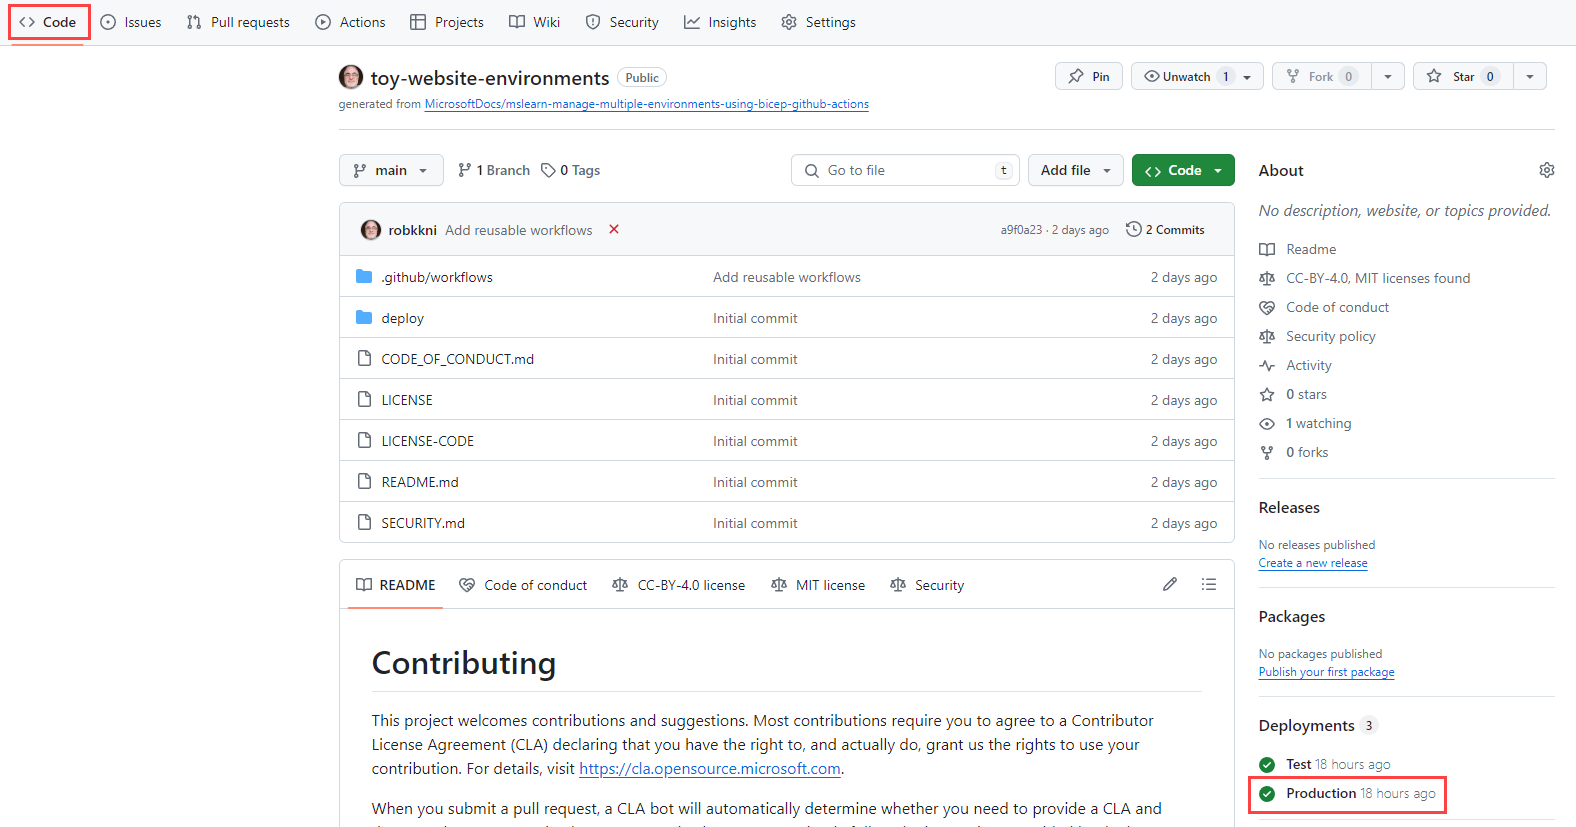
Notice that on the deployment screen, you see an overview of the production environment's deployment history.
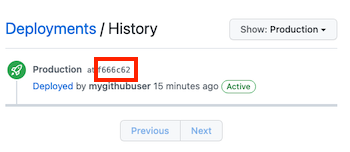
Select the commit identifier.
Notice that GitHub shows you the list of commits included in the deployment. This helps you to see the changes in your environment over time.
In your browser, go to the Azure portal.
Go to the ToyWebsiteProduction resource group.
In the list of resources, open the Azure App Service app.
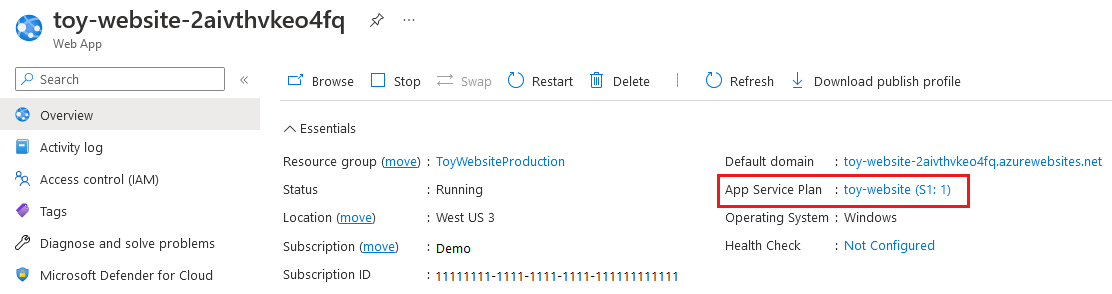
Notice that the type of App Service plan is S1.
Go to the App Service app in the ToyWebsiteTest resource group.
Notice that the type of App Service plan is F1. The two environments use different settings, as you defined in your Bicep file.