Exercise - Add resources to a deployment stack
You are on sprint 3 for the new deposits application. Recently, the deposits team requested changes to some of the Azure services in use. They also requested the creation of other services needed to support the application.
In this exercise, you create a deployment stack scoped to a resource group that references a Bicep file. The file defines an app service plan, an app service, and an Azure SQL database. You then modify the SKU of the app service plan and update the deployment stack. Finally, you add an existing Log Analytics workspace and a new Application Insights instance to support monitoring of the application.
During the process, you'll:
- Create a Bicep file that defines your initial architecture
- Create a deployment stack scoped to a resource group using your Bicep file.
- Modify the properties of an existing managed resource
- Update the Bicep file to include an existing Log Analytics workspace and a new Application Insights instance
- Update the deployment stack to deploy the managed resources
- Validate the deployment stack's managed resources.
This exercise uses the Bicep extension for Visual Studio Code. Be sure to install this extension in Visual Studio Code.
Create the Bicep file
Our first step is to create a Bicep file that defines our resources to use with the deployment stack.
Open Visual Studio Code.
Create a new file called main.bicep.
Save the empty file so that Visual Studio Code loads the Bicep tooling.
You can either select File > Save As or select Ctrl+S in Windows (⌘+S on macOS). Be sure to remember where you saved the file. For example, you might want to create a templates folder in which to save the file.
Add the following Bicep code into the file. You deploy the template soon.
// Parameters
@description('The location for all resources.')
param location string = 'eastus'

@description('The name of the SQL database.')
param sqlDatabaseName string = 'sqldb-${uniqueString(resourceGroup().id)}'

@description('The password of the admin user.')
param sqlServerAdminUserName string

@description('The name of the admin user.')
@secure()
param sqlServerAdminPassword string

@description('The name of the SQL server.')
param sqlServerName string = 'sql-${uniqueString(resourceGroup().id)}'

@description('The name of the web application.')
param webApplicationName string = 'webapp-${uniqueString(resourceGroup().id)}'

// Variables
@description('The name of the app service plan.')
var appServicePlanName = 'plan-deposits'

// Resource - App Service Plan
resource appServicePlan 'Microsoft.Web/serverfarms@2023-12-01' = {
  name: appServicePlanName
  location: location
  sku: {
    name: 'F1'
    capacity: 1
  }
}

// Resource - Web App
resource webApplication 'Microsoft.Web/sites@2023-12-01' = {
  name: webApplicationName
  location: location
  properties: {
    serverFarmId: appServicePlan.id
  }
}

// Resource - SQL Server
resource sqlServer 'Microsoft.Sql/servers@2021-11-01' ={
  name: sqlServerName
  location: location
  properties: {
    administratorLogin: sqlServerAdminUserName
    administratorLoginPassword: sqlServerAdminPassword
  }
}

// Resource - SQL Database
resource sqlServerDatabase 'Microsoft.Sql/servers/databases@2021-11-01' = {
  parent: sqlServer
  name: sqlDatabaseName
  location: location
  sku: {
    name: 'Standard'
    tier: 'Standard'
  }
}
Notice that you're using expressions that include string interpolation and the
uniqueString()function to define default parameter values. Someone deploying this template can override the default parameter values by specifying the values at deployment time, but they can't override the variable values.Also notice that you're using a variable for the App Service plan name, but you're using parameters for the other names. Storage accounts and App Service apps need globally unique names, but App Service plan names need to be unique only within their resource group. This difference means it's not a concern to use the same App Service plan name across different deployments, as long as the deployments are all going into different resource groups.
Save the changes to the file.
Create the deployment stack and deploy your resources to Azure
To deploy this template to Azure, you need to sign in to your Azure account from the Visual Studio Code terminal. Be sure you've installed the Azure CLI tools.
On the Terminal menu, select New Terminal. The terminal window usually opens in the lower half of your screen.
If the shell shown on the right side of the terminal window is bash, the correct shell is open and you can skip to the next section.

If a shell other than bash appears, select the shell dropdown arrow, and then select Azure Cloud Shell (Bash).
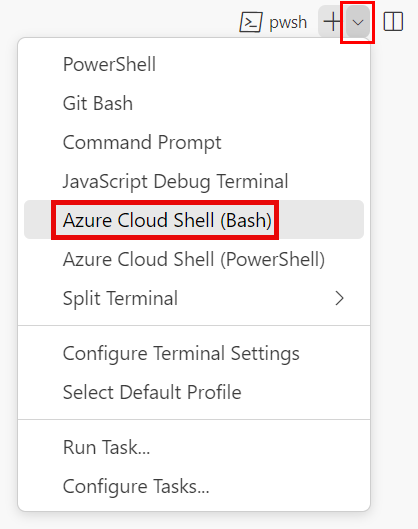
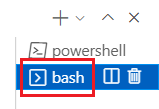
In the list of terminal shells, select bash.
In the terminal, go to the directory where you saved your template. For example, if you saved your template to the templates folder, you can use this command:
cd templates
Install Bicep
Run the following command to ensure you have the latest version of Bicep:
az bicep install && az bicep upgrade
Sign in to Azure by using Azure CLI
In the Visual Studio Code terminal, sign in to Azure by running the following command:
az loginIn the browser that opens, sign in to your Azure account.
The Visual Studio Code terminal displays a list of the subscriptions associated with this account.
In the list, find the subscription that you want to use for this exercise.
If you missed the list from the sign-in, you can use the following snippet to list your subscriptions again.
az account list --output tableSet the default subscription for all the Azure CLI commands that you run in this session.
az account set --subscription "Your Subscription Name or ID"
Create a resource group
We need to create a resource group for our deployment stack and managed resources. To create a resource group, run the following command from the terminal in Visual Studio Code.
az group create \
    --name rg-depositsApplication \
    --location eastus
To deploy this template to Azure, sign in to your Azure account from the Visual Studio Code terminal. Be sure you've installed Azure PowerShell.
On the Terminal menu, select New Terminal. The terminal window usually opens in the lower half of your screen.
If the shell shown on the right side of the terminal window is powershell or pwsh, the correct shell is open, and you can skip to the next section.

If a shell other than powershell or pwsh appears, select the shell dropdown arrow, and then select PowerShell.
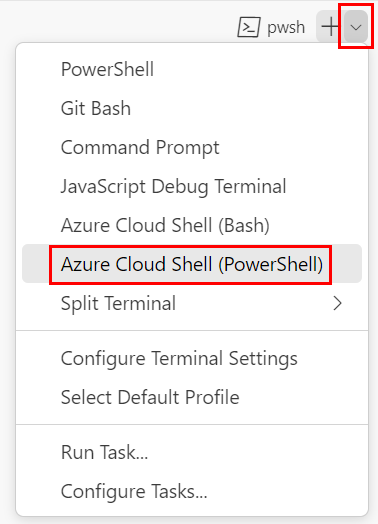
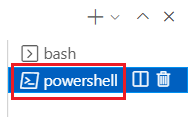
In the list of terminal shells, select powershell or pwsh.
In the terminal, go to the directory where you saved your template. For example, if you saved your template in the templates folder, you can use this command:
Set-Location -Path templates
Install the Bicep CLI
To use Bicep from Azure PowerShell, install the Bicep CLI.
Sign in to Azure by using Azure PowerShell
In the Visual Studio Code terminal, sign in to Azure by running the following command:
Connect-AzAccountIn the browser that opens, sign in to your Azure account.
Get the ID of the subscription that you want to use for this exercise by running the following command:
Get-AzSubscriptionThe subscription ID is the second column. Copy the second column. It looks something like cf49fbbc-217c-4eb6-9eb5-a6a6c68295a0.
Set the default subscription for all the Azure PowerShell commands that you run in this session.
Set-AzContext -SubscriptionId {Your subscription ID}
Create a resource group
We need to create a resource group for our deployment stack and managed resources. To create a resource group, run the following command from the terminal in Visual Studio Code.
New-AzResourceGroup `
    -Name rg-depositsApplication `
    -Location eastus
Create the deployment stack
Next, we need to create our deployment stack scoped to our recently created resource group. To create the deployment stack, run the following command from the terminal in Visual Studio Code.
To create the deployment stack, run the following command from the terminal in Visual Studio Code.
az stack group create \
    --name stack-deposits \
    --resource-group rg-depositsApplication \
    --template-file ./main.bicep \
    --action-on-unmanage detachAll \
    --deny-settings-mode none
It prompts you to enter a value for
sqlServerAdminUserName. Create a name for the SQL server administrator, followed by 'Enter.'
It prompts you to enter a value for
sqlServerAdminPassword. Create a complex password for the SQL server administrator, followed by 'Enter.'
Wait for the update operation to complete before moving on to the next task.
To create the deployment stack, run the following command from the terminal in Visual Studio Code.
New-AzResourceGroupDeploymentStack `
    -Name stack-deposits `
    -ResourceGroupName rg-depositsApplication `
    -TemplateFile ./main.bicep `
    -ActionOnUnmanage DetachAll `
    -DenySettingsMode None
It prompts you to enter a value for
sqlServerAdminUserName. Create a name for the SQL server administrator, followed by 'Enter.'
It prompts you to enter a value for
sqlServerAdminPassword. Create a complex password for the SQL server administrator, followed by 'Enter.'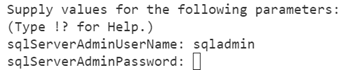
Wait for the update operation to complete before moving on to the next task.
Modify the Bicep file to add the existing Log Analytics workspace and a new Application Insights instance
Open the main.bicep file in Visual Studio Code.
Add the highlighted code to the variables section of your file:
// Variables
@description('The name of the Application Insights instance.')
var applicationInsightsName = 'appinsights-deposits'

@description('The name of the app service plan.')
var appServicePlanName = 'plan-deposits'

@description('The name of the Log Analytics Workspace.')
var logAnalyticsWorkspaceName = 'log-deposits'
Add the following code to the bottom of the file:
// Resource - Log Analytics Workspace
resource logAnalyticsWorkspace 'Microsoft.OperationalInsights/workspaces@2023-09-01' = {
  name: logAnalyticsWorkspaceName
  location: location
  properties: {
    retentionInDays: 30
    sku: {
      name: 'PerGB2018'
    }
  }
}

// Resource - Application Insights
resource applicationInsights 'Microsoft.Insights/components@2020-02-02' = {
  name: applicationInsightsName
  location: location
  kind: 'web'
  properties: {
    Application_Type: 'web'
    WorkspaceResourceId: logAnalyticsWorkspace.id
  }
}
Save the changes to the file.
Modify the Bicep file to modify the app service plan and app service
Open the main.bicep file in Visual Studio Code.
Change the sku name of the app service plan from
F1toS1:// Resource - App Service Plan resource appServicePlan 'Microsoft.Web/serverfarms@2023-12-01' = { name: appServicePlanName location: location sku: { name: 'S1' capacity: 1 } }Add the highlighted code to wire in the Application Insights instance:
// Resource - Web App
resource webApplication 'Microsoft.Web/sites@2023-12-01' = {
  name: webApplicationName
  location: location
  properties: {
    serverFarmId: appServicePlan.id
    siteConfig: {
      appSettings: [
        {
          name: 'APPINSIGHTS_INSTRUMENTATIONKEY'
          value: applicationInsights.properties.InstrumentationKey
        }
      ]
    }
  }
}
Save the changes to the file.
Update the deployment stack
With the Bicep file modified, we want to update the deployment stack so that the changes made to the resources in the Bicep file are implemented.
To update the deployment stack, run the following command from the terminal in Visual Studio Code.
az stack group create \
    --name stack-deposits \
    --resource-group rg-depositsApplication \
    --template-file ./main.bicep \
    --action-on-unmanage detachAll \
    --deny-settings-mode none
You receive a message stating that the stack already exists in the current subscription. If the value of the action on unmanage parameter changed, the warning alerts you of the new values. Press
y, followed by 'Enter`.
It prompts you to enter a value for
sqlServerAdminUserName. Create a name for the SQL server administrator, followed by 'Enter.'
It prompts you to enter a value for
sqlServerAdminPassword. Create a complex password for the SQL server administrator, followed by 'Enter.'
Wait for the update operation to complete before moving on to the next task.
With the Bicep file modified, we want to update the deployment stack so that the changes made to the app service plan are implemented.
To update the deployment stack, run the following command from the terminal in Visual Studio Code.
Set-AzResourceGroupDeploymentStack `
    -Name stack-deposits `
    -ResourceGroupName rg-depositsApplication `
    -TemplateFile ./main.bicep `
    -ActionOnUnmanage DetachAll `
    -DenySettingsMode none
It prompts you to enter a value for
sqlServerAdminUserName. Create a name for the SQL server administrator, followed by 'Enter.'
It prompts you to enter a value for
sqlServerAdminPassword. Create a complex password for the SQL server administrator, followed by 'Enter.'
Wait for the update operation to complete before moving on to the next task.
Verify the update to the deployment stack and the managed resources
With the update complete, we want to validate that the app service plan's sku is updated and that the deployment stack is managing the existing Log Analytics workspace and the new Application Insights instance.
To view the configuration of the app service plan, run the following command from the terminal in Visual Studio Code.
az appservice plan show \
    --name plan-deposits
    --resource-group rg-depositsApplication
Take notice of the sku section of the output. The app service plan is now on the S1 sku. It should be similar to the following output:
"sku": {
    "capacity": 1,
    "family": "S",
    "name": "S1",
    "size": "S1",
    "tier": "Standard"
},
To view the configuration of the deployment stack, run the following command from the terminal in Visual Studio Code.
az stack group show \
    --resource-group rg-depositsApplication \
    --name stack-deposits
Take notice of the resources section of the output. We now see the existing Log Analytics workspace and the new Application Insights instance listed as managed resources. The result should appear similar to the following output:
"resources": [
  {
    "denyStatus": "none",
    "id": "/subscriptions/./resourceGroups/rg-depositsApplication/././servers/sql-brpdm7iotbwjm",
    "resourceGroup": "rg-depositsApplication",
    "status": "managed"
  },
  {
    "denyStatus": "none",
    "id": "/subscriptions/./resourceGroups/rg-depositsApplication/././servers/sql-brpdm7iotbwjm/databases/sqldb-brpdm7iotbwjm",
    "resourceGroup": "rg-depositsApplication",
    "status": "managed"
  },
  {
    "denyStatus": "none",
    "id": "/subscriptions/./resourceGroups/rg-depositsApplication/././serverfarms/plan-deposits",
    "resourceGroup": "rg-depositsApplication",
    "status": "managed"
  },
  {
    "denyStatus": "none",
    "id": "/subscriptions/./resourceGroups/rg-depositsApplication/././sites/webapp-brpdm7iotbwjm",
    "resourceGroup": "rg-depositsApplication",
    "status": "managed"
  },
  {
    "denyStatus": "none",
    "id": "/subscriptions/./resourceGroups/rg-depositsApplication/././components/appinsights-deposits",
    "resourceGroup": "rg-depositsApplication",
    "status": "managed"
  },
  {
    "denyStatus": "none",
    "id": "/subscriptions/./resourceGroups/rg-depositsApplication/././workspaces/log-deposits",
    "resourceGroup": "rg-depositsApplication",
    "status": "managed"
  }
],
To view the configuration of the app service plan, run the following command from the terminal in Visual Studio Code.
$plan = Get-AzAppServicePlan `
    -ResourceGroupName rg-depositsApplication `
    -Name plan-deposits
$sku = $plan.Sku
$sku
Take notice of the output. The app service plan is now on the S1 sku. It should be similar to the following:
Name         : S1
Tier         : Standard
Size         : S1
Family       : S
Capacity     : 1
To view the configuration of the deployment stack, run the following command from the terminal in Visual Studio Code.
Get-AzResourceGroupDeploymentStack `
    -ResourceGroupName rg-depositsApplication `
    -Name stack-deposits
Take notice of the resources section of the output. We now see the existing Log Analytics workspace and the new Application Insights instance listed as managed resources. The result should appear similar to the following output:
Resources                     : /subscriptions/./resourceGroups/rg-depositsApplication/././servers/                        sql-brpdm7iotbwjm
                                /subscriptions/./resourceGroups/rg-depositsApplication/././servers/sql-brpdm7iotbwjm/databases/sqldb-brpdm7iotbwjm
                                /subscriptions/./resourceGroups/rg-depositsApplication/././serverfarms/plan-deposits
                                /subscriptions/./resourceGroups/rg-depositsApplication/././sites/webapp-brpdm7iotbwjm
                                /subscriptions/./resourceGroups/rg-depositsApplication/././components/appinsights-deposits
                                /subscriptions/./resourceGroups/rg-depositsApplication/././workspaces/log-deposits