Convert and migrate your resources to a Bicep file
When you begin the process of migrating to Bicep, it's important to follow a structured process to ensure that your Bicep file correctly describes your Azure resources. You need to make sure that your Bicep code follows best practices and that it's fully tested and safe to use for subsequent deployments. In this unit, you learn about the first two phases for your Bicep migration: the convert phase and the migrate phase.

The main focus of these two phases is to prepare a new Bicep file before you later refactor and test it.
Convert phase
The goal of the convert phase of migrating your resources to Bicep is to capture an initial representation of your Azure resources. The Bicep file you create in this phase isn't complete, and it's not ready to be used. However, the file gives you a starting point for your migration.
The convert phase consists of two possible steps, which you complete in sequence:
- Capture a representation of your Azure resources.
- If necessary, convert the JSON representation to Bicep by using the
decompilecommand.
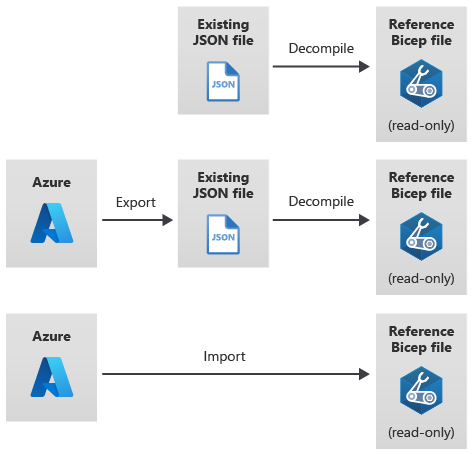
If you have an existing JSON template that you're converting to Bicep, the first step is easy because you already have your source template. You'll learn how to decompile it to Bicep in this unit.
If you're converting Azure resources that were deployed by using the Azure portal or another tool, you need to capture the resource definitions. You can export the resource definitions and convert them to Bicep, or you can use the Insert Resource command in Visual Studio Code to insert a Bicep representation of your Azure resource.
How Azure represents resources
Azure Resource Manager is the service that's used to deploy and manage resources in Azure. All resources deployed to Azure are tracked by Resource Manager, regardless of the method that was used to deploy the resource. You can use the Azure portal, Azure CLI, Azure PowerShell, the Resource Manager REST API, and Azure SDKs to interact with Resource Manager.
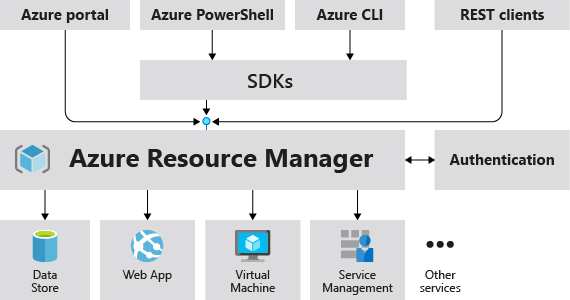
There are two types of operations in Azure: control plane operations and data plane operations. Control plane operations are used to manage the resources in your subscription. Data plane operations are used to access features that are exposed by a resource. For example, you use a control plane operation to create a virtual machine, but you use a data plane operation to connect to the virtual machine by using Remote Desktop Protocol (RDP).
Export existing resources to a JSON template
Regardless of how your Azure resources are created, Resource Manager makes information about each resource available in JSON format. When you ask for a copy of the JSON representation of a resource, you're exporting the resource. The JSON file that you export can be decompiled into Bicep.
Resource Manager provides multiple ways to export Azure resources to a template. You can use the Azure portal, Azure CLI, and Azure PowerShell cmdlets to export single resources, multiple resources, and entire resource groups.
The export process is a control plane operation, which means that it exports only the configuration of the Azure resources. For example, when you export a virtual machine, the data on the virtual machine's hard drive isn't exported. And when you export a storage account, the blobs and other contents of the storage account aren't included in the export process.
You need to consider a few things when you export existing resources:
- The exported resource definition is a snapshot of that resource's current state. It includes all changes made to the resource since its initial deployment.
- The exported template might include some default resource properties that are normally omitted from a Bicep definition. For example, the export process might add read-only properties that Azure sets automatically. It doesn't make sense to include these properties because they're read-only. Consider removing these properties from the resource definitions when you migrate to Bicep to keep your Bicep files free of unnecessary code that might cause confusion.
- The exported template probably won't include all the parameters you'll need to make the template reusable. When you export a template, many of the properties will be hard-coded into the template. You'll see how to add parameters later in this module.
- Some resources can't be exported by using this approach, and you need to define them manually in your Bicep file. You'll learn how to re-create these resources later in this unit.
Save deployments to a JSON template
If you've ever deployed a resource manually from the Azure portal, you might have noticed the option to Download a template for automation on the Review + create tab. This option saves a JSON ARM template that's based on the names and properties you set while creating the resource in the portal.
Resource Manager also tracks resource deployments. Deployment operations include changes submitted by the Azure portal resource creation experience and any ARM template deployments. Changes to existing resources made by using the Azure portal, Azure PowerShell cmdlets, Azure CLI, or other tools usually don't create deployments.
If the deployments were created by using a compatible tool, you can access the deployment template from the resource group's deployment history. You can use the Azure portal, Azure CLI, or Azure PowerShell to save deployments.
You need to consider a few things when you save your templates by using this method:
- The saved template shows the state of the resources at the time of deployment. It doesn't include any changes that were made after deployment.
- If the deployment contained multiple resources, you can't select specific resources to include and exclude. This operation downloads the definition of all resources that were part of the initial deployment. However, when you move to the migrate phase of the process, you can manually ignore resources you don't need.
- The template includes only resource properties that are needed for deployment.
- The template might include parameters that you can use to redeploy the template in multiple environments. However, you need to confirm that these parameters suit your needs.
- The template probably doesn't include extraneous properties, but you should still check that the template includes everything that you expect and remove any unneeded properties.
Note
However you export resources, either by exporting existing resources or by saving deployments, treat the exported file as a starting point, and don't use it directly. Instead, use it as a starting point for your final template.
Insert existing resources to Bicep
The Bicep extension for Visual Studio Code includes the Insert Resource command, which captures a Bicep representation of an Azure resource. This command reads the JSON definition of the resource from Azure, removes properties that are recognized as read-only, and decompiles the JSON to Bicep. As with the export function, the resulting Bicep code can be used as a starting point for your final Bicep file.
You can insert a resource by opening the Visual Studio Code command palette. Use Ctrl+Shift+P on Windows and Linux and ⌘+Shift+P on macOS.
Decompile the source JSON ARM template
The second step in migrating your Azure resources to Bicep is to convert your JSON ARM templates and Azure resources to Bicep templates. The Bicep tooling includes the decompile command to convert templates. You can invoke the decompile command from either Azure CLI or the Bicep CLI.
The decompilation process doesn't guarantee a full mapping from JSON to Bicep. You might need to revise the generated Bicep file to meet your template best practices before you use the file to deploy resources. Consider it the starting point for your migration. Later in this module, you'll learn how to fix any problems that you encounter during the decompilation process.
After you decompile your template, you've completed the convert phase. You now have a valid Bicep file to start from.
Migrate phase
The goal of the migrate phase of migrating your resources to Bicep is to create the first draft of your deployable Bicep file and to ensure that it defines all the Azure resources that are in scope for the migration.
The migrate phase consists of three steps, which you complete in sequence:
- Create a new empty Bicep file.
- Copy each resource from your decompiled template.
- Identify and re-create any missing resources.
Create a new Bicep file
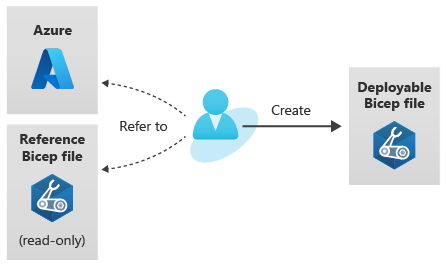
It's a good practice to create a new Bicep file. The file you created in the convert phase is a reference point for you to look at, but you shouldn't treat it as final or deploy it as-is.
Copy resources to the new Bicep file
Copy each resource individually from the converted Bicep file to the new Bicep file. This process helps you resolve any issues on a per-resource basis and avoid any confusion as your template gets larger.
Re-create unsupported resources
Not all Azure resource types can be exported via the Azure portal, Azure CLI, or Azure PowerShell. For example, virtual machine extensions like DependencyAgentWindows and MMAExtension (Microsoft Monitoring Agent) are resource types that you can't export.
When you attempt to export a resource by using the Azure portal, Azure CLI, or Azure PowerShell and an unsupported resource type is included, a detailed error message is generated. You need to re-create any resource that wasn't exported, like virtual machine extensions, in your new Bicep file. You can choose from several tools and approaches to re-create resources, including Azure Resource Explorer, the ARM template reference, and Azure Quickstart Templates.
Azure Resource Explorer
Azure Resource Explorer is a tool that's embedded in the Azure portal. The portal doesn't show certain resource types, but Resource Explorer gives you a JSON representation of your resources. To access Resource Explorer, search for it in the search box:
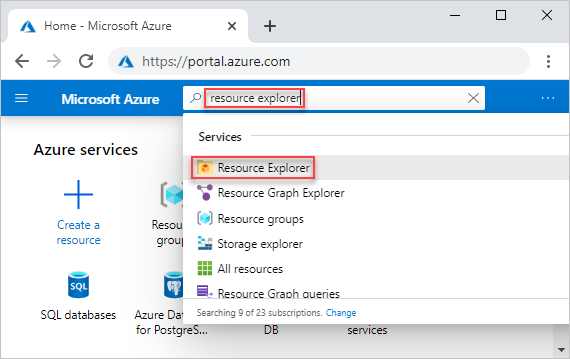
The results pane shows a list of the registered resource providers for your subscription and details for all the resources, resource groups, and subscriptions that you have permission to view. To view a JSON representation of a resource, select the hierarchy on the left side of the pane:
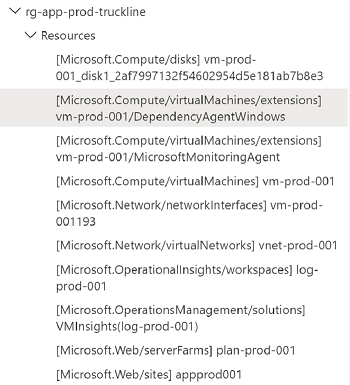
By selecting a resource, you can view the JSON representation, like this example:
{
    "name": "DependencyAgentWindows",
    "id": "/subscriptions/f0750bbe-ea75-4ae5-b24d-a92ca601da2c/resourceGroups/rg-app-prod-truckline/providers/Microsoft.Compute/virtualMachines/vm-prod-001/extensions/DependencyAgentWindows",
    "type": "Microsoft.Compute/virtualMachines/extensions",
    "location": "eastus",
    "properties": {
        "autoUpgradeMinorVersion": true,
        "provisioningState": "Succeeded",
        "publisher": "Microsoft.Azure.Monitoring.DependencyAgent",
        "type": "DependencyAgentWindows",
        "typeHandlerVersion": "9.10"
    }
}
You can use the JSON representation to define a Bicep resource:
resource dependencyAgentWindows 'Microsoft.Compute/virtualMachines/extensions@2022-08-01' = {
  parent: virtualMachine
  name: 'DependencyAgentWindows'
  location: 'eastus'
  properties: {
    autoUpgradeMinorVersion: true
    publisher: 'Microsoft.Azure.Monitoring.DependencyAgent'
    type: 'DependencyAgentWindows'
    typeHandlerVersion: '9.10'
  }
}
Note
The JSON representation includes a property named provisioningState. The provisioningState property is read-only, and it's automatically set by Azure, so it's not included in the Bicep resource definition.
Tip
The Bicep extension for Visual Studio Code helps you define your Azure resources in Bicep. For example, the Bicep representation of the resource includes an API version, but the exported JSON version doesn't. In Visual Studio Code, when you begin to enter the resource type, an API version is automatically suggested.
ARM template reference
The ARM template reference is a source of information about ARM template structure, resource types, API versions, and property definitions for Azure resources. The documentation provides examples in both Bicep and JSON formats.
You can choose specific resource providers and resource types, like Microsoft.Web/serverfarms, and their API versions. You can review which resource properties are required and which are optional. You can also view property descriptions that help you understand what the properties do.
Azure Quickstart Templates
The Azure Quickstart Templates repository is a collection of community-contributed templates. This repository of searchable templates provides examples of many Azure resources and solutions. In some quickstarts, both a JSON ARM template and a Bicep ARM template are available to view. You can use these templates as a reference point to help you build and verify your templates for deployment.
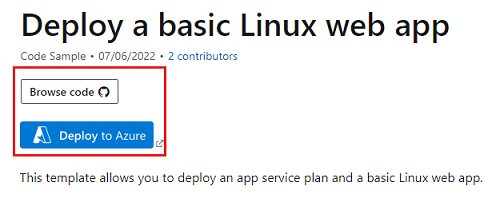
Suppose you want to find a template that builds an Azure App Service plan and app. Each quickstart template gives you the option to deploy the template directly to Azure or to view the template on GitHub.
Keep in mind that the Azure Quickstart Templates are community contributions. Some of the examples might be out of date because features are regularly added to Azure services. The examples also might include resources and properties that you don't need for your use of the template. However, the repository of quickstart templates is a useful resource to help you understand how you can deploy your resources by using ARM templates.