Outbound operations
Two activities are associated with shipping outbound orders: picking the items from the shelf and shipping them out of the warehouse. A source document, a contract that contains details of the business transaction and key information, includes Sales order, Outbound transfer order, Purchase return order, and Service order.
If the environment that your organization is in is order-by-order with minimal bin structure and simple processes, then your organization can post the pick and shipment from the order line. If items from your order line come from more than one bin, then your organization can post the pick and shipment from an inventory pick document. If your organization works with multiple orders and greater control is necessary, you might want to consider posting the pick and shipment from a warehouse shipment document, or posting the pick from a warehouse pick document and then posting the shipment from a warehouse shipment document.
Outbound shipments for batch jobs
If you have ready-to-ship loads, you can set up batch jobs to automatically confirm outbound shipments. The batch job only applies to transfer order shipments. You would use transfer order shipments when you have items that are in transit between warehouses within the same company but different locations. If you want to update the outbound costs that are associated with a sales order, you need to manually run a sales packing slip update from the load. For more information, see Post packing slip for an order.
To process outbound shipments, follow these steps to set up a scheduled batch job to run the outbound shipment confirmation for loads that are ready to be shipped:
Go to Warehouse management > Periodic tasks > Process outbound shipments.
In the Confirm shipment dialog, open the Records to include FastTab. Select Filter.
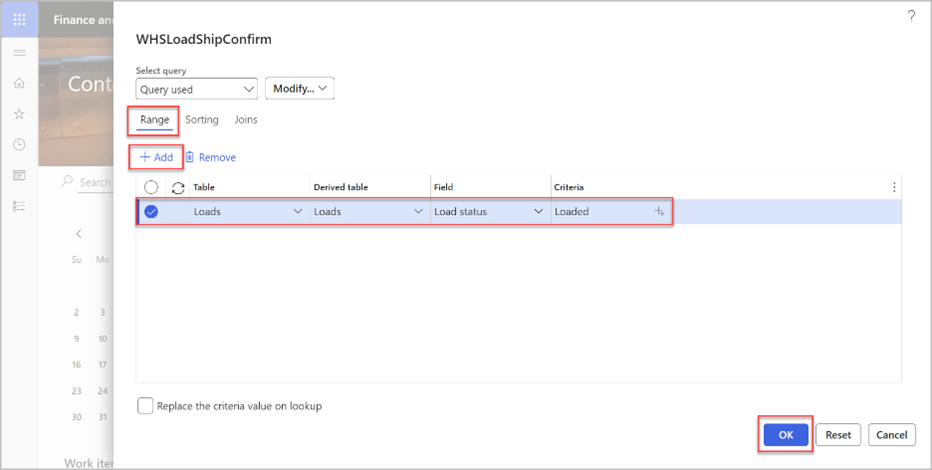
When the query editor dialog opens, select the Range tab. Select Add and then enter the following values:
Table - Loads
Derived table - Loads
Field - Load status
Criteria - Loaded
Select OK.
On the Run in the background FastTab, set Batch processing to Yes.
Select Recurrence.
In the Define recurrence dialog, set the run schedule as needed.
Select OK.
When you return to the Confirm shipment dialog, select OK to add the batch job to the batch queue.
Outbound menu items and menus
You can use the outbound functionality on your mobile device. To enable this functionality, you need to create menu items and menus by following these steps:
Go to Warehouse management > Setup > Mobile device > Mobile device menu items.
Select New to create a new mobile device menu item.
In the New mobile device dialog, enter Menu item name in the Name field and enter Mode in the Type field.
Turn on the Yes or No toggles under Use process guide and Use existing work.
Select Save.
Calculate capable-to-promise quantities in real time
Capable-to-Promise (CTP) in Dynamics 365 Supply Chain Management, helps businesses provide customers with accurate and realistic delivery dates for specific products. It calculates these dates based on available inventory, production capacity, and transportation times, ensuring that what is promised can be delivered on time.
For businesses that manufacture or assemble products only after receiving an order, like in assemble-to-order or make-to-order models, this feature is especially valuable. It factors in all the materials, resources, and logistics required to fulfill the order. By using CTP, businesses can give customers exact shipping and receipt dates, even during live conversations, and adjust delivery timelines based on changes in product configurations or order quantities. Additionally, it allows businesses to group or separate orders to meet specific deadlines, helping them better manage production schedules and customer expectations.
Small parcel shipping
You can use small parcel shipping in situations when your organization decides to ship individual sales orders through commercial shipping carriers instead of using container shipping as you would typically do. Small parcel shipping allows you to communicate and interact directly with shipping carriers through APIs. Small parcel shipping uses a dedicated rate engine to control the interactions between you and your shipping carrier. A rate engine is a tool that the system uses to submit details about a packed container to your carrier, and in return, the carrier supplies you with a shipping label, shipping rate, and tracking number.
Enable small parcel shipping
To enable Small parcel shipping, go to System administration > Workspaces > Feature management. Under All, search for the Small parcel shipping feature in the Transportation management module.
Rate engines
To test the SPS functionality, you need to download demo rate engines from GitHub by following these steps:
On GitHub, download the dynamic-link library (DLL) for the demo rate engine.
On your Microsoft Dynamics 365 Supply Chain Management server, save the DLL in the \AOSService\PackagesLocalDirectory\ApplicationSuite\bin folder.
For more information, see Create a new transportation management engine and Set up transportation management engines.
Set up a rate engine
After you successfully deploy and create a rate engine, follow these steps to set up the rate engine in Dynamics 365:
Go to Transportation management > Setup > Engines > Rate engine.
Select New.
Enter your information in the Rate engine, Name, Rating metadata ID, Engine assembly, and Engine class fields.
Note
If you're using the demo rate engine in the USMF legal entity, set the following fields:
Rating engine - Demo rate engine
Name - Demo rate engine
Rating metadata ID - Leave this field blank
Engine assembly - TMSSmallParcelShippingEngine.dll
Engine class - TMSSmallParcelShippingEngine.SmallParcelShippingRateEngine
Select Save.

