Understand branching
When you build Bicep templates and work within a Git repository, all of your team's changes are eventually merged into your repository's main branch. It's important to protect the main branch so that no unwanted changes are deployed to your production environment. However, you also want your contributors to be able to work flexibly, collaborate with your team, and try out ideas easily.
In this unit, you'll learn about branching strategies and how to protect the main branch. You'll also learn how to set up a review process for your branches.
Why do you want to protect the main branch?
The main branch is the source of truth for what gets deployed to your Azure environments. For many solutions, you'll have multiple environments, such as development, quality assurance (QA), and production. In other scenarios, you might have only a production environment. Regardless of how many environments you use, the main branch is the branch to which your team members contribute. Their changes ultimately land on the main branch.
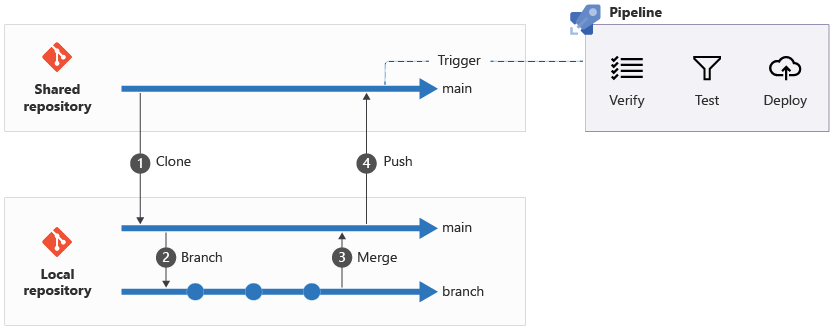
A typical process might be the following:
- A team member clones your shared repository.
- They make local changes on a branch in their own local copy of the repository.
- When they're finished with their changes, they merge these changes in their local repository's main branch.
- They push these changes to the remote repository's main branch.
- In some scenarios, the remote repository's push triggers an automated pipeline to verify, test, and deploy the code. You'll learn more about pipelines in other Microsoft Learn modules.
The following diagram illustrates this process:
Suppose the team member's changes introduced a subtle bug. After the complete process runs, the bug is now on the main branch of the project and gets deployed to production. You might not discover it until you try to deploy it and get an error. Or, for other types of bugs, the deployment might succeed, but cause subtle problems later.
In another scenario, suppose a team member is working on a feature and pushes half of the feature's finished work to the shared repository's main branch. You now have changes on the main branch that aren't finished or tested. These changes probably shouldn't be deployed to your production environment. Deployments to production might need to be blocked until the feature is finished. If newly finished features are on the main branch, you might not be able to deploy them to your customers.
Tip
These problems are particularly difficult for large teams, where multiple people contribute to the same code, but the guidance in this module is valuable as soon as you collaborate with more than one person. The guidance is valuable even when it's just you working on a project, and you're working on multiple features at the same time.
A better way of working is to keep your changes separate while you work on them. You can then have another team member review any changes before they're merged into the main branch of your team's shared repository. This process helps your team make an informed decision on a change before you approve it to be merged.
Feature branches
A feature branch indicates a new piece of work you're starting. The work might be a configuration change to a resource defined in your Bicep file, or a new set of resources that you need to deploy. Every time you start a new piece of work, you create a new feature branch.
You create a feature branch from the main branch. When you create a branch, you ensure that you're starting from the current state of your Azure environment. You then make all your necessary changes.
Because all of the code changes are committed to the feature branch, they don't interfere with the repository's main branch. If somebody else on your team needs to make an urgent change to the main branch, they can do that on another feature branch that's independent of yours.
You can collaborate on feature branches, too. By publishing and pushing your feature branch to the shared repository, you and your team members can work together on a change. You can also hand over a feature to someone else to complete when you go on vacation.
Update your feature branches
While your feature branch is underway, other features might be merged into your repository's main branch. The result is that your feature branch and your project's main branch will drift apart. The further they drift apart, the more difficult it becomes to merge the two branches again at a later point, and the more merge conflicts you might encounter.
You should update your feature branch regularly so that you incorporate any changes that have been made to the repository's main branch. It's also a good idea to update your feature branch before you start to merge the feature branch back into the main branch. This way, you make sure that your new changes can be merged into the main branch easily.
Tip
Merge the main branch into your feature branch often.
Use small, short-lived branches
Aim for short-lived feature branches. This approach helps you avoid merge conflicts by reducing the amount of time that your branches might get out of sync. This approach also makes it easier for your colleagues to understand the changes you've made, which is helpful when you need someone to review your changes.
Split up large pieces of work into smaller pieces and create a feature branch for each one. The bigger the feature, the longer someone needs to work on it, and the longer the feature branch will live. You can deploy the smaller changes to production as you merge each feature branch and gradually build up the broader work.
Imagine that you're making some changes to a set of Bicep code. You're moving some resource definitions into modules. You also need to add some new resources to your Bicep files. It might be a good idea to do all of your module refactoring first, on its own branch. After the modules are merged, you can start to work on the additions to your Bicep files. By separating your changes, you keep each change—and its branch—small and easy to understand.
When you work in this way, it can be helpful to use the if keyword to disable deploying resources until they're ready. The following example code shows how you would use the if keyword to create a Bicep file that defines a storage account but disables the storage account's deployment until you're done with all of the changes.
@description('Specifies whether the storage account is ready to be deployed.')
param storageAccountReady bool = false

resource storageAccount 'Microsoft.Storage/storageAccounts@2022-09-01' = if (storageAccountReady) {
  name: storageAccountName
  location: location
  kind: 'StorageV2'
  sku: {
    name: 'Premium_LRS'
  }
}
You can use parameters to specify different values for the storageAccountReady variable in different environments. For example, you might set the parameter value to true for your test environment and false for your production environment. That way, you can try out the new storage account in your test environment.
Note
When it's time to enable the feature in production, remember that you need to take the following steps for your change to take effect:
- Change the parameter value.
- Redeploy your Bicep file.
Merging feature branches
When you've finished working on a feature branch, you need to merge it into your repository's main branch. It's a good practice to review the changes that were made on the feature branch before merging. Pull requests enable you to review your code. You'll learn more about pull requests later in this module.
Branch protections
In GitHub, you can configure branch protections for the shared repository's main branch. Branch protections enforce rules like:
- No change can be merged into the main branch except through a pull request.
- Changes need to be reviewed by at least two other people.
If somebody tries to push a commit directly to a protected branch, the push fails. You'll learn how to apply branch protections in the next unit.
Branch policies
In Azure DevOps, you can configure branch policies for the shared repository's main branch. Branch policies enforce rules like:
- No change can be merged into the main branch except through a pull request.
- Changes need to be reviewed by at least two other people.
If somebody tries to push a commit directly to a protected branch, the push fails. You'll learn how to apply branch policies in the next unit.
Other branching strategies
When you collaborate on your Bicep code, you can use various branching strategies. Each branching strategy has benefits and drawbacks.
The process you've learned about so far is a version of the trunk-based development strategy. In this branching strategy, work is done on short-lived feature branches and is then merged into a single main branch. You might automatically deploy the contents of the shared repository's main branch to production every time a change is merged, or you might batch changes and release them on a schedule, like every week. Trunk-based development is easy to understand, and it enables collaboration without much overhead.
Some teams separate the work that they've completed from the work that they've deployed to production. They use a long-lived development branch as the target for merging their feature branches. They merge the development branch into their main branch when they release changes to production.
Some other branching strategies require you to create release branches. When you have a set of changes ready to deploy to production, you create a release branch with the changes to deploy. These strategies can make sense when you deploy your Azure infrastructure on a regular cadence, or when you're integrating your changes with many other teams.
Other branching strategies include Gitflow, GitHub Flow, and GitLab Flow. Some teams use GitHub Flow or GitLab Flow because it enables separating work from different teams, along with separating urgent bug fixes from other changes. These processes can also enable you to separate your commits into different releases of your solution, which is called cherry picking. However, they require more management to ensure that your changes are compatible with each other. This module's Summary section provides links to more information on these branching strategies.
The branching strategy that's right for your team depends on the way your team works, collaborates, and releases its changes. It's a good idea to start from a simple process, like trunk-based development. If you find that your team can't work effectively by using this process, gradually introduce other layers of branching, or adopt a branching strategy; but be aware that as you add more branches, managing your repository becomes more complex.
Tip
Regardless of the branching strategy that you use, it's good to use branch policies to protect the main branch and to use pull requests to review your changes. Other branching strategies also introduce important branches that you should protect.
In this module, we use trunk-based development with feature branches, because it's easy to use.