Review and merge Bicep changes
You've learned how to use feature branches and how to apply branch protection to ensure that changes are reviewed before they're merged. Now, you need to follow a consistent process to propose and review your changes before they're merged.
In this unit, you'll learn more about pull requests, including how to create and use them. You'll also learn how you can use pull requests to review Bicep code.
Pull requests
A pull request is a request from you, the developer of a feature, to the maintainer of the main branch. You ask the maintainer to pull your changes into the main branch of the repository.
Pull requests and branch protections
When you configure branch protections, you can require your code owners to review the pull request. For example, you might include the project leads as reviewers for all of your pull requests, or you might specify that a certain number of people must review every pull request.
Pull requests and branch policies
When you configure branch policies, you can require specific people or a group of people to review the pull request. For example, you might include the project leads as reviewers for all of your pull requests, or you might specify that a certain number of people must review every pull request.
You can also require that each pull request is linked to a work item. By using this configuration, you can trace from a work item that contains a feature request to the code that implements the change, all the way to deployment to your production environment.
Create a pull request
You can create a pull request by using the GitHub web interface. You select the source branch, where you've made your changes, and the target branch, which is usually the main branch of the repository.
You can create a pull request by using the Azure DevOps web interface. You select the source branch, where you've made your changes, and the target branch, which is usually the main branch of the repository.
When you create a pull request, you need to give it a name. It's a good practice to make your pull request names clear and understandable. This practice helps your team members understand the context of what they're being asked to review. If they have different areas of expertise, a good name can help them find pull requests where they can contribute meaningful feedback and skip the pull requests that aren't relevant.
Also, pull request names often become part of your Git repository's history, so it's a good idea to make them understandable when somebody looks back at the history.
You can also give pull requests a description. You can mention specific people or refer to issues in your descriptions. Many teams create standardized templates for pull request descriptions so that it's clear what each change is.
You can also give pull requests a description. You can mention specific people or refer to work items in your descriptions. Many teams create standardized templates for pull request descriptions so that it's clear what each change is.
When you create a pull request, you can invite people to review the changes.
Sometimes, you create a pull request just to get feedback from your colleagues. In these situations, you can specify that the pull request is a draft. Reviewers will know that you're still working on the changes. Your reviewers can still provide feedback, but it's clear that the changes aren't ready to merge yet. When you're satisfied with your changes, you can remove the draft status.
Even after you've created a pull request, you can keep making changes to the code on your feature branch. These changes become part of the pull request.
Review a pull request
When you review a pull request, you can see all of the changes. You can comment on the entire pull request, or just on specific parts of the files that have been changed. The pull request author can respond to comments, and other reviewers can participate in discussions. These commenting features make collaborating on pull requests an interactive experience.
When you review Bicep code, look for these key elements:
- Is the file deployable? Deploy and test the Bicep code before it's merged. Ensure that there are no linter warnings, and that the Azure deployment succeeds. In a future Microsoft Learn module, you'll learn about approaches to automatically deploy and verify your changes.
- Is the Bicep code clear and understandable? It's important that everybody on your team understands your Bicep code. When you review a Bicep file in a pull request, ensure that you understand exactly what every change is for. Are variables and parameters named well? Have comments been used to explain any complex sections of code?
- Is the change complete? If this pull request represents part of a wider piece of work, ensure that your environment will work when this change is merged and deployed. For example, if the pull request reconfigures an Azure resource in preparation for a later change, verify that the resource continues to work correctly throughout the whole process. If the pull request adds a new Azure resource that isn't needed yet, consider whether a condition should be added temporarily so that the resource isn't deployed until it's needed.
- Does the change follow good Bicep practices? In other Microsoft Learn modules, you've learned about the elements of good Bicep code. Ensure that the code you review follows those same best practices.
- Does the change match the description? It's a good practice for pull requests to include a descriptive title. Many teams also require that pull requests include a description of the change and its purpose. Check that the changes to your Bicep code match the pull request details. If the pull request author has linked to work items or issues, verify that the changes in the pull request meet the success criteria that the work item has defined.
Complete a pull request
After the pull request is approved, it can be completed. That means the contents of the pull request are merged into the main branch.
In some teams, the pull request author should also complete it. This process helps ensure that the author controls when the merge happens and can be available to monitor any automated deployments. In other teams, approvers complete the pull request. Your team should decide who merges pull requests and when.
In some teams, the pull request author should also complete it. This process helps ensure that the author controls when the merge happens and can be available to monitor any automated deployments. In other teams, approvers complete the pull request. You can even use Azure DevOps to automatically complete a pull request when it meets the approval criteria. Your team should decide who merges pull requests and when.
Your team's process
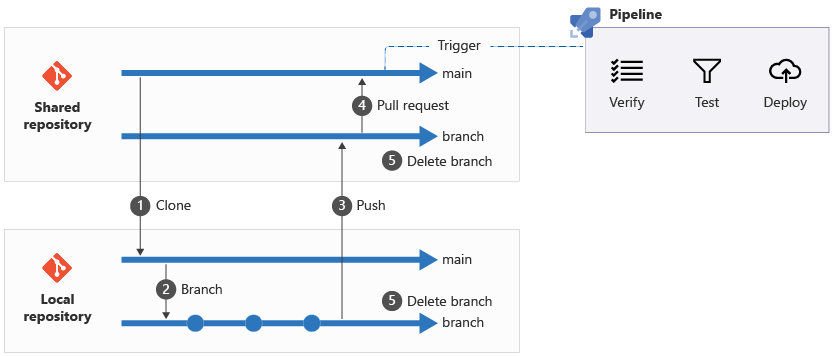
After you start to use feature branches and pull requests, your team's process might change to something like the following:
A team member clones your shared repository.
They make local changes on a branch in their own local copy of the repository.
When they're finished with their changes, they push their local branch to the shared repository.
Within the shared repository, they create a pull request to merge the branch to main.
Other team members review the changes. When they're satisfied, they approve the pull request and it's merged to the shared repository's main branch.
They delete the branches in the shared repository and in their local copy of the repository.
In some scenarios, the remote repository's push triggers an automated pipeline to verify, test, and deploy the code. You'll learn more about pipelines in other Microsoft Learn modules.
The following diagram illustrates this revised process.