Plan and implement Virtual Wide Area Network, including secured virtual hub
A Virtual WAN connects to your resources in Azure over an IPsec/IKE (IKEv1 and IKEv2) VPN connection. This type of connection requires a VPN device located on-premises that has an externally facing public IP address assigned to it.
Prerequisites
Verify that you have an Azure subscription. If you don't already have an Azure subscription, you can activate your MSDN subscriber benefits or sign up for a free account.
Decide the IP address range that you want to use for your virtual hub private address space. This information is used when configuring your virtual hub. A virtual hub is a virtual network that is created and used by Virtual WAN. It's the core of your Virtual WAN network in a region. The address space range must conform to certain rules.
- The address range that you specify for the hub can't overlap with any of the existing virtual networks that you connect to.
- The address range can't overlap with the on-premises address ranges that you connect to.
- If you're unfamiliar with the IP address ranges located in your on-premises network configuration, coordinate with someone who can provide those details for you.
- The address range that you specify for the hub can't overlap with any of the existing virtual networks that you connect to.
Azure portal or Azure PowerShell
You can use either the Azure portal or Azure PowerShell cmdlets to create a site-to-site connection to Azure Virtual WAN. The Cloud Shell is a free interactive shell that has common Azure tools pre-installed and configured to use with your account.
To open Cloud Shell, just select Open Cloud Shell from the upper-right corner of a code block. You can also open Cloud Shell on a separate browser tab by going to https://shell.azure.com/powershell. Select Copy to copy the blocks of code, paste them into Cloud Shell, and select the Enter key to run them.
You can also install and run the Azure PowerShell cmdlets locally on your computer. PowerShell cmdlets are updated frequently. If you haven't installed the latest version, the values specified in the instructions may fail. To find the versions of Azure PowerShell installed on your computer, use the Get-Module -ListAvailable Az cmdlet.
Sign in
If you're using Azure Cloud Shell you'll automatically be directed to sign into your account after you open Cloud Shell. You don't need to run Connect-AzAccount. Once signed in, you can still change subscriptions if necessary by using Get-AzSubscriptionand Select-AzSubscription.
If you're running PowerShell locally, open the PowerShell console with elevated privileges and connect to your Azure account. The Connect-AzAccount cmdlet prompts you for credentials. After you authenticate, it downloads your account settings so that they're available to Azure PowerShell. You can change subscription by using Get-AzSubscriptionand Select-AzSubscription -SubscriptionName "Name of subscription".
Create a virtual WAN
Before you can create a virtual wan, you have to create a resource group to host the virtual wan or use an existing resource group. Use one of the following examples.
This example creates a new resource group named TestRG in the East US location. If you want to use an existing resource group instead, you can modify the $resourceGroup = Get-AzResourceGroup -ResourceGroupName "NameofResourceGroup"command, and then complete the steps in this exercise using your own values.
Create a resource group.
New-AzResourceGroup -Location "East US" -Name "TestRG"Create the virtual wan using the New-AzVirtualWan cmdlet.
$virtualWan = New-AzVirtualWan -ResourceGroupName TestRG -Name TestVWAN1 -Location "East US"
Create the hub and configure hub settings
A hub is a virtual network that can contain gateways for site-to-site, ExpressRoute, or point-to-site functionality. Create a virtual hub with New-AzVirtualHub. This example creates a default virtual hub named Hub1 with the specified address prefix and a location for the hub.
$virtualHub = New-AzVirtualHub -VirtualWan $virtualWan -ResourceGroupName "TestRG" -Name "Hub1" -AddressPrefix "10.1.0.0/16" -Location "westus"
Create a site-to-site VPN gateway
In this section, you create a site-to-site VPN gateway in the same location as the referenced virtual hub. When you create the VPN gateway, you specify the scale units that you want. It takes about 30 minutes for the gateway to create.
If you closed Azure Cloud Shell or your connection timed out, you may need to declare the variable again for $virtualHub.
$virtualHub = Get-AzVirtualHub -ResourceGroupName "TestRG" -Name "Hub1"Create a VPN gateway using the New-AzVpnGateway cmdlet.
New-AzVpnGateway -ResourceGroupName "TestRG" -Name "vpngw1" -VirtualHubId $virtualHub.Id -VpnGatewayScaleUnit 2Once your VPN gateway is created, you can view it using the following example.
Get-AzVpnGateway -ResourceGroupName "TestRG" -Name "vpngw1"
Create a site and connections
In this section, you create sites that correspond to your physical locations and the connections. These sites contain your on-premises VPN device endpoints, you can create up to 1000 sites per virtual hub in a virtual WAN. If you have multiple hubs, you can create 1000 per each of those hubs.
Set the variable for the VPN gateway and for the IP address space that is located on your on-premises site. Traffic destined for this address space is routed to your local site. This is required when BGP isn't enabled for the site.
$vpnGateway = Get-AzVpnGateway -ResourceGroupName "TestRG" -Name "vpngw1"
$vpnSiteAddressSpaces = New-Object string[] 2
$vpnSiteAddressSpaces[0] = "192.168.2.0/24"
$vpnSiteAddressSpaces[1] = "192.168.3.0/24"
Create links to add information about the physical links at the branch including metadata about the link speed, link provider name, and the public IP address of the on-premises device.
$vpnSiteLink1 = New-AzVpnSiteLink -Name "TestSite1Link1" -IpAddress "15.25.35.45" -LinkProviderName "SomeTelecomProvider" -LinkSpeedInMbps "10"

$vpnSiteLink2 = New-AzVpnSiteLink -Name "TestSite1Link2" -IpAddress "15.25.35.55" -LinkProviderName "SomeTelecomProvider2" -LinkSpeedInMbps "100"
Create the VPN site, referencing the variables of the VPN site links you just created. If you closed Azure Cloud Shell or your connection timed out, redeclare the virtual WAN variable:
$virtualWan = Get-AzVirtualWAN -ResourceGroupName "TestRG" -Name "TestVWAN1"Create the VPN site using the New-AzVpnSite cmdlet.
$vpnSite = New-AzVpnSite -ResourceGroupName "TestRG" -Name "TestSite1" -Location "westus" -VirtualWan $virtualWan -AddressSpace $vpnSiteAddressSpaces -DeviceModel "SomeDevice" -DeviceVendor "SomeDeviceVendor" -VpnSiteLink @($vpnSiteLink1, $vpnSiteLink2)Create the site link connection. The connection is composed of two active-active tunnels from a branch/site to the scalable gateway.
$vpnSiteLinkConnection1 = New-AzVpnSiteLinkConnection -Name "TestLinkConnection1" -VpnSiteLink $vpnSite.VpnSiteLinks[0] -ConnectionBandwidth 100

$vpnSiteLinkConnection2 = New-AzVpnSiteLinkConnection -Name "testLinkConnection2" -VpnSiteLink $vpnSite.VpnSiteLinks[1] -ConnectionBandwidth 10
Connect the VPN site to a hub
Before running the command, you may need to redeclare the following variables:
$virtualWan = Get-AzVirtualWAN -ResourceGroupName "TestRG" -Name "TestVWAN1"
$vpnGateway = Get-AzVpnGateway -ResourceGroupName "TestRG" -Name "vpngw1"
$vpnSite = Get-AzVpnSite -ResourceGroupName "TestRG" -Name "TestSite1"
Connect the VPN site to the hub.
New-AzVpnConnection -ResourceGroupName $vpnGateway.ResourceGroupName -ParentResourceName $vpnGateway.Name -Name "testConnection" -VpnSite $vpnSite -VpnSiteLinkConnection @($vpnSiteLinkConnection1, $vpnSiteLinkConnection2)
Connect a VNet to your hub
The next step is to connect the hub to the VNet. If you created a new resource group for this exercise, you typically won't already have a virtual network (VNet) in your resource group. The steps below help you create a VNet if you don't already have one. You can then create a connection between the hub and your VNet.
Create a virtual network
You can use the following example values to create a VNet. Make sure to substitute the values in the examples for the values you used for your environment.
Create a VNet.
$vnet = @{ Name = 'VNet1' ResourceGroupName = 'TestRG' Location = 'eastus' AddressPrefix = '10.21.0.0/16' } $virtualNetwork = New-AzVirtualNetwork @vnetSpecify subnet settings.
$subnet = @{ Name = 'Subnet-1' VirtualNetwork = $virtualNetwork AddressPrefix = '10.21.0.0/24' } $subnetConfig = Add-AzVirtualNetworkSubnetConfig @subnetSet the VNet.
$virtualNetwork | Set-AzVirtualNetwork
Connect a VNet to a hub
The following steps enable you to connect your virtual network to your virtual hub using PowerShell. You can also use Azure portal to complete this task. Repeat these steps for each VNet that you want to connect.
Before you create a connection, be aware of the following:
- A virtual network can only be connected to one virtual hub at a time.
- In order to connect it to a virtual hub, the remote virtual network can't have a gateway.
- Some configuration settings, such as Propagate static route, can only be configured in the Azure portal at this time.
If VPN gateways are present in the virtual hub, this operation as well as any other write operation on the connected VNet can cause disconnection to point-to-site clients as well as reconnection of site-to-site tunnels and Border Gateway Protocol (BGP) sessions.
Add a connection
Declare the variables for the existing resources, including the existing virtual network.
$resourceGroup = Get-AzResourceGroup -ResourceGroupName "TestRG" $virtualWan = Get-AzVirtualWan -ResourceGroupName "TestRG" -Name "TestVWAN1" $virtualHub = Get-AzVirtualHub -ResourceGroupName "TestRG" -Name "Hub1" $remoteVirtualNetwork = Get-AzVirtualNetwork -Name "VNet1" -ResourceGroupName "TestRG"Create a connection to peer the virtual network to the virtual hub.
New-AzVirtualHubVnetConnection -ResourceGroupName "TestRG" -VirtualHubName "Hub1" -Name "VNet1-connection" -RemoteVirtualNetwork $remoteVirtualNetwork
Configure VPN device
Download VPN configuration
Use the VPN device configuration file to configure your on-premises VPN device. Here are the basic steps:
From your Virtual WAN page, go to Hubs -> Your virtual hub -> VPN (Site to site) page.
At the top of the VPN (Site to site) page, click Download VPN Config. You'll see a series of messages as Azure creates a new storage account in the resource group 'microsoft-network-[location]', where location is the location of the WAN. You can also add an existing storage account by clicking "Use Existing" and adding a valid SAS URL with write permissions enabled.
Once the file finishes creating, click the link to download the file. This creates a new file with VPN configuration at the provided SAS url location.
Apply the configuration to your on-premises VPN device. For more information, see VPN device configuration in this section.
After you've applied the configuration to your VPN devices, you aren't required to keep the storage account that you created.
Address space of the virtual hub(s) virtual network.
Example:
"AddressSpace":"10.1.0.0/24"
Address space of the virtual networks that are connected to the virtual hub.
Example:
"ConnectedSubnets":["10.2.0.0/16","10.3.0.0/16"]
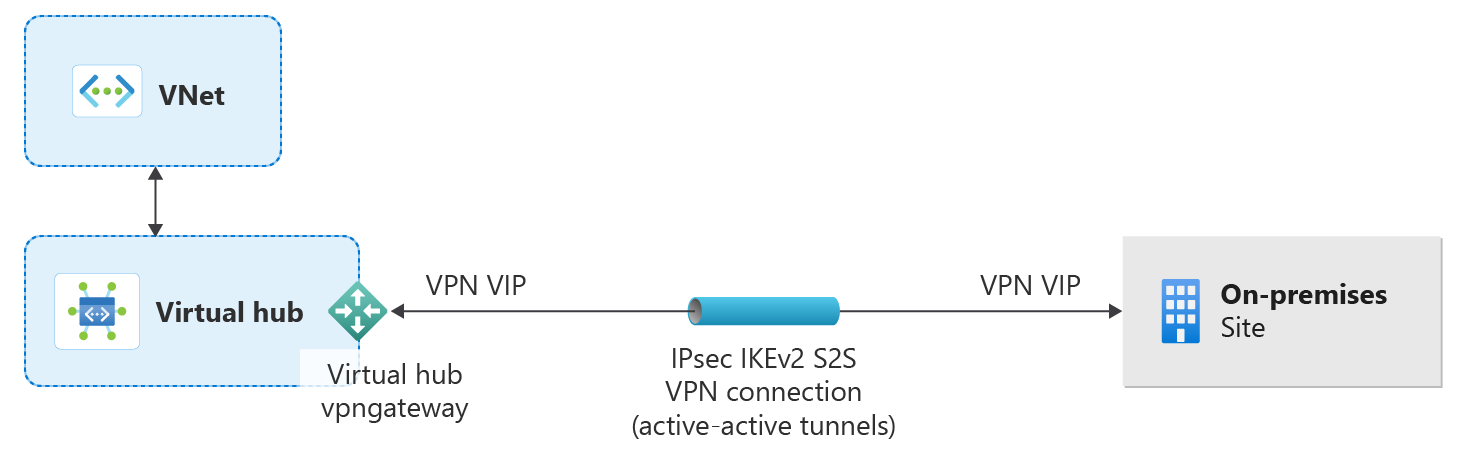
IP address space of the virtual hub vpngateway. Because each vpngateway connection is composed of two tunnels in active-active configuration, you'll see both IP addresses listed in this file. In this example, you see "Instance0" and "Instance1" for each site.
Example:
"Instance0":"nnn.nn.nn.nnn""Instance1":"nnn.nn.nn.nnn"
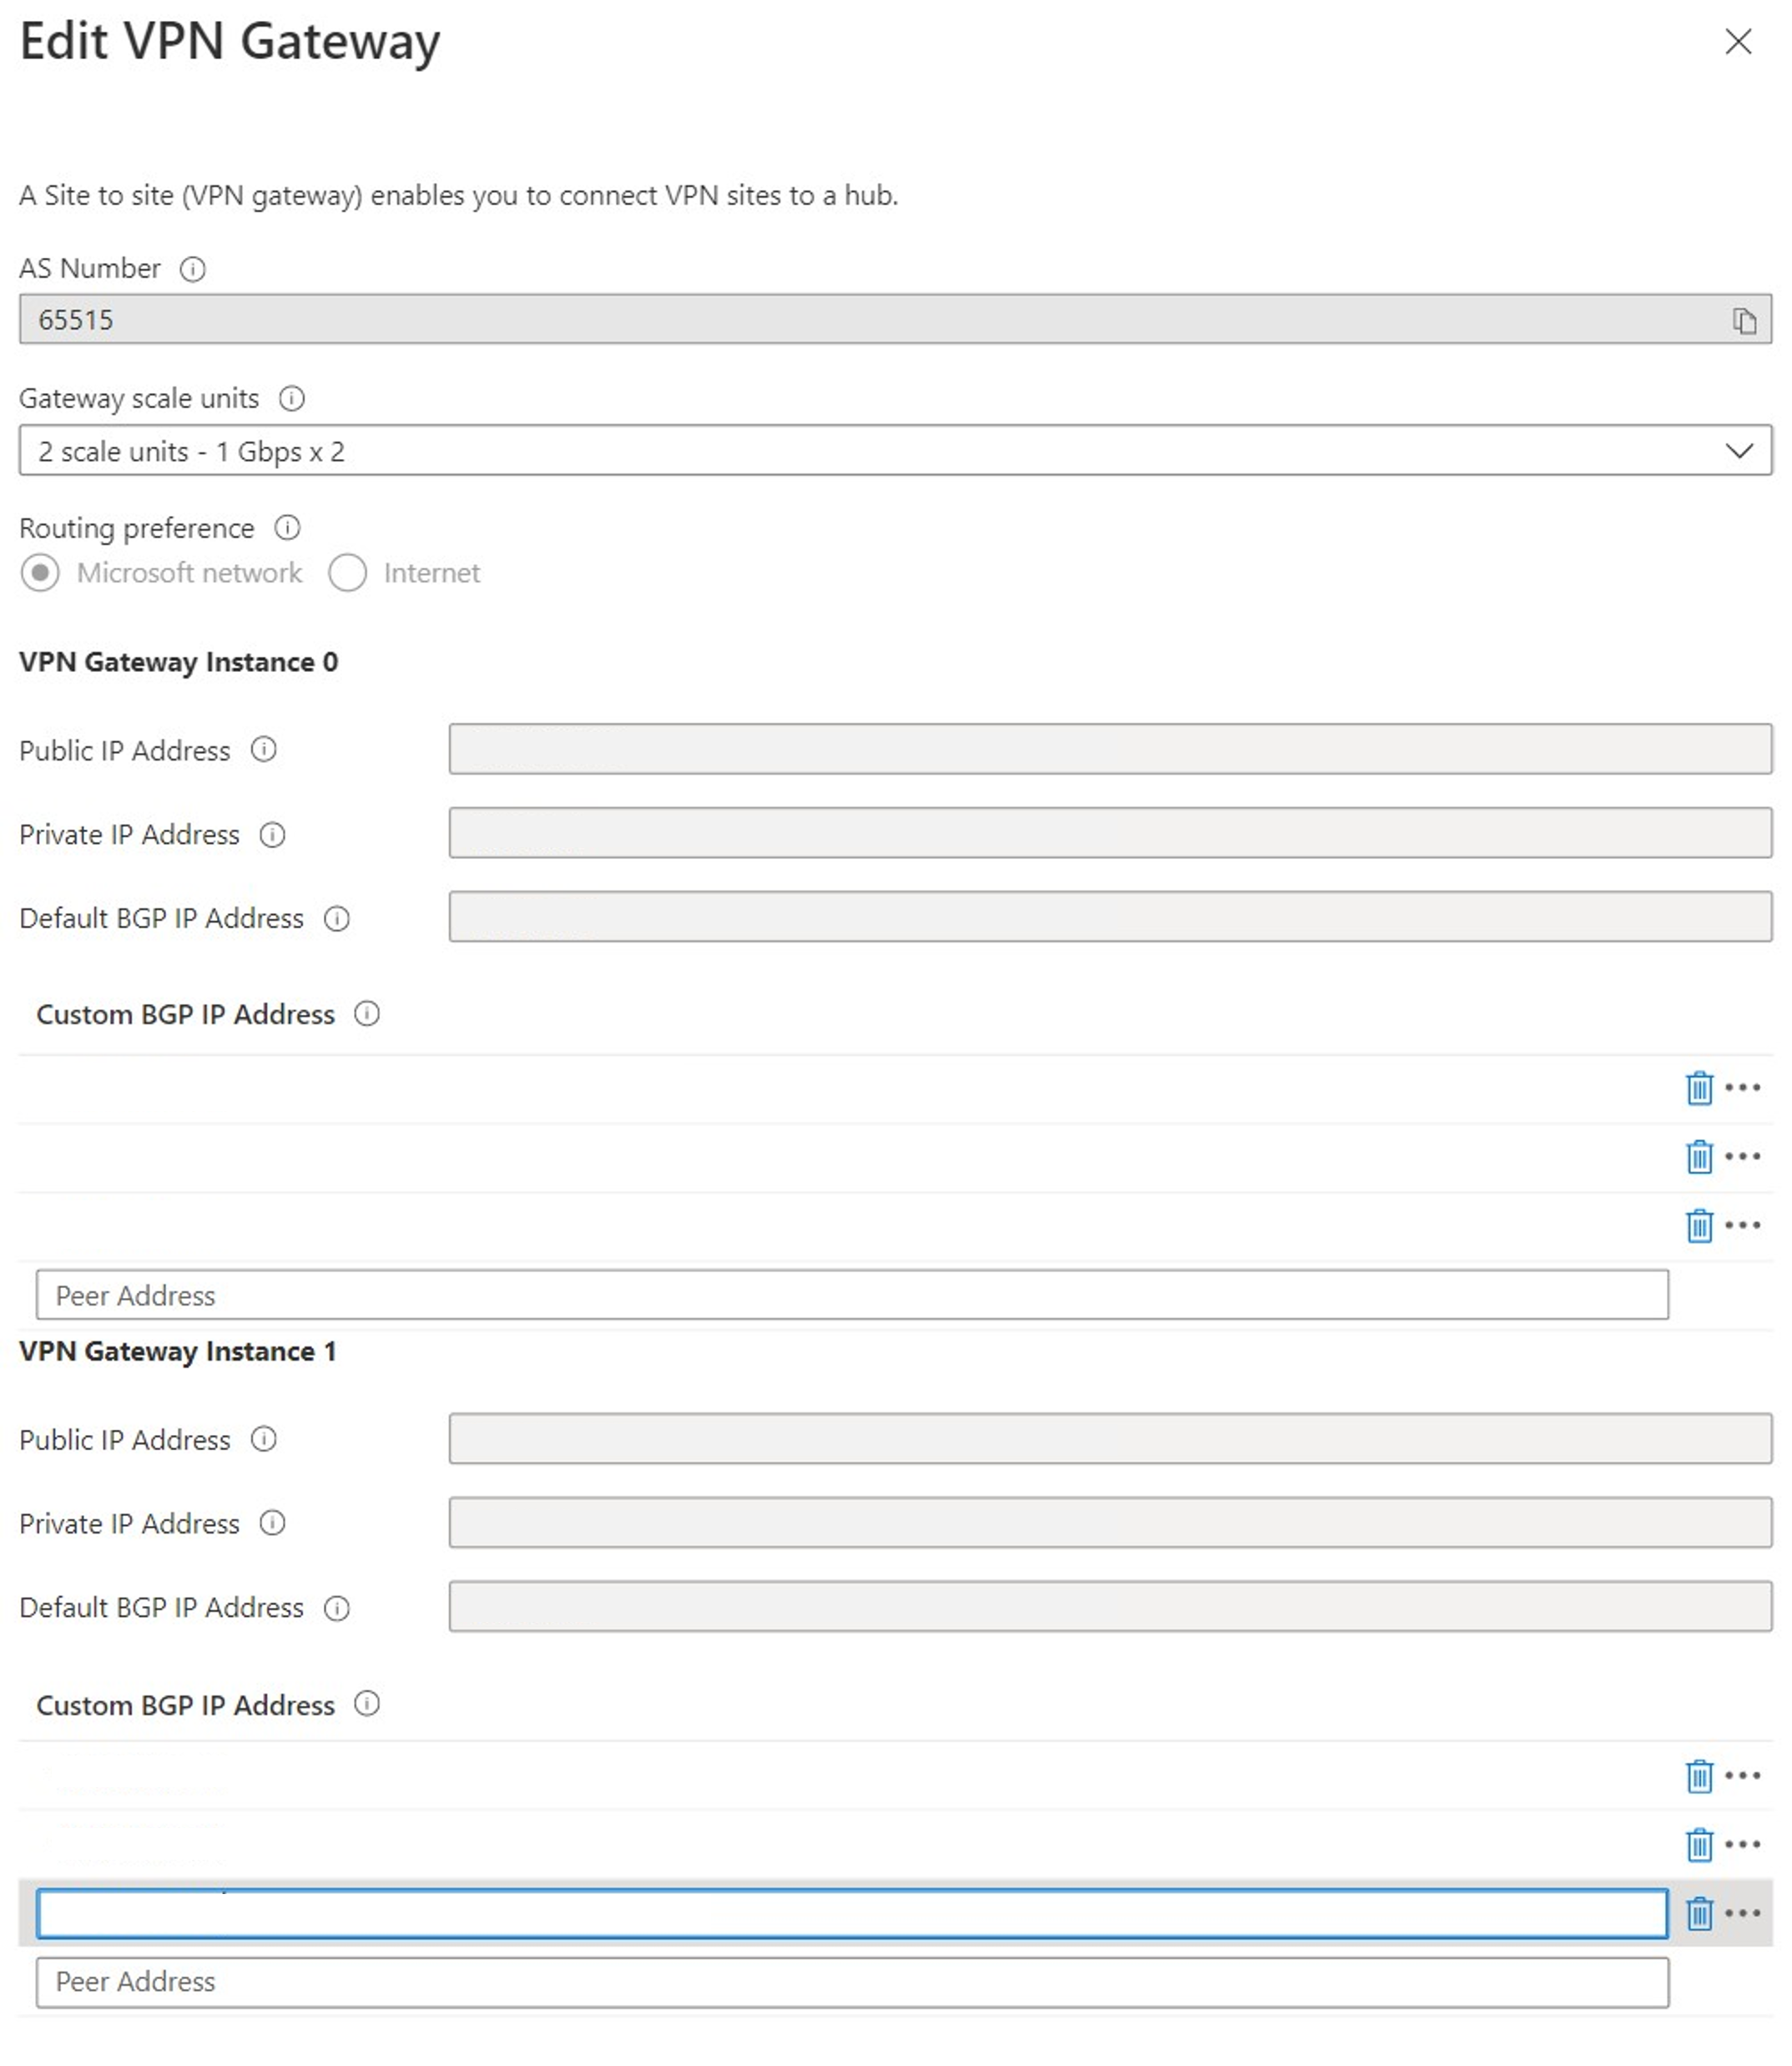
Public IP Address: Assigned by Azure.
Private IP Address: Assigned by Azure.
Default BGP IP Address: Assigned by Azure.
Custom BGP IP Address: This field is reserved for APIPA (Automatic Private IP Addressing). Azure supports BGP IP in the ranges 169.254.21.* and 169.254.22.*. Azure accepts BGP connections in these ranges but will dial connection with the default BGP IP. Users can specify multiple custom BGP IP addresses for each instance. The same custom BGP IP address shouldn't be used for both instances.
VPN device configuration file
The device configuration file contains the settings to use when configuring your on-premises VPN device. When you view this file, notice the following information:
- vpnSiteConfiguration - This section denotes the device details set-up as a site connecting to the virtual WAN. It includes the name and public IP address of the branch device.
vpnSiteConnections - This section provides information about the following settings:
- Vpngateway connection configuration details such as BGP, preshared key etc. The PSK is the preshared key that is automatically generated for you. You can always edit the connection in the Overview page for a custom Pre-Shared Key (PSK).
Example device configuration file
{ "configurationVersion":{ "LastUpdatedTime":"2018-07-03T18:29:49.8405161Z", "Version":"r403583d-9c82-4cb8-8570-1cbbcd9983b5" }, "vpnSiteConfiguration":{ "Name":"testsite1", "IPAddress":"73.239.3.208" }, "vpnSiteConnections":[ { "hubConfiguration":{ "AddressSpace":"10.1.0.0/24", "Region":"West Europe", "ConnectedSubnets":[ "10.2.0.0/16", "10.3.0.0/16" ] }, "gatewayConfiguration":{ "IpAddresses":{ "Instance0":"104.45.18.186", "Instance1":"104.45.13.195" } }, "connectionConfiguration":{ "IsBgpEnabled":false, "PSK":"bkOWe5dPPqkx0DfFE3tyuP7y3oYqAEbI", "IPsecParameters":{ "SADataSizeInKilobytes":102400000, "SALifeTimeInSeconds":3600 } } } ] }, { "configurationVersion":{ "LastUpdatedTime":"2018-07-03T18:29:49.8405161Z", "Version":"1f33f891-e1ab-42b8-8d8c-c024d337bcac" }, "vpnSiteConfiguration":{ "Name":" testsite2", "IPAddress":"66.193.205.122" }, "vpnSiteConnections":[ { "hubConfiguration":{ "AddressSpace":"10.1.0.0/24", "Region":"West Europe" }, "gatewayConfiguration":{ "IpAddresses":{ "Instance0":"104.45.18.187", "Instance1":"104.45.13.195" } }, "connectionConfiguration":{ "IsBgpEnabled":false, "PSK":"XzODPyAYQqFs4ai9WzrJour0qLzeg7Qg", "IPsecParameters":{ "SADataSizeInKilobytes":102400000, "SALifeTimeInSeconds":3600 } } } ] }, { "configurationVersion":{ "LastUpdatedTime":"2018-07-03T18:29:49.8405161Z", "Version":"cd1e4a23-96bd-43a9-93b5-b51c2a945c7" }, "vpnSiteConfiguration":{ "Name":" testsite3", "IPAddress":"182.71.123.228" }, "vpnSiteConnections":[ { "hubConfiguration":{ "AddressSpace":"10.1.0.0/24", "Region":"West Europe" }, "gatewayConfiguration":{ "IpAddresses":{ "Instance0":"104.45.18.187", "Instance1":"104.45.13.195" } }, "connectionConfiguration":{ "IsBgpEnabled":false, "PSK":"YLkSdSYd4wjjEThR3aIxaXaqNdxUwSo9", "IPsecParameters":{ "SADataSizeInKilobytes":102400000, "SALifeTimeInSeconds":3600 } } } ] }
Configuring your VPN device
Note
If you are working with a Virtual WAN partner solution, VPN device configuration automatically happens. The device controller obtains the configuration file from Azure and applies to the device to set up connection to Azure. This means you don't need to know how to manually configure your VPN device.
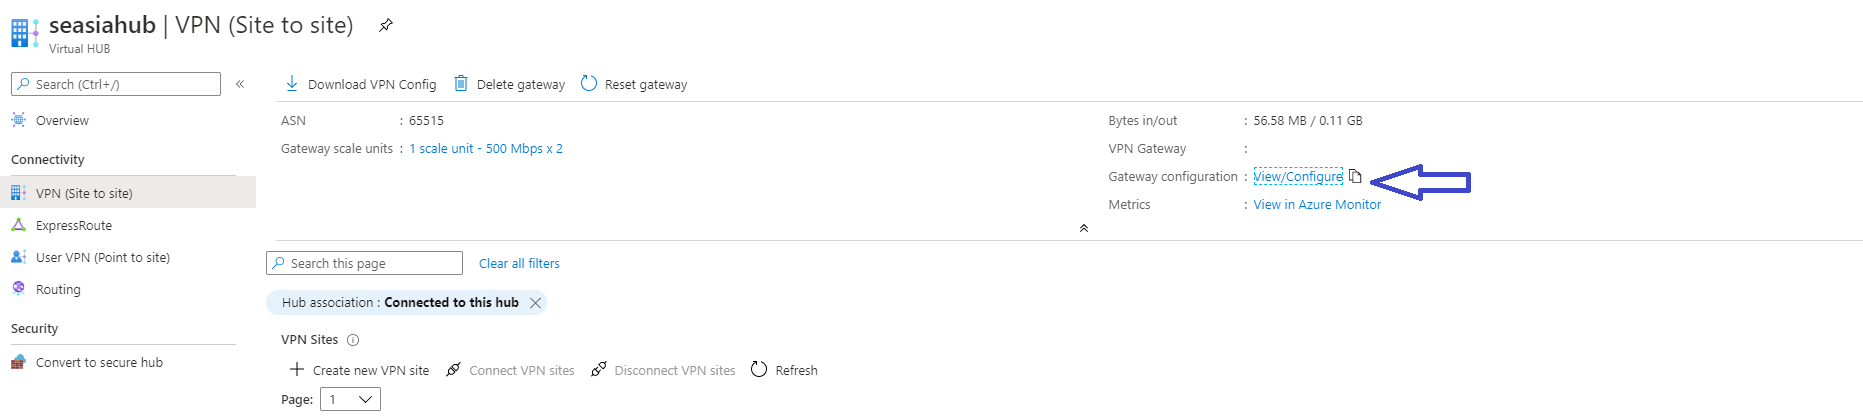
View or edit gateway settings
You can view and edit your VPN gateway settings at any time. Go to your Virtual HUB -> VPN (Site to site) and select View/Configure.
On the Edit VPN Gateway page, you can see the following settings: