Understand workflow jobs
Workflows allow you to automate the steps in your deployment process. Your process might include several logical groups of jobs that you want to run. In this unit, you'll learn about workflow jobs and how you use them to add quality control processes to your Bicep deployments.
What are workflow jobs?
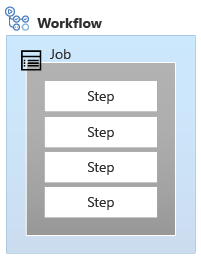
Jobs help you to divide your workflow into multiple logical blocks. Each job can contain one or more steps.
Jobs can be used in your workflow to mark a separation of concerns. For example, when you work with Bicep code, validating the code is a separate concern from deploying your Bicep file. When you use an automated workflow, building and testing your code are often called continuous integration (CI). Deploying code in an automated workflow is often called continuous deployment (CD).
In CI jobs, you check the validity of the changes that were made to your code. CI jobs provide quality assurance. They can be run without affecting your live production environment.
In many programming languages, code needs to be built before someone can run it. When a Bicep file is deployed, it gets converted, or transpiled, from Bicep to JSON. The tooling performs this process automatically. In most situations, you don't need to manually build Bicep code to JSON templates within your workflow. We still use the term continuous integration when we talk about Bicep code, though, because the other parts of CI still apply, such as validating your code.
After your CI jobs run successfully, you should gain increased confidence that the changes you made will deploy successfully too. In CD jobs, you deploy your code to each of your environments. You usually start with test and other non-production environments, and then move through to production environments. In this module, we'll deploy to a single environment. In a future module, you'll learn how to extend your deployment workflow to deploy to multiple environments, such as non-production and production environments.
Jobs run in parallel by default. You can control how and when each job runs. For example, you can configure your CD jobs to run only after your CI jobs successfully run. Or, you might have multiple CI jobs that need to run in sequence, such as to build your code and then test it. You might also include a rollback job that runs only if previous deployment jobs failed.
Shifting left
By using jobs, you can verify the quality of your code before you deploy it. This process is sometimes called shifting left.
Consider a timeline of the activities that you perform when you write code. The timeline starts from the planning and design phases. It then moves to the building and testing phases. Finally, you deploy and then have to support your solution.
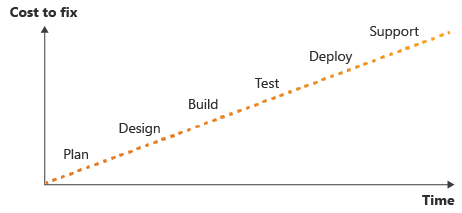
It's a well-understood rule in software development that the earlier in the process that you find an error—the closer to the left of the timeline—the easier, quicker, and cheaper it is to fix. The later in your process that you catch an error, the harder and more complicated it becomes to fix.
So, the goal is to shift the discovery of problems toward the left of the preceding diagram. Throughout this module, you'll see how you can add more validation and testing to your workflow as it progresses.
You can even add validation well before your deployment begins. When you work with tools like GitHub, pull requests typically represent changes that someone on your team wants to make to the code on your main branch. It's helpful to create another workflow that automatically runs your CI steps during the review process for the pull request. This technique helps validate that the code still works, even with the proposed changes. If the validation succeeds, you have some confidence that the change won't cause problems when it's merged to your main branch. If the check fails, you know there's more work to do to before the pull request is ready to merge. In a future module, you'll learn more about setting up a proper release process by using pull requests and branching strategies.
Important
Automated validation and tests are only as effective as the tests you write. It's important to consider the things you need to test and the steps you need to perform to be confident that your deployment is OK.
Define a workflow job
Every workflow contains at least one job, and you can define more jobs to suit your requirements. Jobs run in parallel by default. The type of GitHub account you have determines the number of jobs you can run simultaneously when you use GitHub-hosted runners.
Imagine that you built a Bicep file that you need to deploy twice: once to infrastructure in the United States and once to infrastructure in Europe. You also want to validate your Bicep code in your workflow. Here's an illustration of a multi-job workflow that defines a similar process:
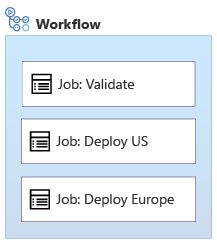
Notice that this example has three jobs. The Validate job is similar to a CI job. Then, the Deploy US and Deploy Europe jobs run. Each deploys the code to one of the environments. By default, the jobs run in parallel.
Here's how the jobs are defined in a workflow YAML file:
name: learn-github-actions
on: [push]
jobs:
  validate:
    runs-on: ubuntu-latest
    steps:
      - run: echo "Here is where you'd perform the validation steps."
  deployUS:
    runs-on: windows-latest
    steps:
      - run: echo "Here is where you'd perform the steps to deploy to the US region."
  deployEurope:
    runs-on: ubuntu-latest
    steps:
      - run: echo "Here is where you'd perform the steps to deploy to the European region."
Control the sequence of jobs
You can add dependencies between the jobs to change the order. Continuing the previous example, you probably want to validate your code before running your deployment jobs, like this:
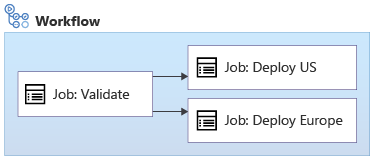
You can specify the dependencies between jobs by using the needs keyword:
name: learn-github-actions
on: [push]
jobs:
  validate:
    runs-on: ubuntu-latest
    steps:
      - run: echo "Here is where you'd perform the validation steps."
  deployUS:
    runs-on: windows-latest
    needs: validate
    steps:
      - run: echo "Here is where you'd perform the steps to deploy to the US region."
  deployEurope:
    runs-on: ubuntu-latest
    needs: validate
    steps:
      - run: echo "Here is where you'd perform the steps to deploy to the European region."
When you use the needs keyword, the workflow waits for the dependent job to finish successfully before it starts the next job. If the workflow detects that all of the dependencies for multiple jobs were satisfied, it can run those jobs in parallel.
Note
In reality, jobs run in parallel only if you have enough runners to run multiple jobs at the same time. The number of GitHub-hosted runners you can use depends on the type of GitHub account you have. You can purchase another GitHub account plan if you need more parallel jobs.
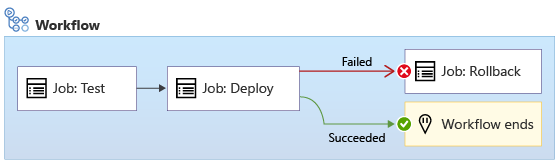
Sometimes, you want to run a job when a previous job fails. For example, here's a different workflow. If the deployment fails, a job called rollback runs immediately afterward:
You use the if keyword to specify a condition that should be met before a job runs:
name: learn-github-actions
on: [push]
jobs:
  validate:
    runs-on: ubuntu-latest
    steps:
      - run: echo "Here is where you'd perform the validation steps."
  deploy:
    runs-on: windows-latest
    needs: validate
    steps:
      - run: echo "Here is where you'd perform the steps to deploy."
  rollback:
    runs-on: ubuntu-latest
    needs: deploy
    if: ${{ failure() }}
    steps:
      - run: echo "Here is where you'd perform the steps to roll back a failure."
In the preceding example, when everything goes well, the workflow runs the Test job first, and then it runs the Deploy job. It skips the Rollback job. However, if either the Test or Deploy job fails, the workflow runs the Rollback job. You'll learn more about rollback later in this module.
Bicep deployment jobs
A typical Bicep deployment workflow contains several jobs. As the workflow moves through the jobs, the goal is to become increasingly confident that the later jobs succeed. Here are the common jobs for a Bicep deployment workflow:

- Lint: Use the Bicep linter to verify that the Bicep file is well formed and doesn't contain any obvious errors.
- Validate: Use the Azure Resource Manager preflight validation process to check for problems that might occur when you deploy.
- Preview: Use the what-if command to validate the list of changes that are applied against your Azure environment. Ask a human to manually review the what-if results and approve the workflow to proceed.
- Deploy: Submit your deployment to Resource Manager and wait for it to finish.
- Smoke Test: Run basic post-deployment checks against some of the important resources that you deployed. These checks are called infrastructure smoke tests.
Your organization might have a different sequence of jobs, or you might need to integrate your Bicep deployments into a workflow that deploys other components. After you understand how the jobs work, you can design a workflow to suit your needs.
Every job executes on a new runner instance that starts from a clean environment. So, in every job you typically need to check out the source code as your first step. You also need to sign in to your Azure environment in every job that interacts with Azure.
Throughout this module, you'll learn more about these jobs and progressively build a workflow that includes each job. You'll also learn:
- How workflows stop the deployment process if anything unexpected happens in any of the previous jobs.
- How to configure your workflow to pause until you manually verify what happened in a previous job.